This article will explain how to take a screenshot on your iPhone when you need to save and/or share a piece of information from your screen. Even if you are an experienced iPhone user and know how to do this, you will find some great tips. You will also learn how to customize the way you take a screenshot and how to screen record on your iPhone.
Contents
- How to take a screenshot on any iPhone model
- How to take a screenshot on an iPhone with AssistiveTouch
- How to take a long screenshot on iPhone
- How to edit a screenshot on iPhone
- How to screen record on iPhone
Before we start
This application will help you clean up useless duplicate images and unneeded bulky media files. The application automatically detects similar and duplicate photos as well as large videos and photos, helping you easily remove them to free up storage space.
Phone Cleaner for Media Files
How to take a screenshot on any iPhone model
Since the rollout of iPhone X, where Apple removed the Home button, the process for taking screenshots has changed. While previous models used the Home button for this function, iPhone X and later models use the On/Off button (on the right side of the device).
How to take a screenshot on iPhone X and later
To take a screenshot on iPhone X/XS/XR/11/12/13, press the Power button on the right and the Volume Up button on the left at the same time.
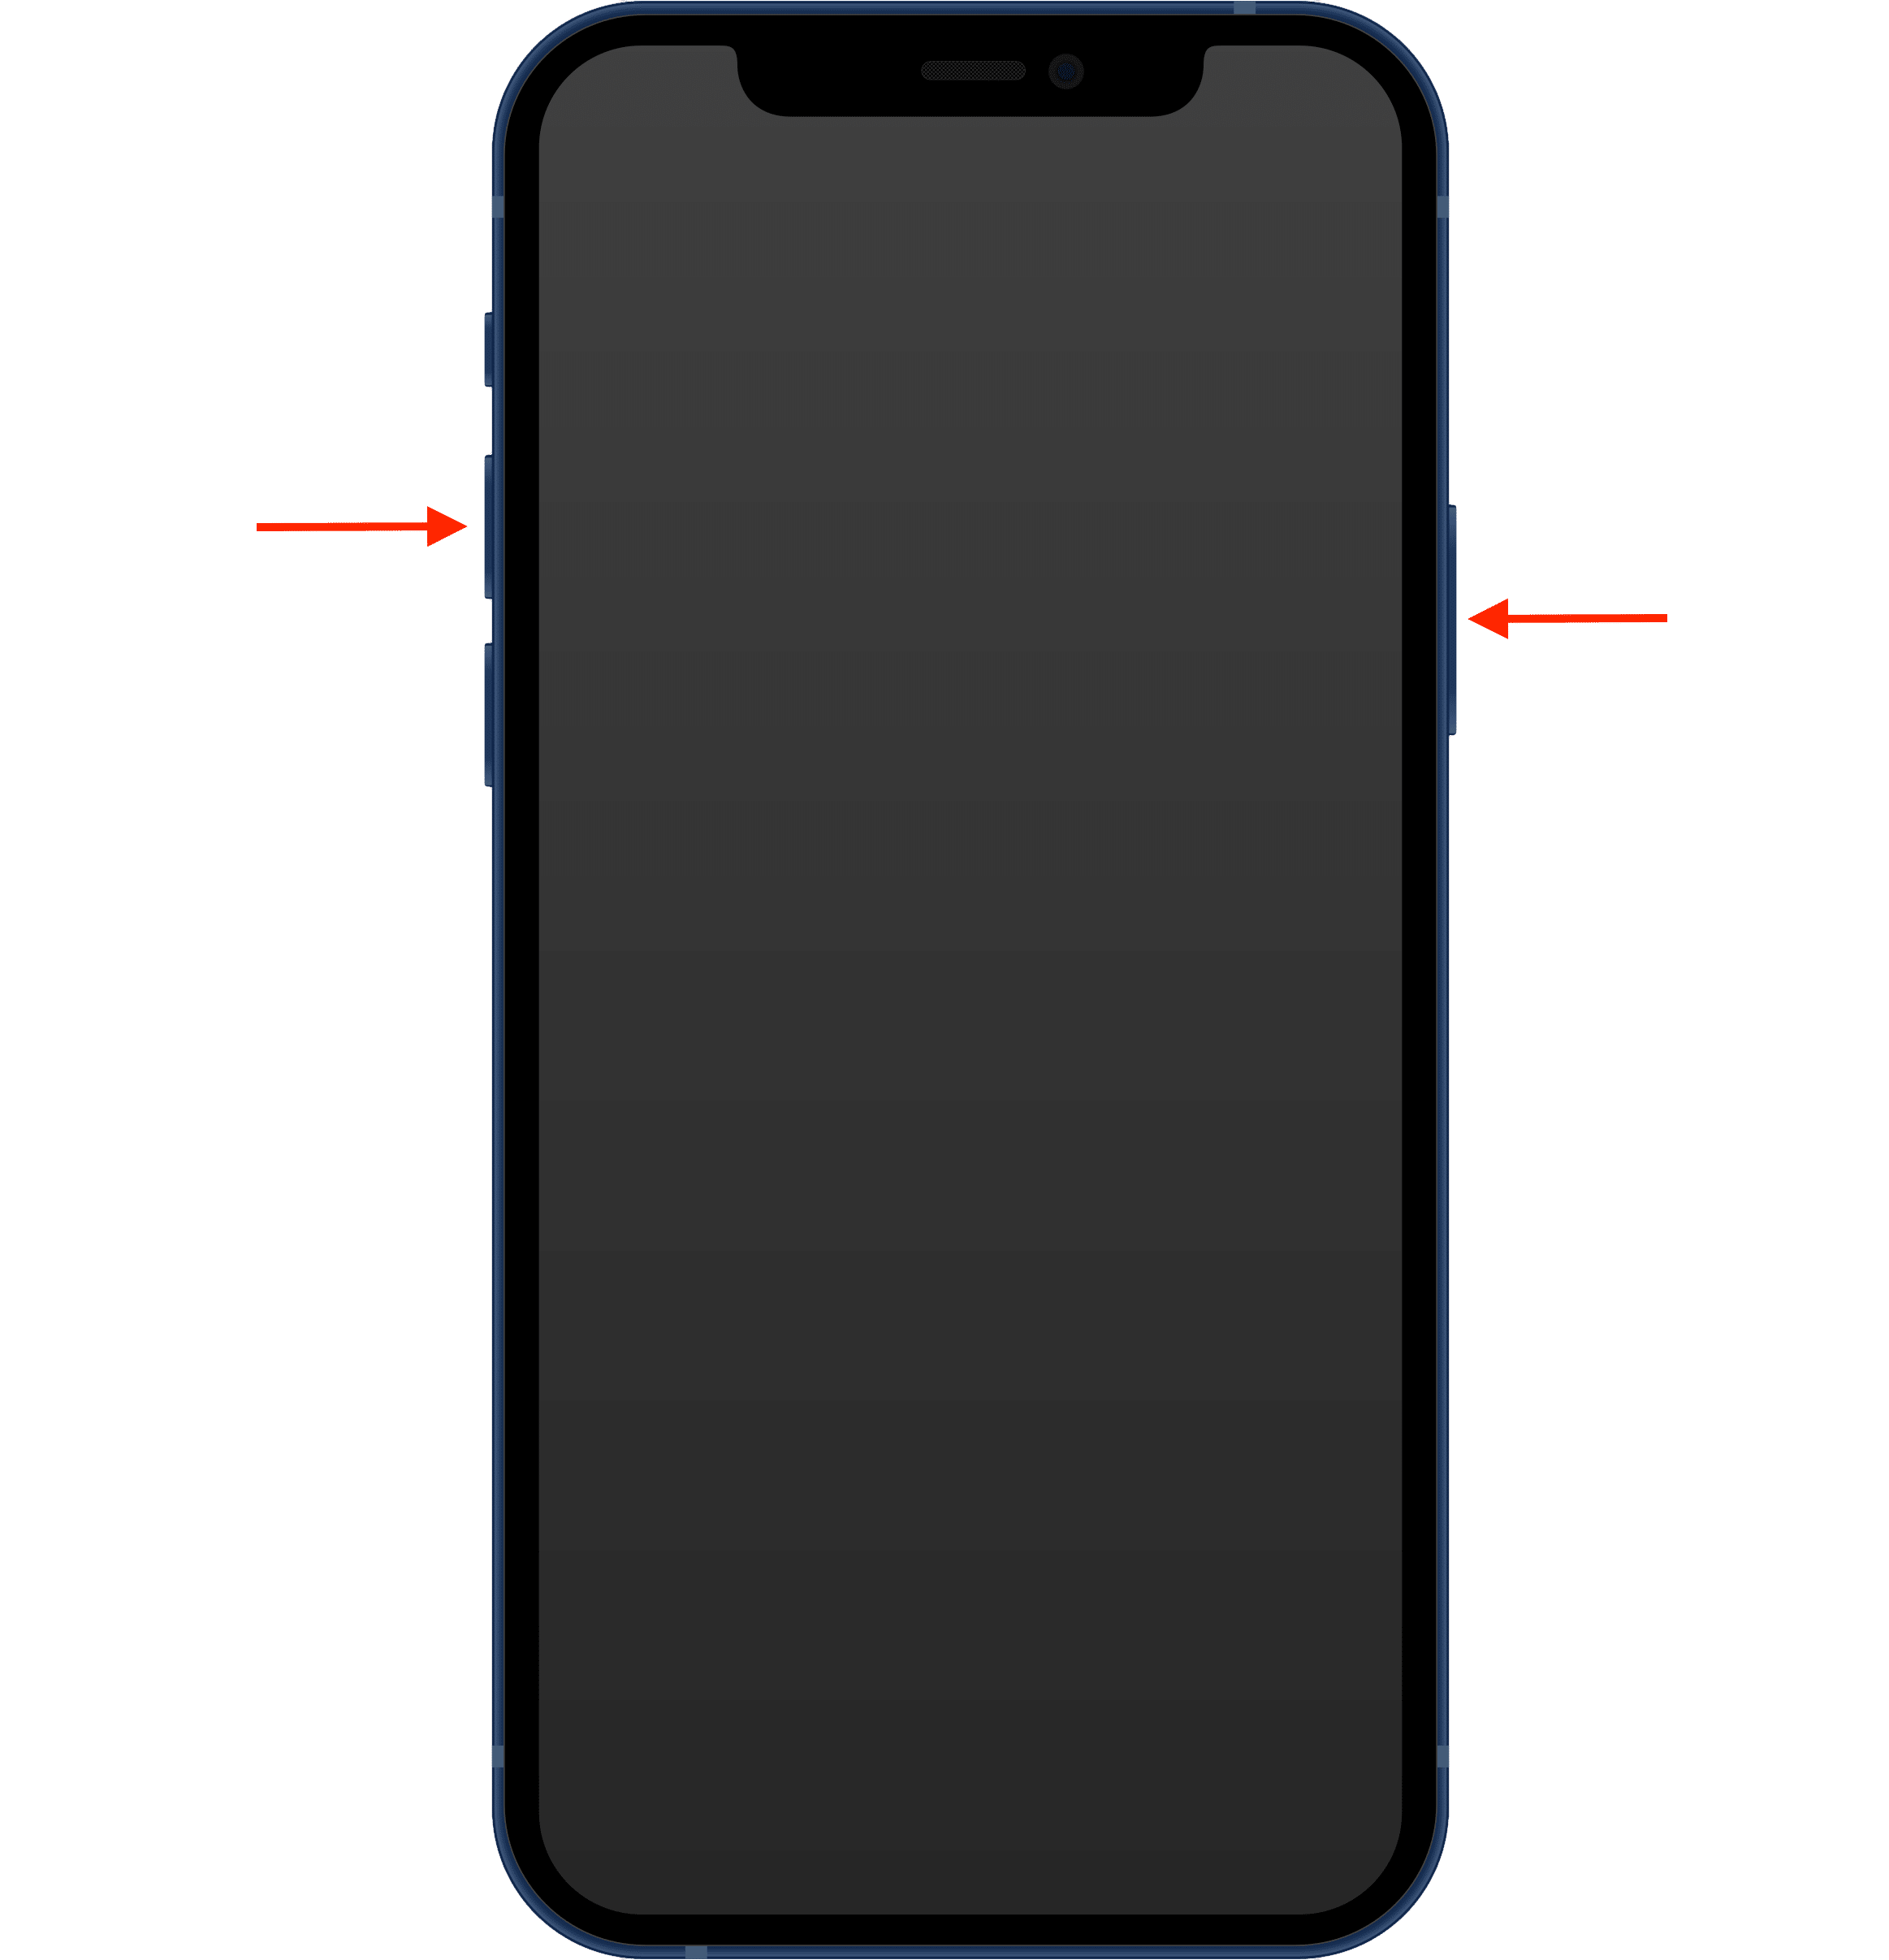
Some iPhone users find it difficult to press these buttons simultaneously.
They often accidentally switch off their iPhones instead. That’s why we recommend first pressing the Volume button and the Power button immediately after.
Also, be careful when pressing the Power button as holding it too long activates Siri.
How to take a screenshot on iPhone 8, 7, 6, and other previous models
On iPhone models 6-8, just press the Power button on the right side of the phone and the Home button at the same time.
This combination works whether your screen is locked or unlocked.
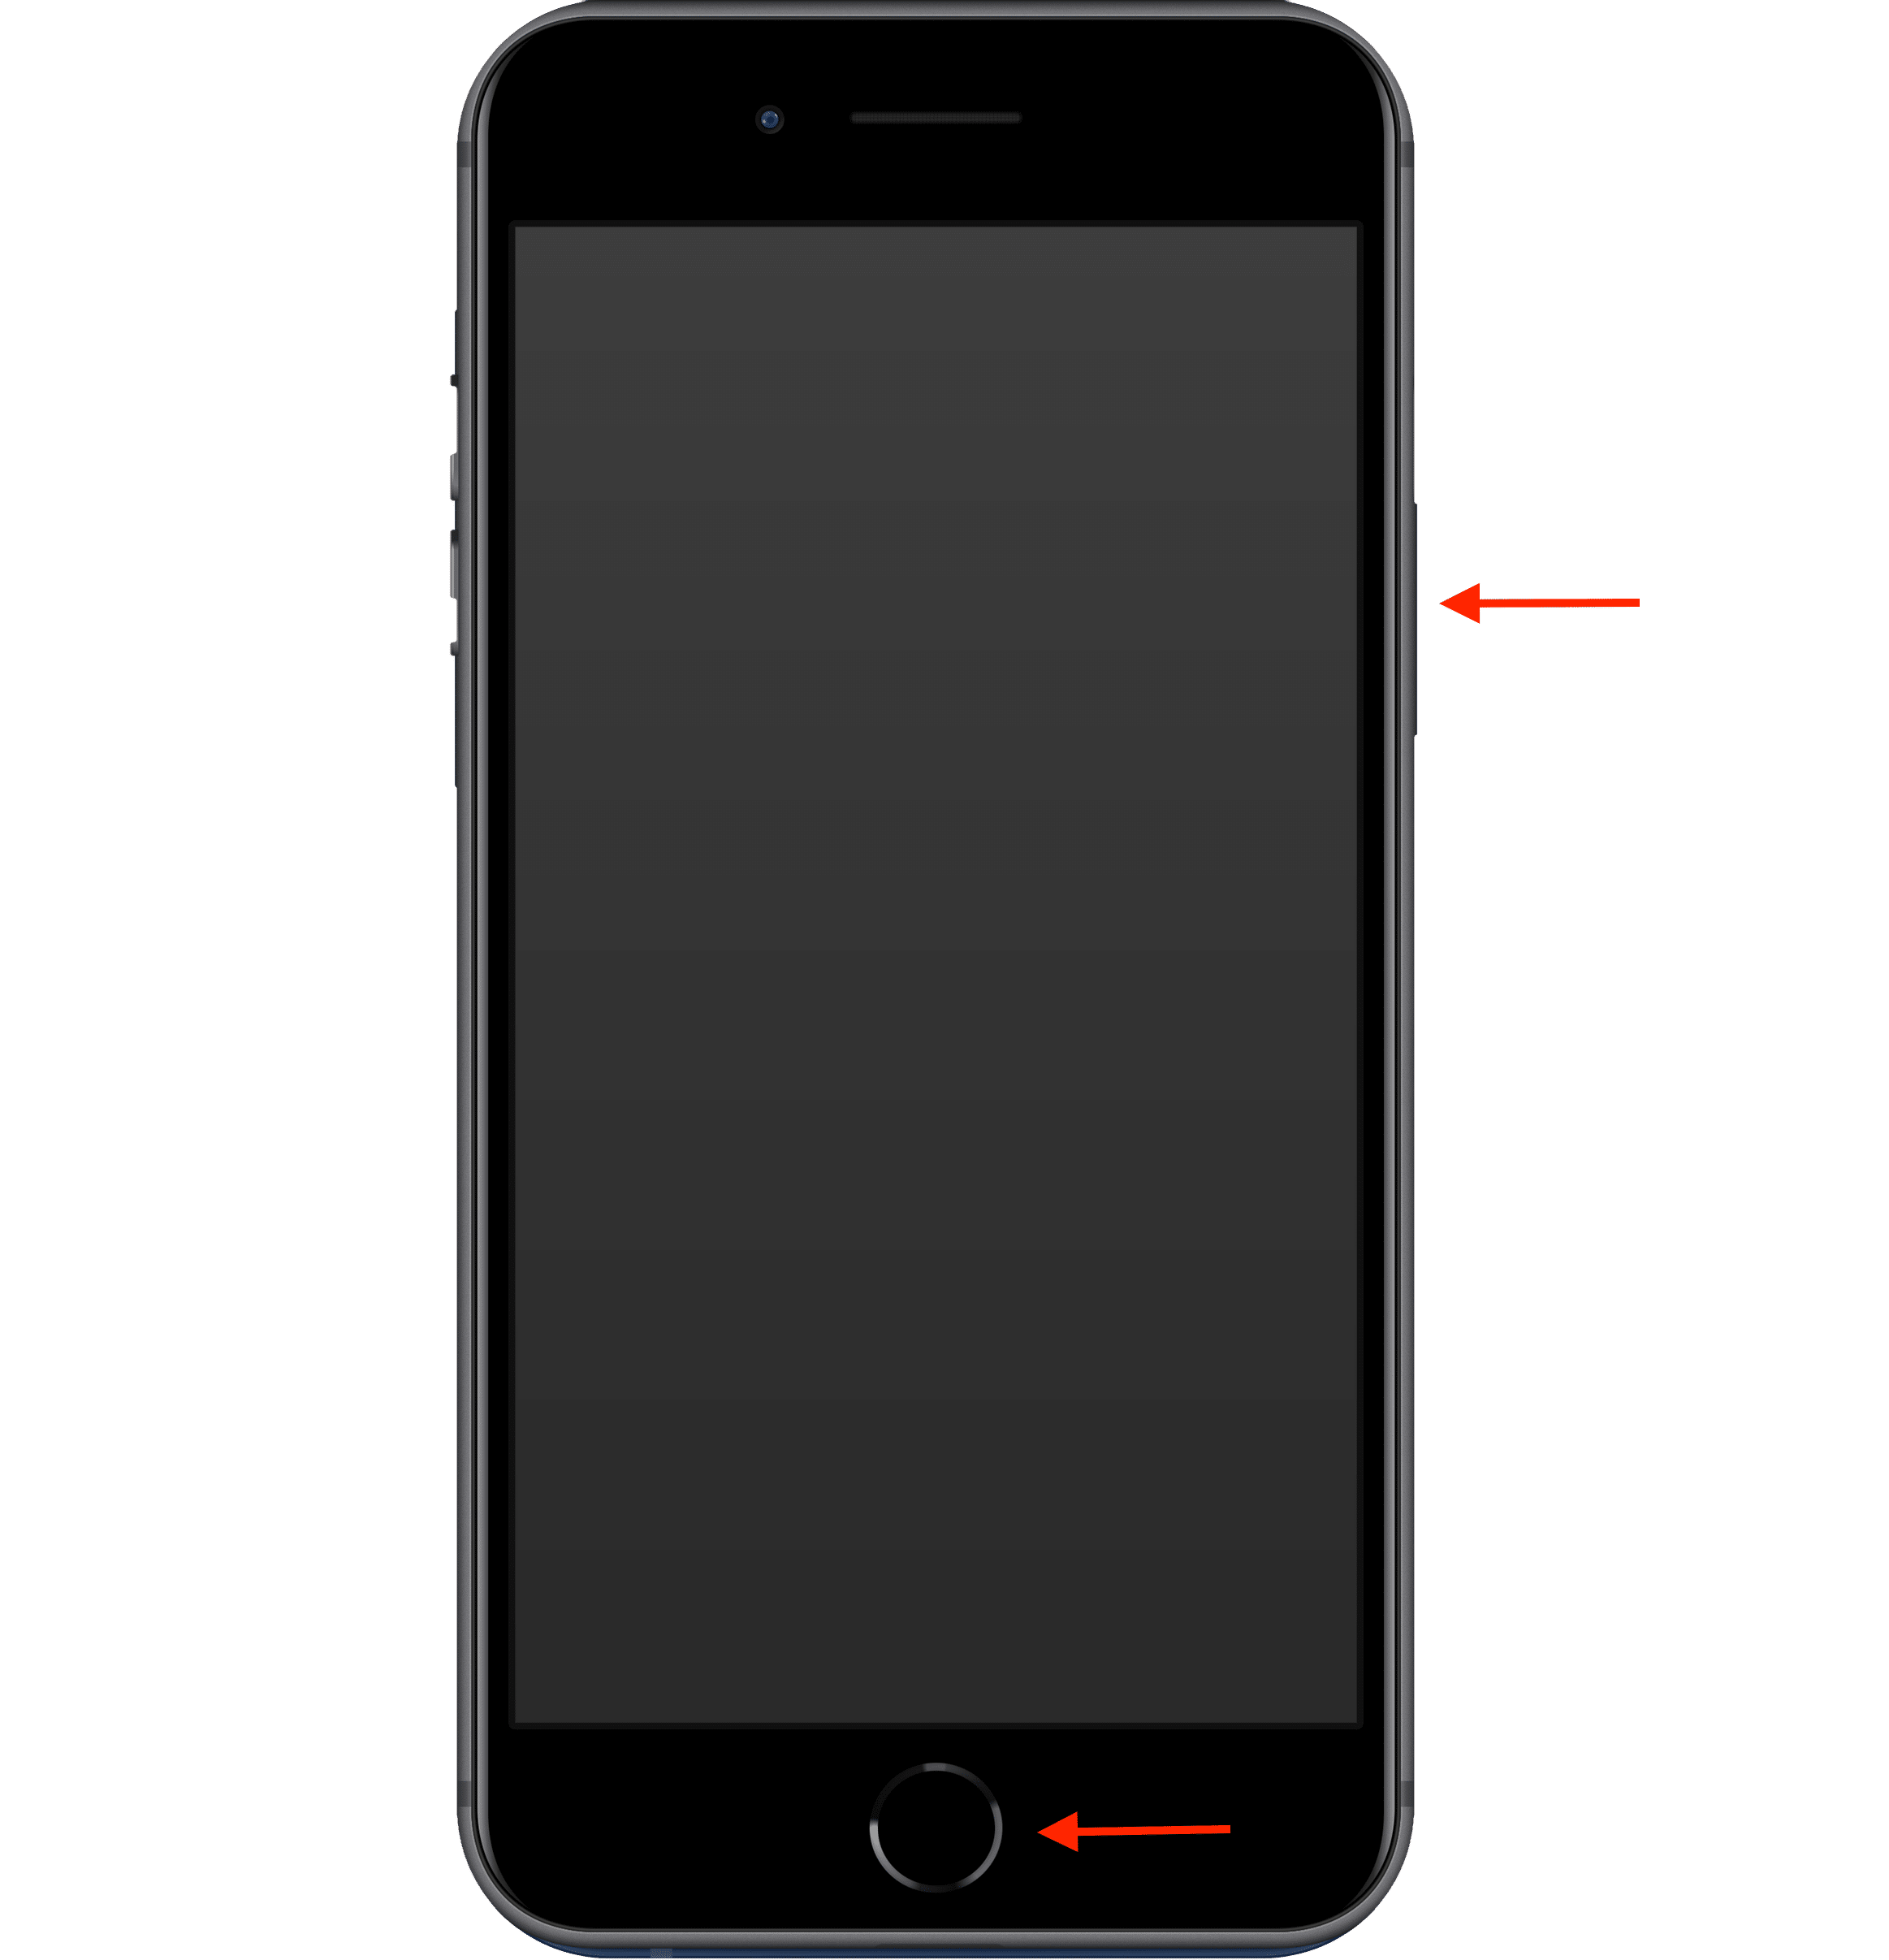
Also, as previously stated, if you can’t simultaneously press these two buttons, try first pressing and holding the Power button, and then immediately press the Home button and release both.
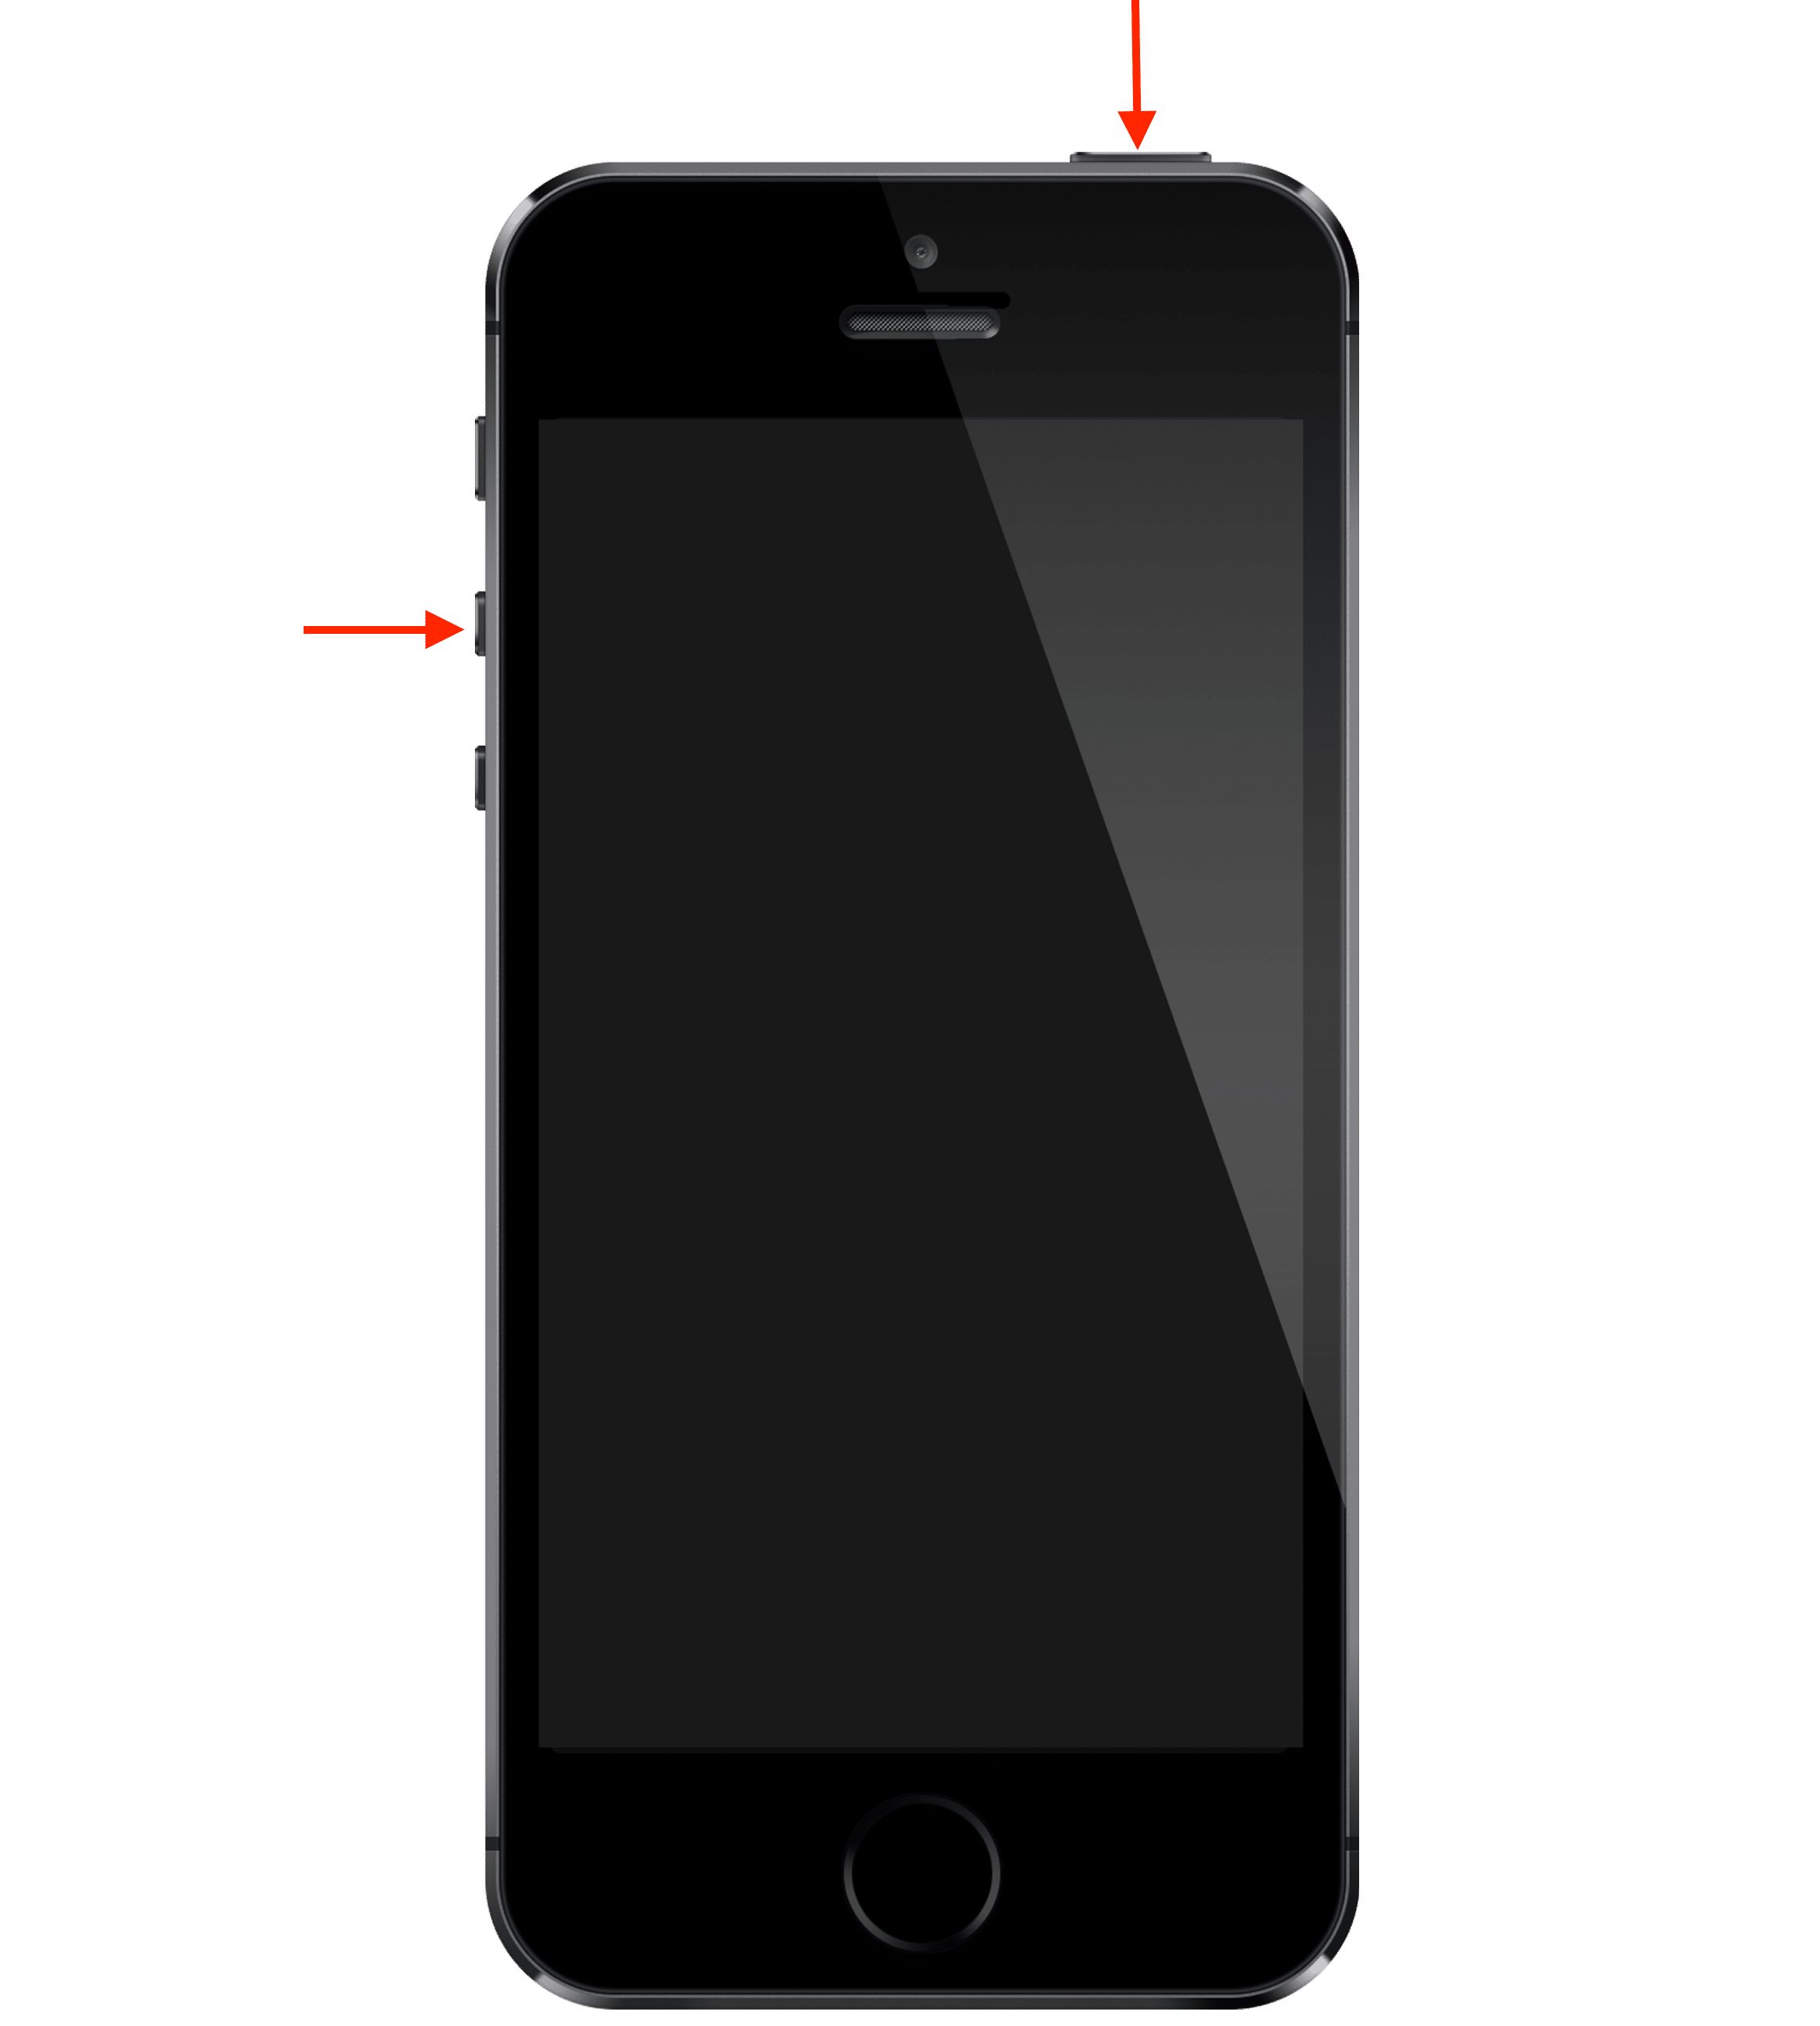
How to take a screenshot on older models of iPhone
In even earlier versions of the iPhone, the Screen Lock button was on the top. However, the process of taking a screenshot was similar to iPhone 6 and later. Instead of using the side lock button, you pressed the top button and Home button at the same time.
How to take a screenshot on an iPhone with AssistiveTouch
With the AssistiveTouch feature, you can take a screenshot on your iPhone without using physical buttons. Instead, it can be done with a single-tap, double-tap, or long press.
All models from iPhone X on (except the 2020 iPhone SE) support this feature. Because these iPhones recognize gestures on their screens, custom actions can be assigned for convenience. While there are many custom actions to choose from, let’s have a look at configuring one for screenshots on your iPhone.
Steps to enable taking screenshots on iPhone with AssistiveTouch:
- On your iPhone, open Settings.
- Scroll down and tap Accessibility.
- Select Touch → enable AssistiveTouch.
- In the Custom Actions section, select Double-Tap (or Single-Tap / Long Press).
- Set up Screenshot for the action you selected.
Now, with a double-tap on the back of your iPhone, you can take a screenshot.
How to take a long screenshot on iPhone
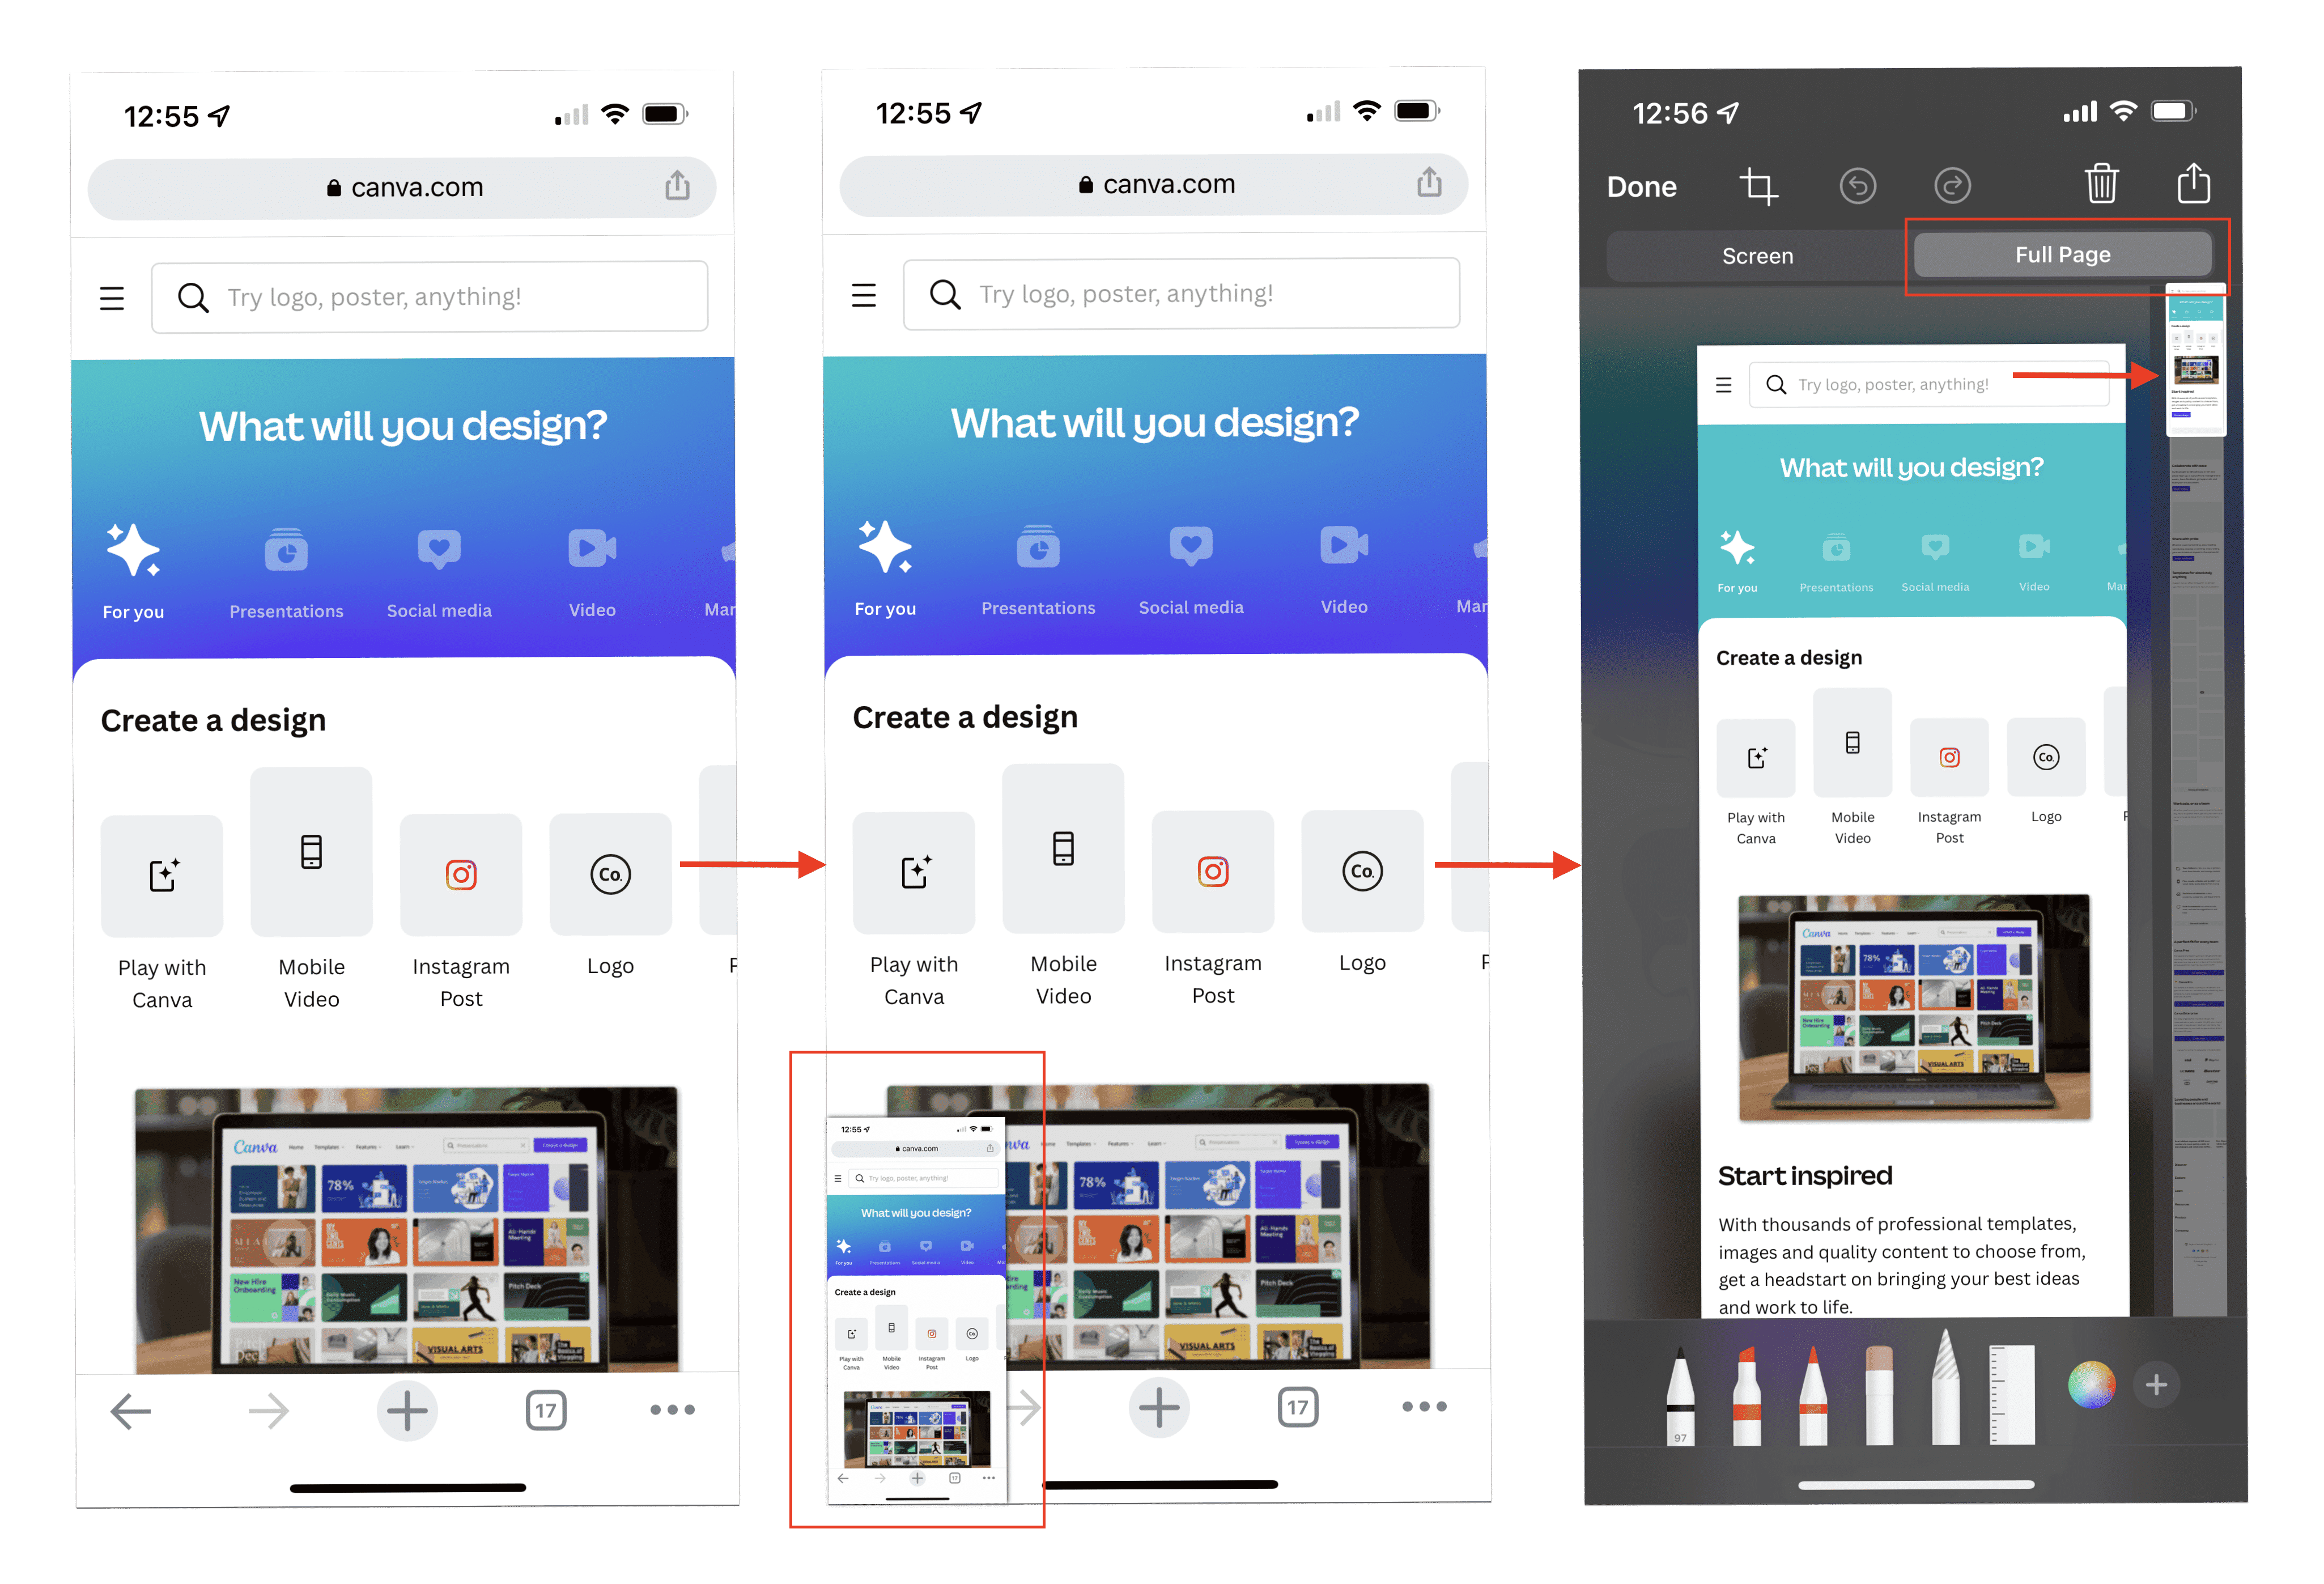
A great feature of iOS 13 is the option to create long (scrollable) screenshots. They are saved in PDF format (not PNG) and allow you to capture beyond the visible part of the screen. For example, you can take a screenshot of an entire browser website page and work with it as one document.
To take a long screenshot on iPhone do the following:
- Open the page that you want to save as a screenshot.
- Press the Power and Volume Up buttons (or Home button, depending on your iPhone model).
- Once the screenshot thumbnail appears in the lower left-hand corner, click on it.
- At the top of the editing window, tap Full Page.
- You will see a slider on the right. Use it to select the entire screenshot page.
How to edit a screenshot on iPhone
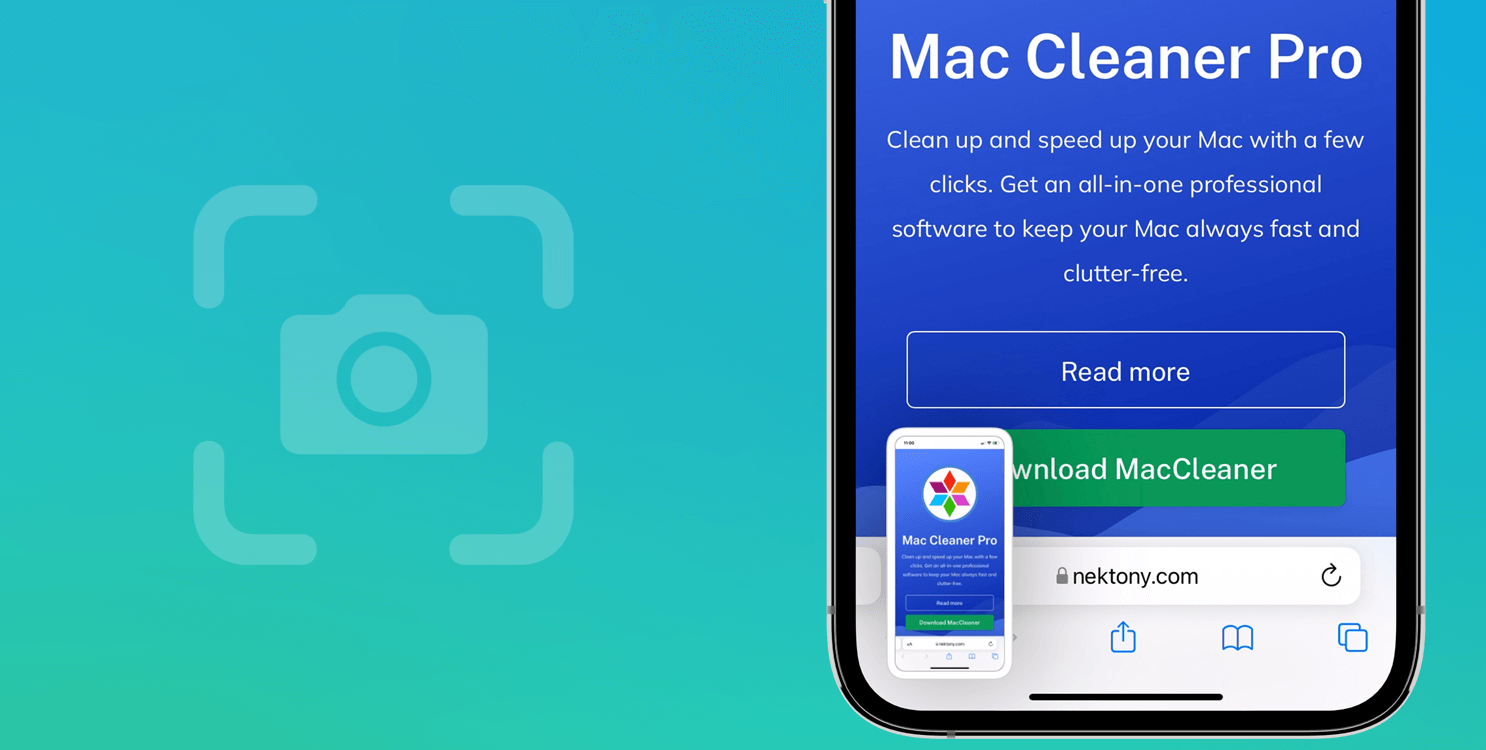
Whichever way you take a screenshot on your iPhone, once you press the required buttons, a thumbnail of your screenshot will temporarily appear in the bottom left-hand corner of the screen. If you do nothing or swipe it to the left, the screenshot will simply be saved to the Photos app.
If you want to edit your screenshot, tap on the thumbnail. Then it will open the image for editing.
Here, you can do the following:
- Crop the image.
- Add a description, text, signature, or shapes.
- Use a magnifier.
- Change the opacity.
- Use a ruler.
- Draw on the image with a pencil, pen, and/or other tools.
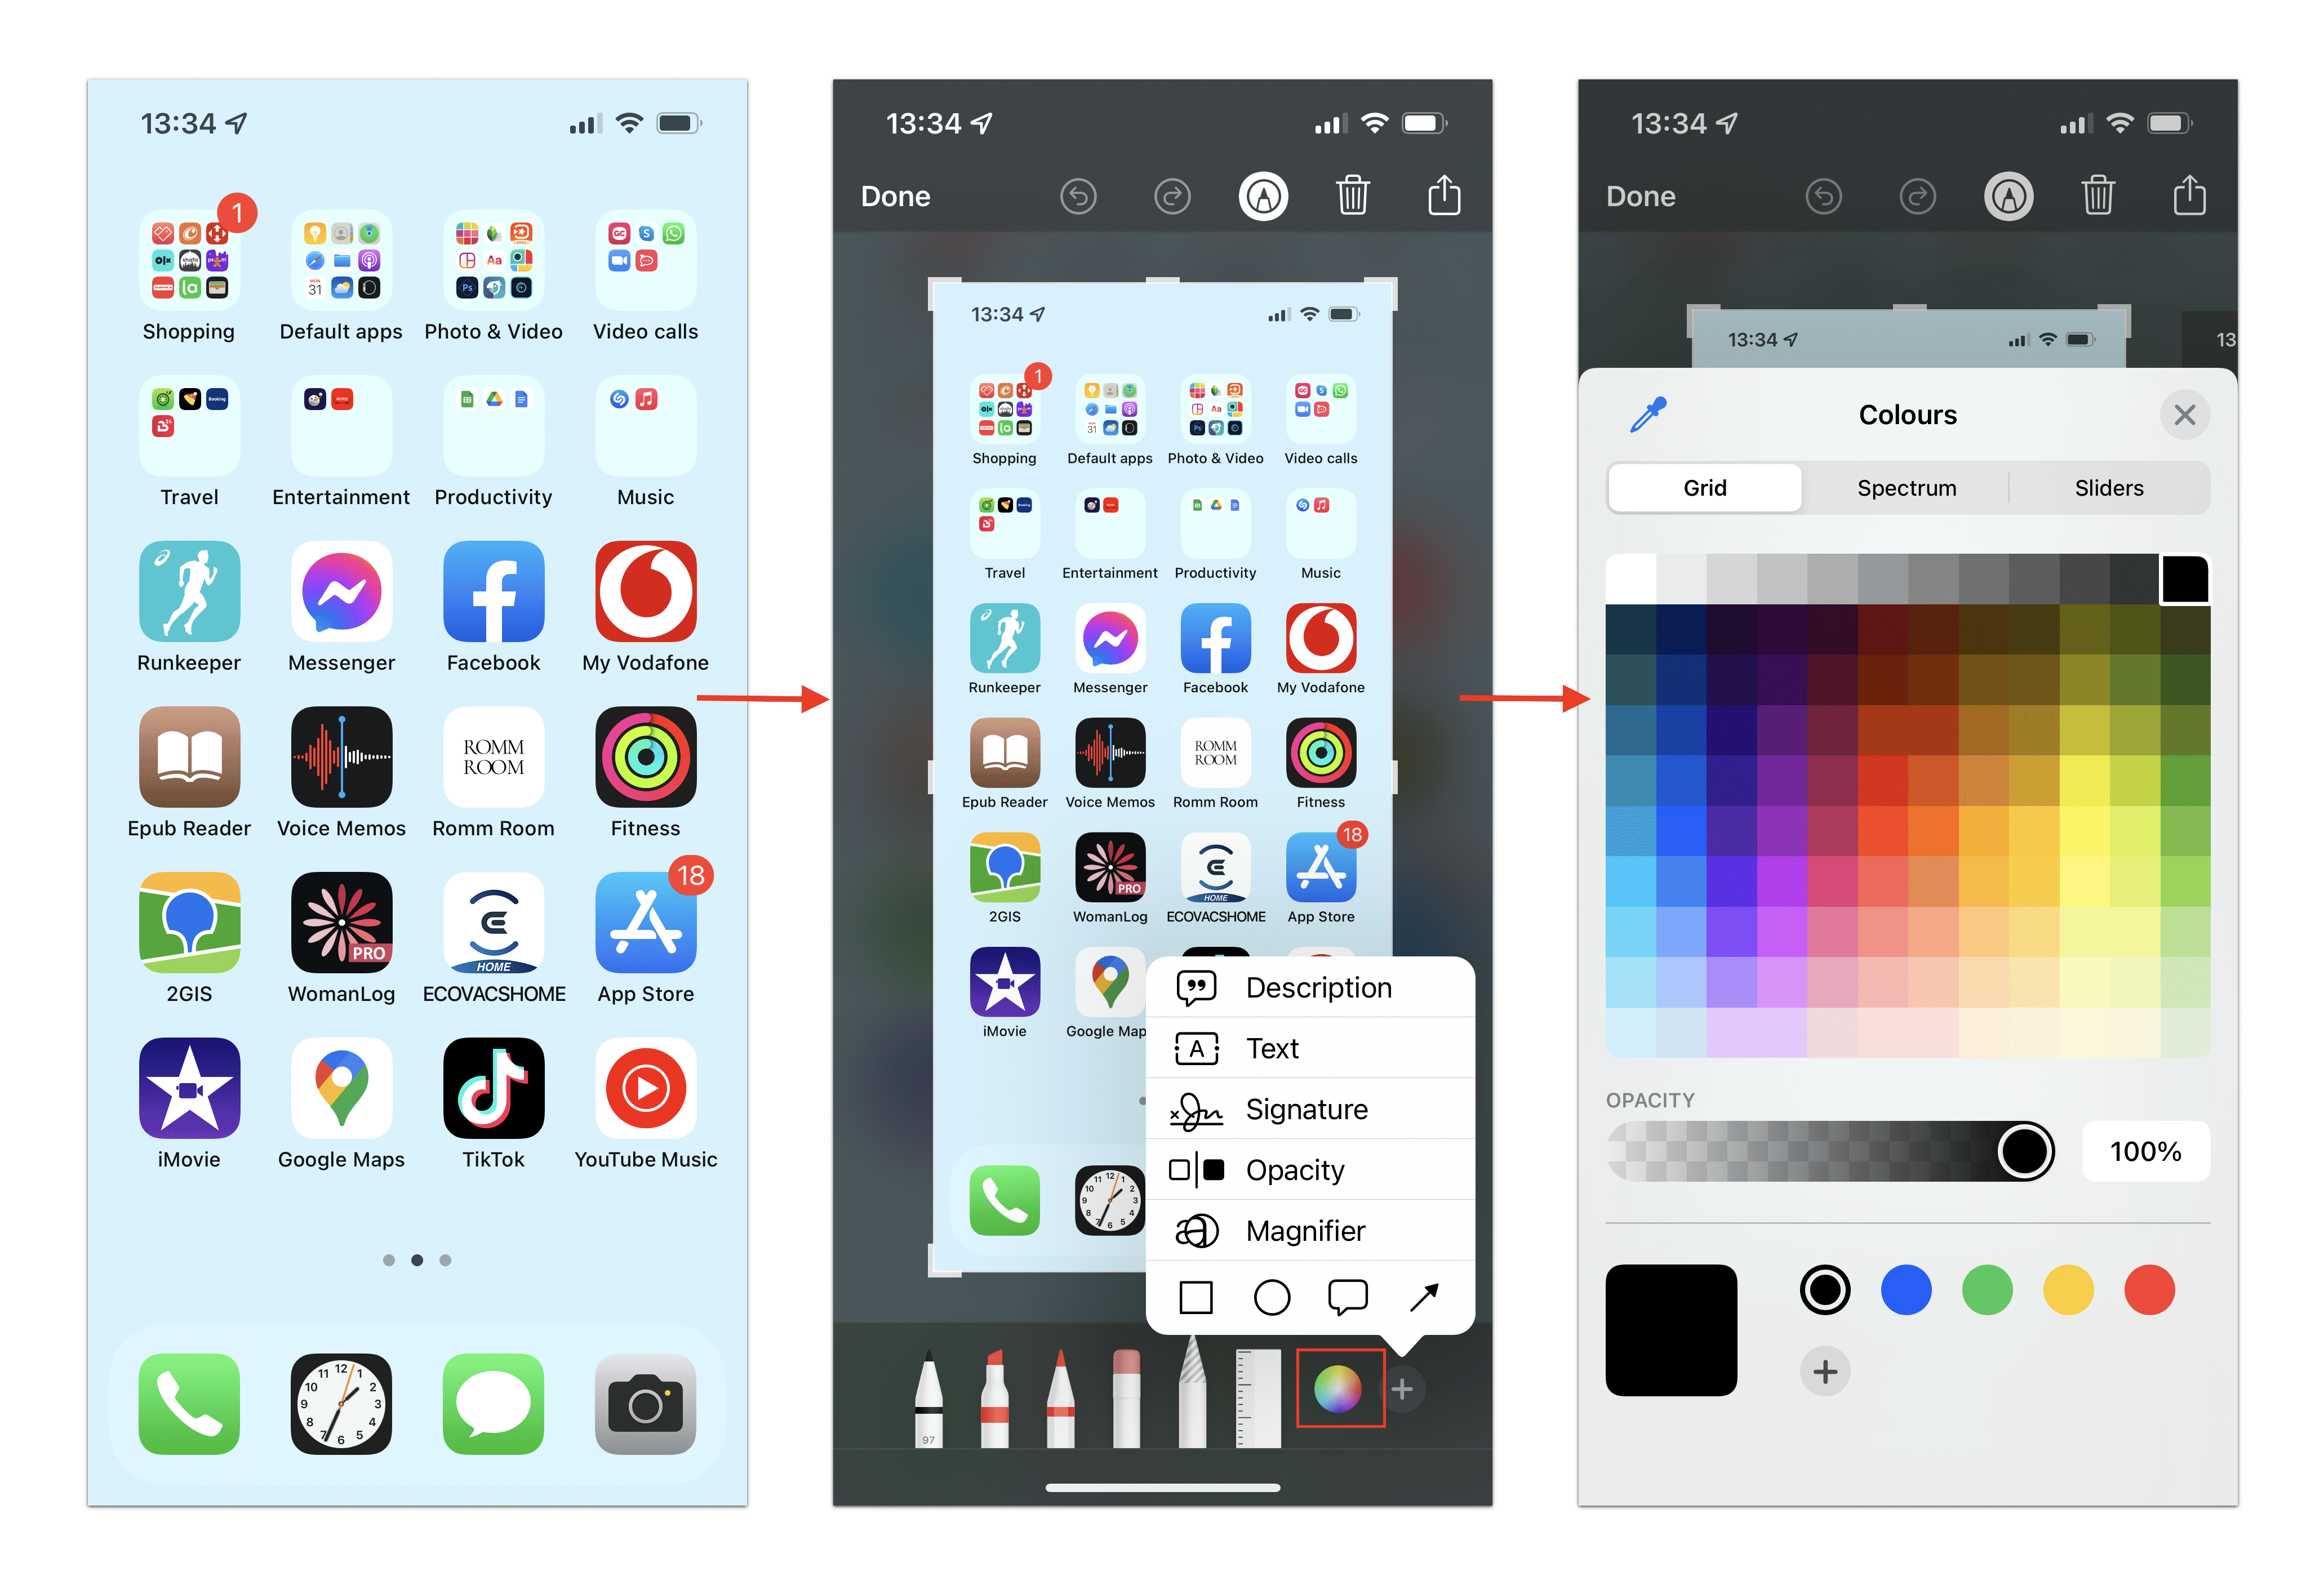
If the standard screenshot editing tools are not enough for you, use the editing menu in the Photos app. This menu provides filters, brightness and contrast adjusters, and more.
Additionally, there are many third-party applications in the App-store for editing iPhone images. Search and download the app with the tools you need to edit your screenshots.
How to screen record on iPhone
To screen record, first you need to enable the feature in Control Center.
How to add screen record on iPhone:
- On your iPhone, go to Settings.
- Scroll down and tap Control Center.
- Drag the Screen Recording feature to the Included Controls section.
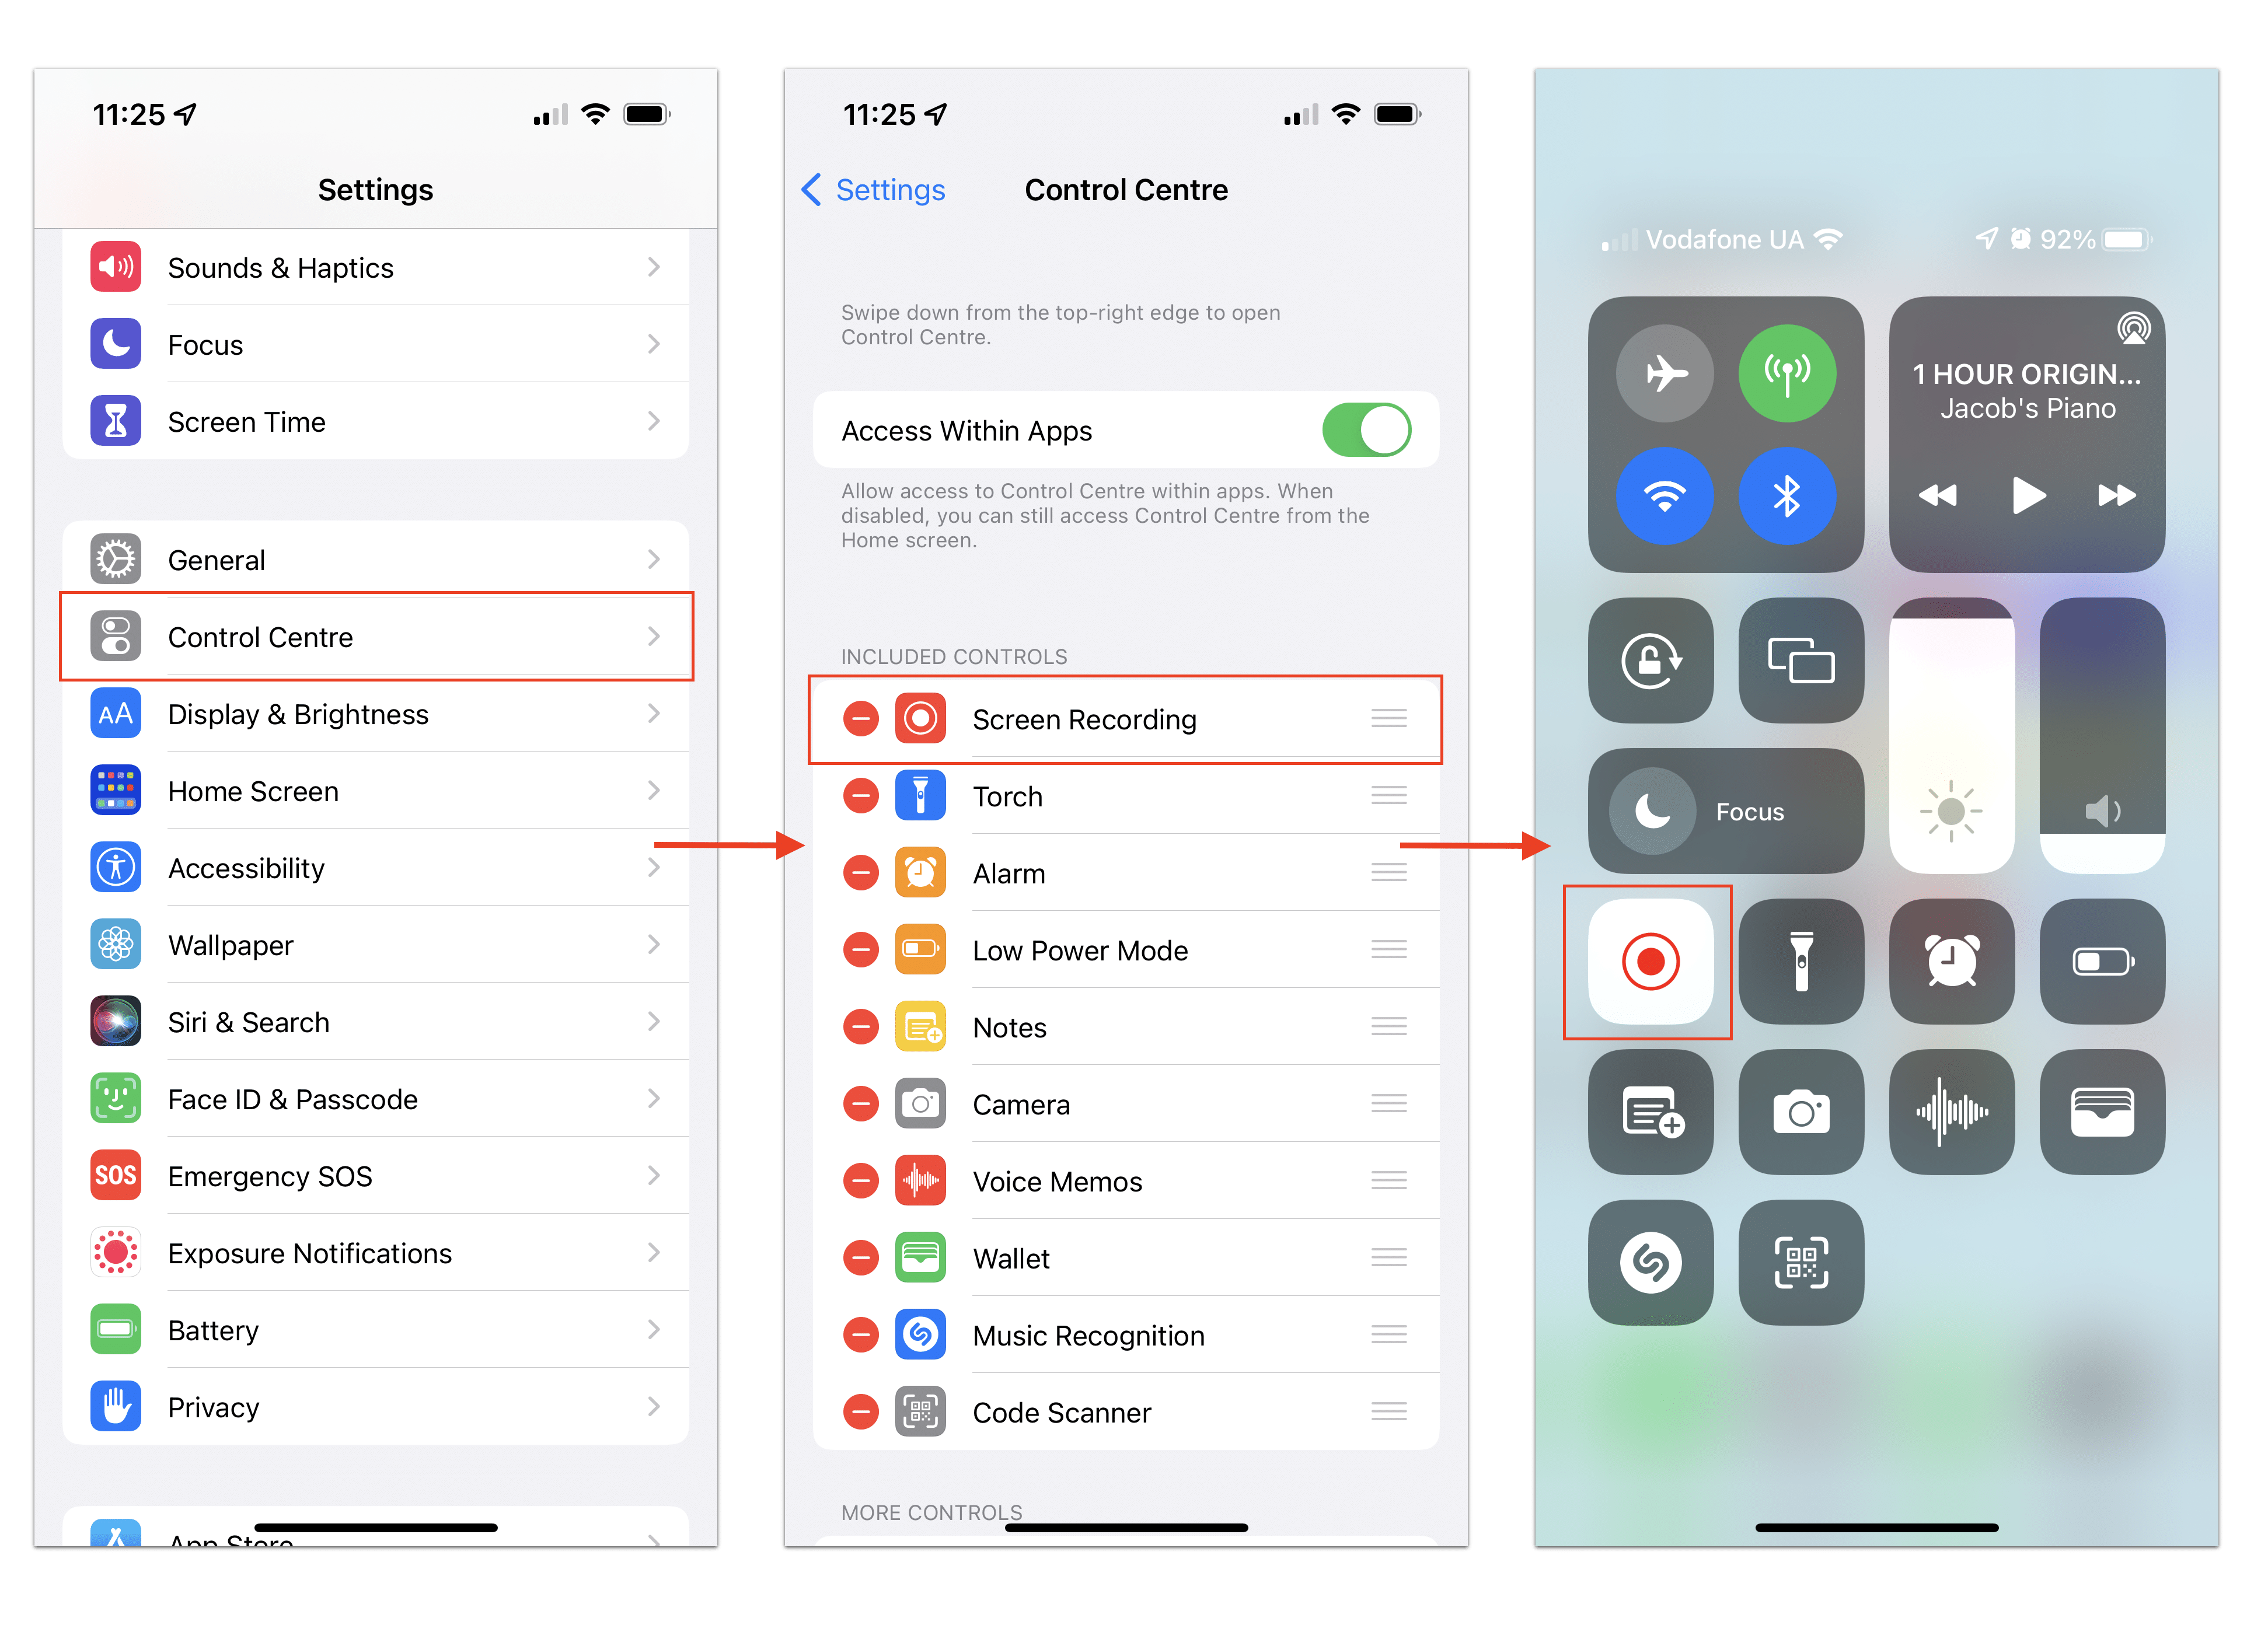
Now you can screen record on your iPhone any time you want.
Here is how to start screen recording on iPhone:
- On your iPhone screen, slide down to open Control Center.
- Tap the Screen Recording icon.
- In 3 seconds, the icon will change to red, indicating that recording has started.
- To stop recording, tap the same icon again.
- When the popup appears, tap Stop.
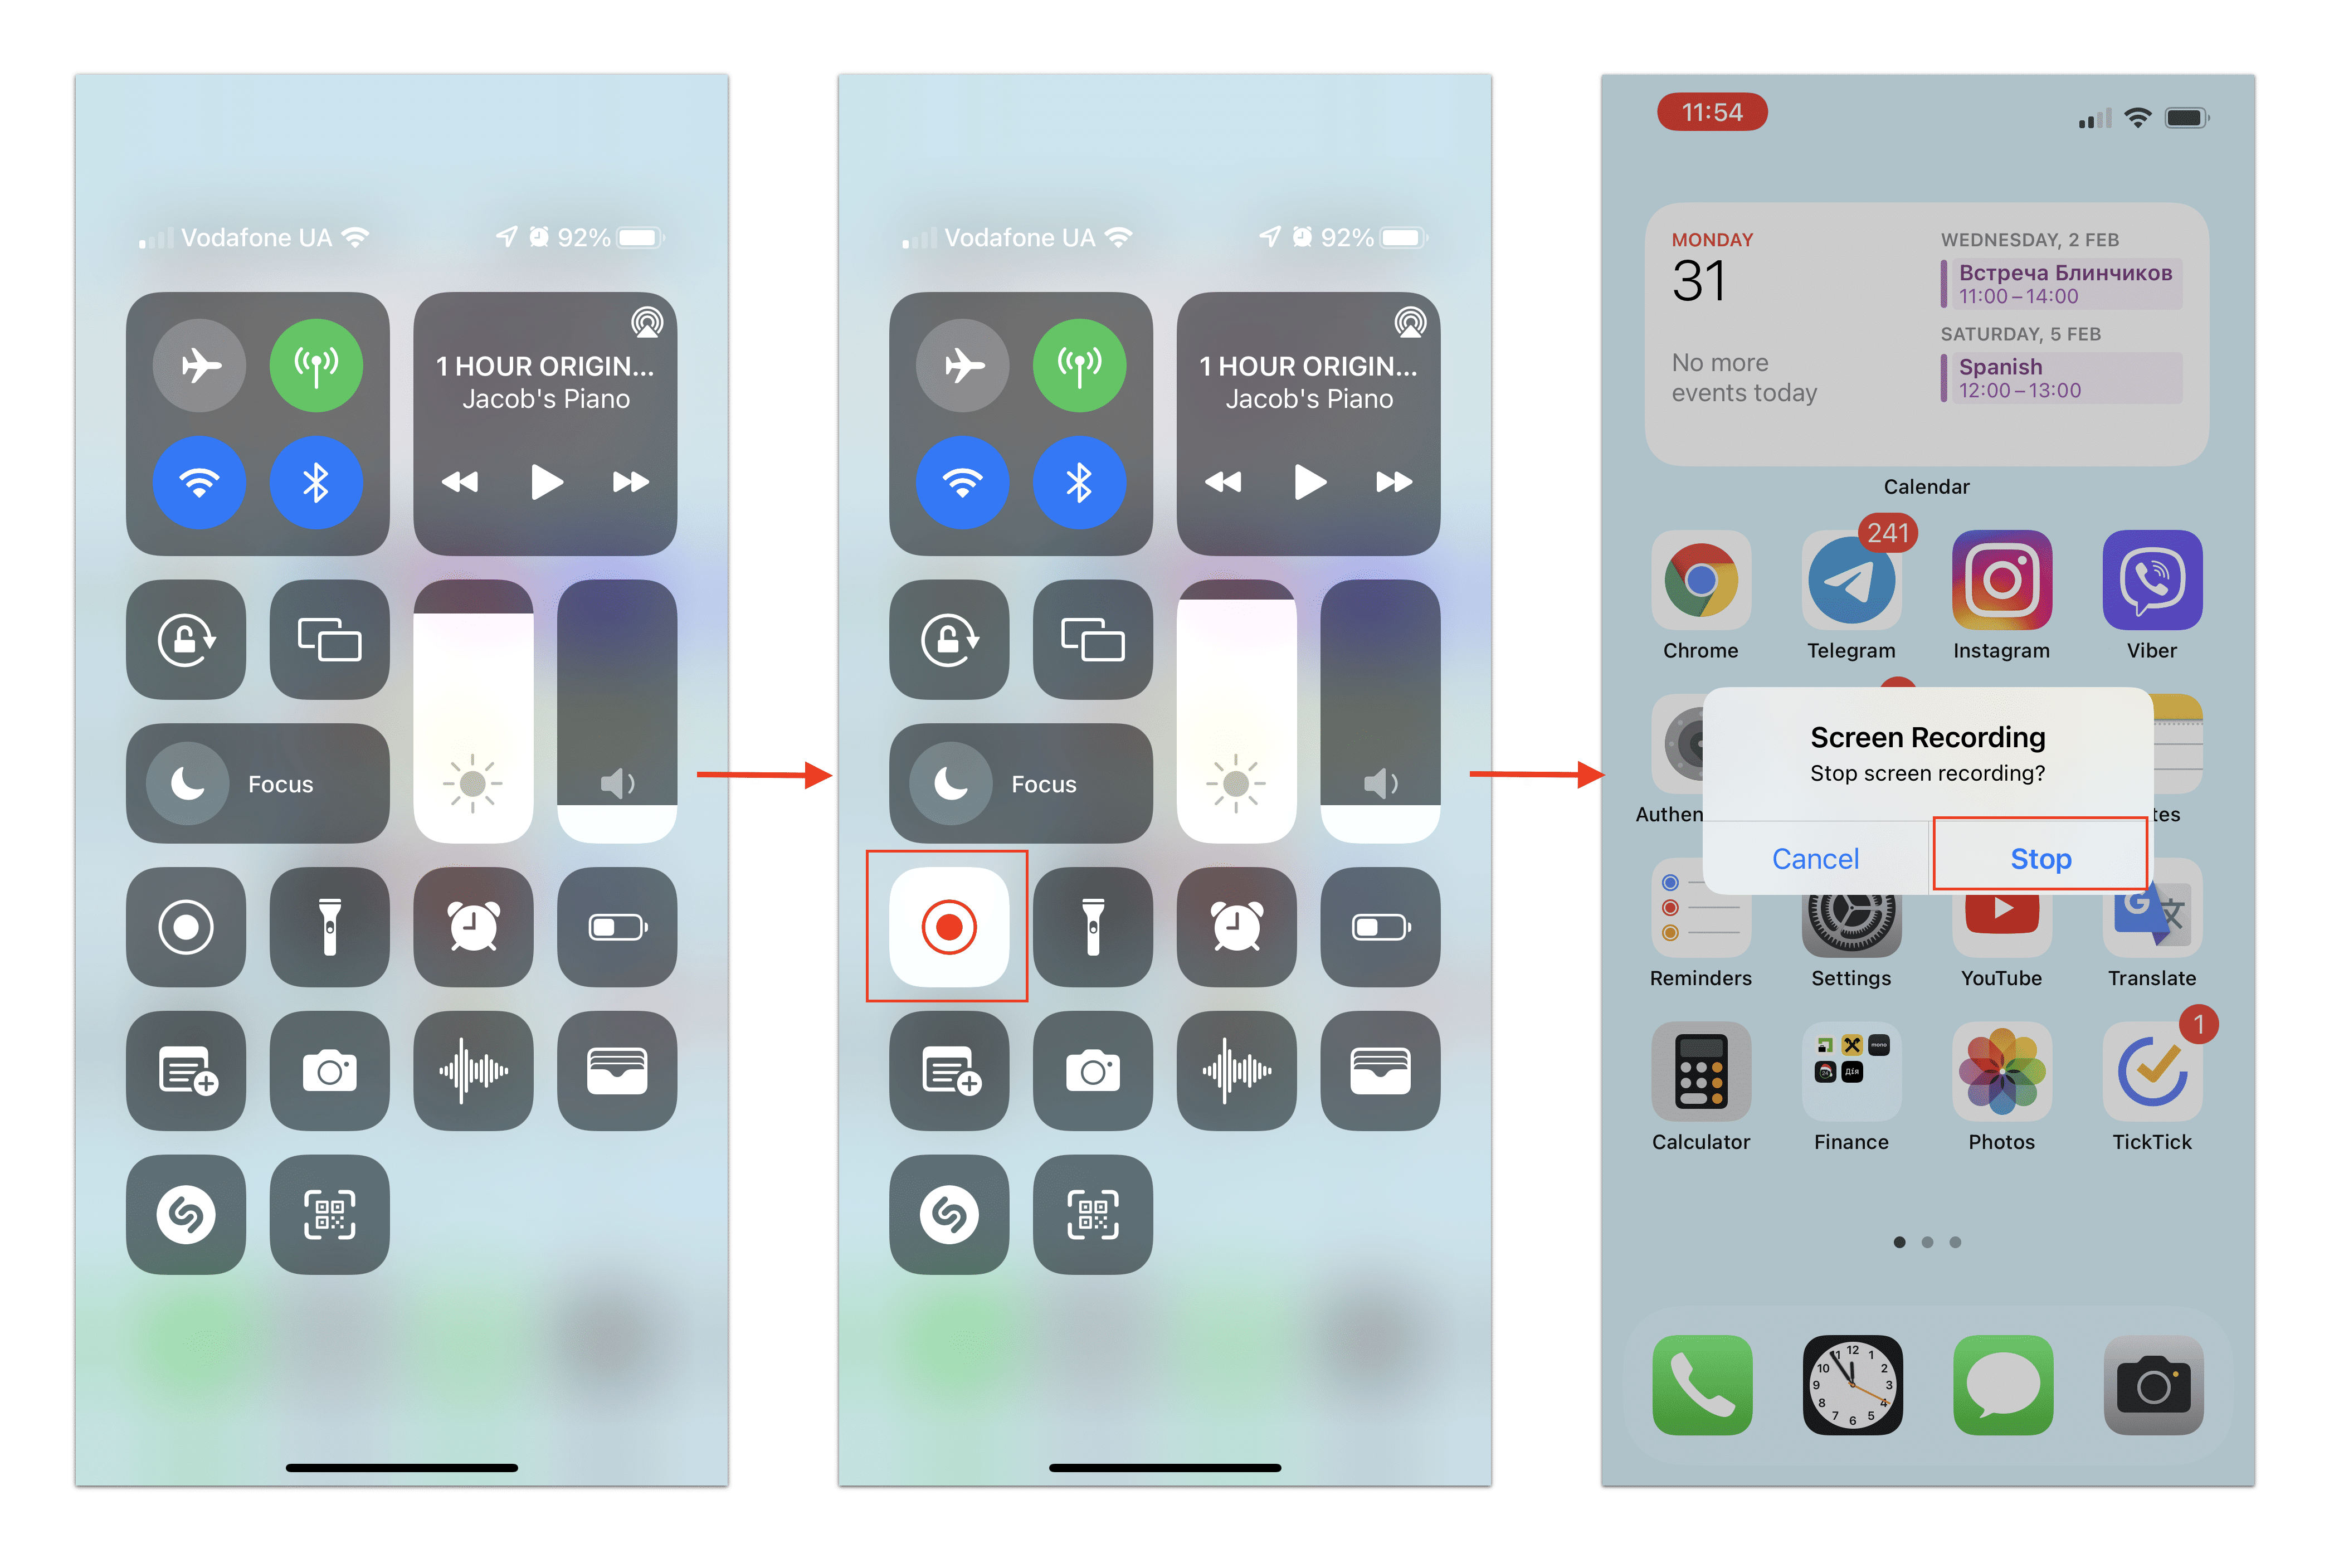
How to screen record on iPhone with sound:
- Open Control Center.
- Tap and hold the Record icon.
- Select what you want to record.
- Tap the Microphone icon.
- Tap Start Recording.
- Once finished, return to Control Center and tap Stop Recording.
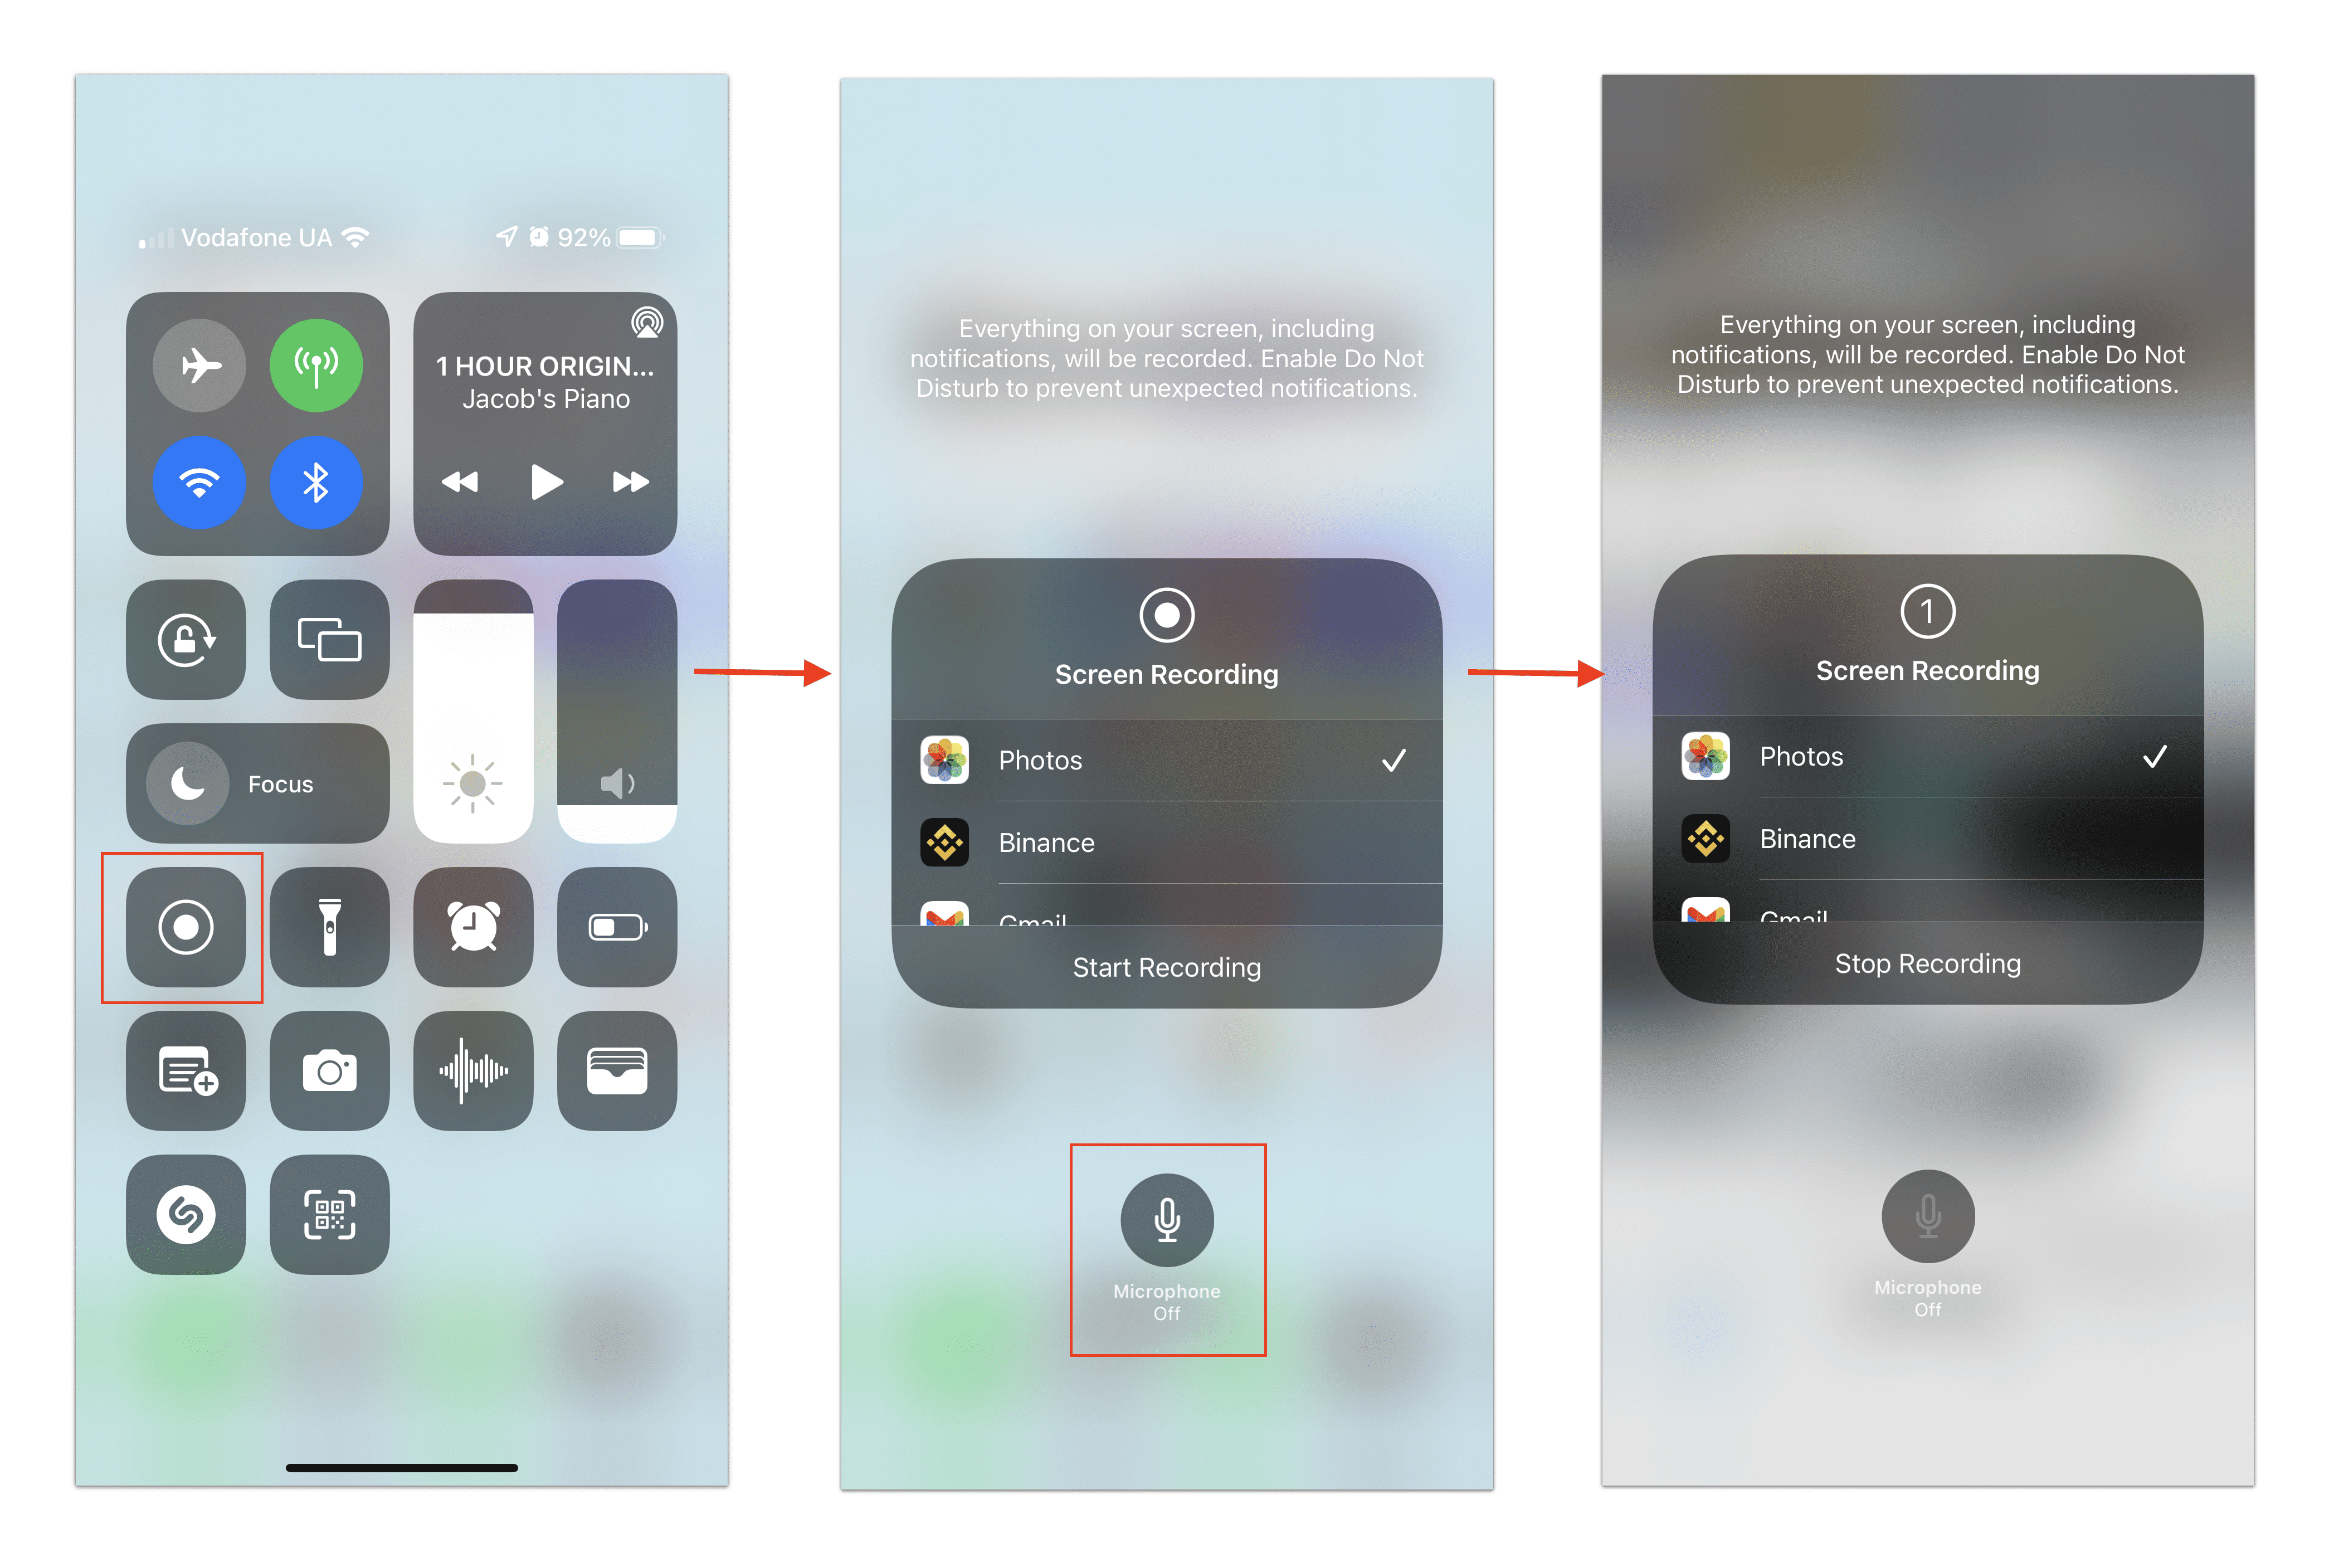
The recordings are saved in your Photos gallery. There, you can edit the video, and/or share it via email, messengers or social media.
Conclusion
Now you know the various ways to take a screenshot or screen record on your iPhone. If you have any tips of your own, share them in the comments below! And remember, if your iPhone is running low on storage space, you can clean up unnecessary duplicate photos and screenshots with the free application, Phone Cleaner for Media Files.
