
Screen recording is a useful feature that allows you to capture what’s happening on your Mac’s screen, along with the audio from your microphone or system. Whether you want to create a tutorial, a presentation, or a video demonstration, screen recording can help you achieve your goal. In this article, we’ll demonstrate a few different ways how to screen record with audio on a Mac.
Contents:
- Can you screen record with audio on Mac?
- How to screen record on a Mac with audio using the Screenshot app
- How to screen record on a Mac with audio using QuickTime Player
- Third-party tools for screen recording with sound on Mac
Before we start
MacCleaner Pro helps you keep your system clean from junk files, running smoothly and free of any system issues. You can remove cache and leftovers from removed apps, find duplicates, uninstall unused apps, optimize RAM usage, and much more. The application provides a free trial.

MacCleaner Pro
Can you screen record with audio on Mac?
Yes, Apple provides options to screen record on a Mac with audio. This means that you can capture both the video and the sound of whatever is happening on your screen. However, you need to adjust some settings before you start recording. You can use built-in Apple tools, like QuickTime Player or Screen Capture, or you can download and use third-party applications to record a screen on Mac with audio. In either case, you’ll need to choose a destination folder for your recorded files.
How to screen record on a Mac with audio using Screen Capture
Mac has a built-in application you can use to record your screen with audio. On macOS Monterey and earlier versions this application is called Screen Capture. If you use macOS Ventura or later, you’ll find the same applications but with a different name – Screenshot.
No matter which macOS version you use, the steps to record a screen on Mac with audio are the same. Here’s how:
- Open the Screen Capture (or Screenshot) app from the Launchpad or the Applications folder.
- The screenshot toolbar will appear.
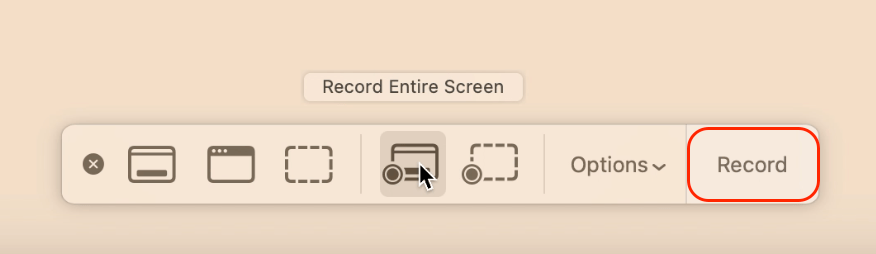
- Select the area on your screen that you want to record. You can also click on the “Record Entire Screen” button to record the whole screen.
- Click Record in the bottom menu.

- To stop recording your Mac’s screen, click on the Stop button in the menu bar or press Cmd+Control+Esc.
- The recorded video will appear in a preview window. You can trim, share, or save it as you wish.
The Screen Capture (Screenshot) app is a simple and convenient way to record your Mac’s screen with audio. However, it has some limitations, such as not being able to record multiple audio sources at once, and it lacks advanced editing features. If you need more functionality, you may want to use third-party screen recording software instead.
How to screen record on a Mac with audio using QuickTime Player
QuickTime Player is another screen recorder that comes pre-installed on MacBook and iMac. It can play various audio and video formats, as well as edit and export them. Another of its features is screen recording, which allows you to capture the activity on your screen and save it as a video file. By default, QuickTime Player doesn’t allow you to record the screen with audio; however, you can install a free extension Soundflower to solve this issue.
Here’s how to record screen and audio on Mac using QuickTime Player:
- Download and install the Soundflower extension on your Mac.
- Open Mac System Settings and click Sound in the sidebar.
- In the Output settings, you’ll see the installed Soundflower extension.
- Set your output to the 2-channel version.
- Open QuickTime Player from the Applications folder or the Launchpad.
- You’ll see the same bottom menu as in the Screenshot app. Here click Options and select Soundflower.
- Click the Record button to start recording.
- To stop recording, click the Stop button at the top of your screen.
- The video will automatically open in QuickTime Player. Save it on your Mac.
- Don’t forget to change your audio output device back in System Settings.

Third-party tools for screen recording with sound on Mac
The built-in screen recorder on Mac has some limitations, such as no default option to record audio. With third-party tools you can record whatever you want with some additional benefits:
- These tools often provide higher resolution, frame rate, and bitrate options for screen recording, resulting in clearer and smoother videos.
- You can get more advanced editing features, such as trimming, cropping, and adding annotations, transitions, filters, and music to your screen recordings.
- They support a wider range of output formats for your screen recordings, such as MP4, MOV, AVI, GIF, and more. This gives you more flexibility and compatibility when sharing or uploading your videos.
- They support audio as well, helping you record anything on your screen with input or output sounds. This means you can even record your voice.
Here’s a list of some popular Mac screen recorders that support system audio:
- Movavi Screen Recorder
- CleanShot X
- OBS Studio
- Snag-It
- Camtasia
- FonePaw
Conclusion
Screen recording on Mac can help you capture the activity on your Mac’s screen for various purposes. You can choose to use the pre-installed apps that come with macOS, such as QuickTime Player or Screenshot, or you can opt for third-party apps and find the best Mac screen recorder depending on your needs. Share in the comments below which method you use to record the screen on your Mac.


