If you need to uninstall Parallels on Mac, you are on the right page. From this article, you will find step-by-step guides of two ways on how to remove Parallels from Mac entirely and safely.
Before writing this guide, we checked the uninstalling Parallels desktop guide, saying to “Simply move the application to Trash.” This is absolutely incorrect. To completely uninstall Parallels desktop application and any application from Mac, you also need to remove its temporary files. In this guide, we’ll explain how to do it properly.
Contents:
- What is Parallels, and why remove it?
- How to uninstall Parallels on Mac manually.
- The easiest way to completely uninstall Parallels on Mac.
- FAQs
What is Parallels, and why remove it?
Parallels Desktop is a utility that allows Mac users to run Windows-based applications on macOS without rebooting their Mac. It’s especially convenient when you need to use software available only for the Windows platform.
Today, the software has over 7 million users worldwide.
However, Parallels Desktop can consume a significant amount of your hard drive space and system memory. For example:
- A standard Windows 11 virtual machine in Parallels can use 30–50 GB of disk space, depending on the software and updates installed.
- When a Parallels virtual machine is running, it divides the system’s resources between macOS and Windows. It typically allocates 4–8 GB of RAM, which can cause your Mac to slow down.
Because of this, you might consider uninstalling Windows from your Mac. Keep reading to learn how to remove Windows properly and free up valuable system resources.
How to remove Parallels from Mac manually
Please, carefully follow each step from this guide to get rid of Parallels with all of its temporary files.
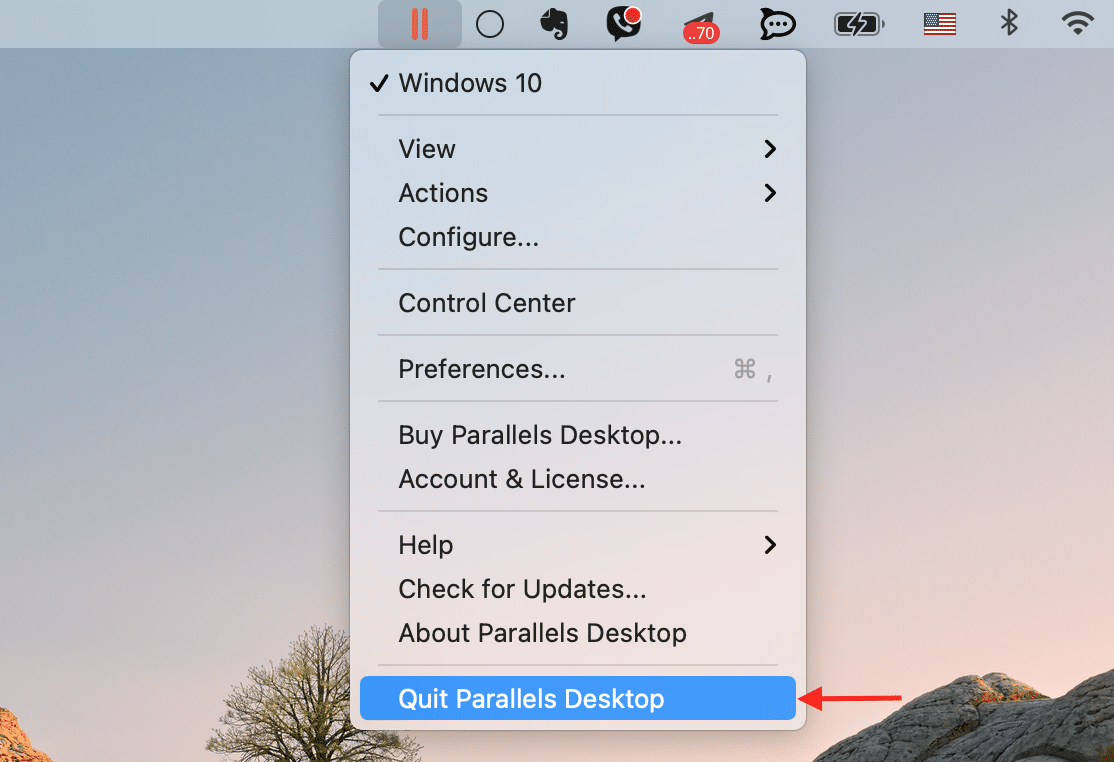
- Quit Parallels. For this, go to the toolbar → click the Parallels icon → select Quit Parallels Desktop. Also, you can quit Parallels from the Dock panel.
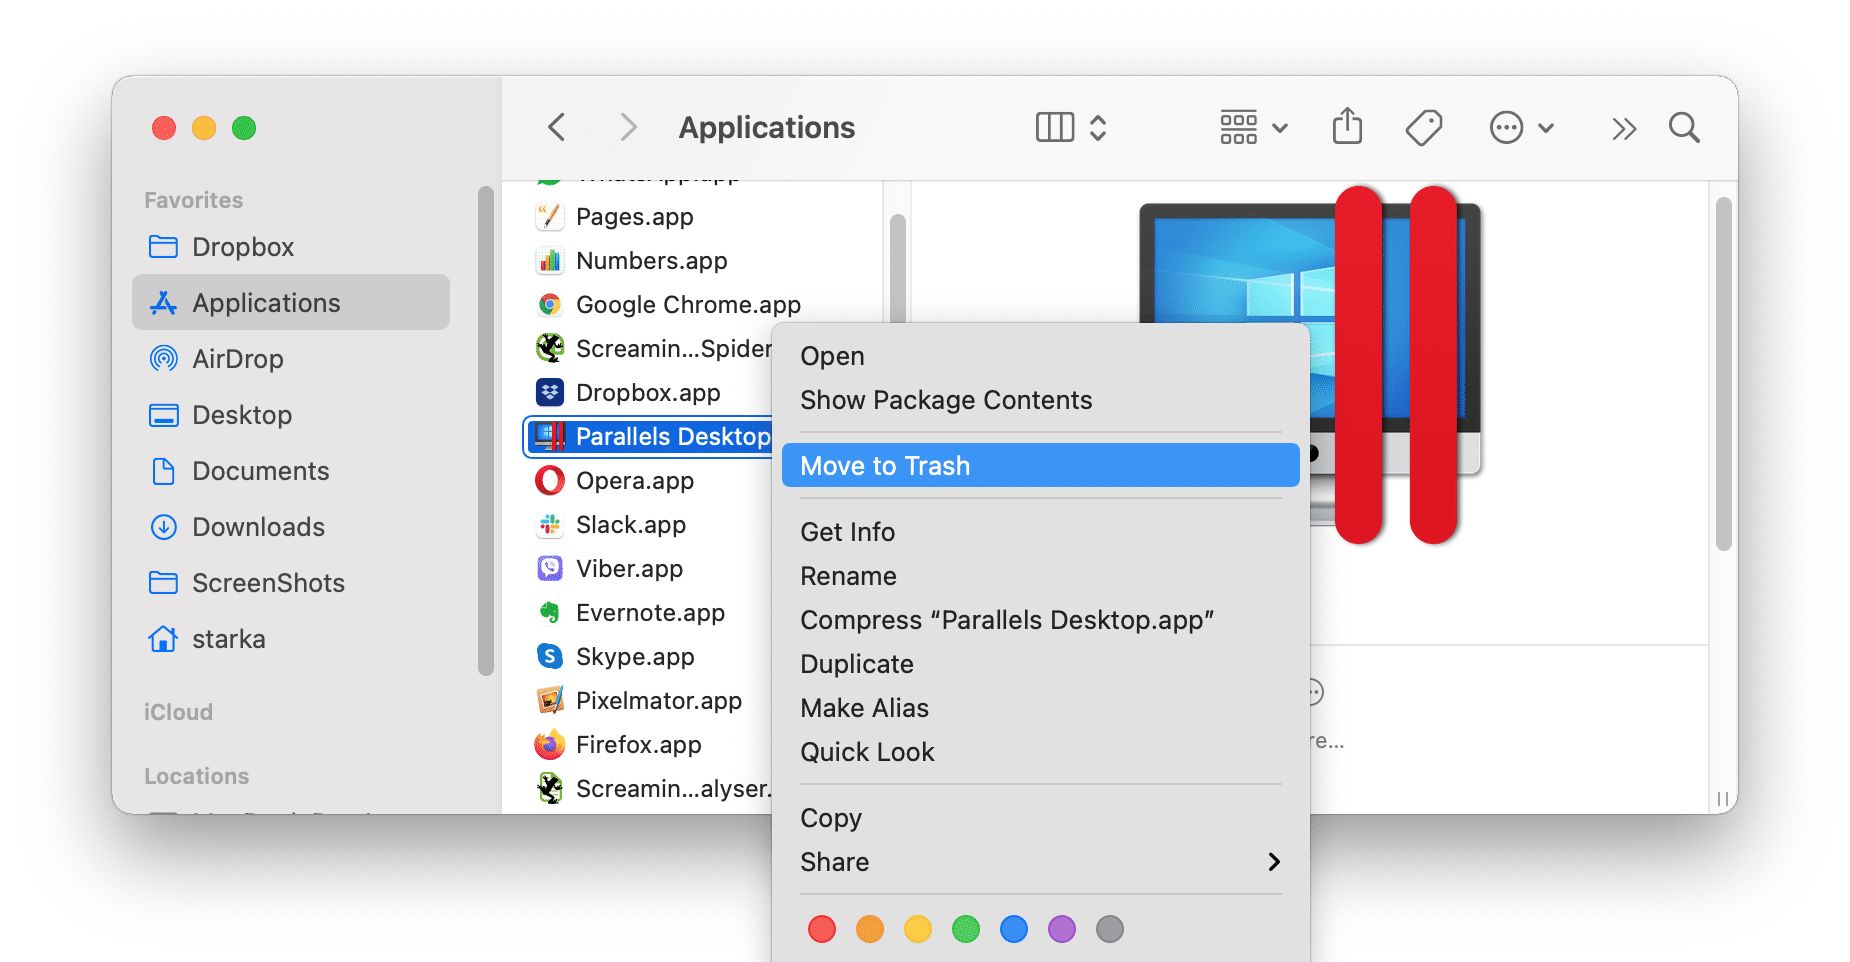
- Go to the Applications folder and remove Parallels Desktop into the Trash.
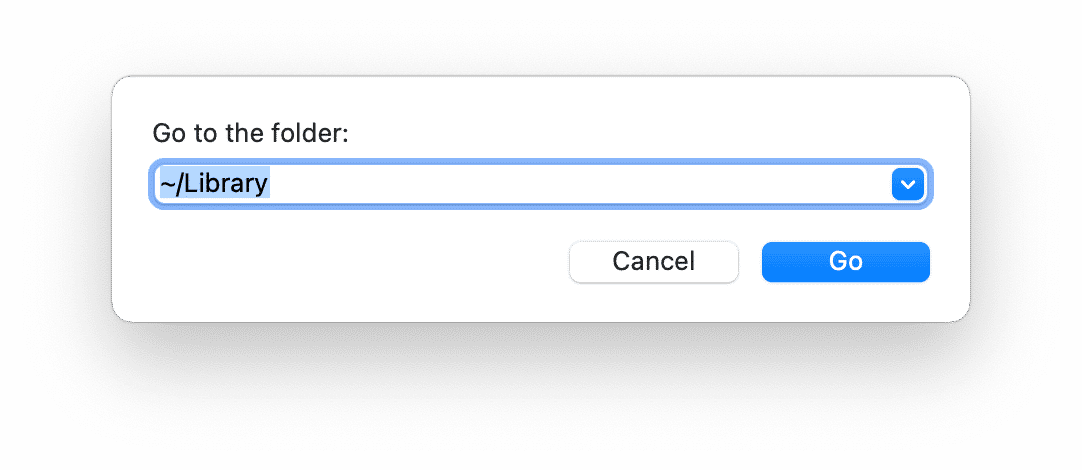
- Now you need to find Parallels Desktop’s temporary files. By default, applications store their remains in the hidden Library folder. To go to this folder, open Finder and press the Command+Shift+G shortcut. Type ~/Library and press Enter.
-
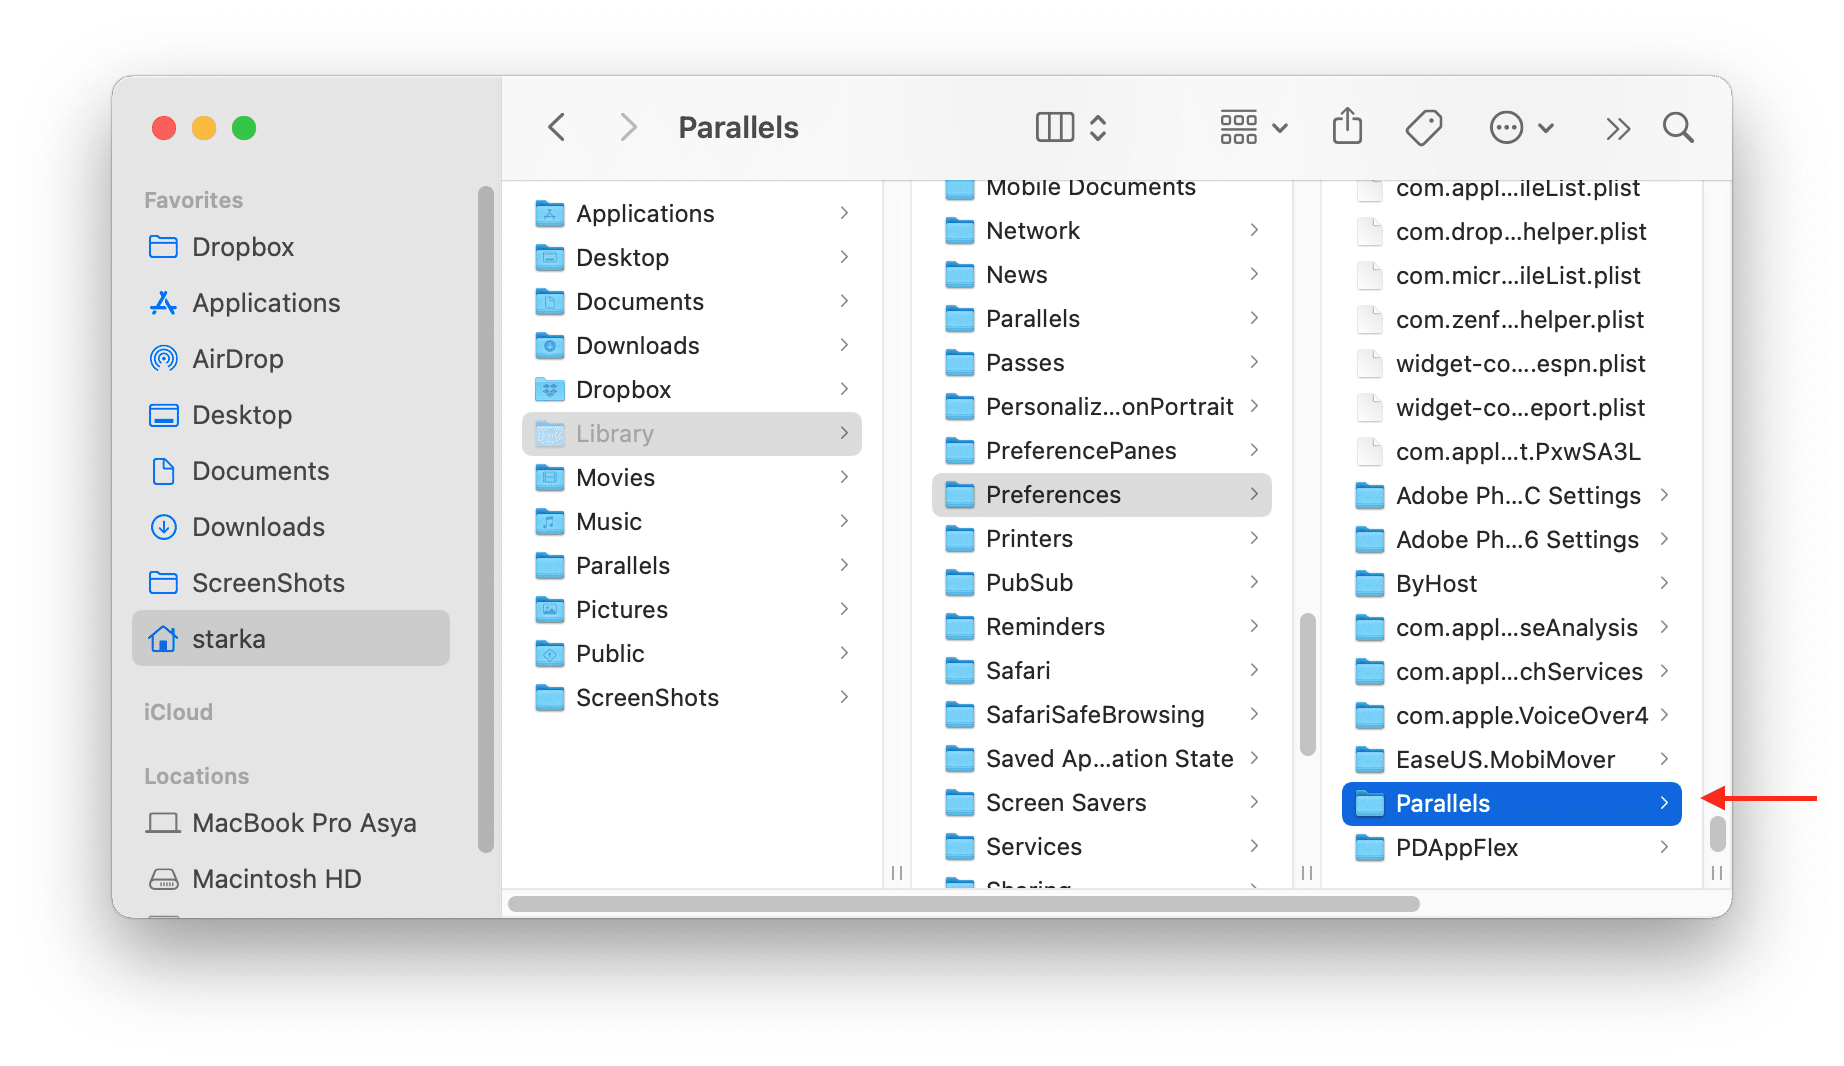
Check the following subfolders for Parallels Desktop’s associated files:
- ~/Library/Application Support/
- ~/Library/Caches/
- ~/Library/Cookies/
- ~/Library/Preferences/
- ~/Library/Saved Application State/
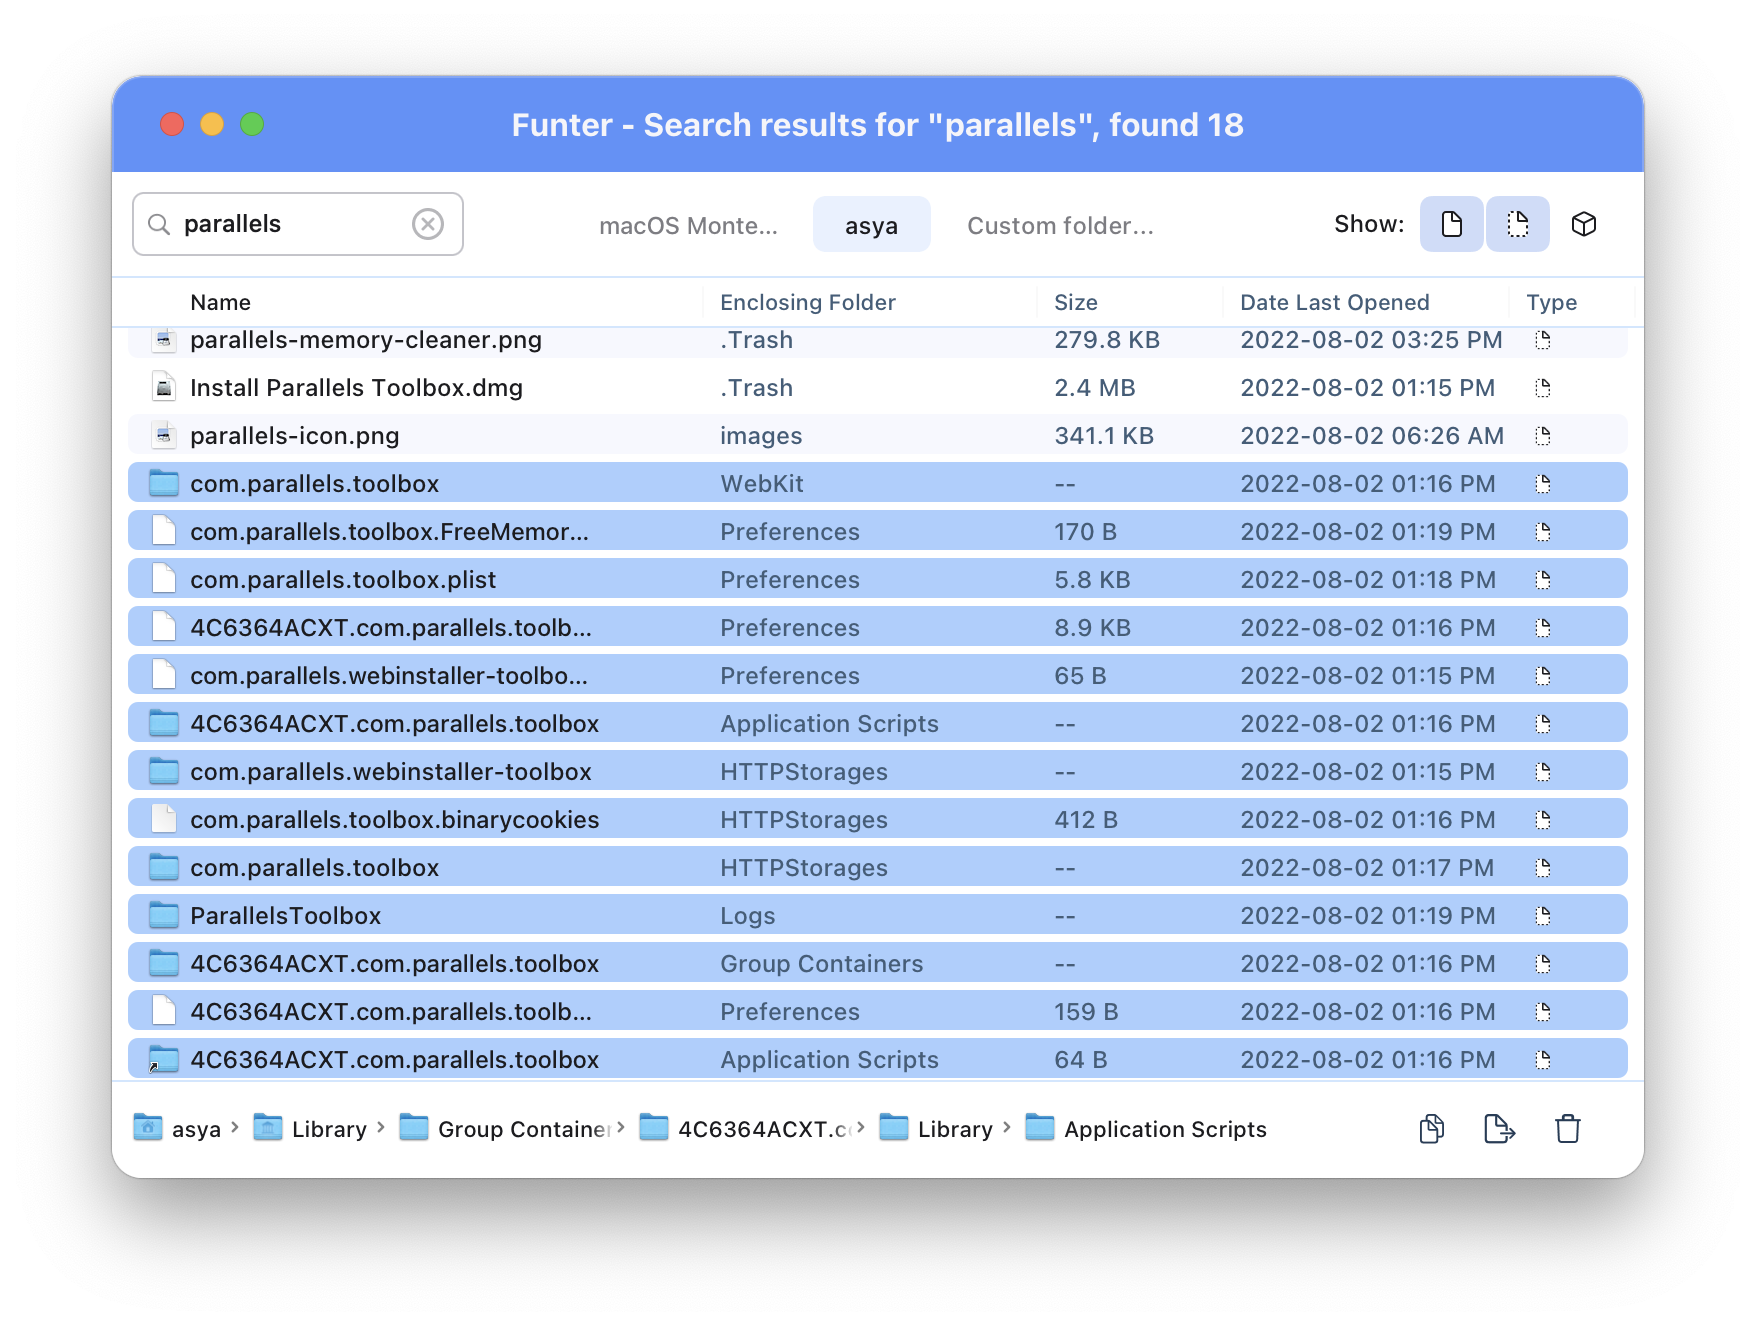
- Also, you can search for hidden files of Parallels using Funter. Funter is a free application from Nektony to find hidden files on Mac operating system. Just type the word “parallels” in its search field and press Enter. Funter will show the list of all files that contain the search word in their names. Select all files associated with the Parallels virtual machine and remove them.
With the help of Funter, you can see that some files might be stored in the deep debris of macOS, and it’s not so easy to find all of them. That’s why we recommend using a third-party uninstaller to remove applications with all of their remaining files.
The easiest way to uninstall Parallels from Mac
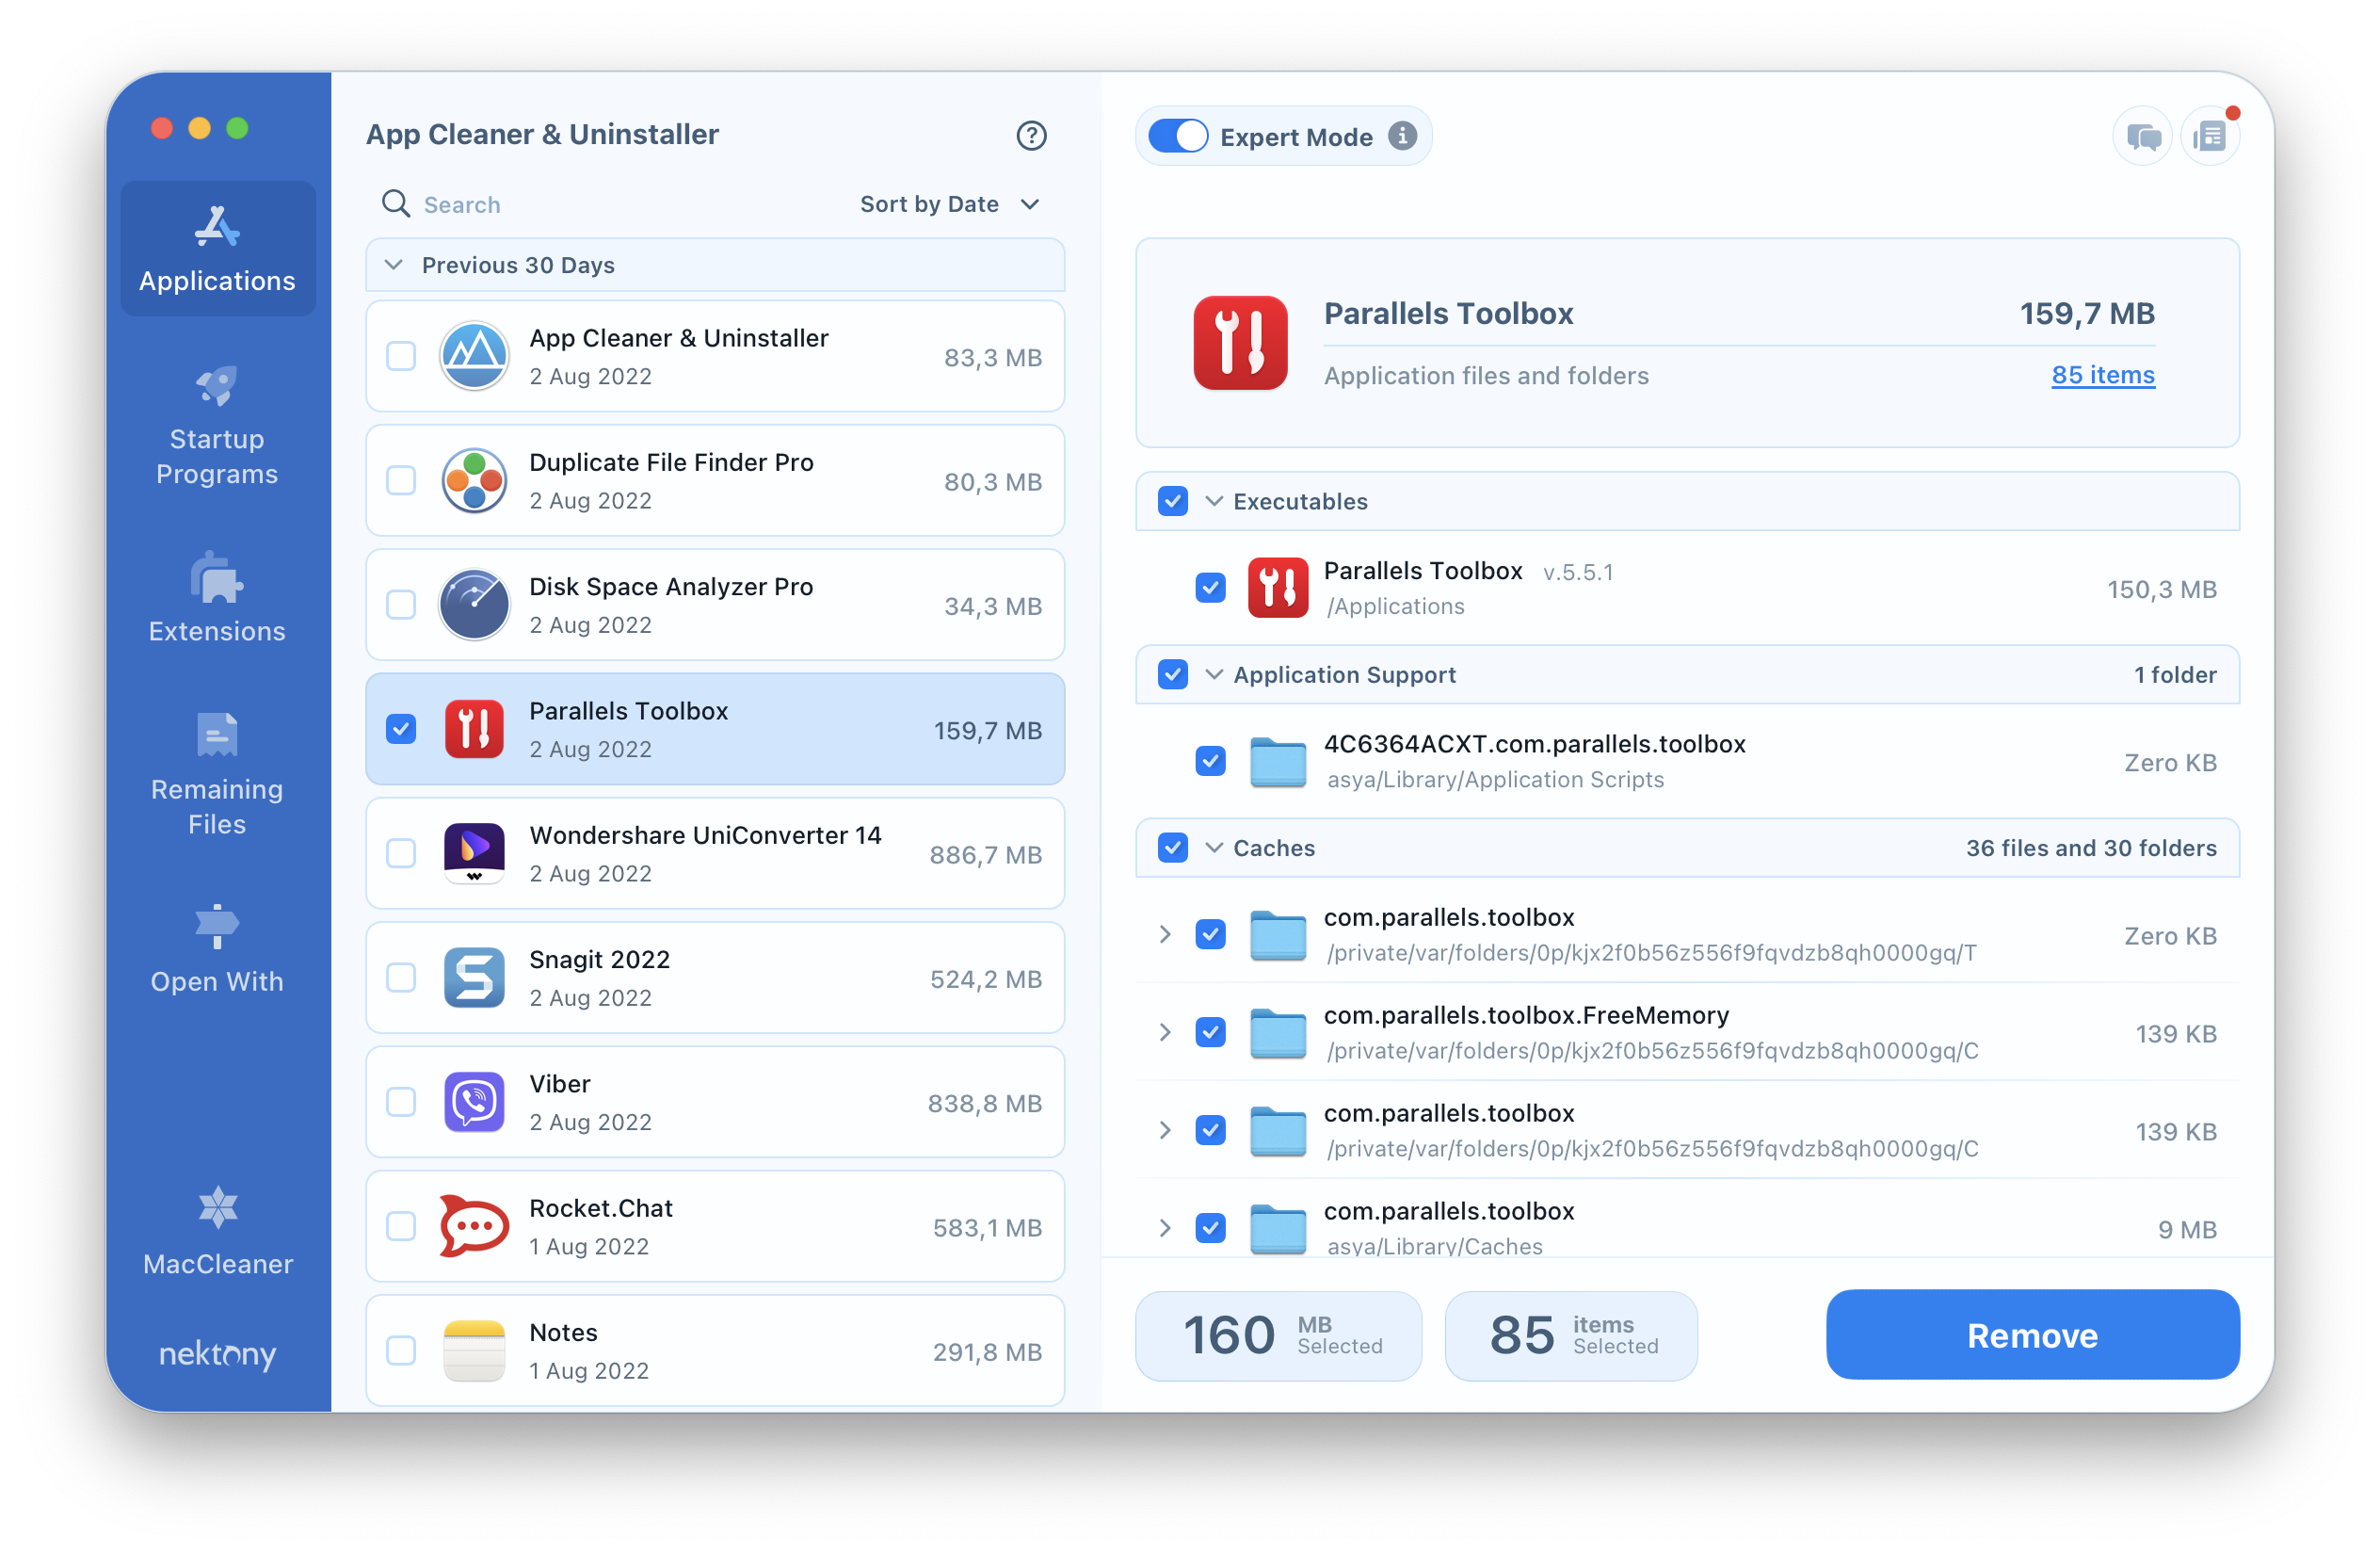
App Cleaner & Uninstaller is a professional tool to uninstall programs and manage extensions on macOS completely. Unlike the manual method of application removal, App Cleaner & Uninstaller finds all the leftovers of apps and allows you to quickly and efficiently get rid of them. Here’s how:
- Quit Parallels Desktop. For this, click on its icon in the toolbar and select Quit Parallels Desktop.
- Launch App Cleaner & Uninstaller and wait until it finishes scanning your application.
- Select Parallels Desktop and click the Remove button.
- Confirm the uninstallation.
- By default, App Cleaner & Uninstaller removes all files to Trash. So empty the Trash and reboot your Mac. In this case, you can be sure that no leftovers of the virtual machine will remain on your disk.
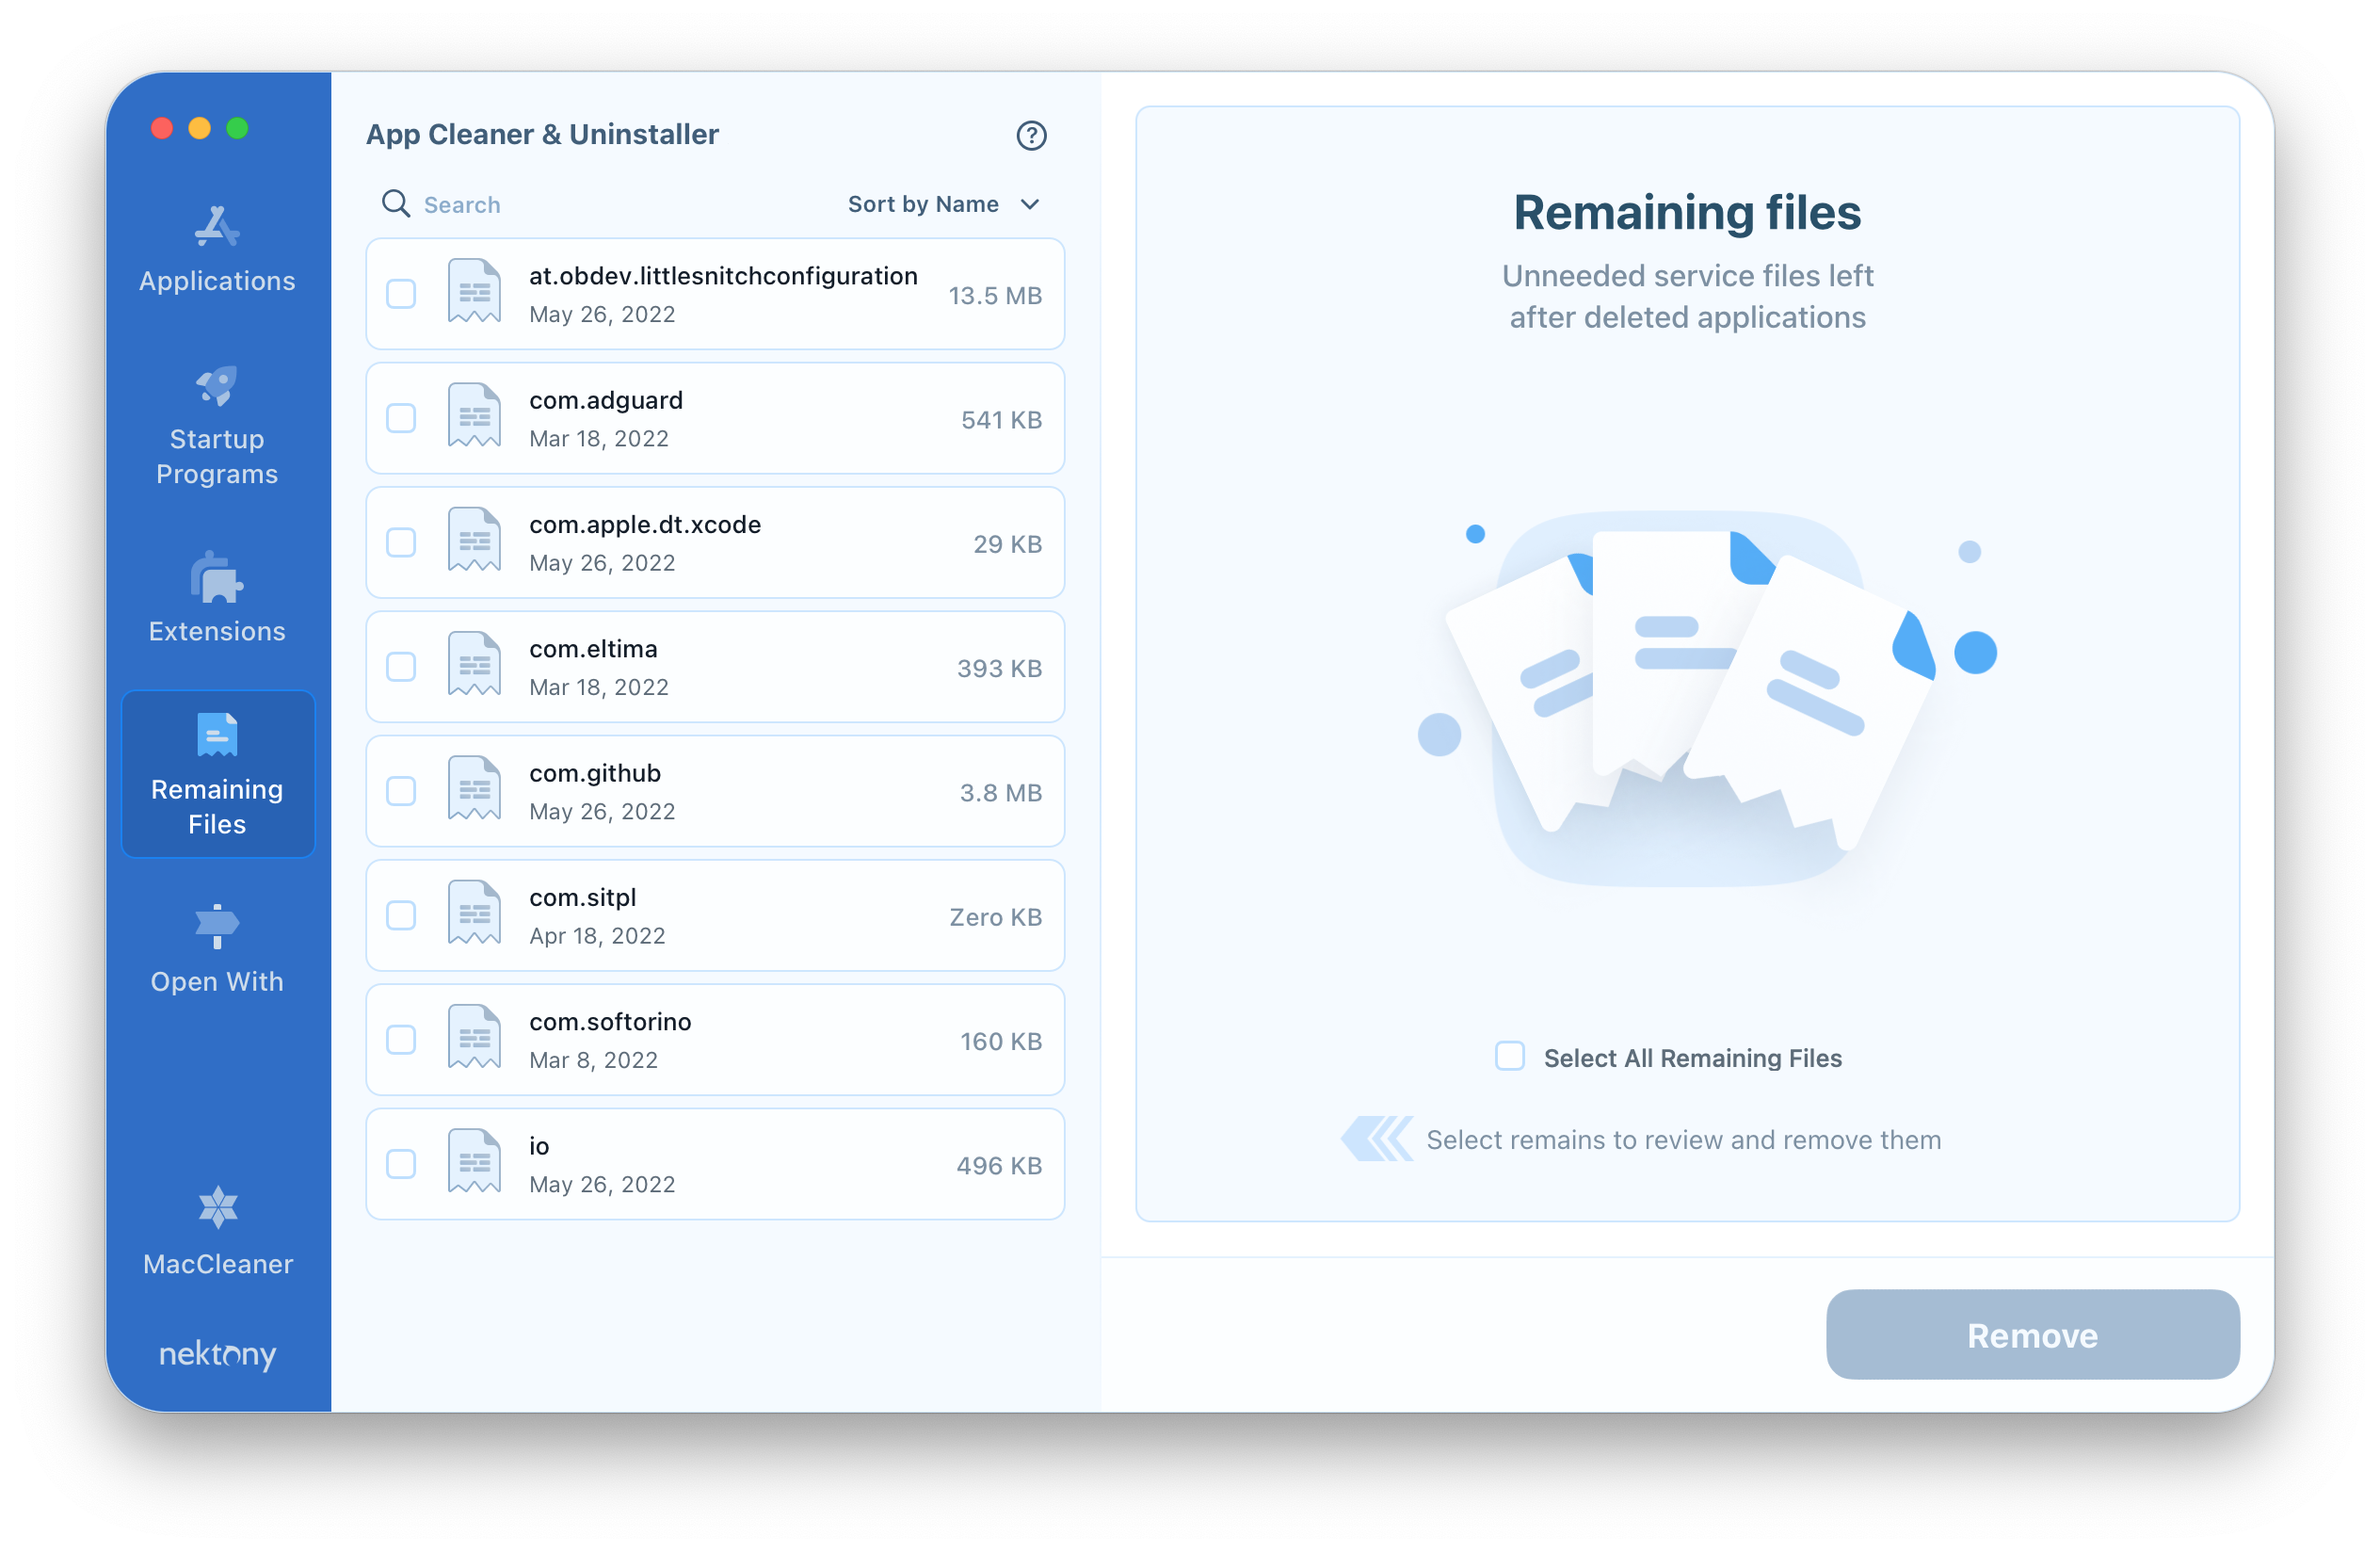
If you have already removed Parallels into the Trash, with App Cleaner & Uninstaller, you can find its remaining files. We recommend removing all leftovers as they are just junk files and eat up valuable space on your hard drive.
How to find Parallels Desktop remaining files:
- In-App Cleaner & Uninstaller, go to the Remaining Files section.
- Select all unneeded leftovers.
- Click the Remove button and confirm the removal.
As you can see, the recommended method of desktop removal from the Parallels’ website leaves leftover files on your Mac. Unfortunately, such useless service files may account for gigabytes of junk on your disk, and they may cause issues. If you want to keep your Mac clean, use App Cleaner & Uninstaller, which removes applications from your Mac both wholly and quickly.
FAQs
How do I delete my Parallels account?
To delete your account with Parallels follow these steps:
- Log in to your account.
- Go to your Personal Profile page.
- Click Delete Account.
- Provide your password to confirm.
- You’ll receive an email with a confirmation and instructions to complete the deletion process.
Why won’t Parallels uninstall from my Mac?
Before attempting to remove Parallels, make sure the application is not open or running in the background. To do this, open Activity Monitor and close any processes related to Parallels.
How do I reset Parallels?
You can use App Cleaner & Uninstaller for this task.
- Open the uninstaller.
- Select Parallels in the list of scanned apps.
- Right-click the app.
- Choose Reset Application from the context menu.
- Confirm the action.


Parallels Desktop at productscrack supports all versions of Windows since Windows 2000, all Intel-based MacOS versions (with a few licensing exceptions), many Linux, BSD, Solaris versions, and a few other operating systems. Each virtual machine works identically to an independent computer with practically all the resources of a physical computer. Keep the appearance of macOS or use the familiar Windows desktop and use Google Drive, Dropbox, OneDrive, or other cloud services.
Great web site you have here.. It’s difficult to find good quality writing like yours these days. I really appreciate people like you! Take care!!|
I feel this is among the so much vital information for me. And i’m happy studying your article. However should remark on few normal things, The site taste is perfect, the articles is in reality great : D. Good job, cheers|