


May 1, 2024
How to find and remove duplicate files in OneDrive
Share

OneDrive is a Microsoft’s cloud storage service, that allows you to easily store your files. However, frequent use can lead to the accumulation of duplicate files, causing clutter and inefficient storage usage. This article will help you identify and remove duplicates from your OneDrive and use the storage efficiently.
Manually find duplicate files in OneDrive
As you know, duplicate files have equal size, type, and content. Sometimes the twin files have the same names. When you copy a file in OneDrive, you see a notification that the file you want to add already exists in OneDrive. However, it is possible to keep both items. By default, the number index is added to a copy of a file within the same OneDrive folder, but you can manually rename duplicate files as well.

If you want to find duplicate files in OneDrive, you can try the following tips:
- Search for the duplicate files by name. To find unwanted replicas of files by their titles, log in to your OneDrive online account → open the folder where you want to search for the same files → click at the top of the list of files → select to sort items by name. Skim the list to find files with equal names or the same name with a number index in parentheses. If they are duplicates, their content, type, and size should be the same.

- Search for duplicate files by size. In case you renamed existing copies, you can try to identify twin files by size. So within the folder with estimated duplicates, arrange the items by Size. If the content and type of files match, it’s likely they are duplicates.
- Search for same files by content. The largest part of most OneDrive storage data is taken by photos. You can try to find identical images by eye. Within the folder with photos, set the view option to show items as Tiles and sort them by size. It’s very likely that the images with the same size and visual content are duplicate photos.


Removing duplicate files from OneDrive online
It’s common to rationalize that we will find and remove unwanted duplicates later, but never actually do so. Not this time! Once you have identified all duplicates in OneDrive, you can easily remove them. For this, tick all unneeded twin files and click on at the top menu of OneDrive cloud storage.

The previous methods of finding and removing duplicates in OneDrive are tedious. Just imagine that you have 100 GB or 1 TB of data in your storage space. With such a large amount of files, you will have to open every single folder, sort files, skim and detect equal files to remove the useless ones. Instead, you can use a special software tool to automatically find and remove duplicates from your Mac.
Remove OneDrive Duplicate Files from Mac
If you use the OneDrive app for Mac, try the free Duplicate File Finder application for deleting duplicate files from your storage easily and quickly .
Duplicate File Finder can scan your folders and find identical files by type, size, and content. Within OneDrive storage, Duplicate File Finder will detect all duplicate photos, documents, videos, and other files among all your folders, as well as identical archives and folders. Here’s how to use it:
- Launch Duplicate File Finder.
- Add OneDrive for scanning.
- Click Find duplicates.

- In the next moment, you will see the scan’s results. You can open the drop-down menu to see certain groups of duplicate files.

- You can select each duplicate step-by-step or click on the Smart Select button to allow the app to automatically choose unneeded copies. Then click on Review to Remove.
- You will see a list of all the items you want to delete from your storage. Skim the files and click Remove to confirm the action.


By default, all deleted items are moved to the Trash on your Mac. However, in the Preferences of the app, you can select to permanently remove duplicate files from Mac or move them to a specific folder.
Important note!
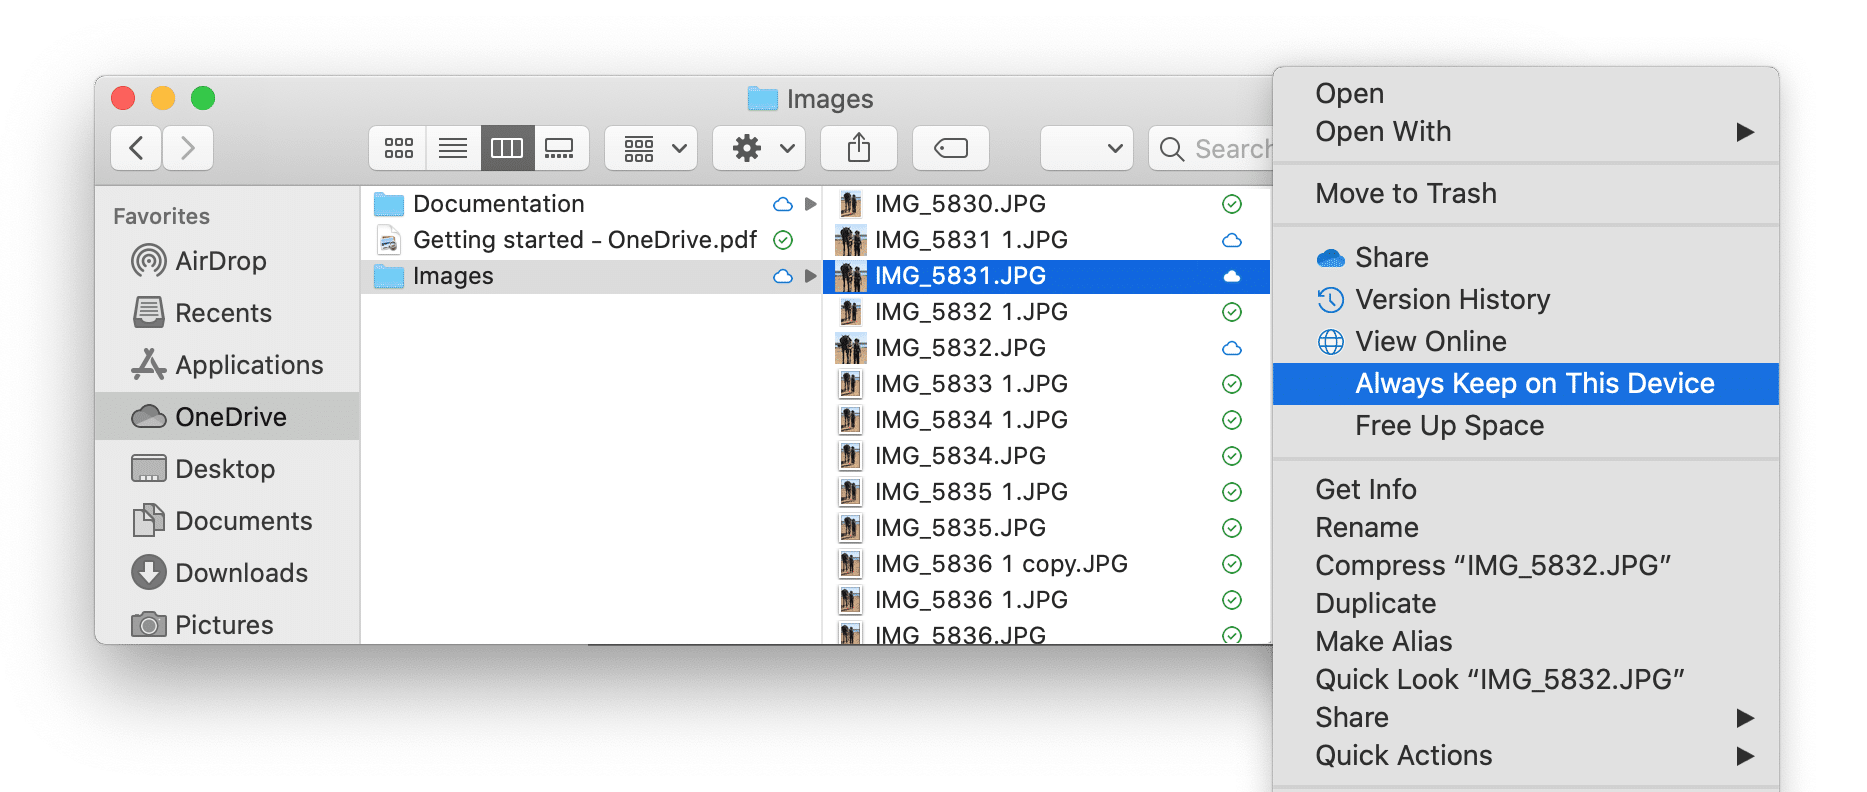
The duplicate finder compares files from OneDrive that are locally stored on a Mac’s hard drive. Please make sure that your OneDrive files are downloaded to your Mac before you start scanning them for duplicates. To check whether the files and folders are downloaded, look at the icon located on the right of the item in the OneDrive folder in Finder. The Cloud icon next to the file means that the file is located online. The green check mark means that the file is downloaded on your Mac.
How to download OneDrive files to Mac:
- Open Finder and go to the OneDrive folder.
- Find the files that are located online. They are marked with the Cloud icon.
- Right-click on the file to open the context menu. Select Open With → OneDrive File Launcher. The file will be downloaded.

Another method to save files to your Mac is to select the Always Keep on This Device option from the context menu.
Once you download your OneDrive file to your Mac, take the steps below to find and remove duplicates from your cloud storage space.
Conclusion
Cloud storage services allow us to keep tons of information and easily share it with others. Using OneDrive, you can store up to 6 TB of data and share it with family members. However, even this huge online storage account will eventually run out of space. To help you free up space and organize your OneDrive files, use the free Duplicate File Finder app on your Mac.
You can download the application from App Store and use it for free. If you would like to get more benefits, such as merging folders, organizing files, and even finding similar photos, use the Pro version of the app, which is available via in-App purchase.