May 29, 2025
Show hidden files on Mac – 4 easy methods
Like any operating system, macOS keeps important files hidden to prevent them from being accidentally deleted and, as a result, from system damage. However, in some cases, you may need to reveal hidden data on your Mac, for example, to explore the hidden Library folder and clear old logs, cache, or other system junk.
This article provides step-by-step guides on how to show hidden folders and files on a Mac.
Four possible methods to show hidden files on Mac:
Video Guide: How to use Funter to see hidden items
1:12

What are hidden files on a Mac?
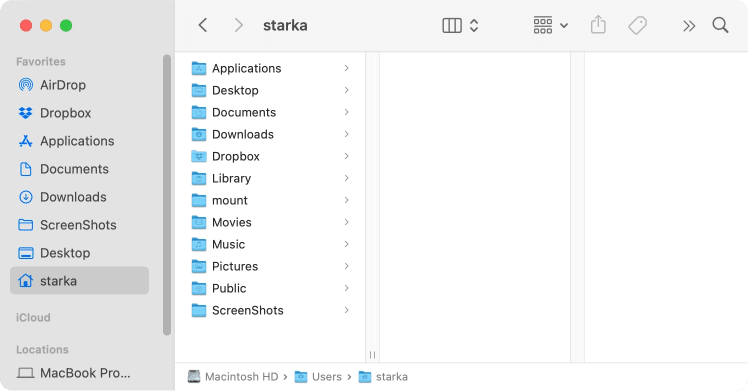
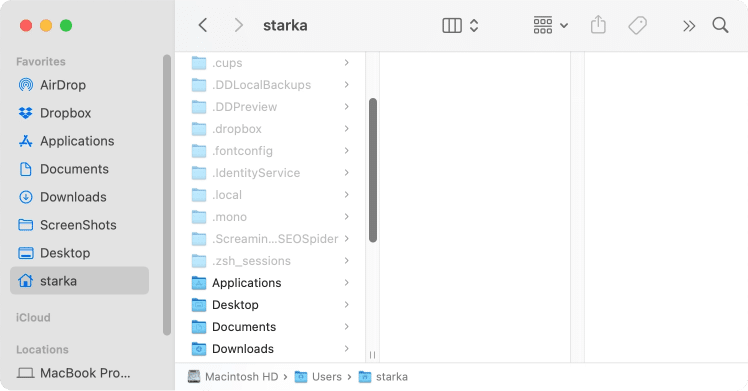
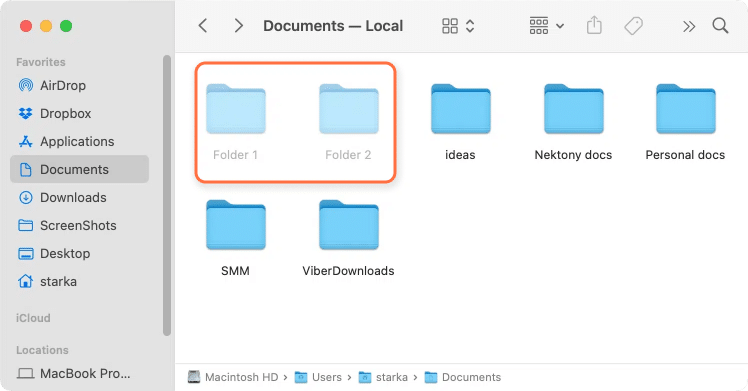
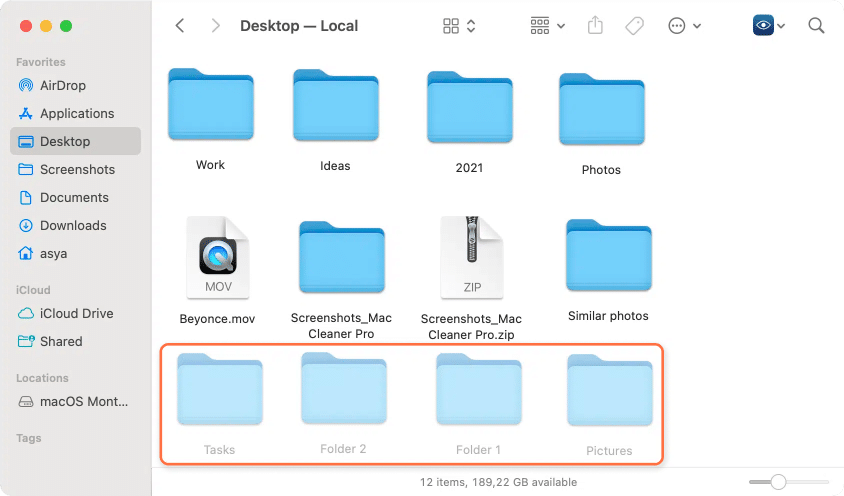
Hidden files on a computer are files that are kept invisible from the users. You can recognize hidden files by their name and icon type. Firstly, hidden file names begin with a dot (or period). Secondly, the file icon is translucent.
Hidden files are invisible
Hidden files are visible
MacOS creates hidden files that are needed for the system to operate. Applications also create hidden files, such as cache files, logs, preferences, etc. Most of them are located in the hidden Library folder. These files are not visible for security reasons and to keep them separate from files created and used by the user. However, not all hidden files are necessary, and many of them you can safely remove.
When deleting hidden files on Mac, you should be careful and not remove important data, that as a result can damage your system. If you accidentally remove system files to the Trash, you have a chance to recover them. For this, you need to right-click the file in Trash and select Put back. If, for some reason, you can’t recover files from the Trash, or if you have already emptied the bin, the only chance to recover them is to use a third-party data recovery software.
Now let’s see how to show and operate such files on Mac operating system.
How to find hidden files on Mac with Funter
The easiest way to manage this task is to use the free Funter application.
Funter allows you to find, hide, and search for hidden files on your Mac in just a few clicks.
For this, follow the steps below:
- Launch Funter.
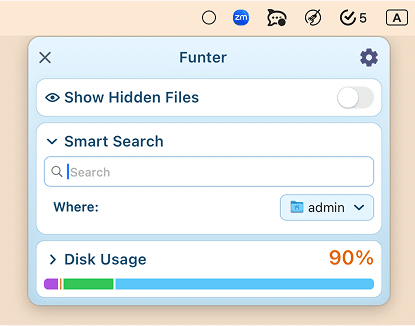
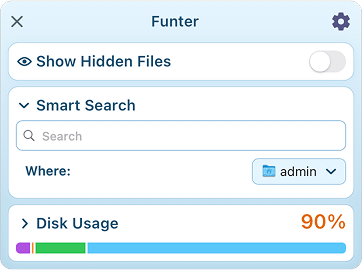
- Click Funter’s icon in the menu bar.
- Switch on the toggle button. Done!
- Open Finder. There you will see your hidden items.

How to view hidden files on Mac using a shortcut
You can use a special keyboard shortcut to see all invisible items on your Mac.
Here is how to view them:
- Activate the Finder application.
- Open a folder that may contain such files.
- Press the Command + Shift + Period (CMD+Shift+.)shortcut.
- Preview all the files you have in the active folder.
- Repeat the steps given above if you want to hide the files again.
Please note, that even if you see all kinds of files with this method, it`s not possible to find them using Spotlight search.
If you need to find hidden files by their names we recommend using Funter.
Funter can find any hidden folder or file on Mac just by entering their names and pressing Enter to find them.
Viewing hidden files with Mac Terminal
Terminal is a command-line application that allows you to manage your Mac using low-level commands. To operate the app correctly, you will need to be familiar with the Terminal app commands.
To show latent files on a Mac using the command line, follow these steps:
- Open Terminal from Launchpad.
- Copy and paste the following command into the Mac Terminal window:
defaults write com.apple.finder AppleShowAllFiles -bool trueCopy
- Press Return.
- Enter the next command to relaunch the Finder application.
killall FinderCopy
- Press again Return to finish.

This command will restart the Finder and then you will see hidden files and folders on your Mac.
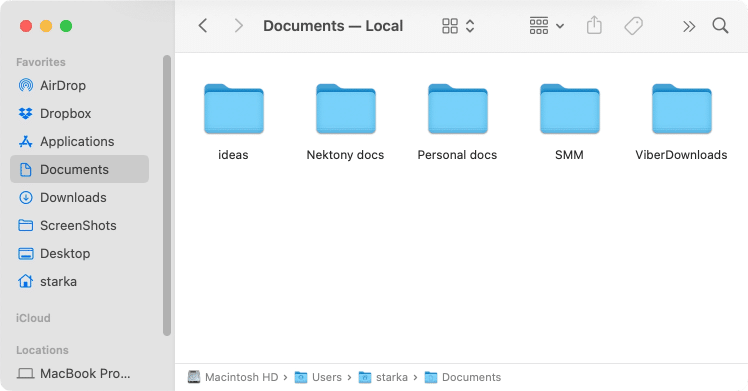
If you want to hide the files again, you simply repeat the operation but change the last word in the first command to “false”. So, you should perform these two commands to make the files invisible again:
defaults write com.apple.finder AppleShowAllFiles -bool falseCopy
killall FinderCopy

How to show hidden folders and files using AppleScript
AppleScript is a language developed to help you automate repetitive or time-consuming Mac actions.
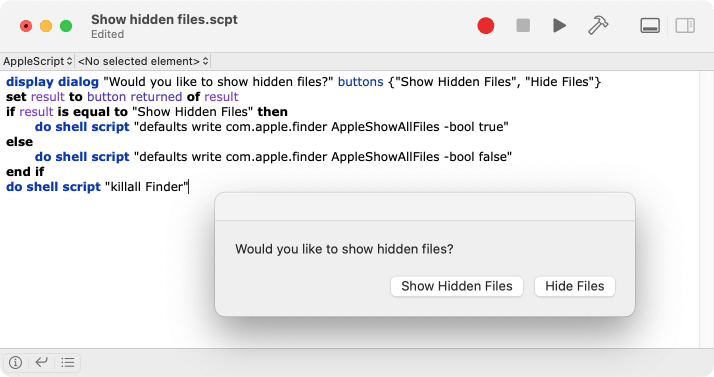
You can also make files visible using AppleScript. Generally, AppleScripts are created within the Script Editor tool.
Follow these steps to show hidden data with AppleScript command:
- Open the Script Editor application from Launchpad.
- Copy and paste the following code into the editor’s window:
display dialog "Would you like to show hidden files?" buttons {"Show Hidden Files", "Hide Files"}
set result to button returned of result
if result is equal to "Show Hidden Files" then
    do shell script "defaults write com.apple.finder AppleShowAllFiles -bool true"
else
    do shell script "defaults write com.apple.finder AppleShowAllFiles -bool false"
end if
do shell script "killall Finder"
Copy
- Click the button.
- Save this file to use it later.
Each time you need to hide or show latent files and folders, just open this script file and click the button.
Viewing hidden files on a Mac external hard drive
The Funter application, which we mentioned above, supports any disk volume. So with Funter, you can find and display hidden files on external storage. Here is how:
- Launch Funter.
- Turn on showing hidden files.
Generally, you can use two ways to make Apple hidden files visible.
Use the Quick Access Window
Use the Finder Toolbar
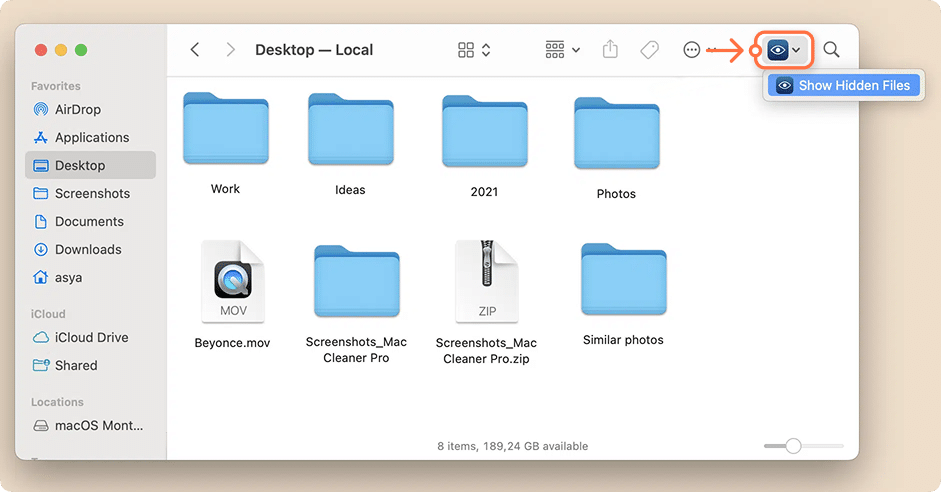
As soon as you turn on showing hidden data, Finder will be relaunched, and you will see all the hidden files stored on your drive.
Funter is a great tool for finding invisible files and folders. If you need to find a specific file on your disk, follow the steps below:
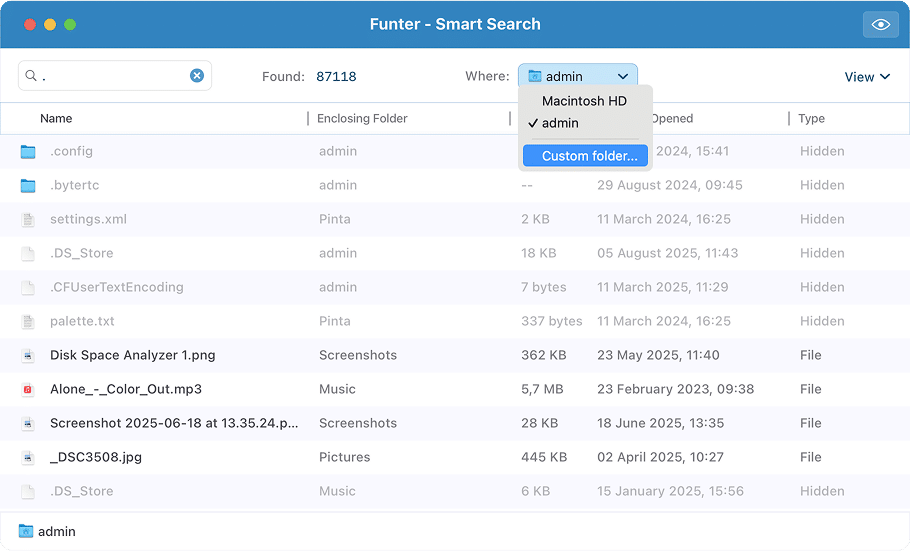
- In the Funter window, type the file’s name and press Return on your keyboard. In our case, we used just a dot, since all hidden files’ names begin with a dot.
- Funter will display the search results.
- In the results window, you can change the location where Funter searches for files.
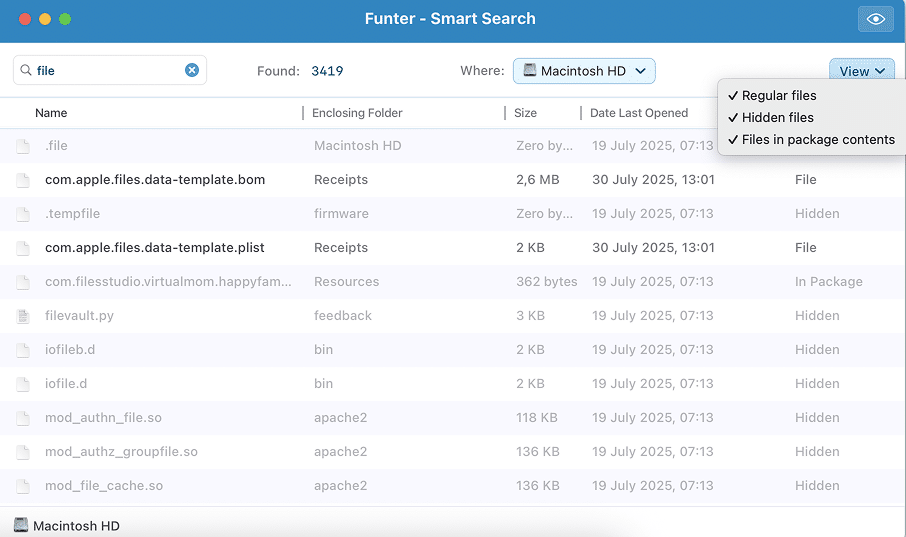
- Click View to choose which types of files to display.
Additionally, you can find any hidden file by its name. Use the search panel to reveal files that Spotlight cannot detect.
So, what is the easiest way to show hidden files on a Mac?
You can display them on your Mac computer using the Funter app, an AppleScript, a Terminal command, or a keyboard shortcut.
If you are looking for the easiest solution to manage your hidden folders and files, you may want to use the free Funter tool. Funter will give you access to all invisible data, but also will help you to search for files by name. More importantly, it can make essential data invisible to prevent its accidental removal.
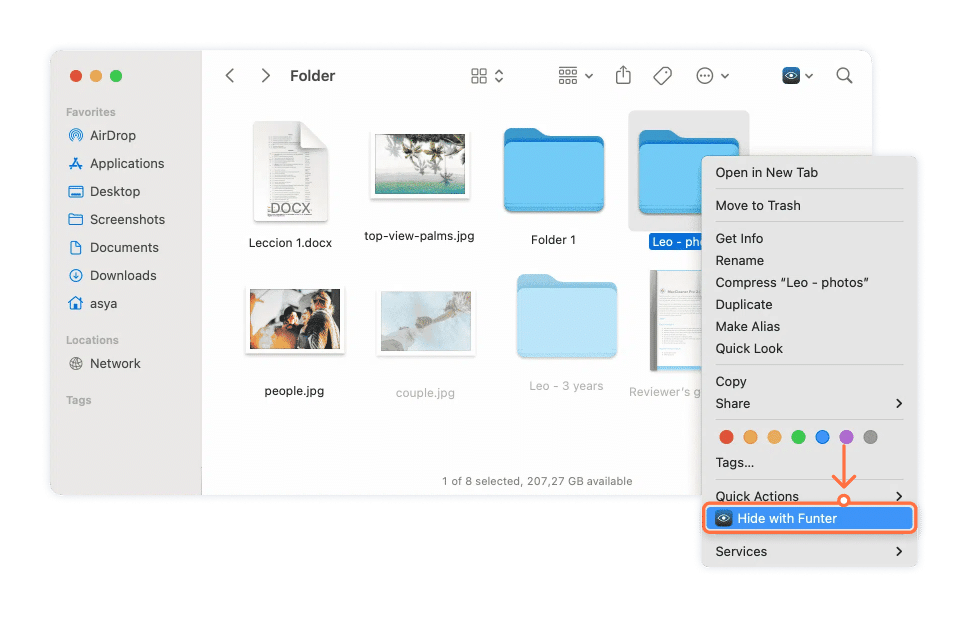
As Funter integrates with Finder, you can change the visibility file right in a Finder window using a special icon menu.
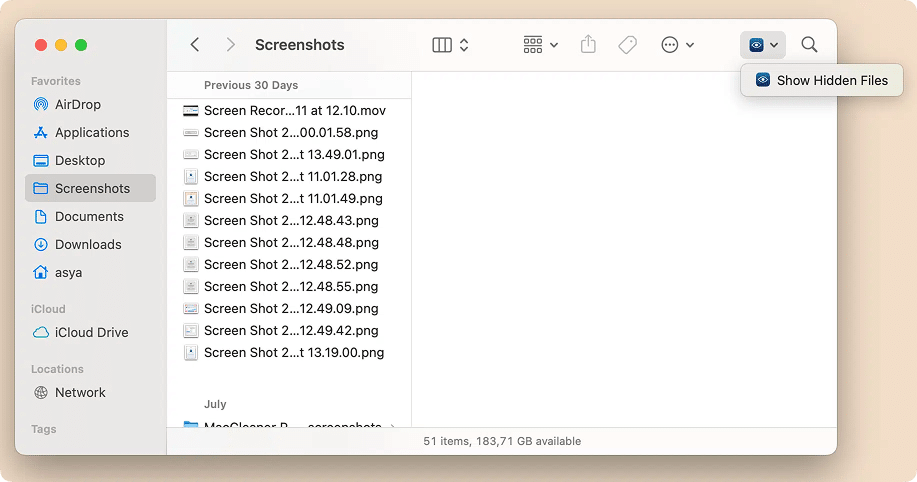
Also, you can hide and unhide files with Funter in Finder using the context menu.
The best thing about Funter is that the application is absolutely free.


Excellent read, I just passed this onto a friend who was doing a little research on that. And he just bought me lunch since I found it for him smile Therefore let me rephrase that: Thanks for lunch!