


February 13, 2026
How to compare folders on Mac
Share

I’ve been using a Mac since back when “loading” was a legitimate coffee-break excuse. Over the years, I’ve refined my workflow to a science – backups are automated, the cloud handles my syncs, and everything has its place. Yet, even with all that optimization, I still find myself staring at two folders named “Tax Docs 2024” and “Key Tax Docs” wondering which one actually has the tax declaration I last edited.
Comparing folders manually is a task that eats up time you’ll never get back. Because the most straightforward way (clicking back and forth until your eyes cross) is so cumbersome, I decided to dive deep into the best ways to tackle this task.
This Article Contains
Before we start
Folder comparison: method overview
Which method of the described below should you choose?
- Use Finder if you just need to compare two folders with several dozens of files at most.
- Use Duplicate File Finder if you want to find unique files, remove duplicates, and even merge two messy folders into one clean one without breaking a sweat.
- Use Terminal if you need a quick text-based report of every single discrepancy.
- Use FileMerge if you already have Xcode installed and need a side-by-side visual tree of what changed.
Here is a quick look at how these methods stack up:
| Method | Best For… | Easiness |
|---|---|---|
| Finder (Manual) | Comparing a few files or very small folders. | ★★☆ |
| Duplicate File Finder | Comparing large folders and merging them. | ★★★ |
| Terminal diff | Developers or users comfortable with code-like output. | ★★☆ |
| Terminal (Hashes/rsync) | Verifying data integrity after a big move or backup. | ★☆☆ |
| Xcode FileMerge | Comparing code projects or text-heavy folder structures. | ★☆☆ |
Once you decide, feel free to scroll to the section describing it in this article.
Compare folders via Finder (manually)
If you have two similar folders, your best bet is to line them up side-by-side and let your eyes do the scanning.
Steps to compare folders in Finder:
- Open two Finder windows: Open the first folder, then press Command+N to open a second window and navigate to the other folder.
- Use List View or Column View: Press Command+2 for List View or Command+3 for Column View. List view is generally better for comparison, as it shows file sizes and dates clearly.
- Sort by Name: Click the Name column header in both windows to ensure the files are in the same alphabetical order.
- Check the Status Bar: Go to View → Show Status Bar. This will show you exactly how many items are in each folder at the bottom of the window. If one says “42 items” and the other says “41,” you already know something is missing.
- Use “Get Info”: Select both folders in Finder, right-click, and choose Get Info (or press Command+I, as per Mac user guide). Compare the total size in bytes. If they aren’t identical to the last digit, the contents are different.


Note:
Finder doesn’t show hidden files (like .DS_Store) by default. This is why two folders might show different sizes even if they look identical to you. To see these hidden files, press Command + Shift + Dot (.).
Comparing folders in the Finder is the “quick and dirty” way. It’s perfect when you’re dealing with a dozen files or just trying to see if a backup folder roughly matches the original. However, notice that it’s entirely manual.
Compare and merge folders with Duplicate File Finder
If you’re like me, you don’t want to spend your Saturday afternoon squinting at two different Finder windows trying to spot a missing .jpg. On numerous occasions and sites like Reddit people expect there should be an app that will do all the job for them.
This is where Duplicate File Finder becomes your best friend. Instead of just showing you a list of files, it actually analyzes the content and helps you merge the folders into one perfect version.
How to compare folders with Duplicate File Finder:
- Download and launch Duplicate File Finder.
- Go to the Compare Folders tab: Look for the Compare Folders option in the sidebar or main screen.
- Choose your folders: Drag and drop the two folders you want to compare into the app.
- Click Compare Folders: The app will scan both locations, even if they have thousands of files, in just a few seconds.
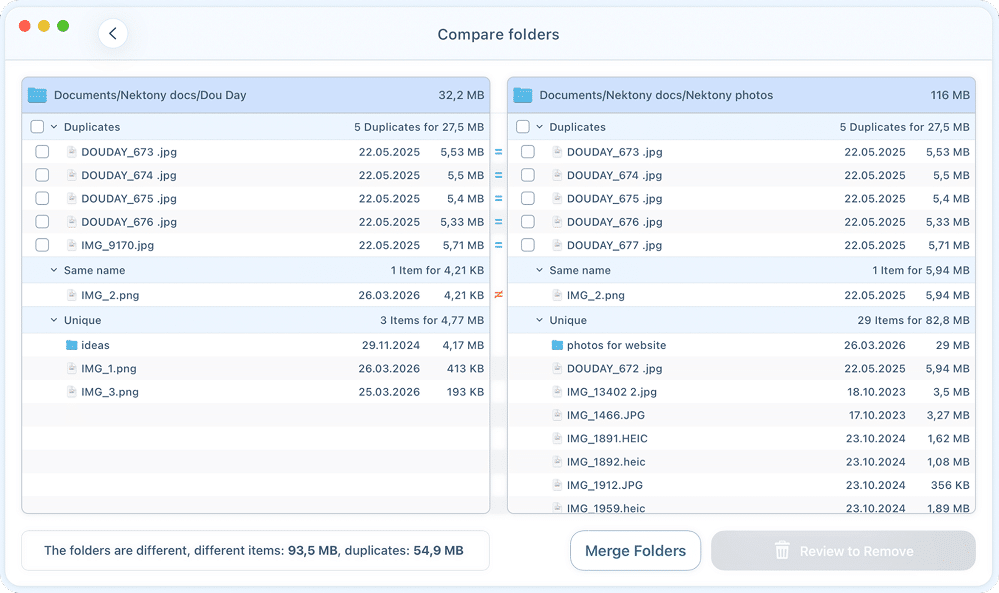
- Review the results: You’ll see a side-by-side view showing:
- Duplicate files: Files that are exactly the same in both folders.
- Unique files: Files that exist in one folder but not the other.
- Same name: Files with the same name but different content or dates.
- Merge (Optional): If you want to combine them, click Merge Folders to create a single, up-to-date folder without any duplicates.

Why this is my favorite method:
- It’s visual: You don’t need to understand code or Terminal outputs.
- It handles “Similars”: It can spot files that are almost the same but might have a different filename.
- Merging is safe: You won’t accidentally overwrite a newer file with an older one because the app flags the differences for you.
Use the Terminal diff command
Now we’re moving into the territory of the enthusiasts who are not afraid to get their hands a little dirty with the command line. If you want a quick, text-based report without installing extra software, the diff command is most often recommended on Macmost and other similar websites.
The diff command is a classic Unix utility that’s been around since the dawn of computing. It’s perfect when you need a fast, “no-frills” report on what exactly is different between two directories.
How to use diff for folder comparison:
- Open Terminal (found in Applications → Utilities).
- Type the following command, but don’t press Enter yet:
diff -qrCopy
- Now drag your first folder into the Terminal window, then drag the second folder right after it.
- Your final command should look something like this:
diff -qr /path/to/FolderA /path/to/FolderBCopy
- Press Enter.

What the -qr flags mean:
- (brief): Tells Terminal to only report if files differ, rather than showing you every single line of changed text inside the files.
-qCopy
- (recursive): Tells Terminal to look inside all subfolders as well, not just the top level.
-rCopy
Understanding the results:
- “Only in”: This file exists in the specified folder but is missing from the other one.
- “Files FolderA/doc.txt and FolderB/doc.txt differ”: Both folders have a file with this name, but the content inside them is different.
Advanced Terminal comparison (Hashes and rsync)
Sometimes, just knowing a file is “different” isn’t enough. If you’ve just copied a massive photo library to an external drive, you want to know if every single byte made it over safely.
Checksum comparison (the “digital fingerprint”)
Every file has a unique hash (like a fingerprint). If the content changes even slightly, the hash changes. To compare all files in two folders by their hash, you can run this:
find /path/to/folder -type f -exec shasum -a 256 {} \; > folder_hashes.txtCopy
By doing this for both folders and comparing the resulting text files (you can use
diff
Copy

However, to tell you the truth, comparing hashes is even more cumbersome than comparing files in Finder.
Using rsync for a “Dry Run”
The rsync command is usually for syncing, but its “dry run” mode is a fantastic comparison tool.
Command:
rsync -ani /path/to/FolderA/ /path/to/FolderB/Copy
- : Enables recursive mode, processing files within archives and folders.
-aCopy
- : This is the “dry run” flag. it tells rsync to show you what it would do to sync both folders without actually moving or deleting anything.
-nCopy
- : This summarizes the differences (e.g., if a file is newer, larger, or missing).
-iCopy
Note:
When dragging folders to Terminal to enter their paths, don’t forget to add the trailing slash.

Now, to properly read the output of this command, you’ll need to read the manual for rsync. But here’s a quick crib:
| Position | Character | Meaning |
|---|---|---|
| 1 | > or < or . | Direction of transfer (< = to destination, . = no transfer) |
| 2 | f or d | File or Directory |
| 3 | s | Size differs |
| 4 | t | Timestamp (time) differs |
| 5 | p | Permissions differ |
| 6 | o | Owner differs |
| 7 | g | Group differs |
| 8 | u | Reserved for future use |
| 9 | a | ACL (Access Control List) differs |
| 10 | x | Extended attributes differ |
On the screenshot above, for instance, I see the following information:
- : The directory (d) exists in both places, but the timestamp (t) doesn’t match
.d..t…….Copy
- : The file (f) exists in both places, but the timestamp doesn’t match
>f..t…….Copy
- : The file exists in both places, but the size (s) and timestamp are different
>f.st…….Copy
- : The directory was created (c) in the source folder (the first one in the command) but is missing from the destination folder (the second folder specified in the command). Since there’s only one instance of it, there are no attributes to compare, and instead of letters and dots, we see ++++++++++.
cd++++++++++Copy
- : The file is present in the source folder but missing from the destination folder.
>f++++++++++Copy
Xcode FileMerge – The developer’s visual choice
We’re now moving into the tools used by power users and developers. If you have Xcode installed (the massive suite of tools for building Mac apps), you actually already have a professional-grade folder comparison tool hidden in your system.
FileMerge is a part of the Xcode developer tools. It provides a side-by-side visual “tree” comparison that makes it incredibly easy to see exactly which files have been added, removed, or changed.
How to use FileMerge:
- Open FileMerge: You can find it by opening Finder → Applications → Xcode (right-click and select Show Package Contents) → Contents → Applications → FileMerge.
- Select your folders: In the pop-up window, choose your “Left” and “Right” folders.
- Click Compare: The app will generate a list showing every difference.
- Review the differences:
- If you see “status: binary files”, it means the file exists in both locations, but its content is different
- “status: added to right” means the file exists in the right folder (that is the second one). The situation is vice versa for “status: added to left”.
- Merge changes: You can click through each difference and choose to keep the version from the left folder, the right folder, or both.


Note:
You can also type opendiff followed by your two folder paths in the Terminal to open FileMerge.

Note:
You can also click the file in the list to see its differences in two instances (but as long as it has text content).

When to use this method:
- If you are a designer or developer comparing two versions of a project.
- If you need to see exactly which lines of text changed inside a file.
- If you prefer a visual interface but want more detail than the standard Finder view.
The bottom line
I’ll be the first to admit: this article might feel like a bit of an overkill if you’re just trying to figure out if your “Vacation 2023” folder is the same as your backup. But in my experience, knowing these different “levels” of comparison saves a massive amount of stress later on.
Next time you’re facing a mountain of data, you won’t have to guess. You’ll know that for a quick check, Finder is there; for a deep data audit, the Terminal is your best bet; and for the fastest, “get it done now” merge, Duplicate File Finder is the smart choice. My goal is always to help you spend less time doing digital chores and more time actually using your Mac.