November 21, 2025
How to uninstall IntelliJ from Mac
IntelliJ IDEA has long been a popular IDE for Java, Kotlin, and other platforms. It deserved its 4.5-star rating by Gartner among developers. It’s sleek and feature-packed, but not light. And still, not every Mac user stays hooked.
Whether you’ve switched to something simpler like VS Code or just want to free up space after a big project, it makes sense to remove IntelliJ completely. No matter what brought you here, removing apps like IntelliJ correctly matters since it leaves plenty of config files behind if not deleted properly.
This guide is exactly about that: uninstalling IntelliJ permanently in four different ways, resetting it if you want a quick fix, and more.
4 options to uninstall IntelliJ IDEA from Mac
I’ll pitch you my test with uninstalling IntelliJ IDEA v2025.2.3 on my MacBook Pro M3 with macOS Tahoe 26.0 in four ways:
- Using JetBrains Toolbox and removing leftovers.
- Digging through the Library manually in Finder.
- Executing commands in the Terminal.
- Making four clicks in an automated uninstaller tool.
All the options I tried work; the right one depends on your comfort level.
Uninstall IntelliJ with JetBrains Toolbox
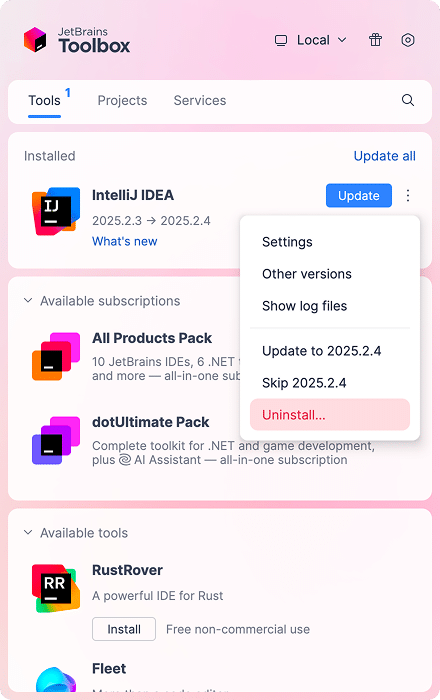
If you’ve installed IntelliJ with the Toolbox App by JetBrains, you can uninstall it there.
- Open the ToolBox.
- In the Installed section, locate IntelliJ IDEA.
- Click the dropdown (⋮) icon next to the IntelliJ IDEA.
- Select Uninstall → confirm.
After I deleted IntelliJ IDEA this way, I had a few files left, which I had to delete manually.
~/Library/Preferences/com.jetbrains.intellij.plistCopy
For this directory, you can paste it into the Go to Folder window (Cmd + Shift + G), hit Return, and delete it from there.
/private/var/folders/***/***/***/com.jetbrains.intellijCopy
How to use path
- Enter /private/var/folders/ in the Go to Folder box in Finder.
- In the search box in the top-right corner, type com.jetbrains.intellij.
- Make sure you search it in /private/var/folders/, not in this Mac.
- Delete the Intellij leftover.
Manually delete IntelliJ
In case the Toolbox crashes or is not your install method, you can delete IntelliJ manually, but make sure you follow all the steps. Otherwise, leftovers will stay buried in the system.
Step 1. Quit IntelliJ and stop background processes
- Open Activity Monitor.
- Type IntelliJ in the search bar.
- Stop all related processes (click the ✕ icon → Stop).
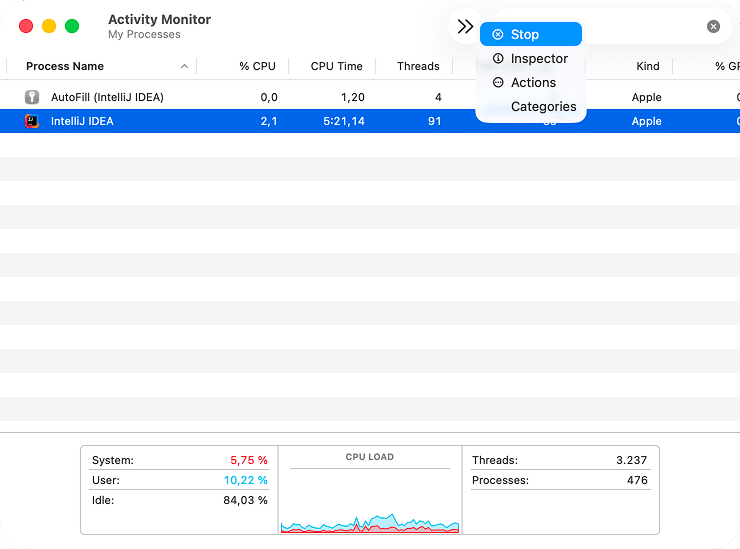
This step is essential as it ensures no app components are running during deletion.
Step 2. Delete the IntelliJ main app
- Open Finder → go to the Applications folder.
- Find IntelliJ IDEA.app → right-click → choose Move to Trash.
If prompted, enter your admin password to confirm.

This step is essential as it ensures no app components are running during deletion.
Step 3. Remove IntelliJ leftovers from Library
Like most JetBrains tools, IntelliJ keeps gigabytes of configuration data, logs, and caches in hidden Library folders. To remove them:
- In Finder’s menu, click Go → Go to Folder.
- Type and press Return.
~/Library/Copy
- Search for and
IntelliJCopy
JetBrains.Be careful with JetBrains in case you use their another product.
- For better results, select Name Contains when typing in the search box.
IntelliJCopy
- Double check you search in the Library, not in this Mac.
- Select any files/folders related to IntelliJ → right-click → choose Move to Trash.

Note:
For your reference, I attach my directories I found containing IntelliJ components (folder names may differ by version).
~/Library/Application Support/JetBrainsCopy
~/Library/Saved Application State/com.jetbrains.intellij.savedStateCopy
~/Library/Logs/JetBrainsCopy
~/Library/Preferences/JetBrainsCopy
~/Library/Preferences/jetbrains.idea.d7ab3053Copy
~/Library/Preferences/com.jetbrains.intellijCopy
~/Library/Preferences/com.jetbrains.intellij.plistCopy
~/Library/Preferences/jetbrains.iu.252.plistCopy
~/Library/Preferences/jetbrains.iu.csat.plistCopy
~/Library/Preferences/llm.ai.assistant.plistCopy
~/Library/Caches/JetBrainsCopy
/private/var/folders/***/***/***/com.jetbrains.intellijCopy
* stands for temporary folders, which are unique on each Mac.
Step 4. Empty the Trash and restart
Once done, empty the Trash and restart your Mac to finalize the cleanup.
Tip:
If you’ve deleted every IntelliJ support file, the app is completely gone from your Mac. Not entirely sure you got them all? Run App Cleaner & Uninstaller, it automatically detects and removes any leftover files for a full, clean uninstall.
Delete IntelliJ with Terminal
If you’re okay typing commands, Terminal gives you results. It takes just a few lines – no need to dig through folders manually. Still, use it carefully: one misplaced character can remove the wrong files.
Note:
Terminal uninstalls are quick but not forgiving. If you prefer a safer route, App Cleaner & Uninstaller does the same deep cleanup automatically – no code, no risk, no leftovers.
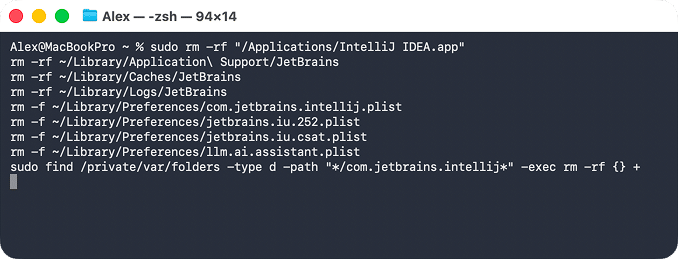
- Open Terminal.
- Quit all IntelliJ processes by executing this command: pkill -f IntelliJ IDEA
Then, you can delete all IntelliJ files at once. Copy and paste the following lines one at a time, pressing Enter after each.
sudo rm -rf “/Applications/IntelliJ IDEA.app”Copy
rm -rf ~/Library/Application\ Support/JetBrainsCopy
rm -rf ~/Library/Caches/JetBrainsCopy
rm -rf ~/Library/Logs/JetBrainsCopy
rm -f ~/Library/Preferences/com.jetbrains.intellij.plistCopy
rm -f ~/Library/Preferences/jetbrains.iu.252.plistCopy
rm -f ~/Library/Preferences/jetbrains.iu.csat.plistCopy
rm -f ~/Library/Preferences/llm.ai.assistant.plistCopy
rm -f ~/Library/Preferences/jetbrains.jetprofile.asset.plistCopy
sudo find /private/var/folders -type d -path “*/com.jetbrains.intellij*” -exec rm -rf {} +Copy
- Enter your admin password if required.
- Restart your Mac.
Automatically uninstall with App Cleaner & Uninstaller
If manual and Terminal steps feel tedious or you want to make sure nothing’s left behind, use App Cleaner & Uninstaller, a tool designed to remove apps on Mac with all hidden components, delete the remaining files if you dragged something to Trash, clean caches, and otherwise manage apps. Here is how it works:
- Download and open App Cleaner & Uninstaller.
- Select IntelliJ IDEA in the Applications list → click Uninstall.
- Review the IntelliJ files marked for deletion and confirm.
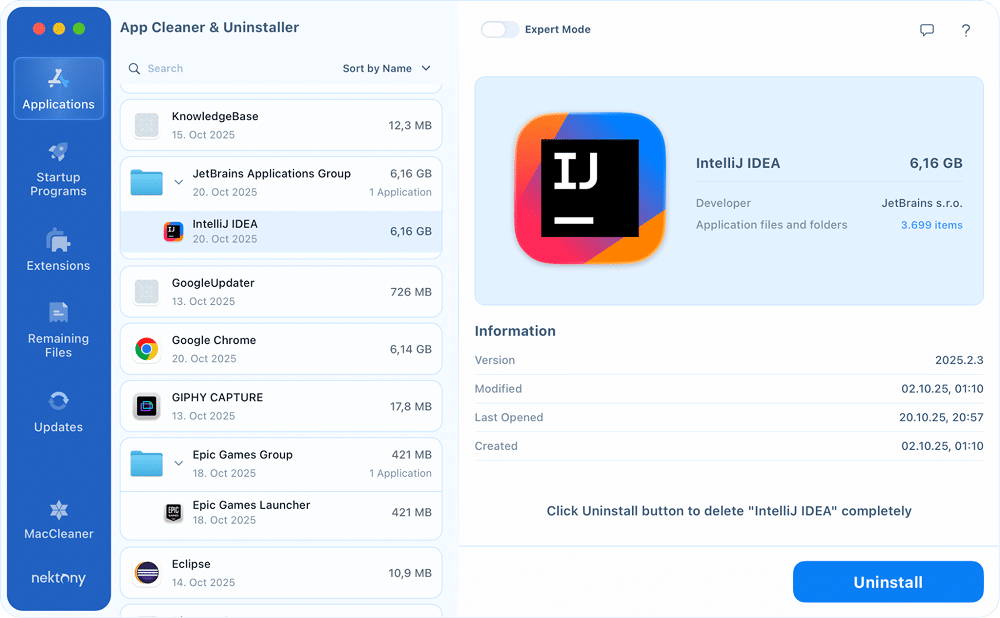
That’s it. It took me less than half a minute. This method is faster and safer than manual deletion. The app ensures a full cleanup without affecting your other JetBrains tools. And suppose you have already deleted IntelliJ manually, so go to the Remaining Files tab in App Cleaner & Uninstaller. In that case, it will show you leftover files you can safely remove.
How to completely reset IntelliJ
If IntelliJ starts crashing or behaving oddly, you can reset it to default settings without uninstalling. Before you proceed with resetting it, make a backup, just in case.
You can reset IntelliJ in a few clicks with App Cleaner & Uninstaller:
- Open the tool → locate IntelliJ among the apps.
- Right-click it → select Reset Application.
- Confirm a total reset of IntelliJ.
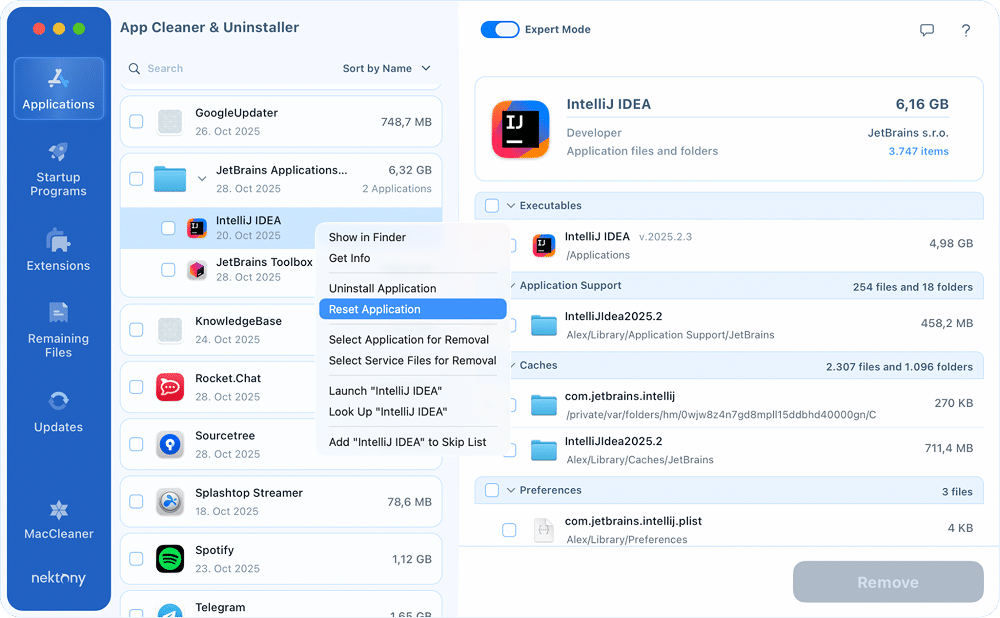
Or you can refresh folders where the app keeps its logs, settings, plugins, and caches. The location of these folders may vary depending on your operating system and app version. So, open Finder and check the following folders:
Settings:
~/Library/Application Support/JetBrains/IntelliJIdea*your version*Copy
Logs:
~/Library/Logs/JetBrains/IntelliJIdea*your version*Copy
Plugins:
~/Library/Application Support/JetBrains/IntelliJIdea*your version*/pluginsCopy
Caches:
~/Library/Caches/JetBrains/IntelliJIdea*your version*Copy
/private/var/folders/***/***/***/com.jetbrains.intellijCopy
Final reminder
You’ve got options for uninstalling IntelliJ, but only one gets it right the first time.
App Cleaner & Uninstaller does the deep cleanup automatically, so you don’t have to chase the app files through the Library, guess what to delete, or be afraid of making a typo in the Terminal. Safe, thorough, and fast – that’s how app removal should feel.
