May 28, 2025
How to uninstall OneDrive on Mac
For years, I used Microsoft OneDrive as my go-to cloud storage app. Seamlessly integrated into Finder, it felt like part of Mac itself. But eventually, I gave in to the gentle persuasion of my loved ones and switched to a different provider with a more appealing family plan.
That’s when I discovered: removing OneDrive on macOS Sequoia 15.4 isn’t as simple as dragging it to the Trash.
Read this step-by-step guide to learn two correct ways to uninstall OneDrive from your Mac.
Why not just trash OneDrive?
At first, I did what most people do. I dragged the OneDrive app to the Trash. But the OneDrive folder was still sitting in my Finder’s sidebar! I realized I need to take a different approach.
I also wanted to make sure there were no leftover background processes eating up RAM, or caches taking up disc space (my Mac’s storage is always tight). So I did some digging.
Turns out, there a few hundred extra files OneDrive leaves behind. I found them, removed them, and had no issues afterward.
From browsing forums, I also noticed that this more thorough removal approach helped others fix issues like trouble saving Office files or problems with file syncing.
The funny thing was, even after I thought I’d uninstalled everything, the OneDrive folder was still in the Finder sidebar! The fix was to reboot my Mac. Classic Microsoft: When in doubt, try turning it off and on again 😂.
The Seven-Step OneDrive uninstallation guide
To fully remove OneDrive from your Mac, you’ll need to visit five folders via Finder and delete a few files and folders from them.
These instructions apply to OneDrive version 25 and up!
To check your version, click the OneDrive icon in your menu bar. If you haven’t updated the app in a while, it might be a good idea to do that first so this guide matches your setup.
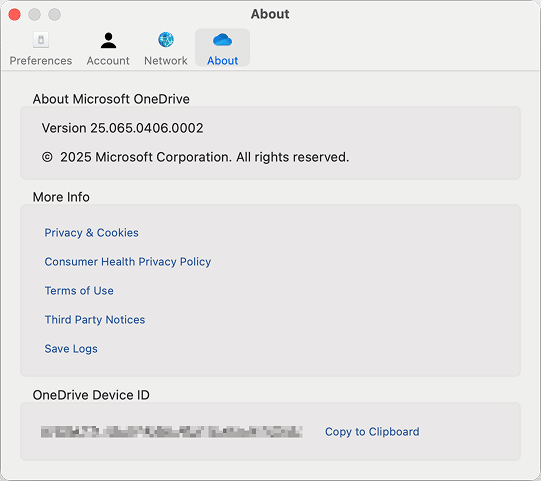
Step 1. Close OneDrive from the Menu bar
Click the OneDrive icon in your menu bar, open Preferences, and choose “Quit OneDrive.”
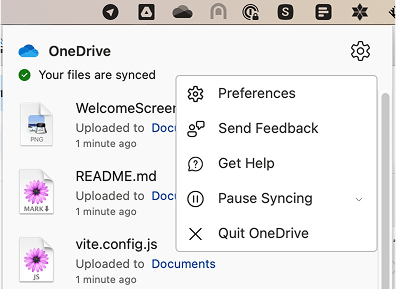
You won’t be able to uninstall the app while it’s running.
Step 2. Drag OneDrive to Trash
Go to your Applications folder and drag the OneDrive app to the Trash. Since it’s usually installed system-wide (meaning for all users), macOS will ask for your password.
That’s normal – just enter your password to proceed.
Step 3. Remove OneDrive containers
Now, we’ll remove OneDrive’s container files.
~/Library/Containers/
Copy
If you don’t see this folder right away, follow these steps:
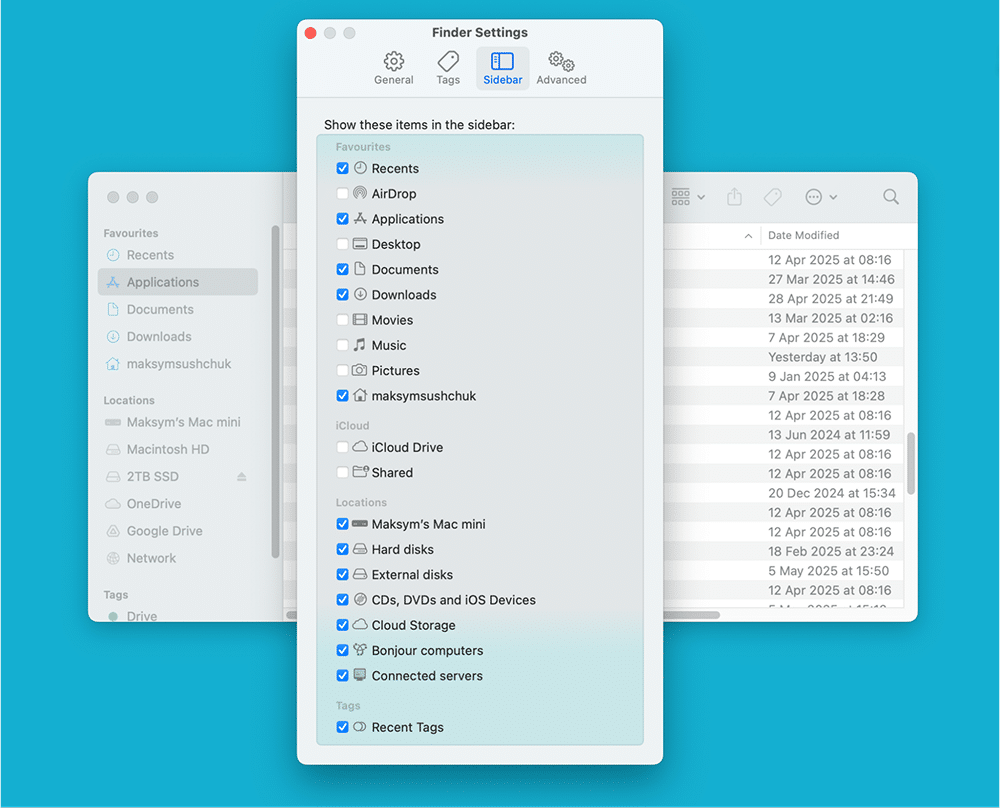
- Open Finder, go to Settings, click the Sidebar tab, and make sure your username is ticked in the Favorites section. That’ll give you quick access to your Home folder (~).
- Back in Finder, click your username in the sidebar. Look for the Library folder in it. It’s hidden by default, so if you don’t see it, press Command + Shift + . (Dot). It should pop right up.
- From Library, navigate to the Containers folder.
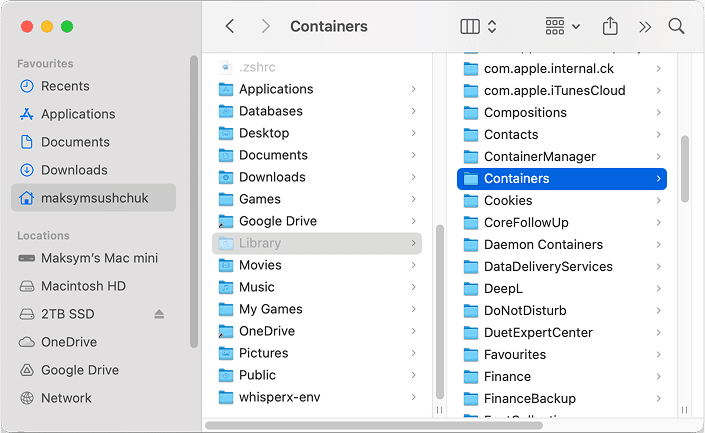
Once you’re in the Containers folder, delete these three folders:
- OneDrive – This one holds logs, config files, and other app-specific data.
- OneDrive File Provider – Contains the files needed to manage synchronization.
- OneDrive Finder Integration – Responsible for the little sync status icons in Finder.
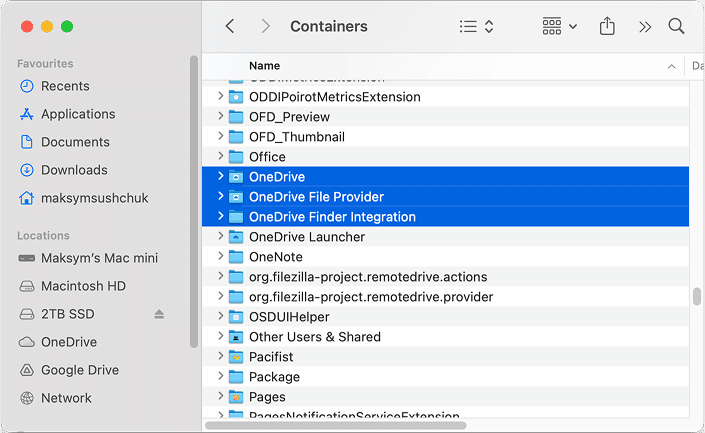
Step 4. Clear out Application Scripts
~/Library/Application Scripts
Copy
This folder contains small helper scripts that expand app behavior. Remove these folders:
- com.microsoft.OneDrive-mac
- com.microsoft.OneDrive-mac.FileProvider
- com.microsoft.OneDrive-mac.FinderSync
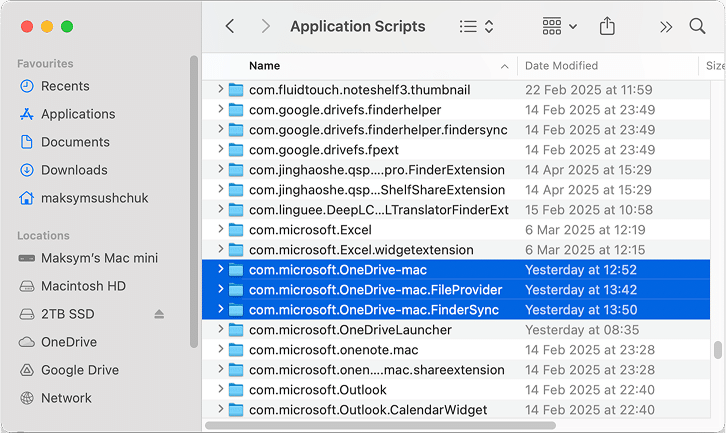
Step 5. Search for OneDrive in Application Support
Hey, we’re halfway there!
~/Library/Application Support/FileProvider
Copy
Here, delete the folder: com.microsoft.OneDrive-mac.FileProvider
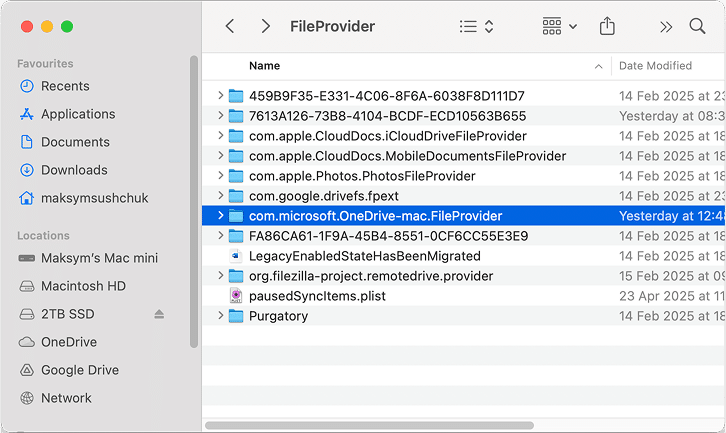
This folder usually stores persistent data related to how file-based apps operate.
Step 6. Remove installation scripts
/private/var/db/receipts/
Copy
To get there:
- In Finder, click your internal drive (usually named Machintosh HD) from the sidebar.
Note:
If you can’t see Macintosh HD in your sidebar, go to Finder Settings → the Sidebar tab → and tick Hard disks in the Locations list.
- Once inside your drive, navigate to private → var → db → receipts
Then delete these two files:
- com.microsoft.OneDrive-mac.bom – This tracks what files the OneDrive installer added.
- com.microsoft.OneDrive-mac.plist – A receipt that tells macOS OneDrive was installed.
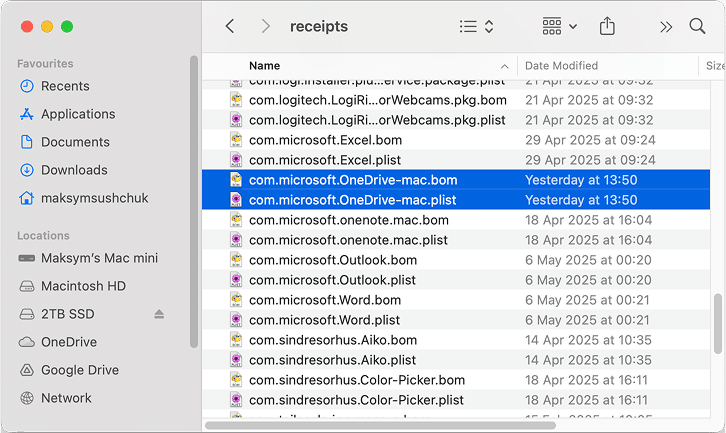
Step 7. Clear leftover temporary data
/private/var/folders
Copy
This is where macOS stores temporary files, often with cryptic folder names. The easiest way to find OneDrive leftovers is to use Finder’s search bar and type OneDrive.
Look for these two folders:
- com.microsoft.OneDrive-mac.FileProvider
-
com.microsoft.OneDrive-mac
(If you see two instances, it’s OK – one might be nested inside the other.)
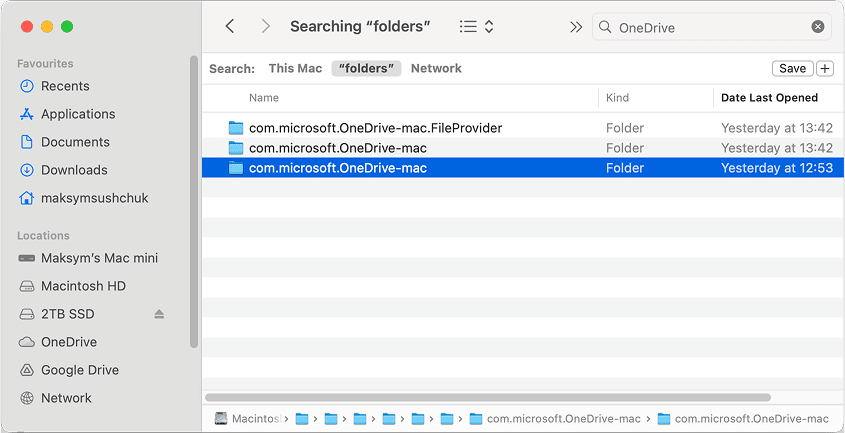
Delete both.
That’s a wrap!
At this point, Microsoft OneDrive is completely removed from your Mac.
However, as a final touch, you might want to:
- press Command + Shift + . again in Finder to make hidden files invisible
- Clean up your Finder’s sidebar if you temporarily showed shortcuts to drives and folders you don’t use (like Hard drives and your Home folder).
The faster, two-step way
Let’s be honest – this manual OneDrive uninstallation method requires knowing quite a few tricks.
If you’d rather go the shorter way, there’s also an app called App Cleaner & Uninstaller.
To remove OneDrive with this app:
- Open the app.
- Find OneDrive in the Applications list.
- Hit Uninstall.
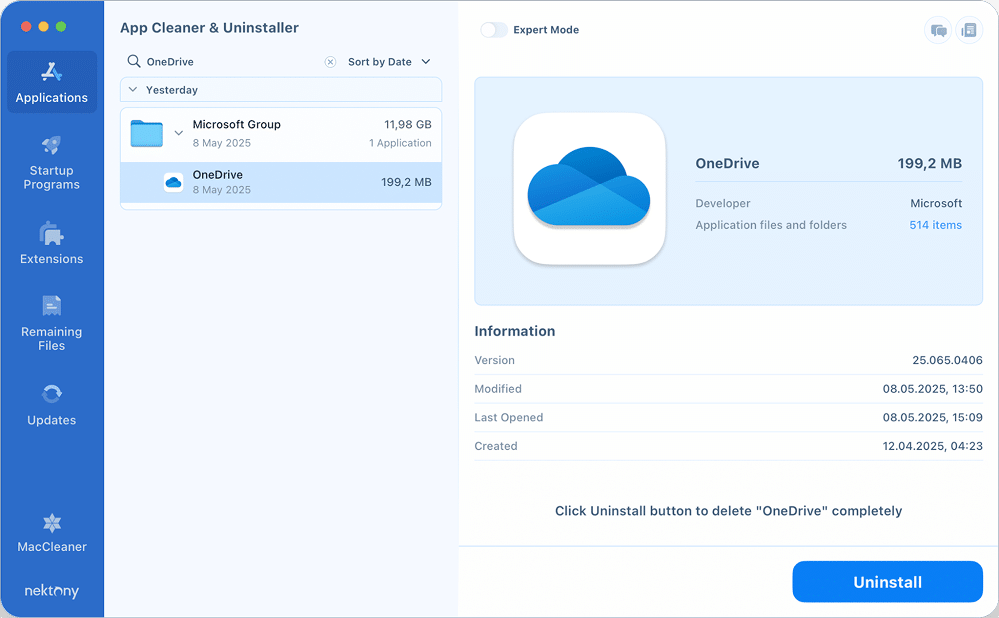
Confirm your intention, and it’s done.
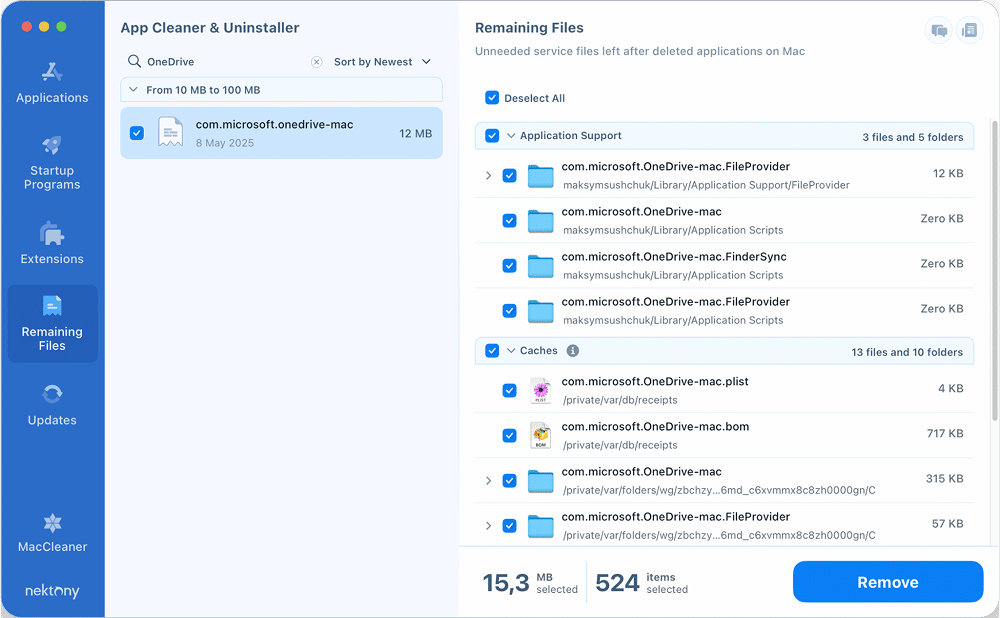
I personally used it to double-check my manual setup. When I first dragged OneDrive to the Trash and noticed it was still lingering, I opened the app, went to the Remaining Files tab – and there they were.
How to remove your OneDrive files
So, you’ve uninstalled OneDrive. Congrats!
But if your goal was to remove both the app and all the files it synced, there’s one more step.
~/Library/CloudStorage/OneDrive-Personal
Copy
Since OneDrive is no longer installed and sync is turned off, it’s safe to delete this folder if you no longer need the files.
Important:
Removing this folder won’t affect anything stored in the cloud. Your OneDrive account and cloud files stay exactly as they are.
Bottom line
If you just toss the OneDrive app in the Trash, you’re leaving behind over 500 related files.
Sure, they sometimes take up only a dozen megabytes, but they can cause all sorts of weird issues with other Microsoft apps. They also clutter up Spotlight search results and can slow down indexation over time, especially if your system is already handling a lot of files.
So why let them hang around?
Whether you go manual or automated, giving OneDrive a proper goodbye keeps your Mac clean – and your future self grateful.
