October 17, 2025
Mac Firewall settings: How to enable, disable, and customize them
In our brutal reality, where 600 million cyberattacks strike every day, nearly 54 people fall victim every second, digital security can’t be an afterthought. And your Mac isn’t immune to these threats. Even Macs need active protection to stay secure. And a basic security tool here is a firewall controlling which apps and connections can interact with your Mac.
In this post, I’ll make it clear what the Mac firewall actually does, why it matters, how to enable, disable it, and how to fine-tune the settings so your Mac isn’t just running, but running safe. I’ll also touch on a third-party firewall if you need extra protection beyond what macOS provides.
What is the Mac Firewall, and how does it work?
The Mac firewall is a built-in network security feature that inspects incoming connections and controls which apps or services can communicate with your Mac. Unlike antivirus software that scans files for malware, the firewall acts as an inspector for your network. It blocks unwanted traffic and allows legitimate apps to function normally.
Here is an illustrative view of how crucial the firewall is to maintain Mac’s security baseline.
| Feature | With Firewall | Without Firewall |
|---|---|---|
| Inbound traffic control | ✅ Blocks unauthorized incoming connections | ❌ All inbound connections allowed, including potentially malicious ones |
| Protection from hackers | ✅ Reduces risk of remote attacks and intrusion | ❌ High risk; hackers can exploit open ports or unprotected services |
| Stealth mode | ✅ Mac can be invisible to network scans | ❌ Mac responds to network probes, making it discoverable |
| App network access | ✅ You can allow or deny specific apps | ❌ Apps can freely communicate with the internet without restrictions |
| Public Wi-Fi safety | ✅ Extra layer of protection on open networks | ❌ Vulnerable to man-in-the-middle attacks, snooping, or data theft |
| Alerts and monitoring | ✅ Built-in firewall logs incoming connection attempts | ❌ No logs; unauthorized access may go unnoticed |
| Impact on system performance | ✅ Minimal; optimized for macOS | ❓ No impact, but at the cost of security |
| Recommended for | ✅ All users, especially on public or untrusted networks | ❌ Only in highly controlled, isolated networks (not recommended) |
Reasons to use the Firewall on Mac
The firewall on your Mac isn’t a nice-to-have; it’s a frontline defense that blocks malicious attempts before they ever touch your files or apps. Relying on the ‘Macs don’t get hacked’ myth is simply unsafe.
The firewall adds an important protective layer between your system and the chaos of the internet, giving you control over which apps and services are allowed to communicate with your Mac.
- Blocks unauthorized incoming connections, reducing the risk of intrusions.
- Defends against denial-of-service (DoS) and port scanning attacks.
- Allows whitelisting or blacklisting apps for precise control over traffic.
- Protects sensitive data when connected to public Wi-Fi or shared networks.
- Hides your Mac with Stealth Mode to avoid detection in network scans.
- Adds an essential security safeguard without slowing down macOS performance.
- Gives you peace of mind, knowing that Mac isn’t open to unknown connections.
Where are firewall settings on Mac?
Apple doesn’t bury the firewall too deep, but you won’t see it in the Dock or menu bar either. To get there:
How to turn on the Firewall on Mac
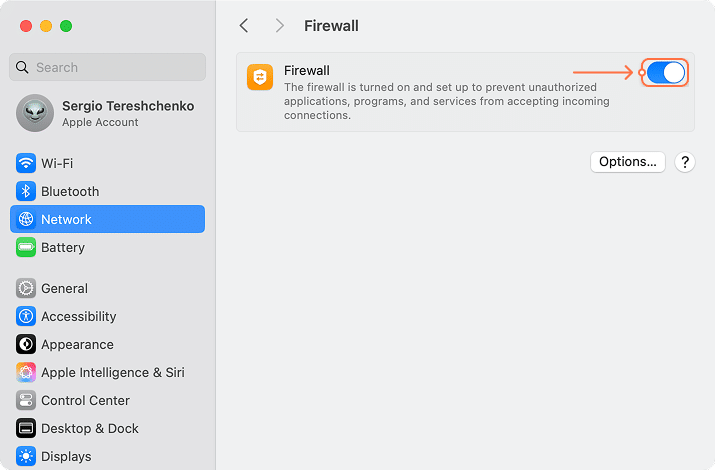
- Open System Settings from the Apple menu.
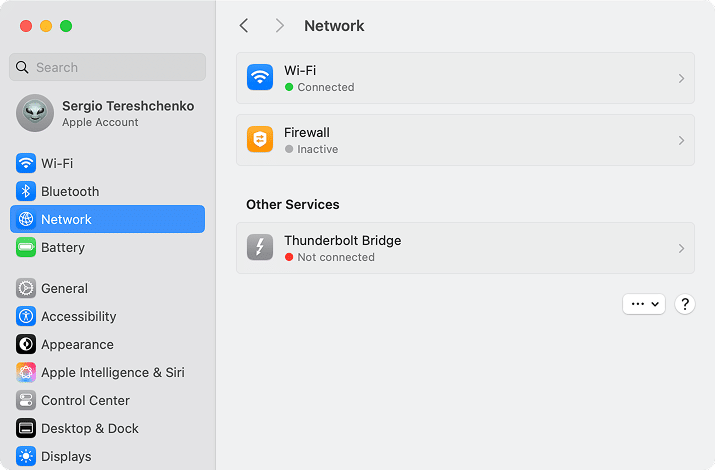
- In the left sidebar, select Network.
- On the right-hand panel, click Firewall.
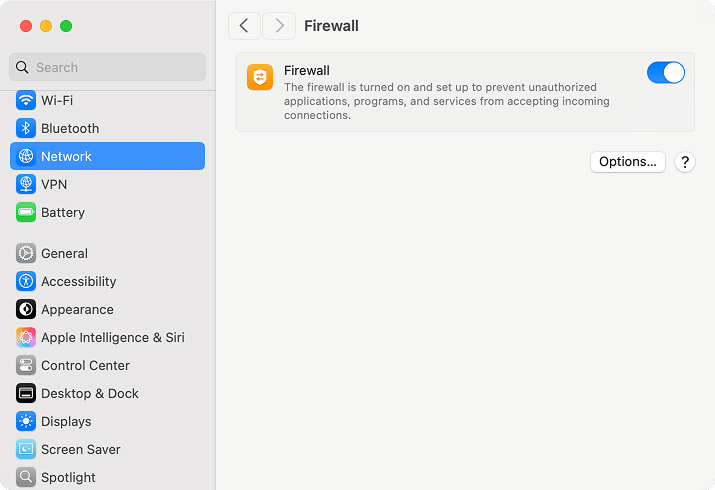
- See if your firewall is currently on or off. If it is off, click the switch button.
That’s your control center. From here, you can switch the firewall on or off and manage advanced options.
How to change Firewall settings
Enabling the firewall is just the first step. Customizing it gives you greater control over which apps and services can connect. Here, you can explore features like Stealth Mode, Block all incoming connections, and adjust your apps and services list.
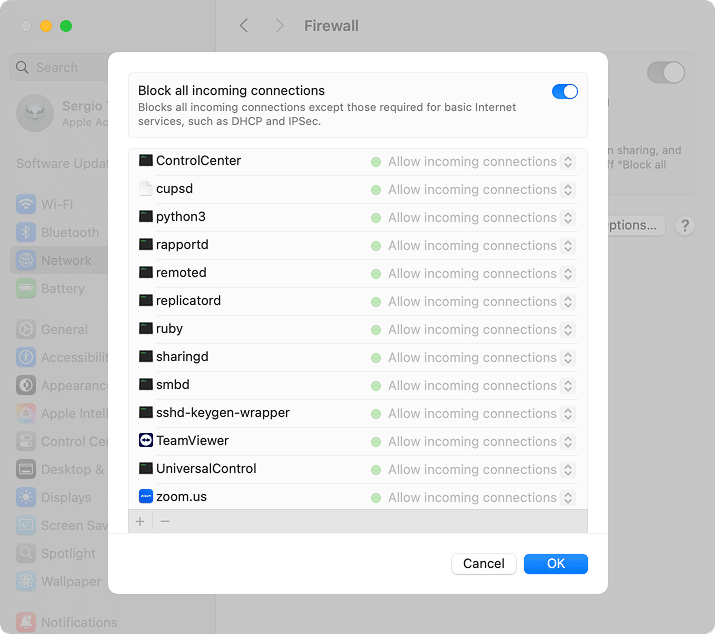
- After you turn on the Firewall, you are able to click on the Options button.
- Toggle on the Block all incoming connections feature.
This is maximum lockdown mode; it blocks every attempt to connect to your Mac except for essential Apple services. It’s useful if you want maximum protection on risky networks, like public Wi-Fi in airports or cafés.
Customize app rules:
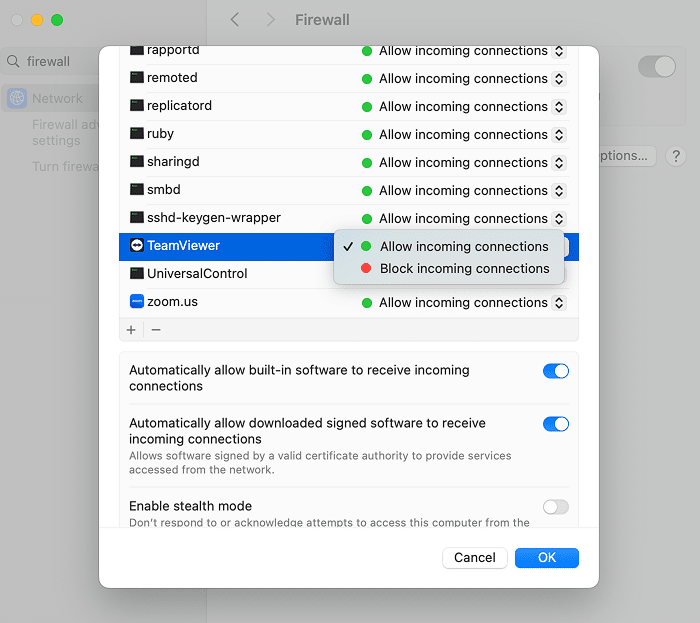
- Click on the + button under the list of applications and processes.
- Select an application to be allowed or blocked.
- Find it in the list → right-click.
- Choose Block incoming connections or Allow incoming connections.
Here, you decide which apps can accept incoming connections and which should be blocked. This is helpful when you want to keep everyday tools, like Zoom or Teams, working without interruption, and restrict apps you don’t fully trust or that don’t need Internet access, such as an offline editor or a game, especially downloaded not from officials.
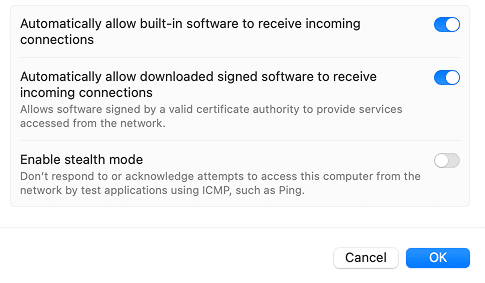
- Toggle on Automatically allow built-in software to receive incoming connections.
This way, system features like AirDrop, File Sharing, or Screen Sharing will function without prompts. Disabling this may break everyday macOS services. - Toggle on Automatically allow downloaded signed software to receive incoming connections.
You can find it useful if you prefer convenience when installing apps from trusted developers. With this enabled, macOS will automatically trust signed apps you install. If you turn it off, you’ll need to manually approve each new app, which offers tighter security but can be less convenient. - Toggle on Enable Stealth mode.
This hides your Mac from prying eyes on the network. When enabled, your Mac won’t respond to ping requests or connection probes, reducing its visibility to casual scans that hackers or malware often use to detect vulnerable devices. It’s a must-have option on public or shared networks where you want your Mac to be less discoverable as a visible target.
How to turn off the Firewall on Mac
There are rare cases when you may want to disable the firewall – like troubleshooting network issues, testing a local server, or allowing specific apps through.
Warning
Turning the firewall off leaves your Mac open to unsolicited connections. Only disable it if you’re on a secure, private network and re-enable it as soon as possible.
As you remember, the path to disable the Firewall is the same as for enabling it:
- Open System Settings → Network → Firewall.
- Toggle the switch to Off.
Firewall configuration best practices for Mac users
Your firewall works best when it’s set up with both security and convenience in mind. Here’s how to strike the right balance:
Recommended firewall setup for everyday use
- Keep the firewall turned on at all times – it’s your frontline defense.
- Keep Automatically allow built-in software enabled so core macOS features (like AirDrop or iCloud) continue working smoothly.
- Keep Automatically allow downloaded signed software enabled for trusted apps to save time when installing/updating apps, and reduce annoying prompts.
- Turn on Stealth Mode if you’re often on public Wi-Fi – this makes your Mac much harder to spot on a network.
Extra tips for advanced security
If you want tighter control over your Mac’s traffic:
- Manually manage app permissions – block any apps you don’t use online or don’t fully trust.
- Turn on Block all incoming connections when working on public Wi-Fi. This mode is restrictive but highly effective in risky environments.
- Pair the firewall with antivirus and VPN for layered protection against malware, phishing, and traffic interception.
- Consider a third-party firewall – tools like FireWally give you full visibility into outgoing traffic, detailed monitoring, and easier control over apps.
Do you need third-party Firewall software for Mac?
Apple’s built-in firewall is good at blocking unwanted incoming connections, but it has its limits. It doesn’t monitor outgoing traffic, which means a malicious app could still send data out without you noticing. For example, if a shady app on your Mac tries to phone home, macOS won’t alert you.
That’s where third-party firewalls step in. Unlike the built-in tool, they:
- Show you real-time network activity for every app.
- Let you block or allow outgoing connections with a single click.
- Provide traffic history and usage stats, so you know what’s happening behind the scenes.
- Help you save data when traveling by stopping apps from using bandwidth in the background.
Your Mac deserves full protection:
FireWally lifts the curtain on your network. With live monitoring, traffic history, and one-click blocking, you’ll track data usage, review traffic history, and shut down what you don’t trust in seconds.
Built-in vs. third-party firewall solutions
Apple’s firewall covers the basics, but third-party tools go further by giving you visibility and control over both incoming and outgoing traffic. Here’s how they stack up side by side:
| Feature | Built-in macOS Firewall | Third-party Firewall (e.g., FireWally) |
|---|---|---|
| Incoming traffic protection | ✅ Blocks unauthorized inbound connections | ✅ Blocks inbound connections with more customization |
| Outgoing traffic control | ❌ Not monitored | ✅ Full control – block/allow app connections |
| Real-time monitoring | ❌ None | ✅ See live network activity per app |
| Traffic history | ❌ Not available | ✅ View history (last hour, 24 hours, etc.) |
| Data usage stats | ❌ No tracking | ✅ Detailed app-by-app and total usage stats |
| Stealth mode | ✅ Can be enabled | ✅ Available, more advanced |
| Ease of use | ✅ Simple, minimal setup | ✅ Intuitive dashboards with more options |
| Ideal for | Everyday users who want a baseline defense | Power, privacy-conscious, corporate users, travelers, or professionals |
Who might benefit from extra protection?
- Users who handle sensitive data (finance, healthcare, legal, research).
- Privacy-conscious users who want to see and control all network activity.
- Professionals who frequently connect to public or untrusted networks.
- Users in industries with regulatory compliance requirements (e.g., GDPR, HIPAA).
- Teams that run internal servers or file-sharing services on Macs.
- Startups and SMEs that lack a dedicated security team but handle valuable data.
- IT administrators who monitor endpoints for suspicious traffic or app behavior.
- Corporate users who work with confidential company files or intellectual property.
- Parents who want to monitor or limit their children’s app network activity.
- Travelers who want to avoid roaming data costs.
- Companies with distributed teams that require visibility and compliance with security standards.
- Anyone who installs a lot of third-party apps and wants to track what they’re really doing online.
Final reminder: don’t skip the firewall
Every day, the internet turns into a battlefield: malicious scans, probing bots, and hidden exploits are constantly looking for a way in. From enabling the firewall to fine-tuning its settings, you give your Mac a fighting chance by blocking unauthorized traffic before it ever reaches your files.
Still, the built-in firewall only takes you so far. With a third-party tool like FireWally, you gain visibility into outgoing connections, real-time monitoring, and detailed control over every app. That way, you turn your Mac into a hardened stronghold against the threats of today and tomorrow. Want more? Consult Nektony on how to future-proof your Mac as a pro.

