
November 15, 2021
How to Grant Access to Folders on Mac
Share

Since the release of macOS 10.14 Mojave, Apple has included a new security feature that ensures third-party applications protect your data. Practically speaking, this means that you have to manually grant access to your apps in order to let them work with the user’s files.
With the macOS 10.15 Catalina version, security rules have become more stringent. The system provides notifications of any attempts to access your data. If an app wants to use data from a particular folder, you would need to grant access to it from within the app, and again confirm this action in the system alert. Currently, macOS Catalina requires that you provide access to your Documents, Desktop, Downloads, and Bin folders, iCloud Drive, the folders of third-party cloud storage providers, removable media, and external drives.
Duplicate File Finder is a software tool that finds and removes unneeded duplicate files, folders and similar photos from your Mac. Understandably, the recent changes regarding file permissions have also affected the way Duplicate File Finder works. In this article, we will show how to provide access to your data and continue using apps as usual, using Duplicate File Finder as an example.
First scan
When using Duplicate File Finder for the first time, the application will need to obtain permission to access folders before scanning. The app will notify you via several pop-up windows, which request access to specific folder/s. Click OK to give the application access to the folder/s for scanning.


Even if you decline access, the scan can proceed with the exception of the requested folders. If you’d like to allow Duplicate File Finder access to scan Documents, Desktop, Downloads, and other folders, read on to learn how.
How to Grant Access to Folders
If you see a window with the notification Some folders cannot be checked, you must provide the Duplicate File Finder application access to folders in order to find all duplicates.
Here’s how to do this on macOS:
- Open System Settings on your Mac.
- Click Privacy & Security in the sidebar.
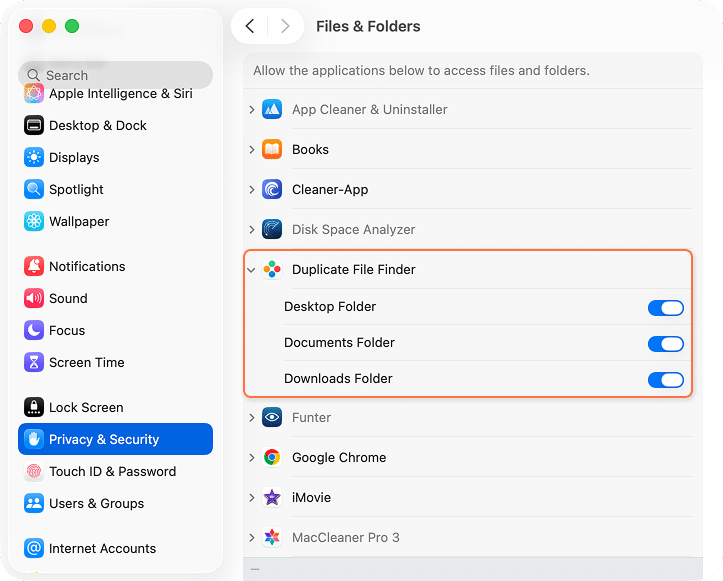
- Scroll down and click Files and Folders in the right panel.
- Locate Duplicate File Finder in the list of apps and turn on the toggle buttons for the Desktop, Documents and Downloads folders.
- Launch Duplicate File Finder and rescan your Mac with full access to folders on your computer.
Full Disk Access
In case you want to scan your whole disk with Duplicate File Finder or if you just don’t have enough time to select all the necessary folders manually, you can grant Full Disk Access.
By choosing the Full Disk Access option, you can grant access to every single folder for duplicate scanning rather than one folder at a time.
Here’s how to do this:
- Open System Settings.
- Click Privacy & Security in the left panel.
- Scroll down the right panel and click Full Disk Access.
- Locate the application and turn on the toggle button for it.

If Duplicate File Finder is not displayed, add the app to the list by following these steps:
- Click the Plus Plus button.
- Select Duplicate File Finder in the Applications folder.
- Click Open to confirm.
- Then launch Duplicate File Finder and rescan your Mac with Full Disk Access on your computer.

Note:
After making changes in System Settings the system may ask you to quit and reopen the app. We advise clicking on Quit & Reopen to apply the changes.
Photos Permission
In case you see a window with the notification Photos Library cannot be checked, – you need to provide the Duplicate File Finder application with access to the Photos app in order to search for duplicates.
For this, take the following steps:
- Open System Settings.
- Select the Privacy & Security in the left panel.
- Scroll down and select Photos.

- Allow access to Photos for Duplicate File Finder.
- Launch Duplicate File Finder and rescan your Mac with full access to Photos on your computer.


Even after you have granted access to the Photos app, Duplicate File Finder and other third-party programs that work with Photos on your Mac, you may still encounter some problems. You may see a pop-up window stating that the application does not have access to Photos in the following situations:
- Your pictures are stored outside the Photos app. In this example, the system does not have Photos Library. However, in Duplicate File Finder, you can choose other folders in which your photos are stored.
- Your Photos Library is empty. If there are no images in Photos Library, choose the folders in which you usually store your pictures for scanning via Duplicate File Finder.
- The Photo Library you opened is not the System Library. You can check it in the Photos app Preferences. If you open a Photos Library and in the Preferences window the “Use as System Photo Library” button is active/enabled, then this Library is the System one.

- The “Copy items to the Photos Library” option is not selected in the Preferences of the Photos app. In this case, all the imported images to Photos from other sources will be shown in the Photos Library. However, without full data they are only previews of the original pictures. Therefore, Duplicate File Finder can not scan them to provide you with the correct results. For best results, enable this option so that the app can work with your images in Photos.
- Your Photos Library is on external or remote storage. Currently, Duplicate File Finder can not scan pictures in those locations, but this issue will be solved with the next software update. However, you can transfer the Photos Library onto your Mac, where Duplicate File Finder can scan it.


Troubleshooting
If there are folders that have not been rescanned due to lack of access, you can edit this in the Get Info window in the Finder.
For this, follow the next steps:
- Open Finder.
- Select the folder, to which you want to provide access and right-click.
- Select Get Info from the menu that appears.

- Click on the Sharing & Permissions section.

- Select Read only or Read & Write next to your user name.
- Open Duplicate File Finder and rescan the folders.


If you have other questions regarding the Duplicate File Finder application, feel free to email us at support@nektony.com.