


August 10, 2026
How to uninstall Gemini AI assistant on Mac: App, CLI, PWA, and all files


Share


Uninstalling Gemini can mean three different jobs depending on what you installed:
- The native Gemini app, the one with the self-restoring login item,
- Gemini CLI, a standalone Node.js command-line tool, and
- A Chrome, Safari, or Edge PWA, for anyone who skipped the native app.
Whatever’s got you here:
- Switching to ChatGPT or Claude after trying the native app,
- Chasing a login item that reappears no matter how many times you remove it,
- Gemini CLI going quiet after Google cut off Free, Pro, and Ultra on June 18, 2026,
- Clearing a Gemini PWA shortcut installed as a browser app, or
- Just clearing AI-tool clutter and getting disk space back,
this guide has a method for each: one-click removal, manual Finder steps, Terminal commands, and dedicated sections for the Gemini CLI and the PWA.
This Article Contains
Let the tool do the uninstalling

Video Guide: How to uninstall Gemini AI assistant on Mac
2:11

Some nuances of uninstalling the Gemini AI app
Moving Gemini.app to the Trash removes the application binary. That’s it. Everything else the app set up on your Mac keeps running or sitting in place, and two things in particular make Gemini worse than the average Mac app to uninstall:
- The Login Item can reappear. Gemini installs GeminiAppLauncher, a Login Item, and GoogleUpdater, a background auto-update process, without asking.
- It grabs a shortcut even when it’s not open. Gemini intercepts Option+Space system-wide, including cases where another app, ChatGPT for Mac, already uses that combination. The interception stays active until the app and its helpers are actually gone, not just closed.
- There’s a smaller, third reason people give up on the native app before they ever get to uninstalling it: certain chat threads refuse to resume, swapping the input field for a link back to the website instead.
What Gemini installs on your Mac
The Gemini native app’s on-disk footprint is spread across diverse Library locations, most of them hidden. I found these locations when testing Gemini v1.84.4.574 on MacBook Pro, Apple M1 running macOS Tahoe 26.4.1.
| Item | Location | Hidden or not |
|---|---|---|
| App bundle |
Copy |
No |
| App data, local settings |
Copy |
Yes |
| Launcher data |
Copy |
Yes |
| Web storage |
Copy |
Yes |
| App cache |
Copy |
Yes |
| Launcher cache |
Copy |
Yes |
| Preferences |
Copy |
Yes |
| Launcher preferences |
Copy |
Yes |
| Shared data |
Copy |
Yes |
| System cache |
Copy |
Yes |
| App logs |
Copy |
Yes |
| Login Item | System Settings → General → Login Items & Extensions → GeminiAppLauncher | UI only |
| Accessibility permission | System Settings → Privacy & Security → Accessibility | UI only |
Important
~/Library/Application Support/Google/
Copy
com.google.GeminiMacOS
Copy
Methods of uninstalling Gemini
Although they share the same name, Gemini for Mac, Gemini CLI, and the Gemini PWA are independent installations. Each stores its own files, so uninstalling one won’t remove the others. Use the table below to find the right method.
| What to remove | What it is | Recommended method |
|---|---|---|
| Gemini for Mac | Native desktop app | App Cleaner & Uninstaller, Finder, or Terminal |
| Gemini CLI | Node.js command-line tool | npm/Homebrew uninstall + remove ~/.gemini |
| Gemini PWA | Browser-installed web app | In Chrome/Edge or App Cleaner & Uninstaller |
Uninstall Gemini AI app with uninstaller
App Cleaner & Uninstaller is the only way that automatically removes everything related to Gemini, including GeminiAppLauncher from Login Items. At the same time, the Finder and Terminal methods require manual intervention, particularly an additional step in System Settings to handle Gemini’s login item.
- Download and open App Cleaner & Uninstaller.
- The Applications list appears automatically.
- Find and select Gemini from the list.

- Optional: Enable Expert Mode to show all Library paths linked to Gemini.
- Click on the Uninstall button or, if you are in Expert Mode, the Remove button.
- If Gemini is still running, App Cleaner & Uninstaller will ask you to quit Gemini inside the tool without you leaving the uninstallation process.
- Check the preview tab with Gemini files to be deleted → click Remove to confirm.
- Empty the Trash.

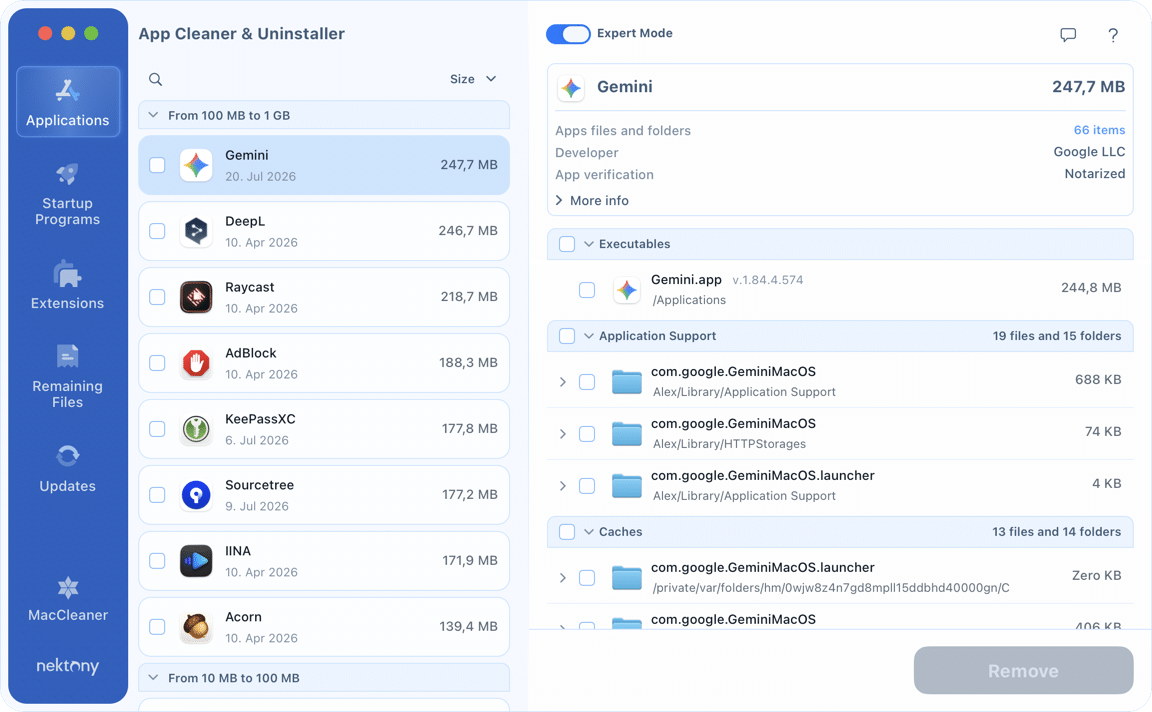

What made this method worth including at all: the login item goes with everything else in that single confirmation, instead of sitting on your to-do list afterward.
Delete Gemini manually in Finder
Step 1. Quit Gemini.
- Press Cmd+Q or right-click its Dock icon and choose Quit.
- If Gemini continues running in the background, use Activity Monitor to stop it.
- Select any Gemini processes and click Stop.

Step 2: Move the Gemini app to Trash.
- Open Finder → go to Applications → right-click Gemini.app → Move to Trash.
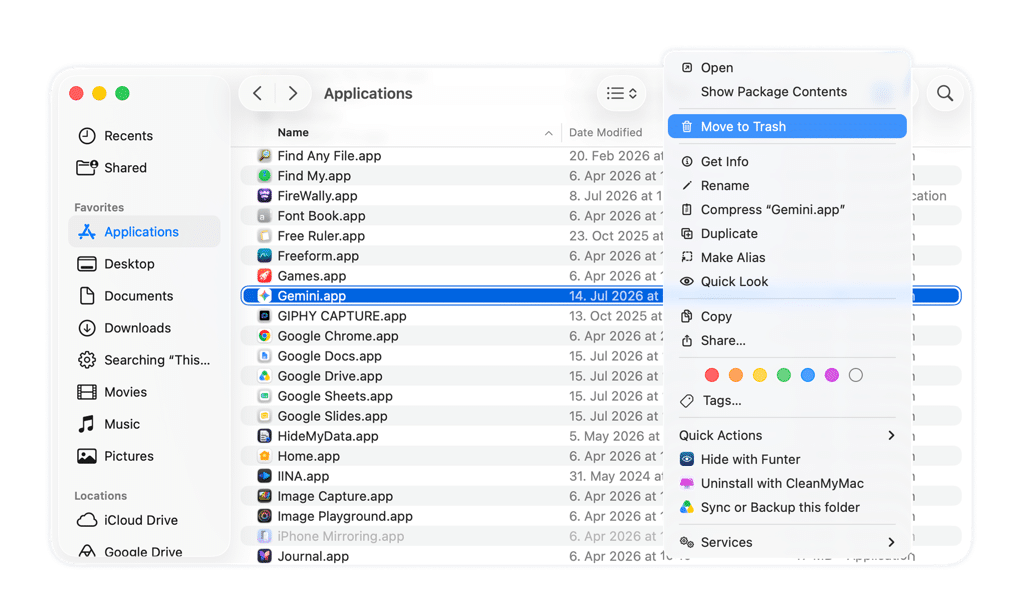
Step 3: Delete the Gemini files and folders from the Library.
- In Finder, press Cmd+Shift+G (Go menu → Go to Folder).
- Paste the paths below one at a time.
- Right-click the respective folder → Move to Trash.
~/Library/Application Support/com.google.GeminiMacOSCopy
~/Library/Application Support/com.google.GeminiMacOS.launcherCopy
~/Library/HTTPStorages/com.google.GeminiMacOSCopy
~/Library/Caches/com.google.GeminiMacOSCopy
~/Library/Caches/com.google.GeminiMacOS.launcherCopy
~/Library/Preferences/com.google.GeminiMacOS.plistCopy
~/Library/Preferences/com.google.GeminiMacOS.launcher.plistCopy
~/Library/Preferences/com.google.GeminiMacOS.shareddata.plistCopy


Step 4: Remove the Gemini system cache.
This path uses a per-user random hash.
- In Finder, use the Go to Folder placeholder to paste this path:
/private/var/folders/Copy
- Use the search box to enter
geminimacos.Copy
- Apply the “Folders” search filter.
- Look through the results. The output related to Gemini cache shall look like: and
/private/var/folders/*/***/*/com.google.GeminiMacOSCopy
/private/var/folders/*/***/*/com.google.GeminiMacOS.launcherCopy
- Right-click all the Gemini cache folders → Move to Trash.
Step 5: Clear the Gemini login item.
- Go to System Settings → General → Login Items & Extensions.
- Locate GeminiAppLauncher (and GoogleUpdater, if listed) under Login Items or Background App Activity → remove it/them by selecting and clicking −.

Step 6: Empty the Trash.
Remove Gemini with commands in Terminal
The commands below remove Gemini completely, and I verified each one myself. Start by quitting all Gemini processes, then remove the app and its associated files by running the commands in sequence.
Note:
These commands permanently delete files without confirmation. Use this method only if you’re confident using Terminal.
- Stop all Gemini processes by entering the following command:
pkill -f “Gemini”Copy

- Remove the Gemini app bundle. To that end, enter this command:
sudo rm -rf /Applications/Gemini.appCopy
- Remove Gemini data. Enter the commands one at a time:
rm -rf ~/Library/Application\ Support/com.google.GeminiMacOSCopy
rm -rf ~/Library/Application\ Support/com.google.GeminiMacOS.launcherCopy
rm -rf ~/Library/HTTPStorages/com.google.GeminiMacOSCopy
rm -f ~/Library/Preferences/com.google.GeminiMacOS.plistCopy
rm -f ~/Library/Preferences/com.google.GeminiMacOS.launcher.plistCopy
rm -f ~/Library/Preferences/com.google.GeminiMacOS.shareddata.plistCopy

- Clear Gemini user caches:
rm -rf ~/Library/Caches/com.google.GeminiMacOSCopy
rm -rf ~/Library/Caches/com.google.GeminiMacOS.launcherCopy
- Clear Gemini system caches:
rm -rf “$(getconf DARWIN_USER_CACHE_DIR)com.google.GeminiMacOS”Copy
rm -rf “$(getconf DARWIN_USER_CACHE_DIR)com.google.GeminiMacOS.launcher”Copy
- Open System Settings → General → Login Items & Extensions and remove GeminiAppLauncher.


Uninstall Gemini CLI
- Gemini CLI is an individual Node.js terminal tool, which can be installed via Homebrew, npm, npx, and MacPorts.
- For many, the removal trigger is the signup failure and message to migrate to Antigravity. Google ended support for Gemini CLI for Free, Pro, and Ultra users on June 18, 2026, directing users to the Antigravity CLI.
- Gemini CLI doesn’t share files, an install path, or a removal method with either the Gemini desktop app or the PWA. Removal steps don’t overlap with either one.

Uninstall Gemini CLI by the method used to install:
- npm (global install), installed with npm install -g @google/gemini-cli → remove with:
npm uninstall -g @google/gemini-cliCopy

- Homebrew, installed with brew install gemini-cli, shall be removed with:
brew uninstall gemini-cliCopy
- MacPorts, installed with sudo port install gemini-cli, shall be removed with:
sudo port uninstall gemini-cliCopy
- npx, no install at all: nothing was installed to begin with, npx runs it from a temporary cache. There is nothing to uninstall in the traditional sense; the package just sat in npx’s temp cache. Clear that cache, but keep in mind it flushes every package you’ve ever run through npx that way, not Gemini CLI alone.
rm -rf “$(npm config get cache)/_npx”Copy

Remove user data after any method
Uninstalling the package doesn’t touch your account data or settings; those are kept apart and need their own cleanup:
- ; the main config folder, holding
~/.gemini/Copy
,settings.jsonCopy
,GEMINI.mdCopy
,oauth_creds.jsonCopy
, angoogle_accounts.jsonCopy
file, andinstallation_idCopy
,history/Copy
, andtmp/Copy
subfolders. In this case, this command works:commands/Copy
rm -rf ~/.geminiCopy
- A matching folder dropped into every project you ran the CLI from; the home folder alone isn’t enough if you used it across multiple repos.
.gemini/Copy
- A Keychain entry, created automatically when you signed in with a Google account. Search “gemini” in Keychain Access, or remove it from Terminal with:
security delete-generic-password -s “gemini-cli” 2>/dev/nullCopy

- A stray , if you ever set one as an environment variable; check it in:
GEMINI_API_KEYCopy
- ,
~/.zshrcCopy
- , and
~/.bash_profileCopy
- any project files.
.envCopy

Remove the Gemini PWA
- If you’ve added Gemini through the install icon in Chrome or Edge’s address bar, or through Safari’s Add to Dock, you have a Gemini PWA, not the native app.
- PWA Gemini is the live website wrapped in its own window, and has no GeminiAppLauncher, no Library files, and no GoogleUpdater involved.
Uninstall the Gemini PWA in Chrome and Edge
- Enter in the URL.
chrome://appsCopy
- Right-click the Gemini icon.
- Click Uninstall.

Uninstall the Gemini PWA in Safari
- Hold the Gemini icon in the Dock → Options → Remove from Dock.
That’s the whole process. There’s no local cache worth chasing down afterward, since the data behind it never really left Google’s servers.
Delete the Gemini PWA in Finder
- Open Finder.
- Use the Cmd + Shift + G shortcut to enter this directory:
~/Applications/Chrome Apps.localized/Google GeminiCopy
- Drag Gemini PWA to the Trash.
Uninstall the Gemini PWA with App Cleaner & Uninstaller
- Run App Cleaner & Uninstaller.
- Locate Chrome Apps in the Applications List.
- Find and select Google Gemini.
- Click Uninstall → confirm by clicking Remove.

Final removal
Gemini AI app
- Use App Cleaner & Uninstaller to remove the Gemini desktop app, its Library files, and the GeminiAppLauncher in one step, which is the only method that handles the login item automatically without a manual visit to System Settings.
- Go Finder way if you’d rather handle the files by hand; just make the Login Items removal the last box you check, since it doesn’t clear it as a side effect.
- Go Terminal way if you are good at doing a job with commands.
Gemini CLI
Uninstall it using the same method you installed it:
- npm,
- Homebrew,
- MacPorts, or
- npx,
~/.gemini
Copy
.gemini
Copy
Gemini PWA
- Browser: Remove the app directly from Chrome, Edge, or Safari.
- Finder: Delete the installed app from the Applications folder.
- App Cleaner & Uninstaller: Remove the PWA automatically in the tool.
Frequently asked questions
What is the fastest way to uninstall a Gemini AI desktop app entirely?
App Cleaner & Uninstaller is the fastest way to completely remove the native Gemini app. It detects the app, its Library files, and GeminiAppLauncher as a whole, so you don't have to search through hidden folders or manually clean up Login Items afterward. If you prefer not to use a third-party tool, Finder and Terminal work too, but they require more manual steps.
How to delete Google Gemini chat history?
Delete Google Gemini chats altogether:
- Visit gemini.google.com.
- Go to Settings (⚙️) → Activity.
- Click the Delete dropdown option.
- Choose All time.
- Click Delete to confirm.
Delete a particular Google Gemini chat:
- Visit gemini.google.com.
- Locate the chat in question from the Chats tab in the left panel.
- Click the three dots dropdown option next to the chat.
- Click Delete to confirm.
What's the difference between uninstalling Gemini for Mac, the Gemini PWA, and Gemini CLI?
They are three separate installations with nothing in common at the file level. Removing one does not affect the others.
- The Gemini native app is downloaded from gemini.google/mac and installs GeminiAppLauncher as a background helper.
- The PWA is installed from a browser address bar and stores almost nothing locally: no Library files, no background process.
- The CLI is a Node.js package installed via npm or Homebrew, stores data in , and has no connection to the native app or PWA.
~/.gemini/Copy