In this post, we’ll share some of the most effective Mac tips and tricks to ensure you get the most out of your computer. From optimizing the performance of your system to using the hidden features, these suggestions can help you be more efficient and productive using your Mac.
1. Switch between multiple documents
When working with multiple documents, you can easily switch between files on your Mac. For this, press Cmd + Tab.
Also, you can switch between documents of the same type only. For instance, maybe you’re playing music and at the same time working on two different Word documents. To switch between the two Word documents without involving the music player, you press Cmd + ~.
2. Add your signature to documents
For this one, open the document within the Preview application, click on the pen icon, and select Create Signature from the built-in iSight (Mac’s inbuilt webcam). Then, sign your name on a white piece of paper, and hold it against the camera, ensuring that it’s aligned properly. The camera will automatically extract the signature, and all you have to do is click Accept to complete the process! In the future, whenever you wish to append your signature to a document, just click on Preview to retrieve the stored signature.

3. Start up the Mac silently
If you’ve used a Mac before, you must be aware of the iconic chime it lets off every time it starts. Unfortunately, that sound isn’t so pleasing to everyone. If you’re one of those people who find the sound not so charming, or even if you like it but are in a place where quiet is paramount, there is a way you can start your Mac without the sound. As you start the Mac, press the Mute button and hold it until the operating system has booted. The whole process will go on without a sound.
4. Organize apps with Stage Manager
Stage Manager is a macOS feature that helps you organize and manage open windows for quick access. It creates a clutter-free workspace by keeping your active window in the center while neatly arranging other open apps on the left side of the screen.
To enable the Stage Manager, follow these steps:
- Open System Settings.
- Click Desktop & Dock in the left panel.
- Scroll down and toggle on the Stage Manager option.

5. Take a screenshot of a specific part of the screen
You probably already know how to take a picture of the whole screen on your Mac. At any point, just hit the Command + Shift + 3 to capture the full screen. However, you can also capture just a portion of the screen by pressing 4 instead of 3. So, you’d press Command + Shift + 4.
6. Record your screen
In addition to taking a screenshot of the screen, you can also record the screen! To do this, you’ll need a built-in feature known as QuickTime Player.
- Open QuickTime Player from the Applications folder.
- In the menu bar, click File and choose New Screen Recording.
- A new window will show up on your desktop and begin to record your screen.

What’s more, just like with screenshots, you can choose to record the whole screen or just a portion of it. And, you can also capture sound!
7. Run Windows on your Mac machine
Yeah, this is possible. It is also surprisingly simple. Navigate to applications on Mac laptop or desktop, click on Utilities, and select Boot Camp from the list. This will help you partition your hard drive. The next time you restart your computer, you’ll be asked to insert a Windows CD, and from there you can install Windows. After installation, the next time you restart the computer, you’ll be able to boot from either the macOS partition or Windows partition.
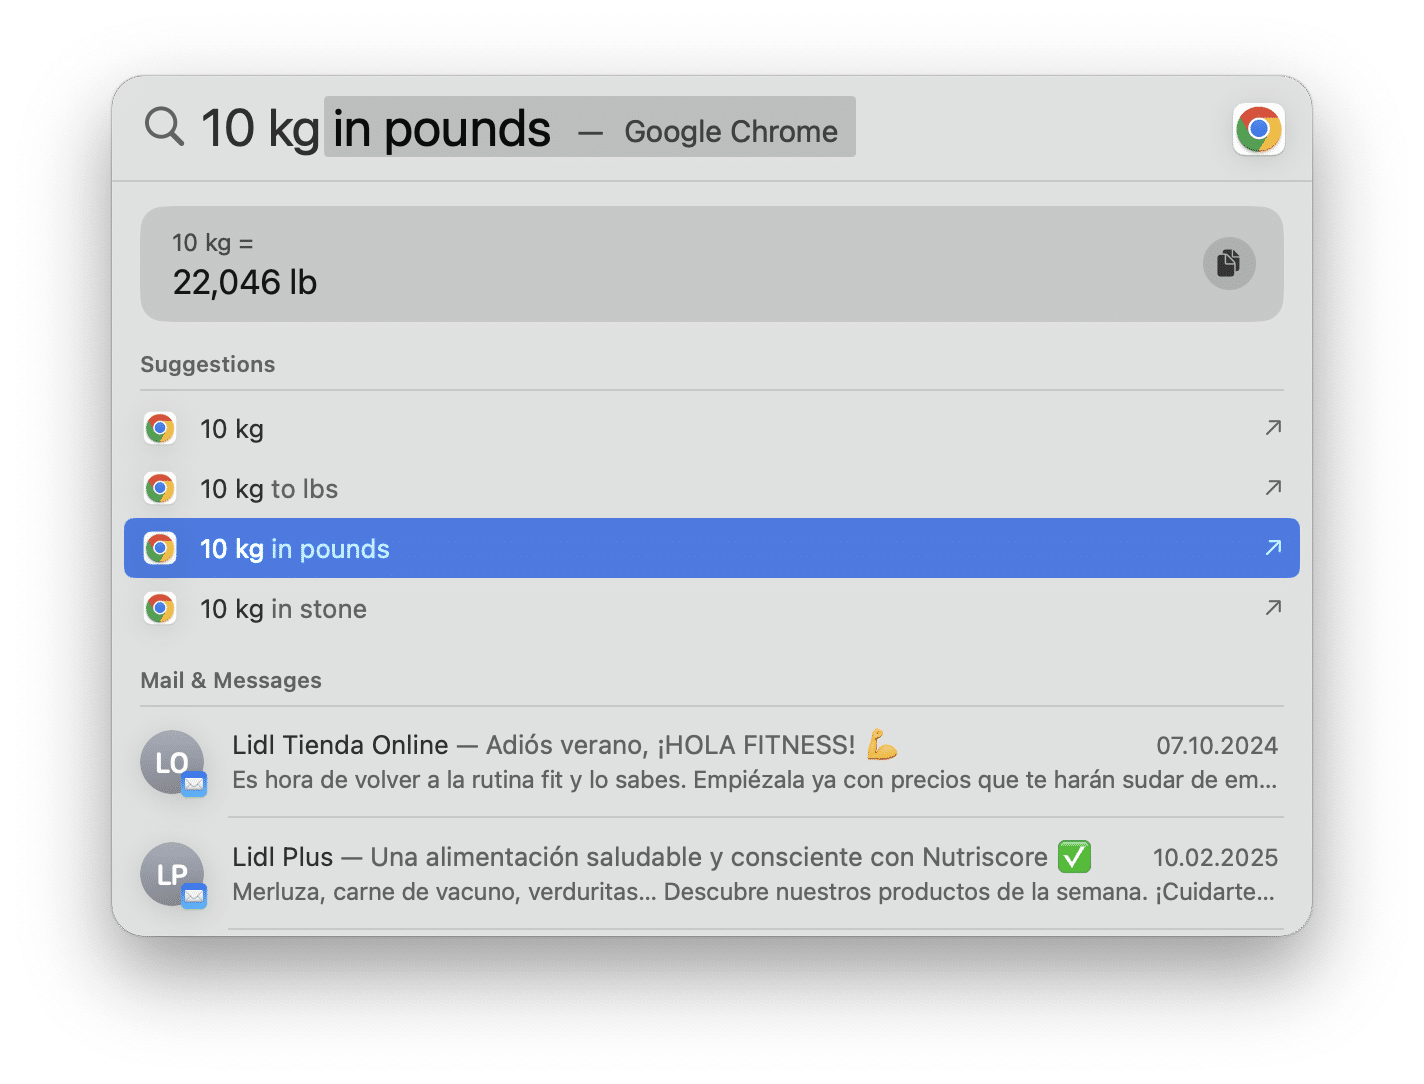
8. Convert any unit using Spotlight
Spotlight makes it easy to find things on your Mac and even online. But something you might not know is that you can also use it to convert units on the spot. To get started, open Spotlight, type the figure you want to convert, and it will show you a list of conversions. For example, if you enter 10kg, you will see results in tons, lbs, and so on. You can use the feature for currency, measurement, weight, and all other forms of metric conversions as long as you’re connected to the internet.
9. Make your cursor appear bigger
Mac intentionally hides your cursor when you’re busy working on various things. For instance, when you’re watching a movie on the latest laptop, the cursor will automatically disappear to allow you to enjoy your movie without distractions. The same applies when you’re typing a document. To make the cursor reveal itself, all you need to do is wriggle your mouse or run your finger back and forth across the trackpad. The cursor will balloon in size, revealing itself, and once you stop, shrink back to its normal size.

10. Lost a password? Find it with ease
Mac computers are designed to store every username and password deep within the system. So, all passwords to all sites and applications you use are just resting somewhere within the computer, though it’s important to mention that, for security purposes, they are all encrypted before being stored. To retrieve a lost password, use a built-in macOS app called Keychain Access. There you’ll see all logins stored on the computer.

11. Split the Screen
Mac’s Split Screen feature allows you to divide your screen between two windows and adjust how much space each one takes up. This feature is particularly useful for Mac users who need to monitor one window while actively using another. Additionally, if you have multiple browser windows open (such as Firefox or Chrome), you can even drag tabs between them for seamless multitasking.
To use Split Screen on a Mac, click and hold the green full-screen button in the top-left corner of a window, then choose to tile it to the left or right side of the screen. Select another window to fill the other side, and both will be in Split View.

12. Change the folder icons
Changing folder icons can make it quicker to find specific folders, especially with custom icons for projects or categories. Also, unique icons make your Mac feel more personalized and stylish.
To change icons, right-click on the folder you want to change and select Get Info → Copy the image for an icon and paste it in the Get Info window instead of a small folder icon at the top left.
![]()
There are many more Mac tips and tricks out there. The twelve we’ve covered here are just some of the most important ones. Hopefully, they’ve opened your eyes to a few new ideas; things you didn’t know about earlier, and which will help you use your Mac with greater ease.


