


October 29, 2025
How to delete junk files on Mac
Share

Junk files are often created by various system utilities and apps that you install on your machine. While junk files won’t directly affect your work, they can slow down your system, which affects your Mac’s overall performance. Therefore, it’s highly recommended that you clean up junk from your Mac on a regular basis.
If you’re new to this and you haven’t deleted any junk files from your Mac before, the following should teach you how to find and delete them from your machine.
This Article Contains
Before we start
If you do not have time to manually explore how to find and remove junk files on your Mac, use the special software MacCleaner Pro. This all-in-one solution will help you to quickly and easily clean and speed up your Mac. Download a free trial of MacCleaner Pro and clean useless junk files from your Mac.
Watch the video to see how easy it is to delete junk files on Mac with MacCleaner Pro.
Video Guide
3:01

What are junk files?
We call junk files the temporary files that can be removed from Mac without harming the system’s work. They are caches, logs, leftovers of already removed applications, unused localizations, and other service files.
Besides temporary files, you may also have other items on your computer that you don’t need, for example, duplicate files, unused applications, large and old unused files, etc. All this is also junk. It’s always a good idea to tidy up your Mac and remove all types of junk from your hard drive. Keep reading to learn how to delete temporary files from Mac.
Steps to clean your Mac from junk
Tip 1. Get rid of Mac’s caches
Caches allow your computer tools and apps to load certain preferences quickly. These files are good when they’re small in numbers. However, if these grow up and you have thousands of caches, they can slow down your Mac.
You can safely delete the cache junk from your Mac and improve your machine’s performance. An easy way to get rid of cache files is to use the Finder.
Steps to delete temporary files on Mac manually:
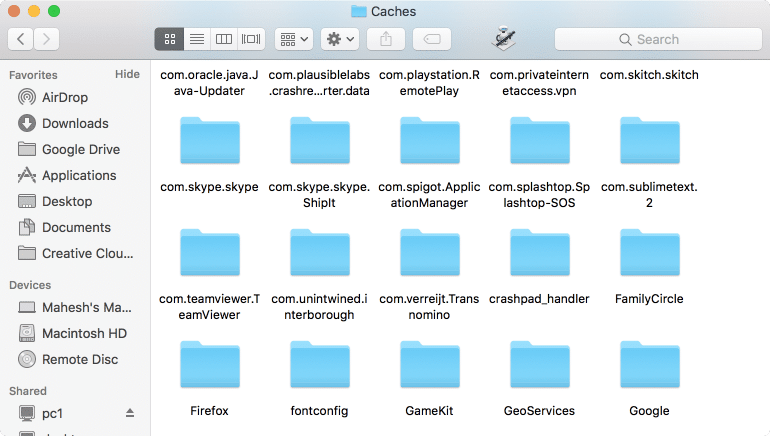
- Launch a Finder window, click Go at the top, and select Go to Folder.
- Type the following into the box on your screen and press Enter.
~/Library/CachesCopy
- You now need to go into each folder on your screen and remove the files from there. As an optional step, you can back up these files to another folder so you can restore them in case something goes wrong.

Deleting cache files will significantly improve the speed of your Mac machine.
You can use the provided guide to remove other types of temporary files, such as logs, cookies, preferences, application support files, etc.
Where this method falls short
While the method above helps you get rid of caches and other temporary files from your Mac, it actually does not delete all the cache junk that has been ever created on your machine. This is because, practically, it’s almost impossible to find each and every cache file and remove it from your Mac.
Various apps place their cache files and other service items in different directories and locations. You might delete something from the aforementioned folder, but certain cache files may still be lingering around in other folders. Some apps prefer to keep their cache files deep down in directories, and it is extremely difficult to get to those files and delete them.
As if that isn’t enough, there is sandbox data of various Mac Store apps stored on your machine. This leads you to the question: how do you clean your Mac from all cache junk? Well, the answer is a third-party tool.
What’s the solution then?
There’s an app called MacCleaner Pro that does all the hard work for you, so you can sit back, relax, and wait for the junk files to be deleted from your Mac. This app goes deep down in your Mac’s directories, finds the temporary files created by various apps and tools, and deletes them all from your machine.
All of this happens with a few clicks in the program – it doesn’t require much manual interaction.
Steps to remove caches with MacCleaner Pro:
- Download and launch MacCleaner Pro.
- Go to the Clean Up section.
- Select Caches.
- Click on Review and Clean Up and confirm the action.


Tip 2. Remove the language files that you are unlikely to use
Most apps that you install on your Mac actually come with various languages built into them. This way, if you don’t like the default language of the app, you can switch to your favorite language.
More often than not, many of these localizations are useless for you as it’s highly unlikely you’ll use them all in the app. If this is true for you, you can remove the unused language files from your Mac, which helps remove junk from your machine.
Steps to remove localizations junk from Mac manually:
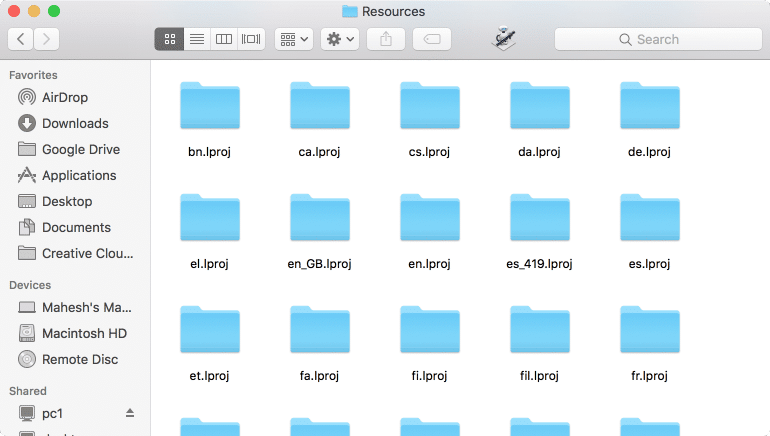
- Open the Applications folder using the Finder.
- Find the app that you want to remove the languages for, right-click on the app, and select Show Package Contents.
- Head to Contents followed by Resources.
- Here, you will find folders with language shortcodes and .lproj extension. Go ahead and delete the language folders that you won’t be using.
That will help regain some storage space on your Mac.
Where this method falls short
While deleting language files for certain apps will still keep the app running smoothly, there are a few things you need to be aware of while deleting these files. That is because ending-up deleting files when you are not supposed to will only cause issues on your Mac.
A normal app turning into a dangerous app
If you mess around with the language files of an app that you haven’t launched before, your Mac might consider the app as a dangerous one because it lacks certain files that are supposed to be there. This could cause a lot of issues and frustration as you simply can’t launch your app. Therefore, we strongly recommend that you run the applications at least once, and only then remove unnecessary languages from them.
Languages files are elsewhere, too
The directory specified in the above method isn’t the only one where your apps store their language files. It is totally up to the app where it prefers to save its language files, and until and unless you find that folder, those language files will continue to occupy your Mac’s memory space.
Manually deleting app support files isn’t safe
While our method does recommend you to go ahead and delete the language files from certain folders in your apps, it’s not the safest way to get rid of these files. This is because sometimes you may end up deleting files that you weren’t supposed to. When this happens, your apps will become dysfunctional, and reinstalling them would be the only way to get them to work.
How do you safely delete language files then?
Well, do yourself a favor and get an app called MacCleaner Pro to get rid of unwanted language files from your Mac. This app uses various smart algorithms to find and delete unwanted language files without causing any issues with your apps. The app knows where to look for the files, how to remove them, and how to ensure the apps are still functional.
Steps to remove language files with MacCleaner Pro:
- Open MacCleaner Pro and click Clean up Mac in the left sidebar.
- Tick-mark Language files on the right.
- Hit Review and Clean Up and confirm the deletion.

That’s all you need to do to remove all language files – safely – from your Mac.
Tip 3. Delete the app installers once the apps are installed
While many users would prefer to use the Mac App Store to download apps, that is not the only way to get new apps for your machine. You can actually download app installers from various sites and get the apps you need for your Mac.
Once you’ve installed an app using these installers, you no longer need these installation files. Most users forget or ignore these files, but these files continue to occupy the precious storage on your Mac.
So, it’s a good idea to remove these app installers’ junk once you’ve used them. This is fairly easy to do and the following shows how.
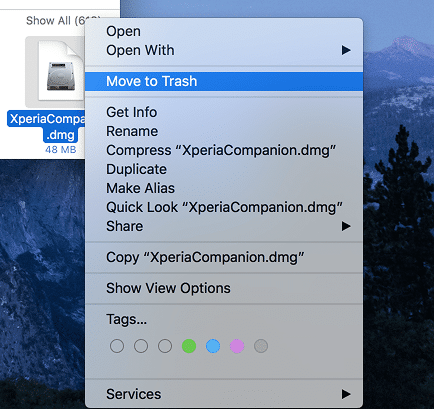
- Open the folder where your app’s uninstallation file is located. Usually, this is the Downloads folder.
- Right-click on your app’s DMG or PKG file and select Move to Trash.

- Empty the Trash so the installer is gone for good.
Please note that your app installers may not only be in the Downloads folder. Therefore, to fully clean your Mac from them, we recommend using MacCleaner Pro. This software will help you quickly find and remove all installation files wherever they are stored on your Mac.

Tip 4. Uninstall unused apps from your Mac
Your Mac likely has more apps than you need and that’s because most users tend to forget to delete apps that they don’t use. If you run a check for unused apps on your Mac, you’ll be surprised by the number of old and idle junk that you will find on your machine.
Removing these unused apps will not only help you regain your storage space, but this will help remove the clutter from your Mac.
- Launch the Applications folder using the Finder.
- Find the app or apps that you no longer use and wish to discard.
- Drag the apps over to the Trash icon in the Dock and those apps will be removed from your Mac.

You will need to clear the Trash once you’ve removed all your unused apps. This will ensure that your apps are gone forever from your machine.
Does this method delete the app and all of its data?
Most people believe that once they’ve removed an app from a Mac, the app and all of the files associated with it are gone. Unfortunately, that’s not the case. When you delete an app, there are still some residual files left on your machine. These files are often the reason why your Mac’s storage is filled-up even though you don’t have that many apps on it.
If you’re looking to get rid of an app along with all of its files, and you want to do it manually, then you’re going to have to dig deeper and go into the following directories to find and remove the associated files.
~/Library/Application SupportCopy
~/Library/CachesCopy
~/Library/LogsCopy
~/Library/PreferencesCopy
~/Library/ContainersCopy
~/Library/CookiesCopy
With most users downloading and removing a number of apps on a daily basis, it sometimes becomes difficult to manually find and delete the leftover files of your apps.
What’s the solution for this, then?
MacCleaner Pro’s app uninstaller is what can help you out there. This feature in the app finds all the apps you’ve installed on your Mac, and then it lets you choose and delete the apps that you no longer need.
This program ensures that all the data associated with your app is also gone when the app itself is removed. Here’s how you use this feature:
- Launch App Cleaner & Uninstaller from the MacCleaner Pro’s bundle.
- Choose the app you want to uninstall from the list, and click on Uninstall on the right pane.


Your app will be gone with all of its data.
Tip 5. Use a dedicated app to remove all junk files on a Mac
Your Mac offers various options to help you remove junk files but there is a problem with that. If you have gone through any of the above methods, you probably know that those methods are time consuming.
Not only do they take up your precious time, but they often don’t do their job the way it should be done. For example, when you remove an app using the Trash method, it leaves many leftover files of that app on your Mac. Those files then need to be deleted manually – again consuming more of your time.
If you don’t want all of that hassle, you can use a third-party app to remove all junk files at once from your Mac. There’s an app called MacCleaner Pro that helps you do just that. This app scans your Mac for any junk files, lets you view what category those files belong to, and helps clear them all in one-click.
Here’s how to run disk cleanup with MacCleaner Pro:
- Launch MacCleaner Pro on your Mac.
- Wait for the app to scan your computer and find junk files.
- Click Clean Up in the left sidebar, and you will see all junk file types on the right pane. You will also see the amount of space that those files currently occupy on your Mac.
- Select unneeded files and hit Review to Clean Up at the bottom of your screen to get rid of those junk files from your machine.
This app offers various other cleaning features so that your Mac is always clean of any junk and unused apps. The following are some of those features if you’re curious and want to fully clean up your Mac machine.
Speed up Mac
If you’re noticing that your Mac’s performance has gone down, this feature is certainly going to help you speed up your Mac. That’s because this feature finds the causes of the issue, like your RAM being used inappropriately, and frees-up those items so that your Mac runs faster.

Again, you don’t have to do anything manually. Just press a few buttons in the app and it’ll take care of the rest for you.
Remove large files from your Mac
Most of the time, it’s not the tiny files that take up your precious storage but it’s those large files that you once downloaded but forgot to delete. Luckily, MacCleaner Pro has an additional tool for this called Disk Space Analyzer. This option helps find those storage-hogging files on your Mac and lets you delete them.

You get to pick what files you want to get rid of to ensure your important files aren’t deleted.
Get rid of duplicates
Finding duplicate files is the biggest headache for many people, but if you don’t do it, your Mac has double the amount of storage occupied than what it should have. Fortunately, MacCleaner Pro has a solution to this issue as well.

If you click on Find duplicate files in this program, it helps you find all of the duplicate files that are stored on your Mac machine. Once the files are found, you can then remove all of them at once. This saves you a tremendous amount of time, and saves you from frustration.
Conclusion
Like most other things in your life, your Mac also needs to be maintained. You should keep it in good shape by removing junk files from it, keeping track of its performance, and basically ensuring that it’s working the way it should. The above methods will help you remove unwanted files, which will significantly boost your machine’s performance.
In case you can’t find the time to delete junk files and look after the health of your Mac on a regular basis, you can use an app like MacCleaner Pro and it will automate all of those tasks for you. It’s indeed a life-saver app for many users, and you should give it a go if you haven’t already.