
FileVault disk encryption is one of the most effective methods of protecting your MacOS from thieves, unauthorized access and ultimately, identity theft. Apple has invested plenty of time and resources into equipping their Mac users with AES-128 encryption, which includes a 256-bit key to provide full-disk encryption. Apart from using the correct FileVault recovery key you initially set up, the data on your disk will be rendered unrecognizable. This makes it a highly desirable feature for users that hold sensitive information on their hard drives.
What is worth noting is that when you set up your Recovery Key, there will be no way to restore your data if you misplace the key. Even if you bring your Mac to an Apple service center directly, they won’t be able to help you. The only alternative would be to use the iCloud option to decrypt it.
However, that will mean compromising your data by relying on Apple to make sure no one else is able to gain access to it. Before going through the process of Mac encryption, be sure to weigh the pros and cons. If you are the type of person who would rather be able to restore his data easily, this option might not be for you.
Contents:
- 1. Should I use FileVault?
- 2. How to enable FileVault and encrypt all files on Mac
- 3. How to disable FileVault
- 4. How to encrypt files on Mac
- 5. How to hide files in addition to putting a password on them
Should I use FileVault?
If your Mac has information you don’t want anyone else to have access to in any circumstance, then the short answer would be yes. The main downside is the fact that if you lose your key, your data is good for nothing, as mentioned previously. Restoring your information after encryption is completed will be very difficult, if not impossible in most cases.
Also, you should keep in mind that the whole process of encryption, as well as decryption, does have a heavy impact on your machine’s system resources. Although you can keep using your Mac during the file encryption, you will definitely notice slower performance until the process is finished. Below we will show you the main ways to switch FileVault on and off at your convenience.
How to enable FileVault and encrypt all files on a Mac
If you’re running the newest version of macOS, then your system is most likely encrypted already. You can check to see if FileVault is turned on by following the steps below:
- Open on your Mac
- Click in the sidebar.
- Scroll down and find the the section.
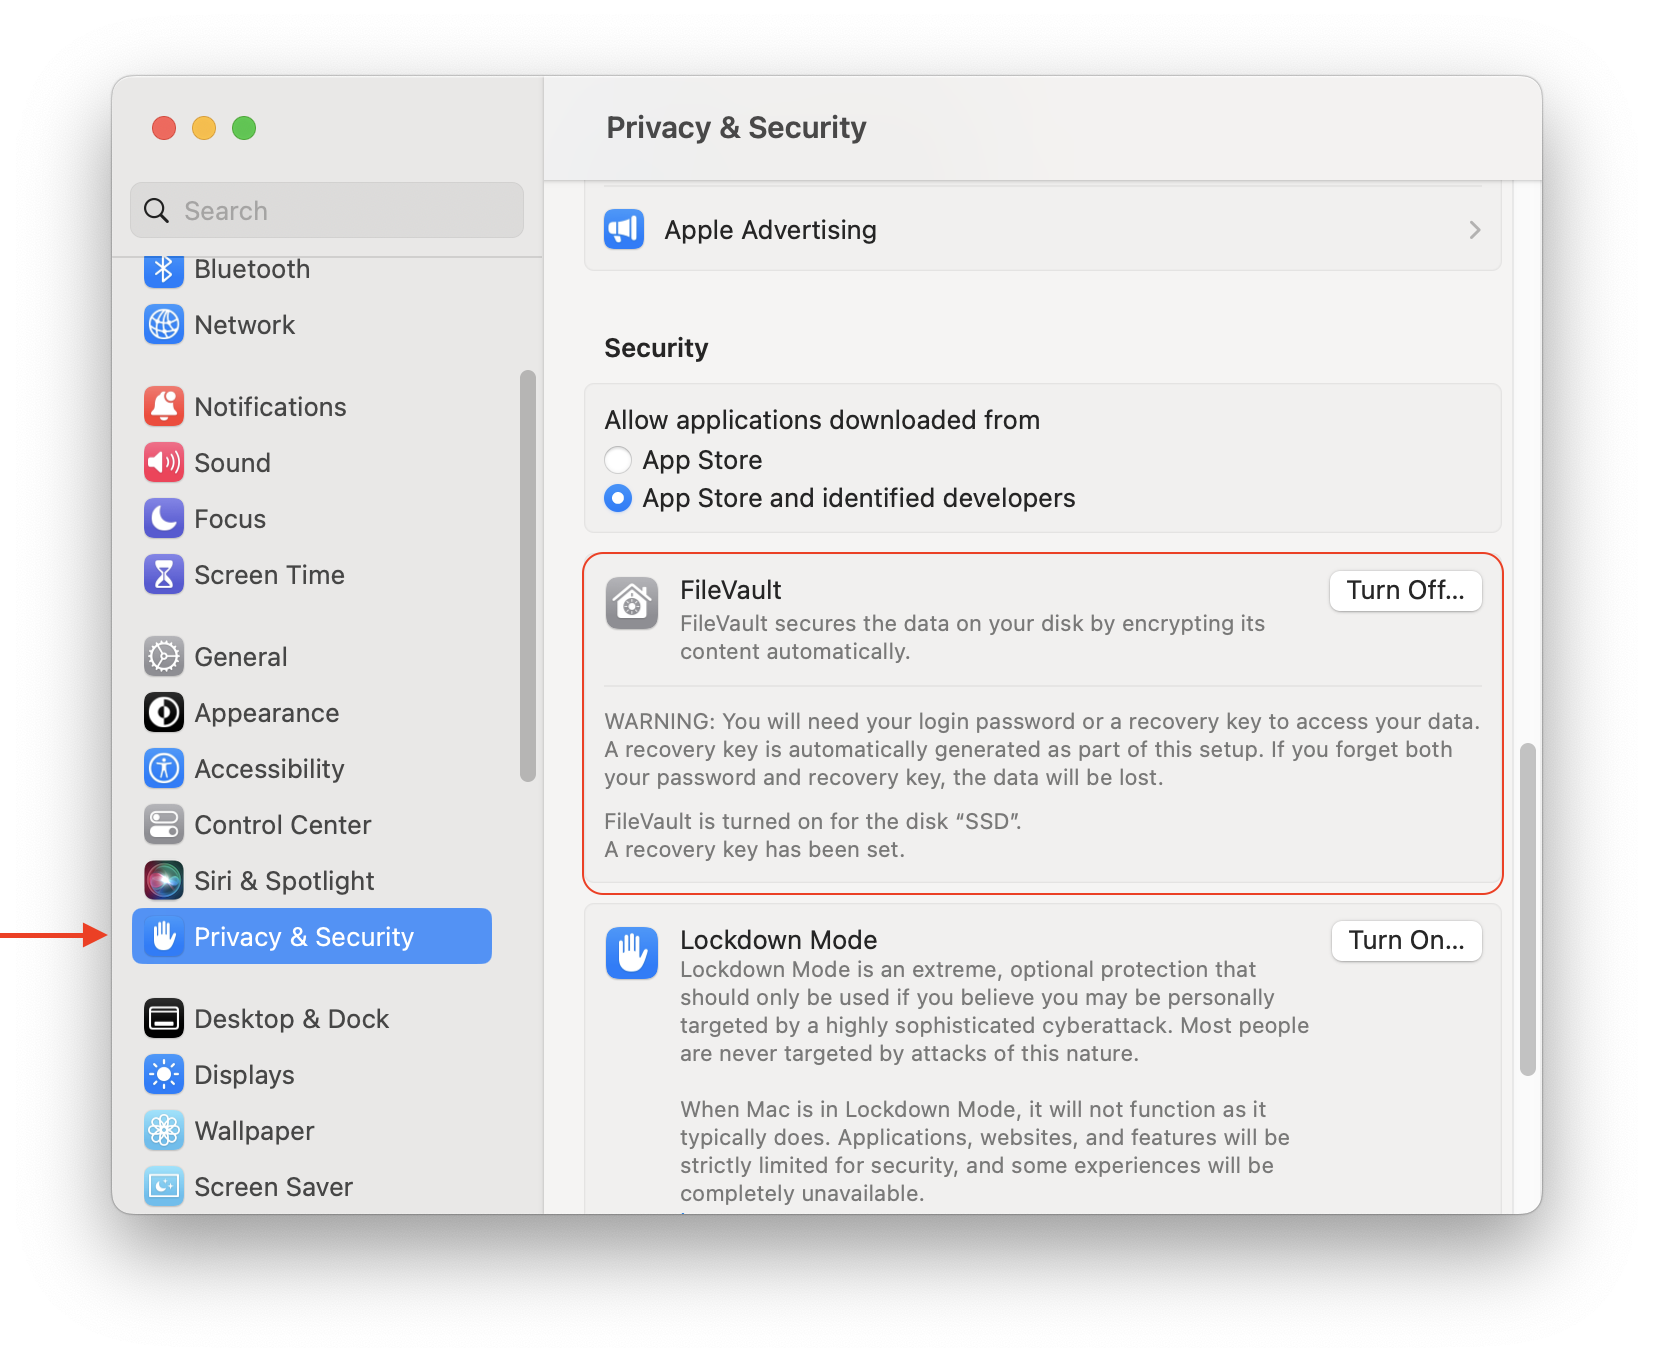
By default, on macOS FileVault is turned on. If not, use the toggle button to switch it on and follow the onscreen instruction.
You have two options for creating the encryption keys. You can either use your iCloud account as the cipher or make a permanent FileVault recovery key. The first option is safer for your data as you have more chances for successful recovery, but that comes at the cost of potentially compromising it. The second option works well for users that consider their data as classified, and are willing to lose access to it if the Mac recovery key is lost.
How to disable FileVault
If for some reason you have changed your mind regarding encryption, you can always turn off FileVault by going through system preferences on your Mac.
- Go to → click on .
- In the section, switch off the toggle button.
- You will need to enter your administrator name and password to proceed.


Allow for time to fully decrypt all of your files. Similar to encrypting, the process will be running in the background until it’s done.
How to encrypt files on Mac
Although Apple’s FileVault has some great advantages, you aren’t left with much choice but to encrypt the entire Mac hard drive. Encrypting individual files and folders is a much faster process and doesn’t necessarily put all of your files at risk if you happen to forget your password. For this reason, Disk Utility, a system utility app that is primarily used for internal and external disk management, will help you do just that in a few simple steps. You can use it to set a password on both files and folders and choose between 128-bit AES and 256-bit AES encryption. Follow the steps below to try it out for yourself:
- Launch the Disk Utility app on your Mac. It should be located in the → .

- As soon as the app has started, go to → →

- From the window that appears, you will be able to choose the folder that you wish to encrypt; click on once done.

- Choose your encryption method and image format if you need to, and click on .

- From there, enter the password for your encrypted disk image and you are all set.


After you have followed these steps, you will have a password protected disk image with your folders and files. You can follow the same process to encrypt a zip folder on a Mac. This is a great way to secure a limited number of files that you need kept safe on your Mac without having to encrypt the whole system.
How to hide files in addition to password protection
A great way to keep your files even safer would be to hide them within your macOS using a free application from Nektony – Funter. This way, in case someone does gain access to your machine, they will have a hard time locating your files as they won’t be visible to them in the first place. Simply follow the steps below to see how you can use Funter to hide files and folders on your Mac.
- Download and launch Funter.

- Choose the folder or file that you need and right click on it, then use the feature on it.

- You can now search for hidden files with Funter. Simply type in the name of the file or folder that you have set as hidden in the search bar.

- If you decide to use the Unhide with Funter feature to make your files visible, you can do that the same way you hid them. First either click on Show Hidden Files to find the folder you hid, or search for them and then click on Show in Finder. Once you have done that, simply right click on it and unhide it back into its normal state.


Not only does the app provide a great feature for locating files that you have set as hidden, but it also finds and deletes certain log or leftover system files that would not be visible in the regular files list.
Conclusion
By encrypting your files, you can rest assured that you will protect your data and privacy. We would still suggest that you backup your files thoroughly before you go through with the encryption, because you never know what may go wrong. Making sure your data is backed up is especially important if your data can be considered sensitive to you or anybody else.
Analyze disk space usage on Mac
")


