June 3, 2025
How to uninstall Skype on Mac
Microsoft officially shut down Skype on May 5, 2025. Farewell to one of the tech icons of the early 2000s.
Whichever app you prefer instead, there’s no point in keeping Skype on your Mac anymore.

Dragging to the Trash removes the app itself but not the leftovers. Caches, settings, and background files often stay behind and quietly take up space.
So I looked into how to remove Skype completely from my macOS and leave no trace behind.
Follow this step-by-step guide to do the same.
Contents
Before we start
If you’re in a hurry and want the easiest way to uninstall Skype from your Mac, try App Cleaner & Uninstaller by Nektony. It fully removes any app from your Mac safely and in just a couple of clicks.
How to manually remove Skype from your Mac for good
This guide applies to Skype version 8.128 and macOS Sequoia 15.4.
The list of files for removal can differ for earlier versions of macOS or Skype.
Also, you might not find some of the files listed here. Feel free to ignore it: that means your Skype setup did not generate them.
The idea is simple: you’ll visit a few folders and delete files Skype left behind. I’ll explain what each folder or file does – and your job is just to move them to the Trash.
1. Delete Skype
If you haven’t deleted the Skype app yet, you can do that first by dragging it from the Applications folder to the Trash.
2. Remove Skype plugins
If there’s one category of files you don’t want to leave behind for sure, it’s Skype plugins. These little guys can throw unexpected errors when you click someone’s name or phone number in your Contacts app, even after Skype is gone.
~/Library/Address Book Plug-ins/
Copy
In this folder, find and remove the following files:
- SkypeABCaller.bundle
- SkypeABChatter.bundle
- SkypeABDialer.bundle
- SkypeABSMS.bundle
If you don’t know how to go to the Address Book Plug-ins folder, here’s a small guide.
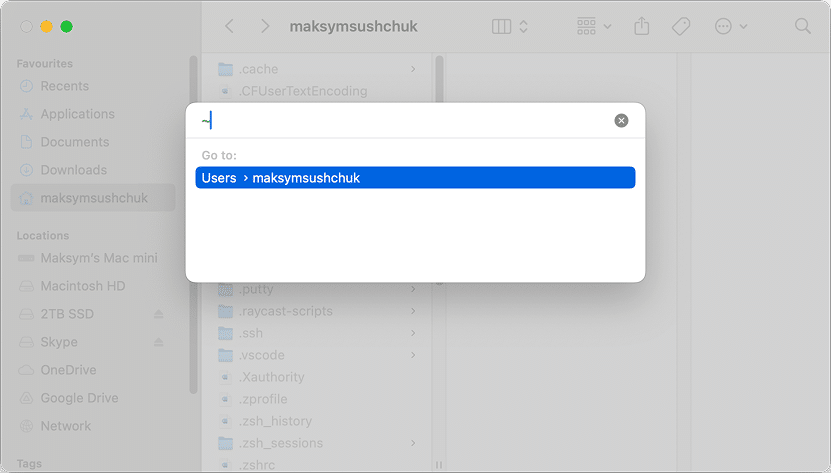
First, you need to get to the ~ folder. The “~” symbol means your personal user folder. To open it in Finder:
- Click your name under Favorites in the sidebar (you can add it in Finder Settings → Sidebar tab if it’s not there)
- Or press Command + Shift + G to launch the Go to Folder dialog, then type ~ and hit Enter.
- Once you’re in the ~ folder, locate the Library folder. This folder is hidden in Finder by default, so you might want to use the Command + Shift + . (dot) to reveal hidden files first.
- Finally, when you get to , open the Address Book Plug-ins folder. This one is not hidden and must be easy to find.
~/Library/Copy
3. Clear Skype preferences
Skype preferences files store your personal Skype settings, like window position and the last used camera.
~/Library/Preferences
Copy
Look for these files and delete them:
- com.skype.skype.plist
- com.skype.skype.Helper.plist
~/Library/Preferences/ByHost/
Copy
com.skype.skype.ShipIt…
Remove them all.
It’s OK if you can’t find some of the files mentioned in this guide.” That means Skype had no need to generate them yet.
4. Remove HTTP cache
HTTP cache holds cached Skype data related to internet activity, like cookies.
~/Library/HTTPStorages/
Copy
Here, find and delete this folder: com.skype.skype
5. Delete application data
This one stores your chat history, call logs, and media files, so clearing it can free up a noticeable amount of space.
~/Library/Application Support/Microsoft/
Copy
Here, you need to get rid of the folder: Skype for Desktop
6. Clear recently opened file info
The file obviously tells macOS which documents Skype opened recently.
Head to:
~/Library/Application Support/com.apple.sharedfilelist/com.apple.LSSharedFileList.ApplicationRecentDocuments/
Copy
Look for the file com.skype.skype.sfl3 and delete it.
7. Clear cache files
First, let’s remove cache files used for speeding things up and handling updates.
~/Library/Caches/
Copy
Look for and remove these folders:
- com.skype.skype.ShipIt
- com.skype.skype
They’re safe to delete.
Next, you’ll want to remove the file containing details on your last use of Skype.
~/Library/Saved Application State/
Copy
Here, you might find the following file: com.skype.skype.savedState. No need to keep it if you’re uninstalling Skype.
8. Delete logs.
Every app generates logs containing entries about their actions. Skype is no exception. Its log folders contain logs created by Skype’s background processes.
~/Library/Logs/
Copy
And delete:
- Skype
- Skype Helper (Renderer)
9. Clean up temporary files.
These files store temporary data. They usually clear out on restart, but if you rarely shut down your Mac, it’s worth doing manually.
/private/var/folders/
Copy
The private folder is not in your ~ folder.
It’s in the root of your disk (in most cases, it’s called Macintosh HD).
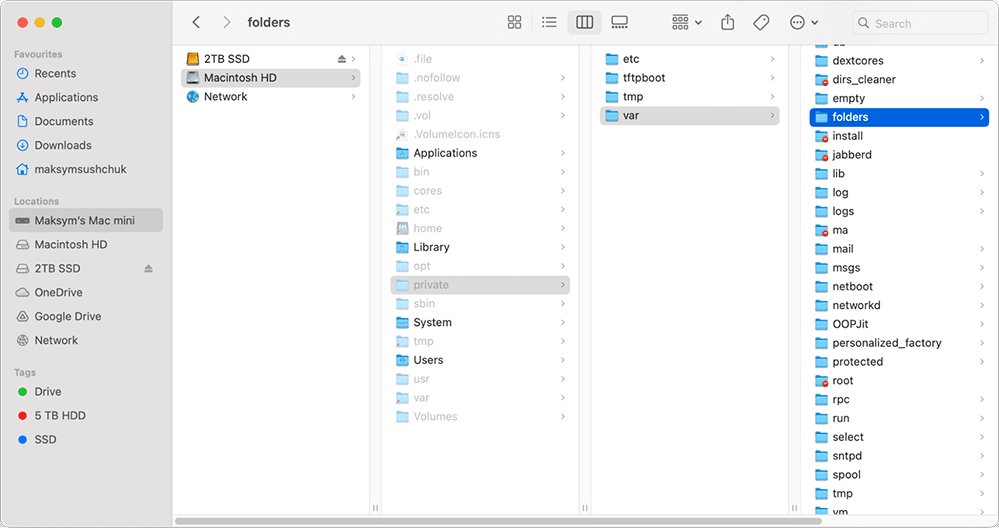
Inside, the folder names are pretty cryptic, so the easiest way is to search for “skype” inside this folder.
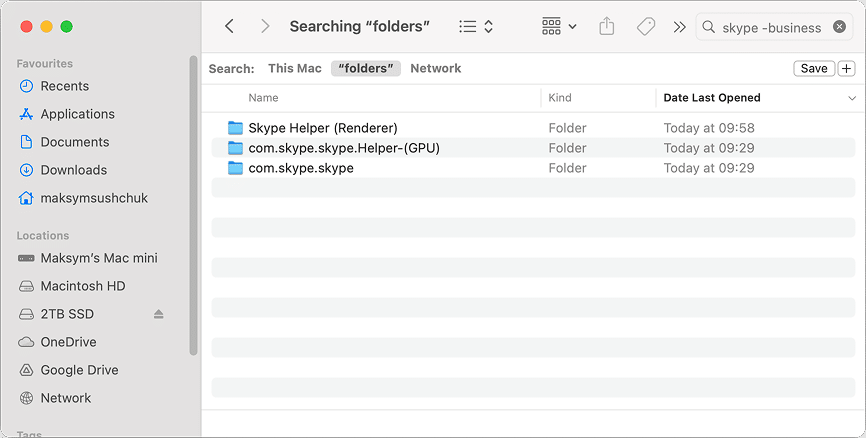
When you find these, delete them:
And delete:
- com.skype.skype
- com.skype.skype.Helper-(GPU)
- Skype Helper (Renderer)
That’s it! You’ve now removed all traces of Skype on your Mac.
How to remove Skype using Terminal
The steps above walk you through manually deleting Skype-related files. But if you’re comfortable using Terminal, you can remove them much faster with just a few commands.
Don’t worry — I’ve got you covered. And no, you don’t have to memorize any fancy code. In fact, there’s just one command you’ll be using: rm -rf:
- rm means “remove”
- -rf tells your Mac to delete folders and their contents without asking for confirmation

Below is the full list of commands. Each one removes a different leftover from Skype. Copy, paste to Terminal and hit Enter for each of one of them to remove all Skype-related data.
Skype preferences
rm -rf ~/Library/Preferences/com.skype.skype.plistCopy
rm -rf ~/Library/Preferences/com.skype.skype.Helper.plistCopy
rm ~/Library/Preferences/ByHost/com.skype.skype.ShipIt.*.plistCopy
User data
rm -rf ~/Library/HTTPStorages/com.skype.skypeCopy
rm -rf ~/Library/Application\ Support/Microsoft/Skype\ for\ DesktopCopy
rm -rf ~/Library/Application\ Support/com.apple.sharedfilelist/com.apple.LSSharedFileList.ApplicationRecentDocuments/com.skype.skype.sfl3Copy
Cache
rm -rf ~/Library/Caches/com.skype.skypeCopy
rm -rf ~/Library/Caches/com.skype.skype.ShipItCopy
Logs
rm -rf ~/Library/Logs/SkypeCopy
rm -rf ~/Library/Logs/Skype\ Helper\ \(Renderer\)Copy
Saved application state
rm -rf ~/Library/Saved\ Application\ State/com.skype.skype.savedStateCopy
Contacts integration plugins
rm -rf ~/Library/Address\ Book\ Plug-Ins/SkypeABCaller.bundleCopy
rm -rf ~/Library/Address\ Book\ Plug-Ins/SkypeABChatter.bundleCopy
rm -rf ~/Library/Address\ Book\ Plug-Ins/SkypeABDialer.bundleCopy
rm -rf ~/Library/Address\ Book\ Plug-Ins/SkypeABSMS.bundleCopy
Temporary system files
rm -rf /private/var/folders/*/*/*/com.skype.skypeCopy
rm -rf /private/var/folders/*/*/*/com.skype.skype.Helper-*Copy
rm -rf /private/var/folders/*/*/*/"Skype Helper (Renderer)"Copy
How to uninstall Skype for Business
Unlike the regular version of Skype, Skype for Business is still active, so there’s no rush to remove it unless you have a reason.

If you do want to uninstall it, the process is similar but involves a different set of files. You can either delete these manually in Finder or use Terminal again.
Here’s how to do it in Terminal:
- Use this command to remove the app from Applications (if you haven’t already):
sudo rm -rf "/Applications/Skype for Business.app"Copy
- Delete the login item to stop Skype for Business from auto-starting:
osascript -e 'tell application "System Events" to delete login item "Skype for Business"'Copy
- Remove system-level configuration files:
rm -f /private/var/db/receipts/com.microsoft.SkypeForBusiness.bomCopy
rm -f /private/var/db/receipts/com.microsoft.SkypeForBusiness.plistCopy
- Clean up the leftovers in the Application Scripts folder:
rm -rf ~/Library/Application\ Scripts/com.microsoft.SkypeForBusinessCopy
- Remove the Container folder created by Skype for Business:
rm -rf ~/Library/Containers/com.microsoft.SkypeForBusinessCopy
- Finish off by removing private temporary app data:
rm -rf /private/var/folders/*/*/*/com.microsoft.SkypeForBusinessCopy
The two-click way: use App Cleaner & Uninstaller
If you want an even easier method, consider using an app like App Cleaner & Uninstaller. It automatically finds and deletes all leftover files associated with apps like Skype.
Here’s how to use it:
1. Open the app.
2. In the Applications tab, select Skype.
3. Click the Uninstall button and confirm.
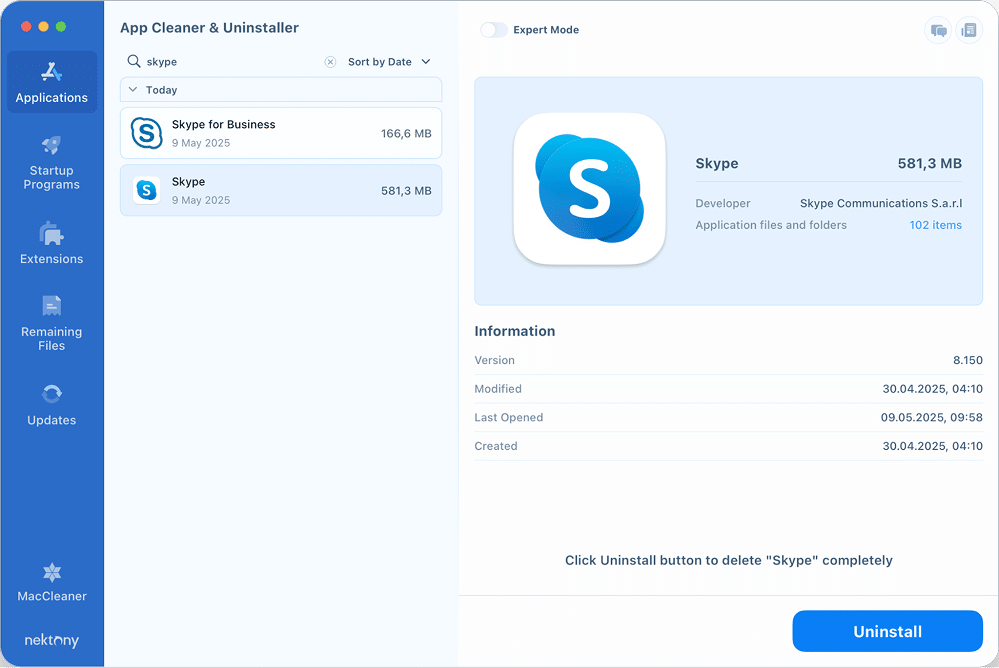
If you’ve already trashed Skype, go to the Remaining Files tab, find Skype-related leftovers, and remove them with one click.
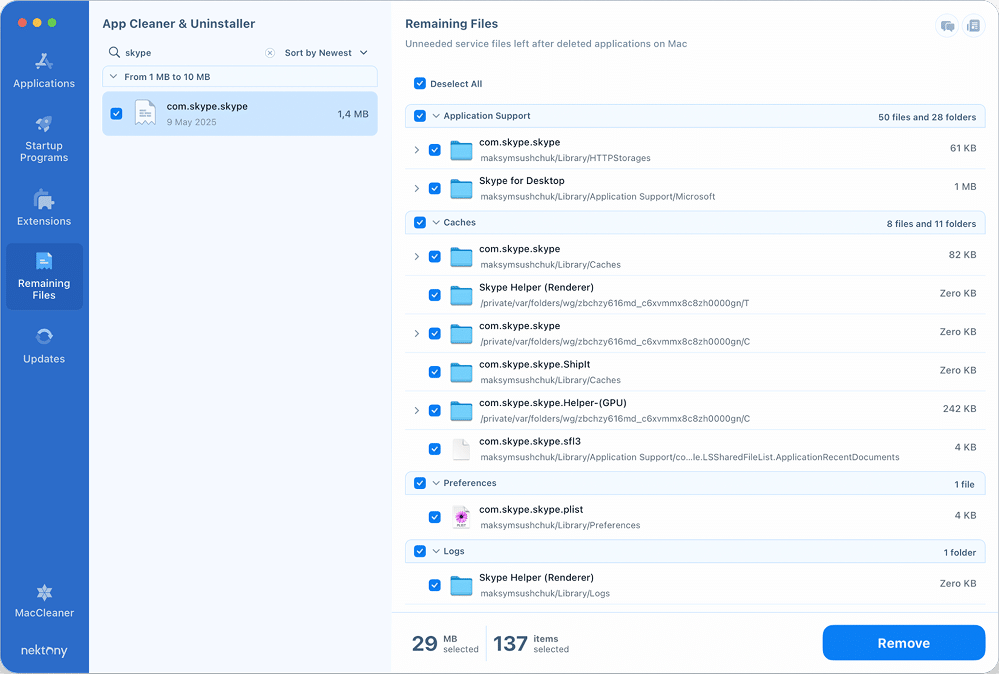
This app knows exactly which files Skype creates and safely removes only those. It’s quick, safe, and hassle-free. And you can apply this approach to Skype for Business as well.
That’s a wrap
I didn’t delete Skype until now, but moved on from it years ago — faster, sleeker alternatives came along. But I still remember our old family group chat and my first calls across the ocean with friends I hadn’t seen in years. Those memories were made possible thanks to Skype, and for that, it’ll always have a nostalgic spot in our hearts.
Just… not on our Macs anymore. That spot’s been vacated. 😄

