Help
Memory Cleaner
Monitor memory usage
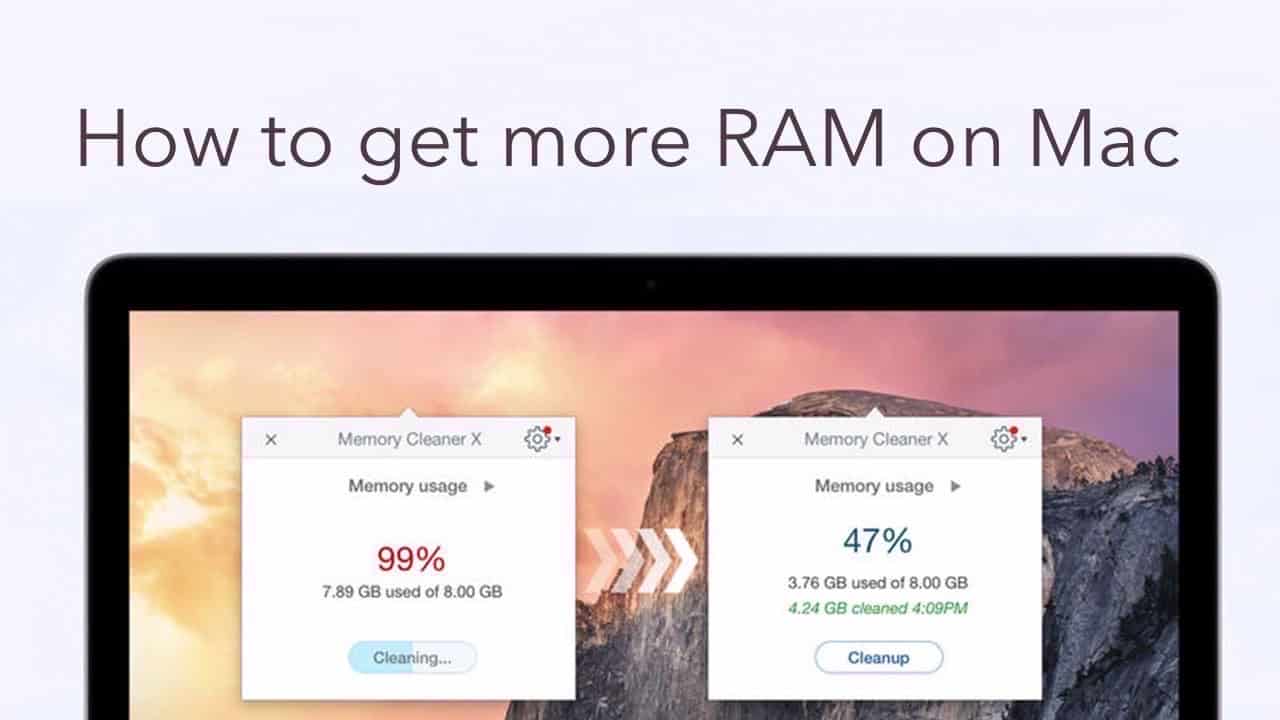
Memory Cleaner is an application that helps you free up unused RAM and speed up your Mac. Once you launch the app, it regularly scans your system and shows the memory usage on your Mac, including the memory used by a single application launched on your system.
Launch Memory Cleaner and find the memory indicator in the menu bar.

Click the Memory Cleaner’s icon to see the RAM monitor – the amount of free RAM, the size of the RAM being used, and the amount of memory occupied by active applications. General memory usage is displayed both by percentage and in GB.

Free up memory
Memory Cleaner allows you to clean up your RAM memory, which in reality is free. However, the system shows it as occupied by apps. Just check the indicator periodically. If the amount of used memory reaches its peak point, click Free Up. After the cleaning process you will see the amount of cleared memory in the window and the time of the last cleanup.


If you have freed enough memory, then go on with your work.
Sometimes all of your RAM may be used for active processes and it is impossible to clear enough memory. In that case, close unused applications and then click Free Up once more.
By performing these two simple steps, your Mac will always have to operate at high speed.
Automatic cleanup mode
Memory Cleaner allows you to set up an automatic cleaning of your inactive memory. You can change the settings right in the Memory Cleaner window.
- Click the Memory Cleaner icon in the menu bar.
- Switch on the option “Automatically free up”.


If needed, you can change the frequency of automatic RAM cleanup. For this, click the arrow icon and open the settings for this option.
- Click the Gear icon in the top right corner of the app’s window.
- Choose Settings from the menu.

- Go to the Automation tab.
- Enable the option Automatic RAM cleanup.
- Move the sliders on the lines depending on how often you want the cleanup to occur. For example, on the Frequency line, the points of the slider may have the following definitions:
– rarely – every 8 hours
– normally – every 40 minutes
– often – every 1-2 minutes - Set up other conditions of RAM cleanup – Memory Usage and CPU Usage.


Also, in the General tab of Memory Cleaner settings, you can enable the option to automatically clean up RAM when large applications quit. It will be useful to everyone who often uses large apps such as iMovie, iTunes, Adobe Photoshop, Pixelmator, and others.
Disk usage
Besides monitoring your RAM usage, Memory Cleaner provides an additional feature called Disk Usage. It helps you monitor your disk space usage and free up space on your Mac.

In the Disk Usage section of the Memory Cleaner window, you can see the volume of junk files, duplicate files, applications, and large and old files. You can click on each category of files to see them in more detail and manually find and remove those unneeded files.
Also, Memory Cleaner synchronizes with other Nektony applications of MacCleaner Pro’s bundle. With these additional tools, you can quickly and easily remove all junk files, like caches, logs, Mail attachments, duplicate files, large and unnecessary files, and apps with their remaining files. As a result, you can recover valuable disk space and speed up your system.
Simply switch between the tabs in the Disk Usage section and click the appropriate buttons to open MacCleaner Pro or additional tools from its bundle.

If you don’t have the tools from the MacCleaner Pro’s bundle, you will see the Review and Clean button, which will provide you with smart tips on how to free up disk space on your Mac.
Full Disk Access
For security reasons, Apple requires that you manually grant access to your apps to operate the user`s files. Since Memory Cleaner provides a feature to show you disk usage and junk files, you will need to grant Full Disk Access to allow the app to find these files.
Here is how to grant access for Memory Cleaner:
- Open Memory Cleaner settings.
- Switch to the Disk Access tab.
- Click Open Settings.

- It will open the Mac System Settings window, showing the Full Disk Access option in the Security & Privacy section.
- Switch on the toggle button for Memory Cleaner.
- If you don’t see the app in this list, click the Plus(+) icon and add Memory Cleaner to this list.


Now Full Disk Access is enabled for Memory Cleaner, and the app can fully analyze your disk and help you get rid of junk files on your Mac.
Language
Memory Cleaner supports the following languages:
- English
- German
- French
- Spanish
- Italian
- Ukrainian
- Russian
- Chinese
By default, when you launch the app for the first time, it uses the system language you previously set. To change the app’s language, follow these steps:
- Open Mac System Settings.
- Go to General → Language & Region.
- Scroll down and locate the Applications section.
- Click the Plus (+) icon and add Memory Cleaner.
- Change the language for the app.
- Restart the app to set the new language.

Uninstallation guide
If for any reason you need to uninstall Memory Cleaner, follow these steps:
- Quit the app. For this, open Memory Cleaner from the toolbar → click the Gear icon → choose Quit Memory Cleaner.

- Go to the Applications folder → locate and remove Memory Cleaner to the Trash.
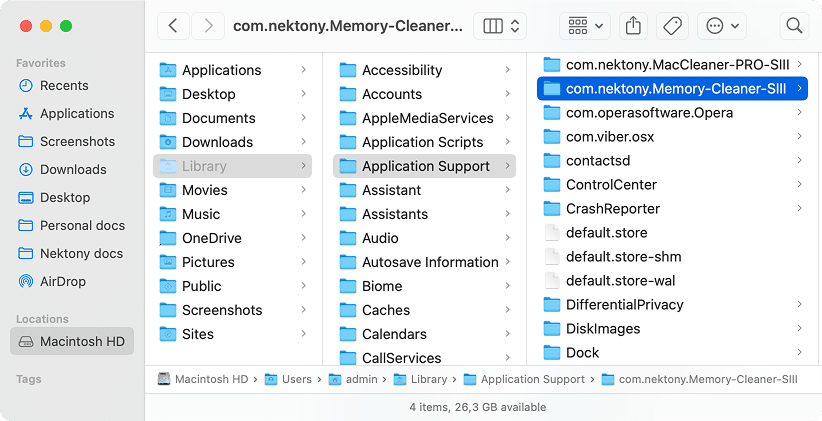
- In Finder, press Cmd+Shift+G to open the Go to Folder search box.
- Type ~/Library and hit Return.

- Here, find and remove all files associated with Memory Cleaner. Look in the following directories:
- ~/Library/Application Support/com.nektony.Memory-Cleaner-SIII
- ~/Library/Caches/com.nektony.Memory-Cleaner-SIII
- ~/Library/HTTPStorages/com.nektony.Memory-Cleaner-SIII
- ~/Library/Preferences/com.nektony.Memory-Cleaner-SIII


Note: The exact list of support files may vary depending on your version of the app or usage. Be sure to carefully check all relevant ~/Library subfolders for any remaining files related to Memory Cleaner.
Another option to quickly and completely uninstall Memory Cleaner is to use App Cleaner & Uninstaller.
If you have any questions about Memory Cleaner, contact our support team. We will be happy to assist you.
Video Guides