September 24, 2025
Find and remove the largest files and folders on Mac
We can all pack Mac’s storage faster than we expect. Doesn’t matter if yours has 256GB or a full 1TB – it happens. But here’s a twist: macOS needs breathing room, which leads to this unspoken rule: never let storage creep past 80-90%, i.e. leave 10-20% free.
Why? Because the system isn’t just storing your files. It’s also working behind the scenes:
- Virtual memory. When RAM overflows, macOS dumps extra data on your disk.
- System updates. They need gigabytes of space to unpack and install.
- Temporary files. Apps and the system are writing caches and logs all the time.
- Performance. A packed drive results in your Mac being slow.
That’s when you need to clean up your Mac. One of the things you can do is find the big files on your Mac. In this work of mine, you’ll get practical ways to do that – spotting the space hogs with Finder, System Settings, Terminal, or a Disk Space Analyzer. On top of that, I’ll share hacks for hidden and duplicate files (you’ll love this if loads of photos, docs occupy your Mac).
This Article Contains
Meet your Mac's storage detective
Instead of blindly deleting random files, let a Disk Space Analyzer draw the full picture. It shows what fills up your disk by visualizing it clearly, so you see every Mac’s corner, from heavy folders to hidden items. Once you open it, clearing space feels quick and effortless.
Delete big files from System Settings
macOS gives you built-in tools to track down and remove bulky files. It’s not as visual as a Disk Space Analyzer. Still, it’s handy if you want a standard overview without extra apps.
- Click the Apple logo in the top-left corner → choose System Settings.
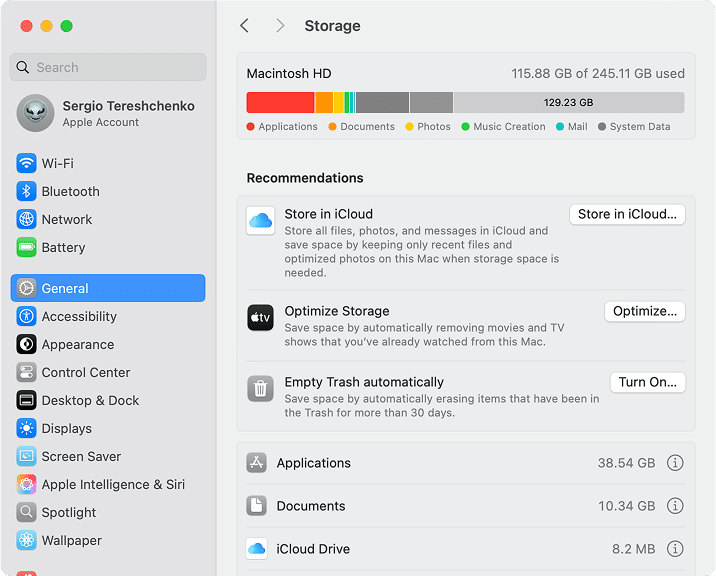
- In the left sidebar, go to General → select the Storage tab from the right panel.
- See the colored storage bar at the top: each color is a category → hover over a section to check its size.
- Below the bar, look through the Recommendations section with Apple’s tips for saving space, like emptying Trash automatically or moving files to iCloud.
- Scroll down past Recommendations to locate a detailed list of categories – Applications, Documents, iCloud Drive, Trash, and more → pay attention to storage numbers opposite to each category.
- Click the (i) icon next to a category → see the largest files inside it.
- Select the ones you don’t need and hit Delete.
The downside of this method is that you won’t see the whole picture at once, but it’s still a solid way to spot and remove large files directly.
Detect large files with Finder
Finder also has a trick up its sleeve. You can set custom filters to surface files above a certain size – super helpful when you need to locate the really big stuff.
- Open Finder.
- Press Command + F to start a search.
- Change the search filter to File Size → is greater than.
Note:
In case the File Size criterion isn’t there, open the dropdown → click Other… → select the File Size from the list → click the OK button.
- Enter the size (for example, 500 MB).
- Control-click the file you want to delete → Move to Trash.
- Empty Trash.
Your Mac will then list every file larger than the size you set. From there, you can decide what stays and what goes.
Search big files using Smart Folder
If you often look for the same types of files, creating a Smart Folder lets you create custom searches that update automatically and always keep tabs on certain file types.
- In Finder, go to the File menu and choose New Smart Folder.
- Add filters by clicking the + button.
- For example, set Kind → Application (Folder, Image, Movie, Music, PDF, and more).
- Choose File Size → is greater than 1 GB.
- Trash the item to be deleted.
- Finish deletion by emptying Trash.
- Click Save to store this Smart Folder in your sidebar for quick access.
Now, every time you open that Smart Folder, Finder instantly shows files that match your criteria – no need to repeat the search. It’s like having a custom shortcut for finding your biggest files.
Find the biggest files in Terminal
In order for Terminal to process commands on locating the largest items across your Mac correctly, you have to give Terminal Full Disk Access first. You can do that this way:
- Open System Settings.
- In the left sidebar select Privacy & Security.
- Click the Full Disk Access tab in the right panel.
- Check Terminal from the list.
- Enter the admin password.

- Open Terminal (Applications → Utilities → Terminal).
- Check the heaviest folders in your user folder by entering this command:
After you run a scanning command below, it may take a while to scan your entire device, especially if your Mac is jammed. Please wait until the scan is complete.
du -sh /* | sort -hr | head -n 10Copy
Useful for scanning common storage-heavy locations.
- Run this command to see the 10 largest files in your home folder:
find ~ -type f -exec du -h {} + 2>/dev/null | sort -hr | head -n 10Copy
This scans for files, shows their size, sorts them, and returns the heaviest ones.
- To check a specific folder (like Downloads) for big files, use this command:
du -sh ~/Downloads/* | sort -hr | head -n 10Copy
From here, you decide which files are worth keeping and which should go to Trash.
Note:
Terminal deletes a file permanently without putting it to Trash. Please double-check the file you want to remove with Terminal.
- To delete a big file, run the rm command followed by the file’s directory. You can copy that directory from the previous output results or drag the file from Finder into Terminal. In my case, I decided to delete the old movie from the Downloads folder:
rm /Users/sergio/Downloads/The.Irishman.2019Copy
Find big files on Mac automatically
macOS has its own built-in tools to manage storage, but it’s better to have more detail. That’s where a Disk Space Analyzer comes in. Rather than digging through folders, it scans your drive and shows a colorful map of your storage. Every slice on the chart is a file or folder, and the bigger the slice, the more space it eats. You’ll spot the culprits right away.
- Get and open Disk Space Analyzer.
- Hit the Start Scanning or Play button to scan your Macintosh HD.
- Select the Biggest Files tab.
- Select old or unused files → click Review to Remove → push the Remove button.
The beauty of this tool is speed and clarity. One scan, and you’ll know exactly where your GBs went, from hidden system files to forgotten downloads. The benefits don’t stop there:
- It works with external drives, DMGs, and USB sticks.
- It spots hidden files that normally slip past you.
- It highlights problem files instantly.
- It lets you delete selected big files in a single shot.
- It saves you from manually searching for oversized files.
- It earns trust for freeing space in a simple, satisfying way.
Source: App Store
Final checkup
So, what did we cover? You’ve now got macOS’s own tools in System Settings, a few search tricks in Finder, commands in Terminal, and, when you want the full story, a Disk Space Analyzer. Each has its place, but only one gives you that bird’s-eye view in seconds.
The truth is, keeping your Mac’s storage clean isn’t just about decluttering. It’s what keeps performance sharp and updates running smoothly. And while you can chase down large files manually, why waste time when a Disk Space Analyzer shows you everything at a glance, from hidden junk to the heaviest folders, and lets you clear them in a click?
In short, giving your Mac breathing room is the secret to keeping it fast and stress-free. Add using Disk Space Analyzer as a habit, and you’ll always know where your gigabytes went and how to win them back quickly. Want more? Find out from Nektony how this tool can transform the way you manage your Mac storage.


