August 14, 2025
How to uninstall Evernote from Mac the right way
Can’t figure out how to completely uninstall Evernote? Never mind. This guide provides detailed steps to remove Evernote in manual and automated ways fully.
By the end, you’ll be assured Evernote is entirely gone, including the app itself and all the junk files. Plus, I’ll say a couple of words about pre-uninstallation, bug fixing, alternatives to Evernote, and how to delete Web Clipper and your account.
This Article Contains
Need the easy button?
Forget the complexities of manual uninstallation. App Cleaner & Uninstaller is the easy button for removing any app, like Evernote, from your Mac, along with every last bit of its support files, caches, and preferences. It’s the quickest route to reclaiming disk space and improving your Mac’s performance.
What is Evernote?
Evernote is a cross-platform note-taking app that helps you capture and organize ideas, lists, documents, projects, and more. You can add text, images, audio, PDFs – even clip content straight from your browser.
It’s convenient to keep everything from shopping lists to meeting notes in one searchable place. Everything syncs across your devices, so you can pick up data where you left off, whether you’re on your Mac, iPhone, or the web.
Guess what?
ElectroIQ’s stats say that over 225 million users have created more than 8 billion notes. Evernote gets 36.9 million visits monthly, with 25% logging in daily. Still, downloads dropped from 9.6 million in 2017 to 1.7 million in 2023.
Why uninstall Evernote?
Which means people use it less than before. Plus, Evernote is a helpful tool though, but not without its flaws. That’s why many users eventually choose to uninstall Evernote, often due to common issues and user concerns like these:
- Persistent installer pop-ups: The Evernote installer keeps popping up on the desktop, which can be an annoyance and disrupt workflow (see related discussion on Reddit).
- Sync issues across devices: Notes don’t always sync properly between Mac, iPhone, and web, leading to lost or outdated content.
- Reinstall needed for bug fixes: According to discussions on the Apple Support Community, the only way to fix ongoing glitches is to uninstall and reinstall Evernote completely.
- Lagging and freezing: The app can become sluggish or unresponsive, especially with large notebooks or extended use.
- Switching to ecosystem apps: Many users move to Apple Notes, Google Keep, or Notion to stay within their preferred ecosystem and reduce app clutter.
- Excessive CPU usage: Evernote is known to cause unusually high CPU load, which can be a reason why your Mac slows down.
Before you uninstall Evernote
When examining the whole Evernote-uninstallation thing, I came across Evernote’s official article, which suggests two precautions:
- Save your Activity Log.
- Back up your account and any local, unsynced notebooks.
Save a copy of your Evernote Activity Log
The Activity Log can come in handy if you ever need to troubleshoot, reach out to support, or want a paper trail before you uninstall. There are two options to grab it:
Option 1: If Evernote still opens
- Launch Evernote.
- In the top menu bar, click Help → Activity Logs → Save As.
- Choose a destination → hit Save.
Option 2: If Evernote won’t launch
- Open Finder.
- In the top menu, click Go → Go to Folder.
- Paste the following path and hit Return:
If that folder’s empty, try this one instead:~/Library/Application Support/Evernote/logsCopy
~/Library/Containers/com.evernote.Evernote/Data/Library/Application Support/Evernote/logsCopy
- Save your Activity Log(s) to the desired location.
Export your notes and notebooks
Exporting your notes post-Evernote is non-negotiable if you still need access. Here’s how to take them with you:
- Open the Evernote desktop app.
- Select either the entire notebook or individual notes.
- Right-click the selection → choose Export.
- Pick your desired format:
- .ENEX (Evernote’s native format for importing later)
- single-page HTML (for web-style readability)
- or multi-page HTML (if you like everything organized)
- Choose what metadata to include, like tags, author, and creation date.
- Click Export. The file will land on your desktop (unless you pick a different location).
Note:
Uninstalling Evernote on a computer does not delete your account. If you’ve synced notes, you can access them after reinstallation or on any other device using your account. Make sure your notes are synced and available on Evernote Web.
2 Ways to remove Evernote
Once your logs and notes are backed up, you’re all set to safely and permanently remove Evernote. Below follow manual and automated methods to uninstall Evernote (tested on version 10, running on macOS 15).
Delete Evernote manually
If you are okay with the DIY route, you can uninstall Evernote manually using Finder. This method involves deleting the app and locating and removing residual files spread throughout your Mac. Here is what to do:
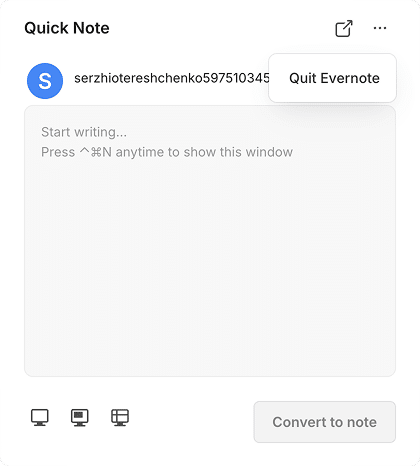
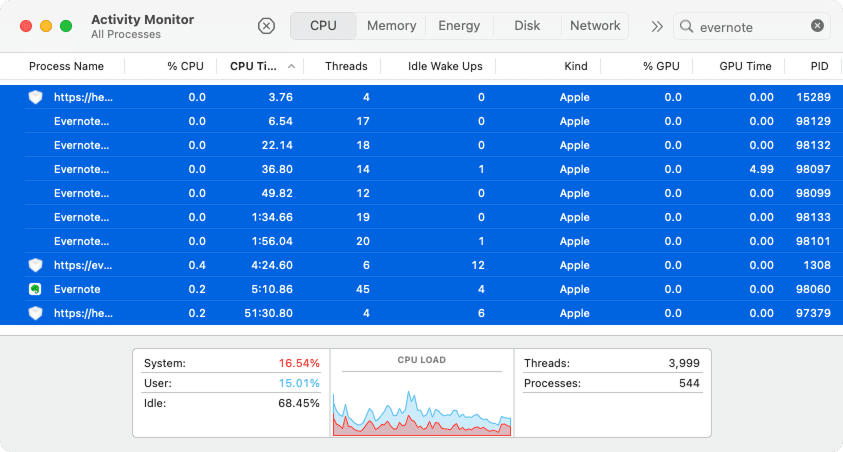
- Quit Evernote:
Сlick the menu bar icon → three dots → Quit Evernote. - Stop background processes:
Open Activity Monitor → search Evernote → select its processes → click X to quit them. - Delete the app.
Go to your Applications folder → drag Evernote to the Trash. - Find and delete leftover files.
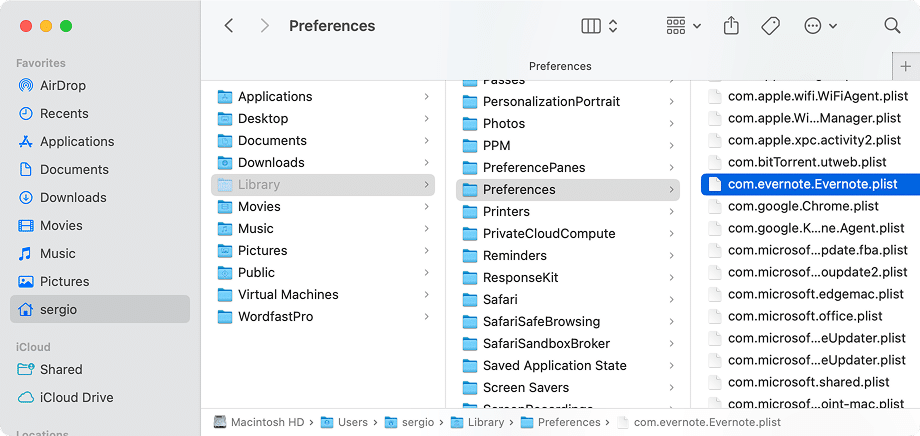
Switch to Finder, press Shift + ⌘ + G → paste the paths below bit by bit → remove anything related to Evernote:Application support:
~/Library/Application Support/com.evernote.EvernoteCopy
~/Library/Application Support/com.evernote.EvernoteHelperCopy
~/Library/Application Support/EvernoteCopy
~/Library/HTTPStorages/com.evernote.EvernoteCopy
~/Library/Application Scripts/com.evernote.Evernote.shareextCopy
Preferences:
~/Library/Preferences/com.evernote.Evernote.plistCopy
~/Library/Preferences/com.evernote.EvernoteHelper.plistCopy
→ look for a file matching com.evernote~/Library/Preferences/ByHost/Copy
Caches:
~/Library/Saved Application State/com.evernote.Evernote.savedStateCopy
~/Library/Caches/com.evernote.EvernoteCopy
~/Library/Caches/com.evernote.edam.usageCopy
~/Library/Application Support/com.apple.sharedfilelist/com.apple.LSSharedFileList.ApplicationRecentDocuments/com.evernote.evernote.sfl3Copy
/private/var/folders/Copy
Use the top-right search box to search for com.evernote → click on the folders filter → delete folders that begin with /private/var/folders/ and are Evernote remnants.
Containers:
~/Library/Group Containers/Q79WDW8YH9.com.evernote.EvernoteCopy
~/Library/Containers/com.evernote.Evernote.shareextCopy
Crash reports:
~/Library/Caches/com.plausiblelabs.crashreporter.data/com.evernote.EvernoteCopy
Cookies:
~/Library/Cookies/com.evernote.Evernote.binarycookiesCopy
- Empty the Trash.
🎯 Mission complete. Evernote is in the past.
Uninstall Evernote automatically
Since manual removal may miss hidden files, an uninstaller tool like App Cleaner & Uninstaller guarantees an automated clean uninstall. Even Evernote’s support recommends deleting all the app’s files with an uninstaller software.
So, I tried App Cleaner & Uninstaller myself. This application helped me remove and manage programs on my Mac, clear cache files, change extensions, and even find hidden files of earlier removed apps – all in a single sweep.
- Install and open the App Cleaner & Uninstaller.
- Locate Evernote and check it on the list of applications.
- Press Uninstall → confirm the removal.
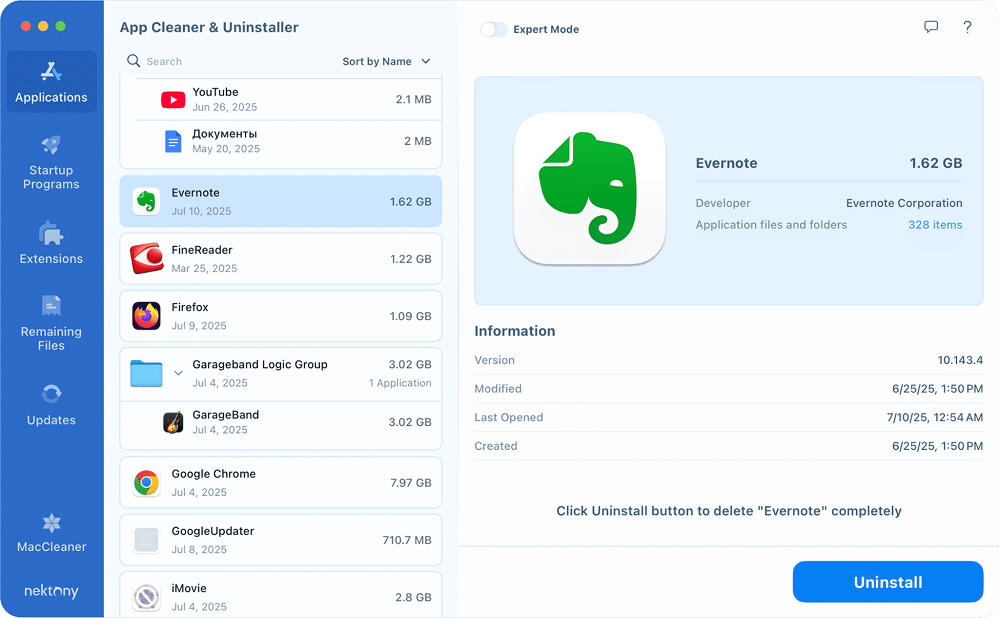
Easy as that 😎 No traces of Evernote.
How to erase Evernote’s remaining files
If you’ve proceeded with the Evernote uninstall by manually deleting files but want a faster way to catch leftover files, App Cleaner & Uninstaller makes it simple:
- Come back to the App Cleaner & Uninstaller.
- Switch to the Remaining Files tab.
- Check Evernote and press Remove → complete the removal.
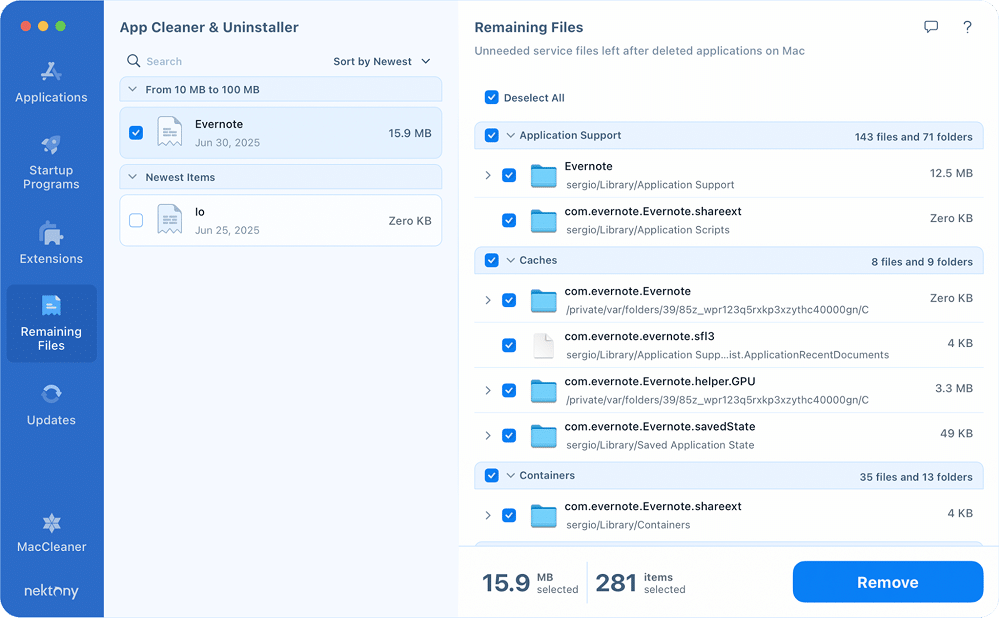
Relief
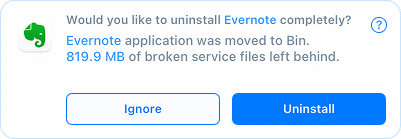
If you’re used to dragging apps to Trash, you can enable a leftover deletion auto-alert in App Cleaner & Uninstaller → Settings → General. With this setting on, once you trash an app like Evernote, the tool will instantly pop up, offering to delete all the junk files completely along with the main app.
Troubleshooting: Evernote issues on Mac
Even with a comprehensive guide, you might run into a few technical glitches – especially when managing different versions or after recent updates. Here are some frequent problems users encounter and how I’ve found success in fixing them:
- Conflicts between App Store and website versions
Problem: If both the App Store and the official site versions of Evernote are installed (or one wasn’t fully uninstalled), they may conflict and cause database or syncing issues.
Fix: Fully uninstall both versions of Evernote → Reinstall only one version. - High CPU usage after updates
Problem: Sometimes, after an update (especially with the App Store version, e.g., 10.98.3), Evernote might cause unusually high CPU load.
Fix: Delete the App Store version and its support files → Download and install the latest version from Evernote’s official site. - JavaScript Error at Launch (main process error)
Problem: After installation, you might face an error message like:
Error: dlopen(…node_modules/electron-native-auth…): Library not loaded.
Fix: Update Evernote to the recent version, which addresses this bug. If the issue persists, perform a full uninstall and then reinstall the app.
If you face other rare issues (like Evernote crashing at startup), you can also refer to Evernote’s official troubleshooting guide for crash diagnostics and logs, which I found helpful.
Evernote alternatives
If Evernote has left you looking for something new, perhaps you’re seeking a simpler interface, deeper organization, or just a different approach. The note-taking landscape has many excellent replacements that better suit Mac.
| Name | Description |
|---|---|
| Apple Notes | Built right into macOS and iOS, it syncs seamlessly via iCloud. Supports quick notes, checklists, handwriting, and attachments. Perfect if you’re staying in the Apple ecosystem. |
| Notion | Combines note-taking, databases, wikis, and task management in one flexible workspace. Ideal for productivity nerds or teams. It can be a bit overkill for simple notes. |
| Microsoft OneNote | Free, powerful, and part of the Microsoft 365 family. Great for students or anyone who likes digital notebooks and stylus input. Cross-platform and collaborative. |
| Google Keep | For quick captures, sticky notes, and reminders. It’s simple, visual, and integrates with the Google ecosystem. Excellent for short notes, lists, and setting location-based reminders. |
| Obsidian | Local-first, Markdown-based, and geared toward knowledge management and linking ideas. Perfect for developers, researchers, and personal knowledge bases. |
- Want a simple, built-in app that syncs across your Apple devices?
📌 Try Apple Notes. - Need a robust all-in-one tool for planning, notes, and tasks?
📌 Go with Notion. - Prefer structured notebooks with a stylus and Office 365 integration?
📌 Give OneNote a spin.
If you try out these tools and later realize they aren’t the right fit, you can learn how to properly uninstall Notion and correctly remove OneNote from your Mac.
Final notes
You’ve now got the full picture on how to completely uninstall Evernote from your Mac. While the manual method works if you want to dig through a library folder on your own, there’s a faster, safer, and more efficient way to do it.
App Cleaner & Uninstaller takes the guesswork out of the process by detecting and erasing every last file, background service, and hidden cache related to Evernote, so that you won’t leave any clutter, background processes, or annoying system files.
Instead of manually locating remnants, remove everything in seconds. This hack to keep your Mac clean, fast, and clutter-free – not just with Evernote, but any app you choose to remove. Ask Nektony how the tool can do even more for your Mac.
