


January 16, 2026
How to create a folder on Mac: A 360-degree guide
Share

Creating a new folder was one of the very first things I learned to do on a computer back in the 90s. However, it took me nearly two decades to figure out that even something as simple as a “folder” comes in all kinds of flavors: hidden folders, locked folders, smart folders that update themselves, and even immutable folders that refuse to be deleted.
I learned about these variations the hard way, usually while troubleshooting a chaotic mess caused by my own bad habits. I wrote this guide so you don’t have to spend twenty years learning the same stuff in a chaotic, granular way.
Whether you just need a quick shortcut or want to generate a complex directory structure on your Mac, here is the guide I wish I had.
This Article Contains
Want to organize your Mac the smart way?
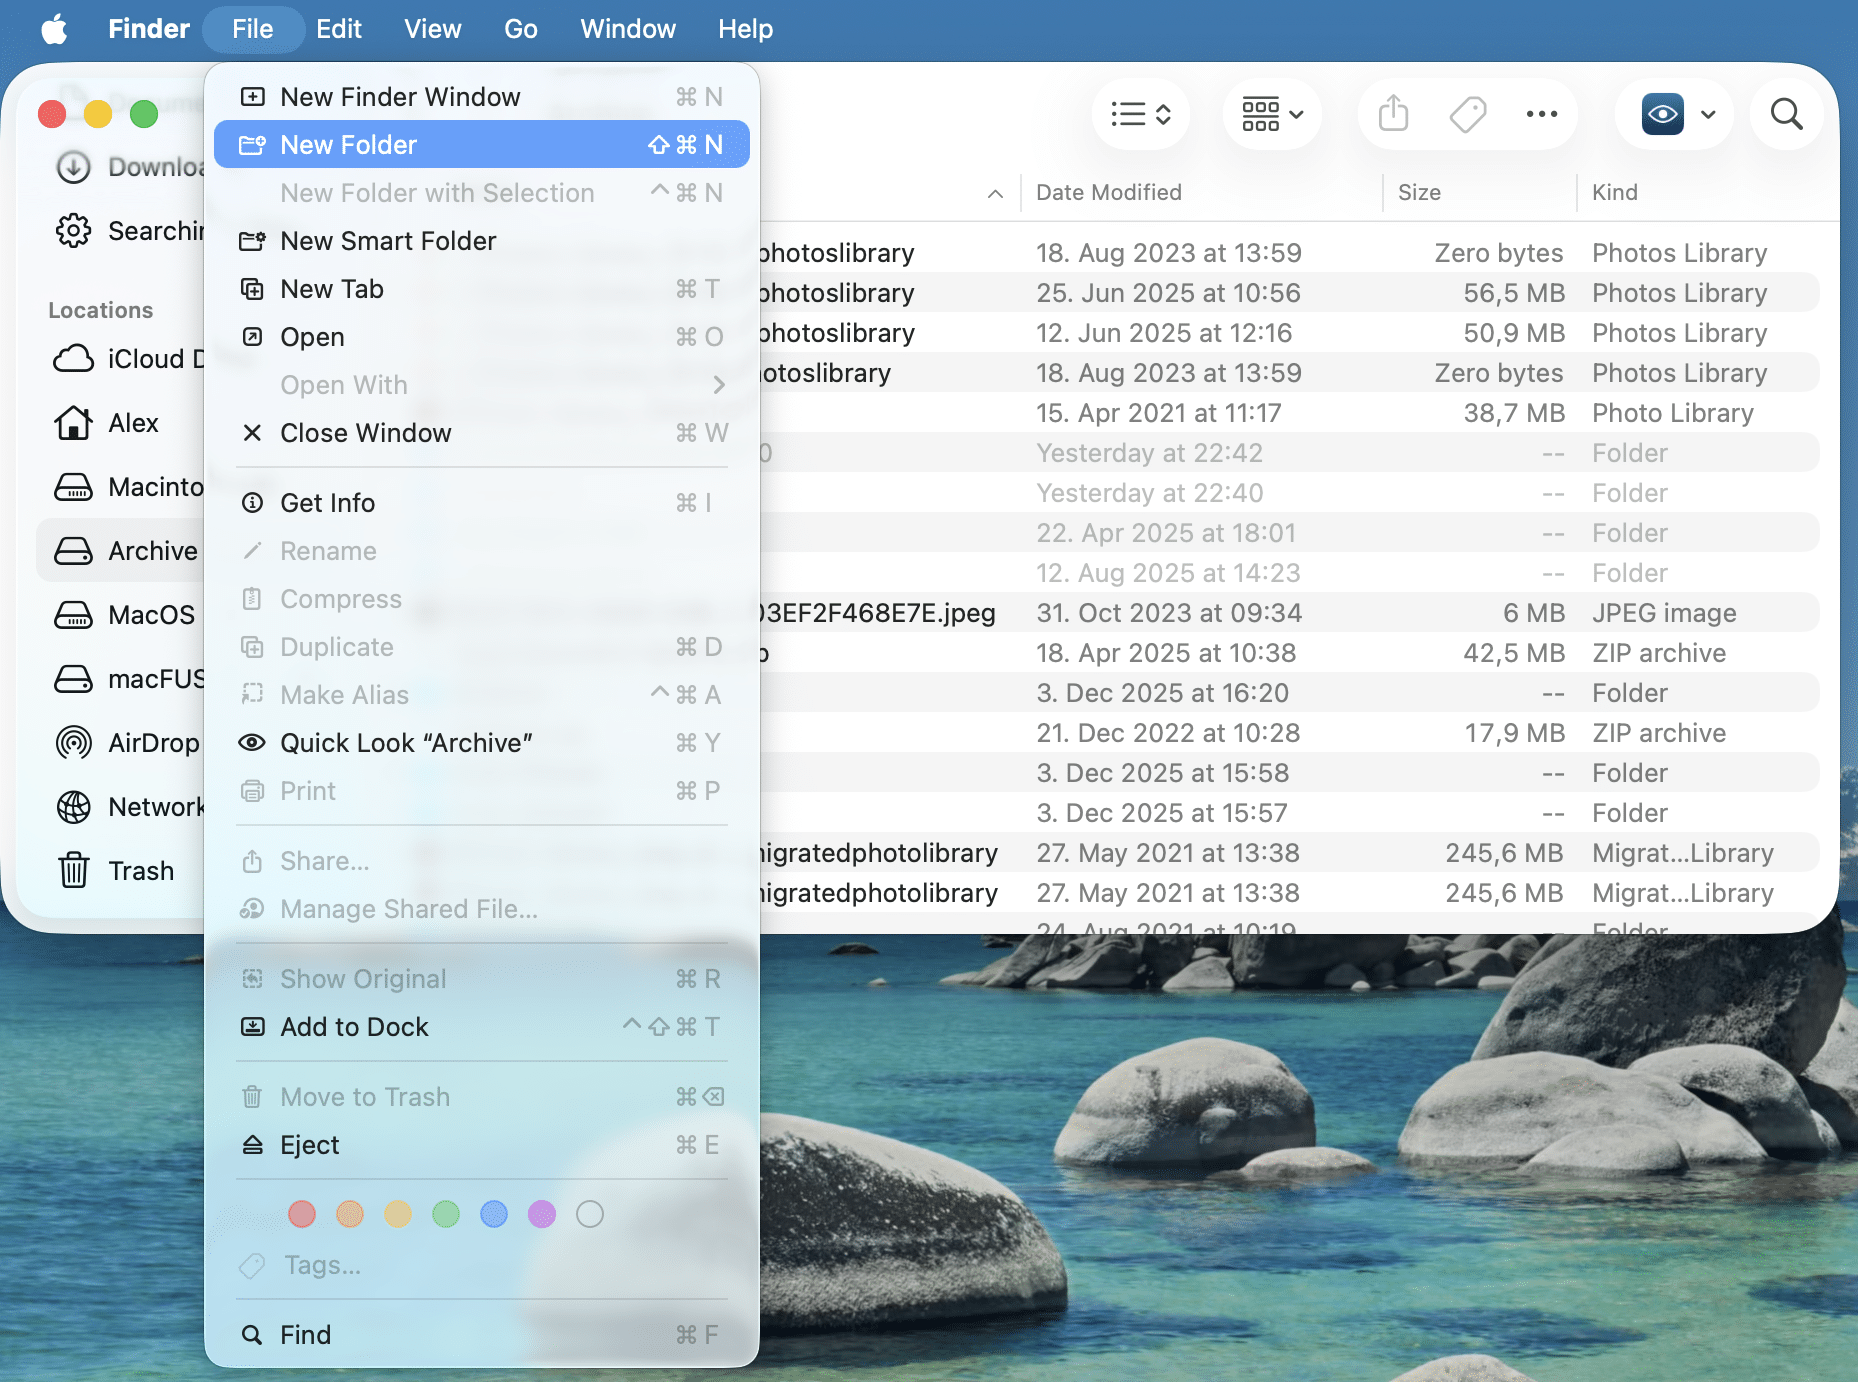
How to create a new folder on Mac
Using the Menu Bar:
- Open Finder and navigate to where you want the new folder.
- In the top menu bar, click File → New Folder.
- A folder named “Untitled Folder” will appear. Start typing immediately to rename it.
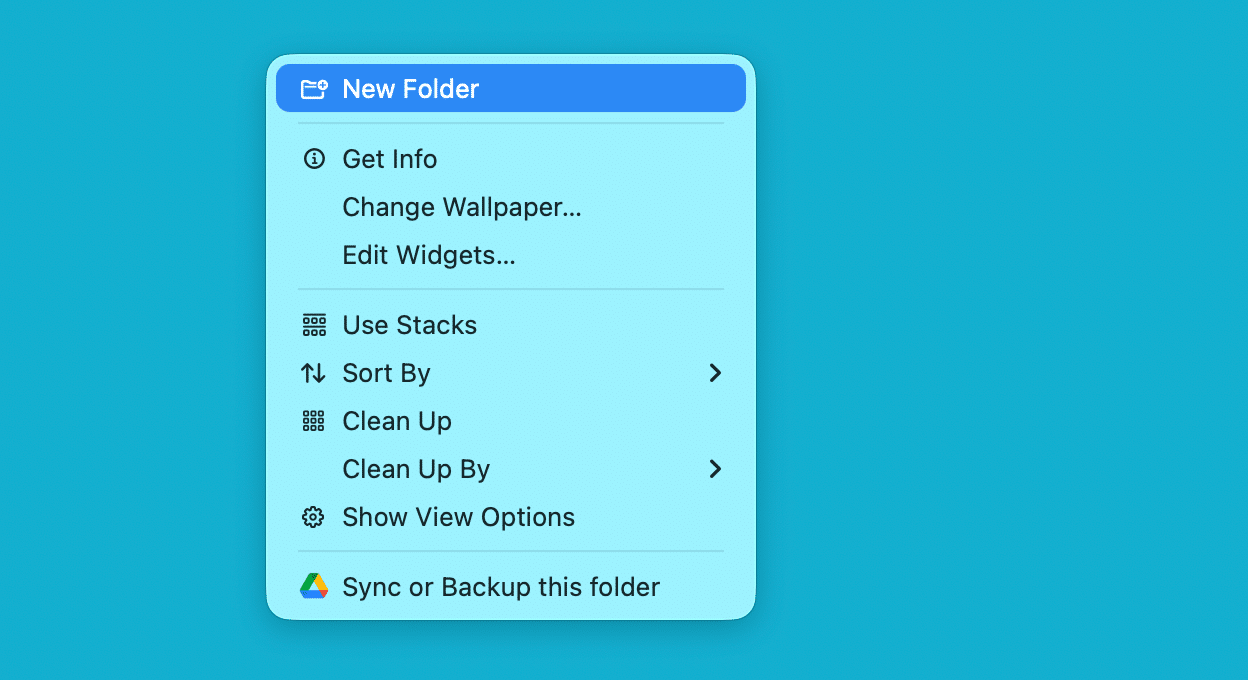
Using the Context Menu:
This is often faster if your hand is already on the trackpad or mouse.
- Right-click (or Control-click) on any empty space in a Finder window or on your Desktop.
- Select New Folder from the dropdown menu.
Note:
If the New Folder option is greyed out, you might be in a protected directory (like the top level of your hard drive) where you don’t have permission to make changes.
Shortcut to create a new folder on Mac:
If you are like me and prefer to keep your hands on the keyboard, this is the only method you need. It is muscle memory for every Mac power user.
- Press Shift + Command + N.
That’s it. The new folder appears instantly, ready to be renamed. This works on the Desktop and inside any Finder window.
How to create a folder from selected items
This is my absolute favorite trick for cleaning up my digital clutter. If your Desktop looks like a scattered puzzle of screenshots and PDFs, do not drag them one by one into a new folder. Use this grouping feature instead.
- Select all the files you want to group together.
- Right-click on any one of the selected files.
- Choose New Folder with Selection (items) from the menu.

macOS will magically sweep all those files into a single new folder. You just have to name it, and your clutter is gone.
How to create a Smart Folder on Mac
A “Smart Folder” isn’t actually a folder at all (again, as per Apple’s user guide). It’s a saved search that looks and acts like a folder. Think of it as a dynamic window that gathers files from all over your Mac based on specific rules you set, like “All PDF files created last week” or “All images larger than 50MB.”
- Open Finder.
- In the menu bar, click File → New Smart Folder.

- Click the + icon in the top-right corner to add search criteria.
- Choose your filters (Kind, Date, Name, etc.) and click Save.


Note:
Since Smart Folders are just windows into your existing files, they do not create copies. If you delete a file from a Smart Folder, you are deleting the original file from your drive.
My take is that Smart Folders is a great way to keep an eye on files and the activities happening on your system, but not the way to organize them, as sometimes people on Reddit might assume.
How to create a folder using Terminal
For most people, Finder is fine. But if you want to feel like a hacker, or if you need to create a specific folder structure instantly without clicking fifty times, Terminal is the tool of choice.
The basic command (mkdir )
Open Terminal (from Applications → Utilities) and type the following command:
mkdir MyFolderCopy
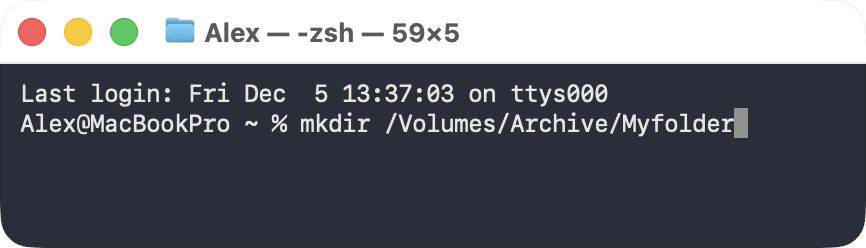
By default, this creates the folder in your Home directory (~). If you need it somewhere specific, just type the full path:
mkdir /Volumes/Archive/MyFolderCopy
Creating nested folders instantly (-p )
This is the “power user” move. If you need to create a project folder with several subfolders inside (like Project/Images/Drafts ), you don’t have to make them one by one. Use the -p flag:
mkdir -p ~/Documents/Project/Images/DraftsCopy
The -p tells macOS to create the entire path chain if it doesn’t already exist.
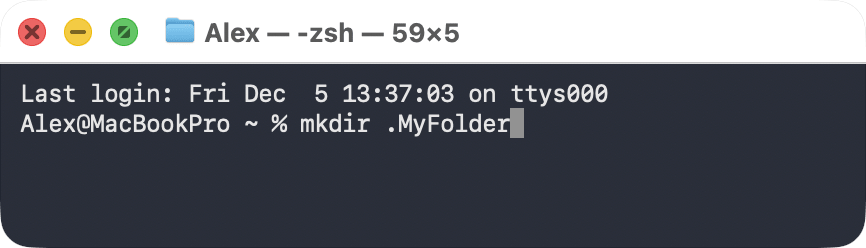
Creating hidden folders
Sometimes you need a folder that doesn’t clutter your view. In macOS, any folder name starting with a dot is automatically hidden
mkdir .MyFolderCopy
Note:
If you can’t find the hidden folder you just created in Finder, toggle hidden files and folders on instantly by pressing Command + Shift + . (period).
If you want to hide a folder that already exists, you can’t just rename it. You need a “flag” command:
chflags hidden MyFolderCopy
To bring it back into plain sight later, just reverse the flag:
chflags nohidden MyFolderCopy
Advanced: Permissions and security (Terminal)
Warning:
These commands give you control over who can see and touch your data. If you are sharing a Mac with others or building a local server, this is essential. If you are just organizing holiday photos, proceed with caution (you don’t want to lock yourself out of your own folder).
Creating a folder with restricted permissions
You can create a folder that only you can open. No other user account on the Mac will have access.
mkdir -m 700 PrivateFolderCopy
The 700 code tells macOS: “I get full control; everyone else gets nothing.”
If you already have a folder and want to change its permissions, use the chmod command:
- Only you have access:
chmod 700 FolderNameCopy
- You have full access; everyone else can read and open it, but not delete or modify it:
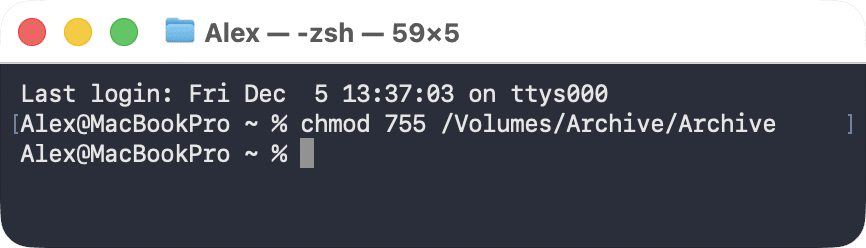
chmod 755 FolderNameCopy
Creating folders as administrator (sudo)
Sometimes you need to create a folder in a directory owned by the system, like /usr/local. Standard commands will fail with a “Permission Denied” error. You need sudo (SuperUser DO).
- Type
sudo mkdir /usr/local/mytoolsCopy
- Enter your admin password (you won’t see typing on the screen) and hit Enter.
By default, this new folder is owned by “root” (the system). To take ownership of it so you can actually use it, run:
sudo chown username:staff /usr/local/mytools
Copy
The “un-deletable” folder (uchg)
If you have a folder containing critical data that you never want to accidentally delete, you can make it “immutable.”
sudo chflags uchg ImportantDataCopy
Once this flag is set, even an admin cannot delete this folder until the flag is removed (nouchg). It is the digital equivalent of bolting a safe to the floor.
Where you CAN’T create folders (SIP)
Even with sudo, you might hit a wall. That is SIP (System Integrity Protection). Apple strictly forbids creating folders in core system locations like /System, /bin, or /sbin. This is to stop malware (and well-meaning users) from breaking the OS.
Specialized folders & locations
Not all folders on your Mac behave the same way. Some live in the cloud, some are strictly for robots (automation), and some are locked “sandboxes” for your apps. Here is a quick tour of the special cases.
iCloud Drive folders
When you create a folder in iCloud Drive, it automatically syncs across all your Apple devices. But here is the catch: to save space, macOS might remove the physical copy from your hard drive and keep only a “cloud” shortcut.
- How to keep it real: If you need a folder to stay physically on your Mac (so you can access it without internet), right-click the folder and select Keep Downloaded.

- Sharing: You can also right-click these folders to generate a “Share File” link, effectively turning a local folder into a cloud server (well, kind of).

App containers (The “Sandbox”)
~/Library/Containers
Copy
How to open this folder
- In Finder, press Command + Shift + G to open the Go to Folder window.
- Copy the path ~/Library/Containers, paste it into the field, and press Enter to open it.


These are Sandboxes. macOS treats App Store apps like toddlers; it puts them in a playpen (Container) so they can’t mess up the rest of your house (System).
Generally, you should not manually create or delete folders here. These are managed by the apps themselves. If you delete a container, you might reset that app to its factory settings.
Hidden system paths
~/Library
Copy
- The “Go” Method: Open Finder, click Go in the menu bar, and you will see Library in the list.

- The “Teleport” Method: If you know the exact path (like ), press Command + Shift + G (or click Go → Go to Folder…) and paste the address directly.
~/Library/ContainersCopy


Using emojis in folder names
Yes, you can absolutely name a folder “Project 🚀” or “Finances 💸”. Just press Control + Command + Space while renaming to open the Emoji picker.
Note:
macOS handles Unicode characters smoothly, but if you transfer these folders to a Windows PC or an old server, the emoji might turn into gibberish code. This is due to a specific Unicode normalization (NFD) macOS uses.
Automation folders (LaunchAgents)
If you are scripting or setting up background tasks, you will need specific folders where macOS looks for “instructions” (usually .plist files) on what to launch when it wakes up.
- : User-specific scripts (run when you log in).
~/Library/LaunchAgentsCopy
- : System-wide scripts (run when the Mac boots up).
/Library/LaunchDaemonsCopy
Note:
These folders often don’t exist by default on a clean install. You might need to create them manually using the mkdir
commands we discussed earlier
Copy
Tips for keeping your Mac organized
Creating folders is easy; keeping them organized is the hard work. Here are a few habits that have saved me from “Desktop Chaos.”
- Use Naming Conventions: Don’t name folders “Stuff” or “New Folder 2.” Use dates and projects (e.g., 2024-10_ProjectAlpha). It sorts automatically and saves you from searching later.
- Color Code with Tags: Right-click a folder and assign a color tag (e.g., red for the external drive, green for cloud files). This gives you a way to quickly access and understand the nature of the files you’re working with.
- Don’t Organize “Junk”: Creating folders for files you don’t need is a waste of time. Before you organize, clean up.

Pro Tip:
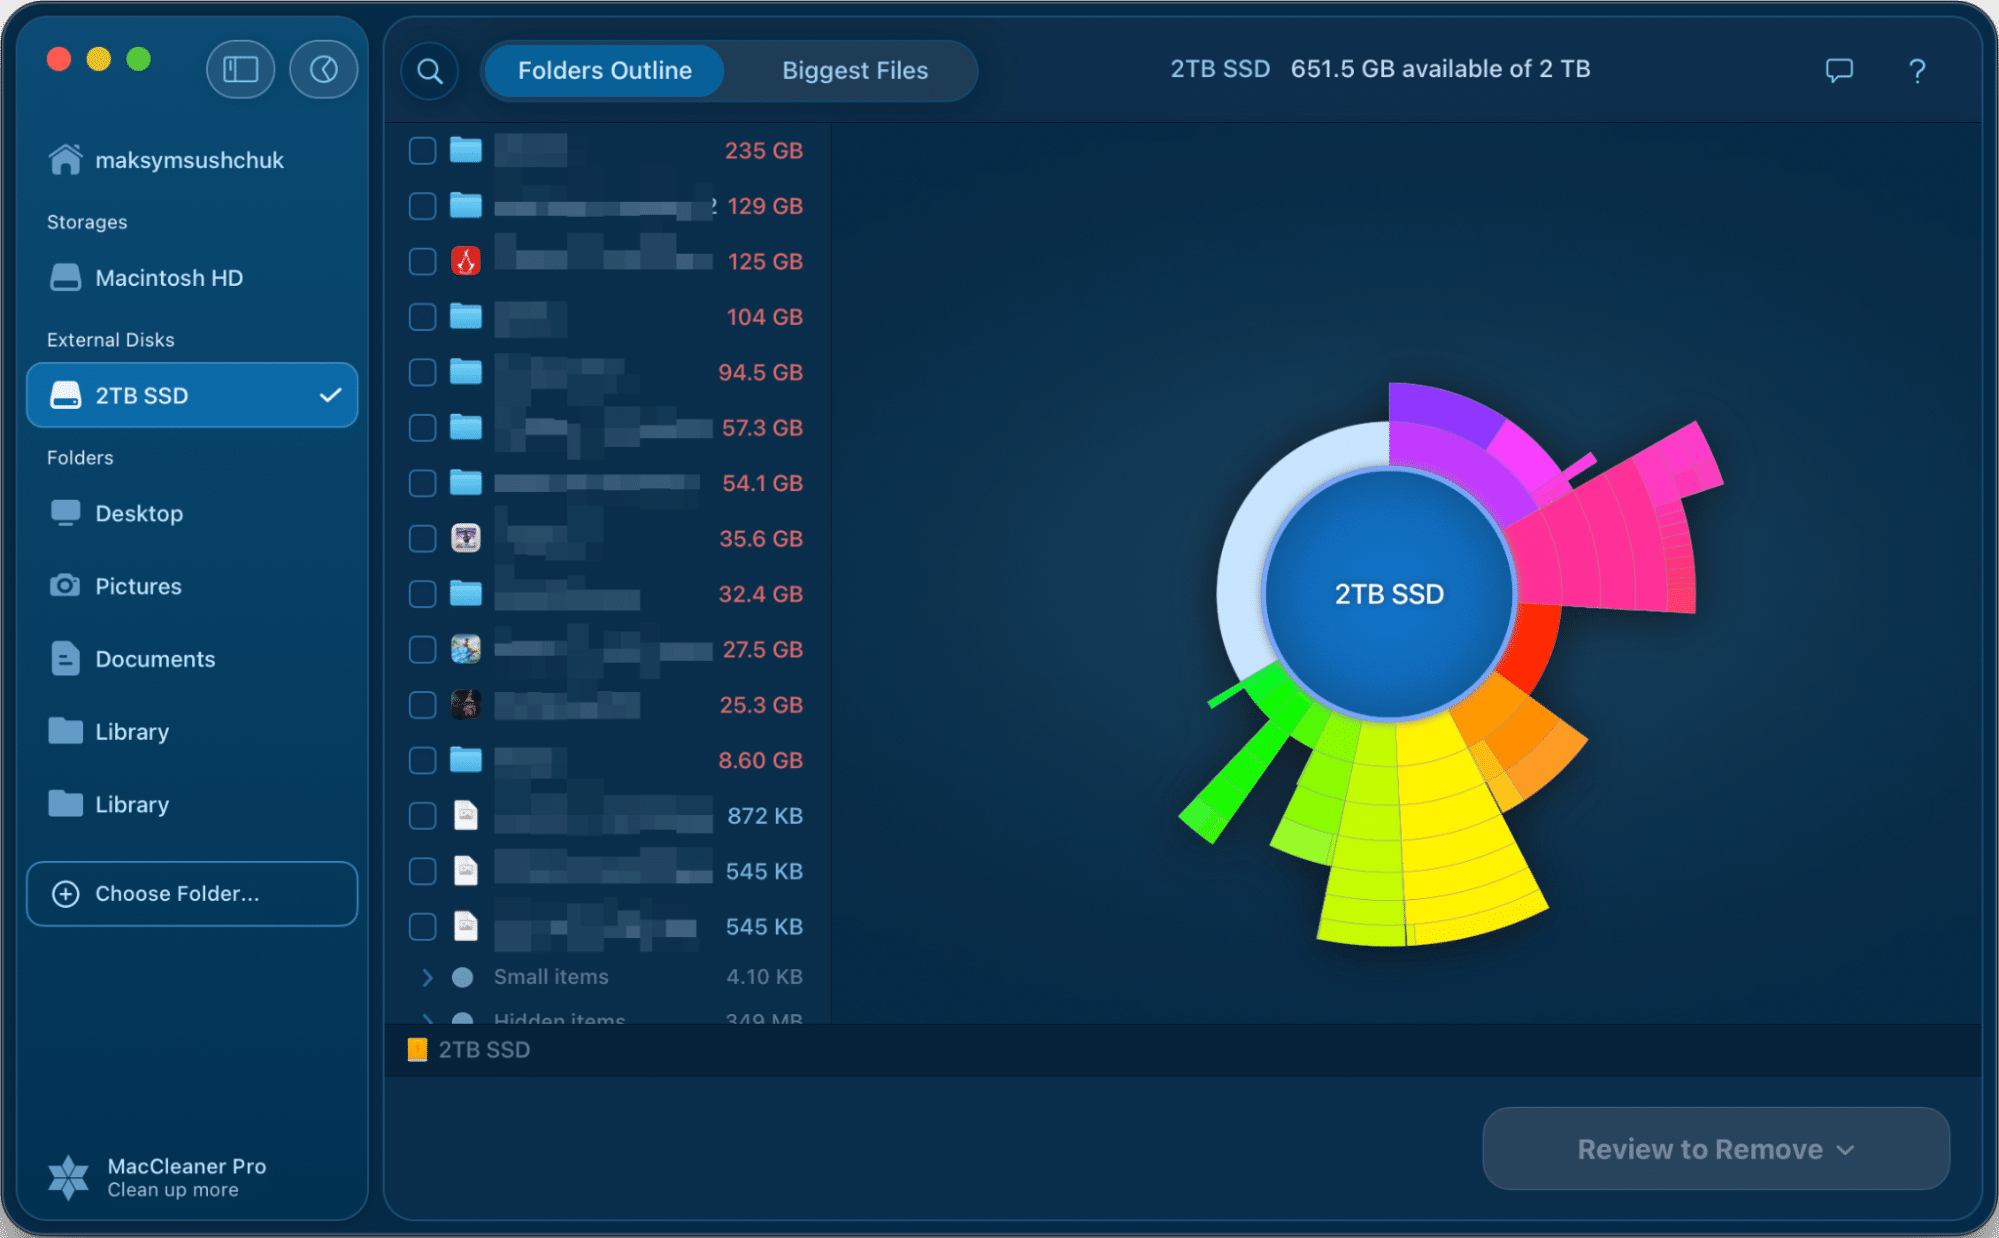
Use Disk Space Analyzer from Nektony to scan your internal and external drives. It shows you exactly which folders are taking up the most space visually. It’s much easier to organize your file tree when you can actually see it.
Bottom line
I’ll be honest with you: I know every single method I just wrote about, and yet, my own file system is still often pure chaos.
Sure, I have a basic folder structure for my documents and projects. But everything beyond that? It tends to get messy. I’m a chaotic person by nature. I usually only find the inspiration to organize when I’m procrastinating on other tasks that feel too complicated or energy-consuming. Cleaning up my folders is my version of “productive therapy.”
But when I do finally sit down to organize, I don’t want to fight with my computer. I use these shortcuts to move fast, and I use tools like Disk Space Analyzer to see exactly what I’m dealing with. It makes the process manageable and, dare I say, almost enjoyable.
So don’t worry if your Mac isn’t perfectly organized today. Just knowing how to create the structure you need is the first step.