Contents
- What is the difference between folders and albums in iOS photos?
- How to create albums and folders for photos on iPhone?
- iPhone photo organization ideas.
- FAQs
Tip – Declutter iPhone photos
Phone Cleaner for Media Files
What is the difference between folders and albums in iOS photos?
When it comes to organizing photos on iPhone, you might want to create a new album or folder. But what’s the difference between a folder and an album on iPhone? Let’s clarify this. While albums contain your photos, folders contain your albums. You need just to understand this sort of hierarchy. You can add albums to a folder but you cannot add photos directly to a folder. When you need to sort and organize photos in the Camera Roll, you need to create an album. If you have too many albums and now there’s a mess of albums on your iPhone, then you can create folders to sort these albums. Note that you cannot move albums between folders on iPhone. If you need to move an album, you will have to recreate the album in the destination folder, then delete the original album. Thus, before creating albums and folders on your iPhone, we recommend first learning the tips from this article to find out the best way to organize your photos.How to create albums and folders for photos on iPhone?
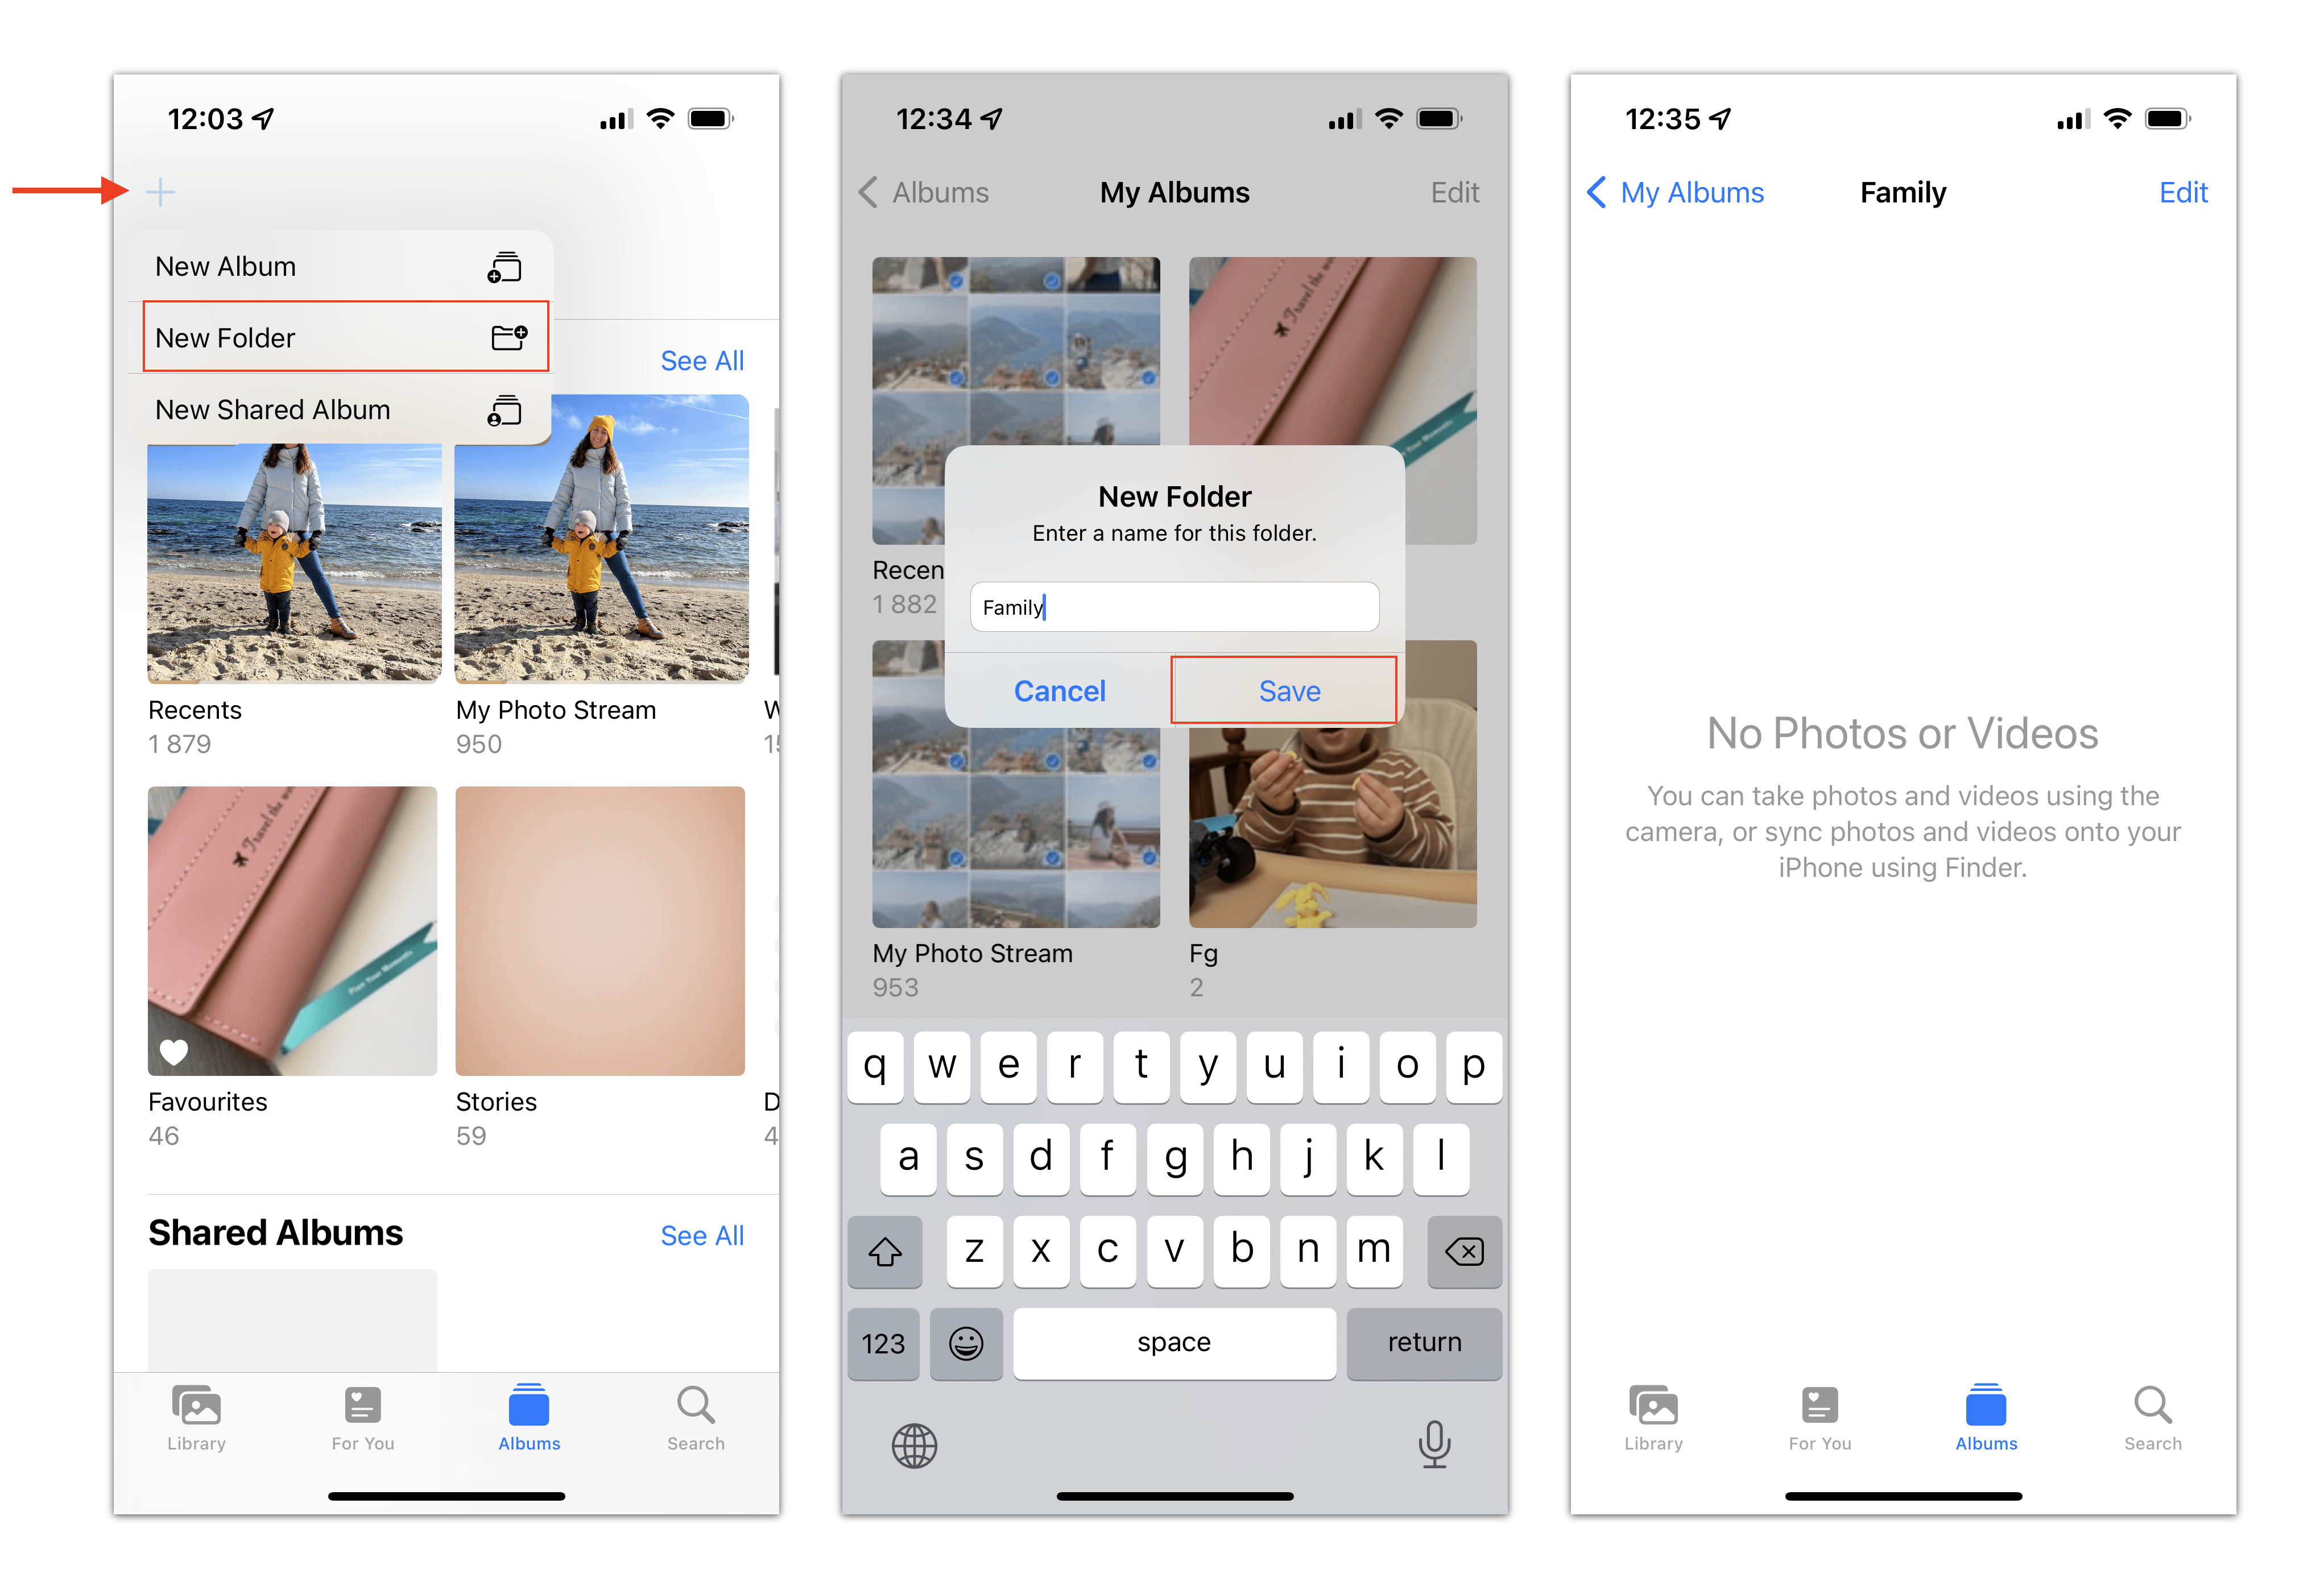
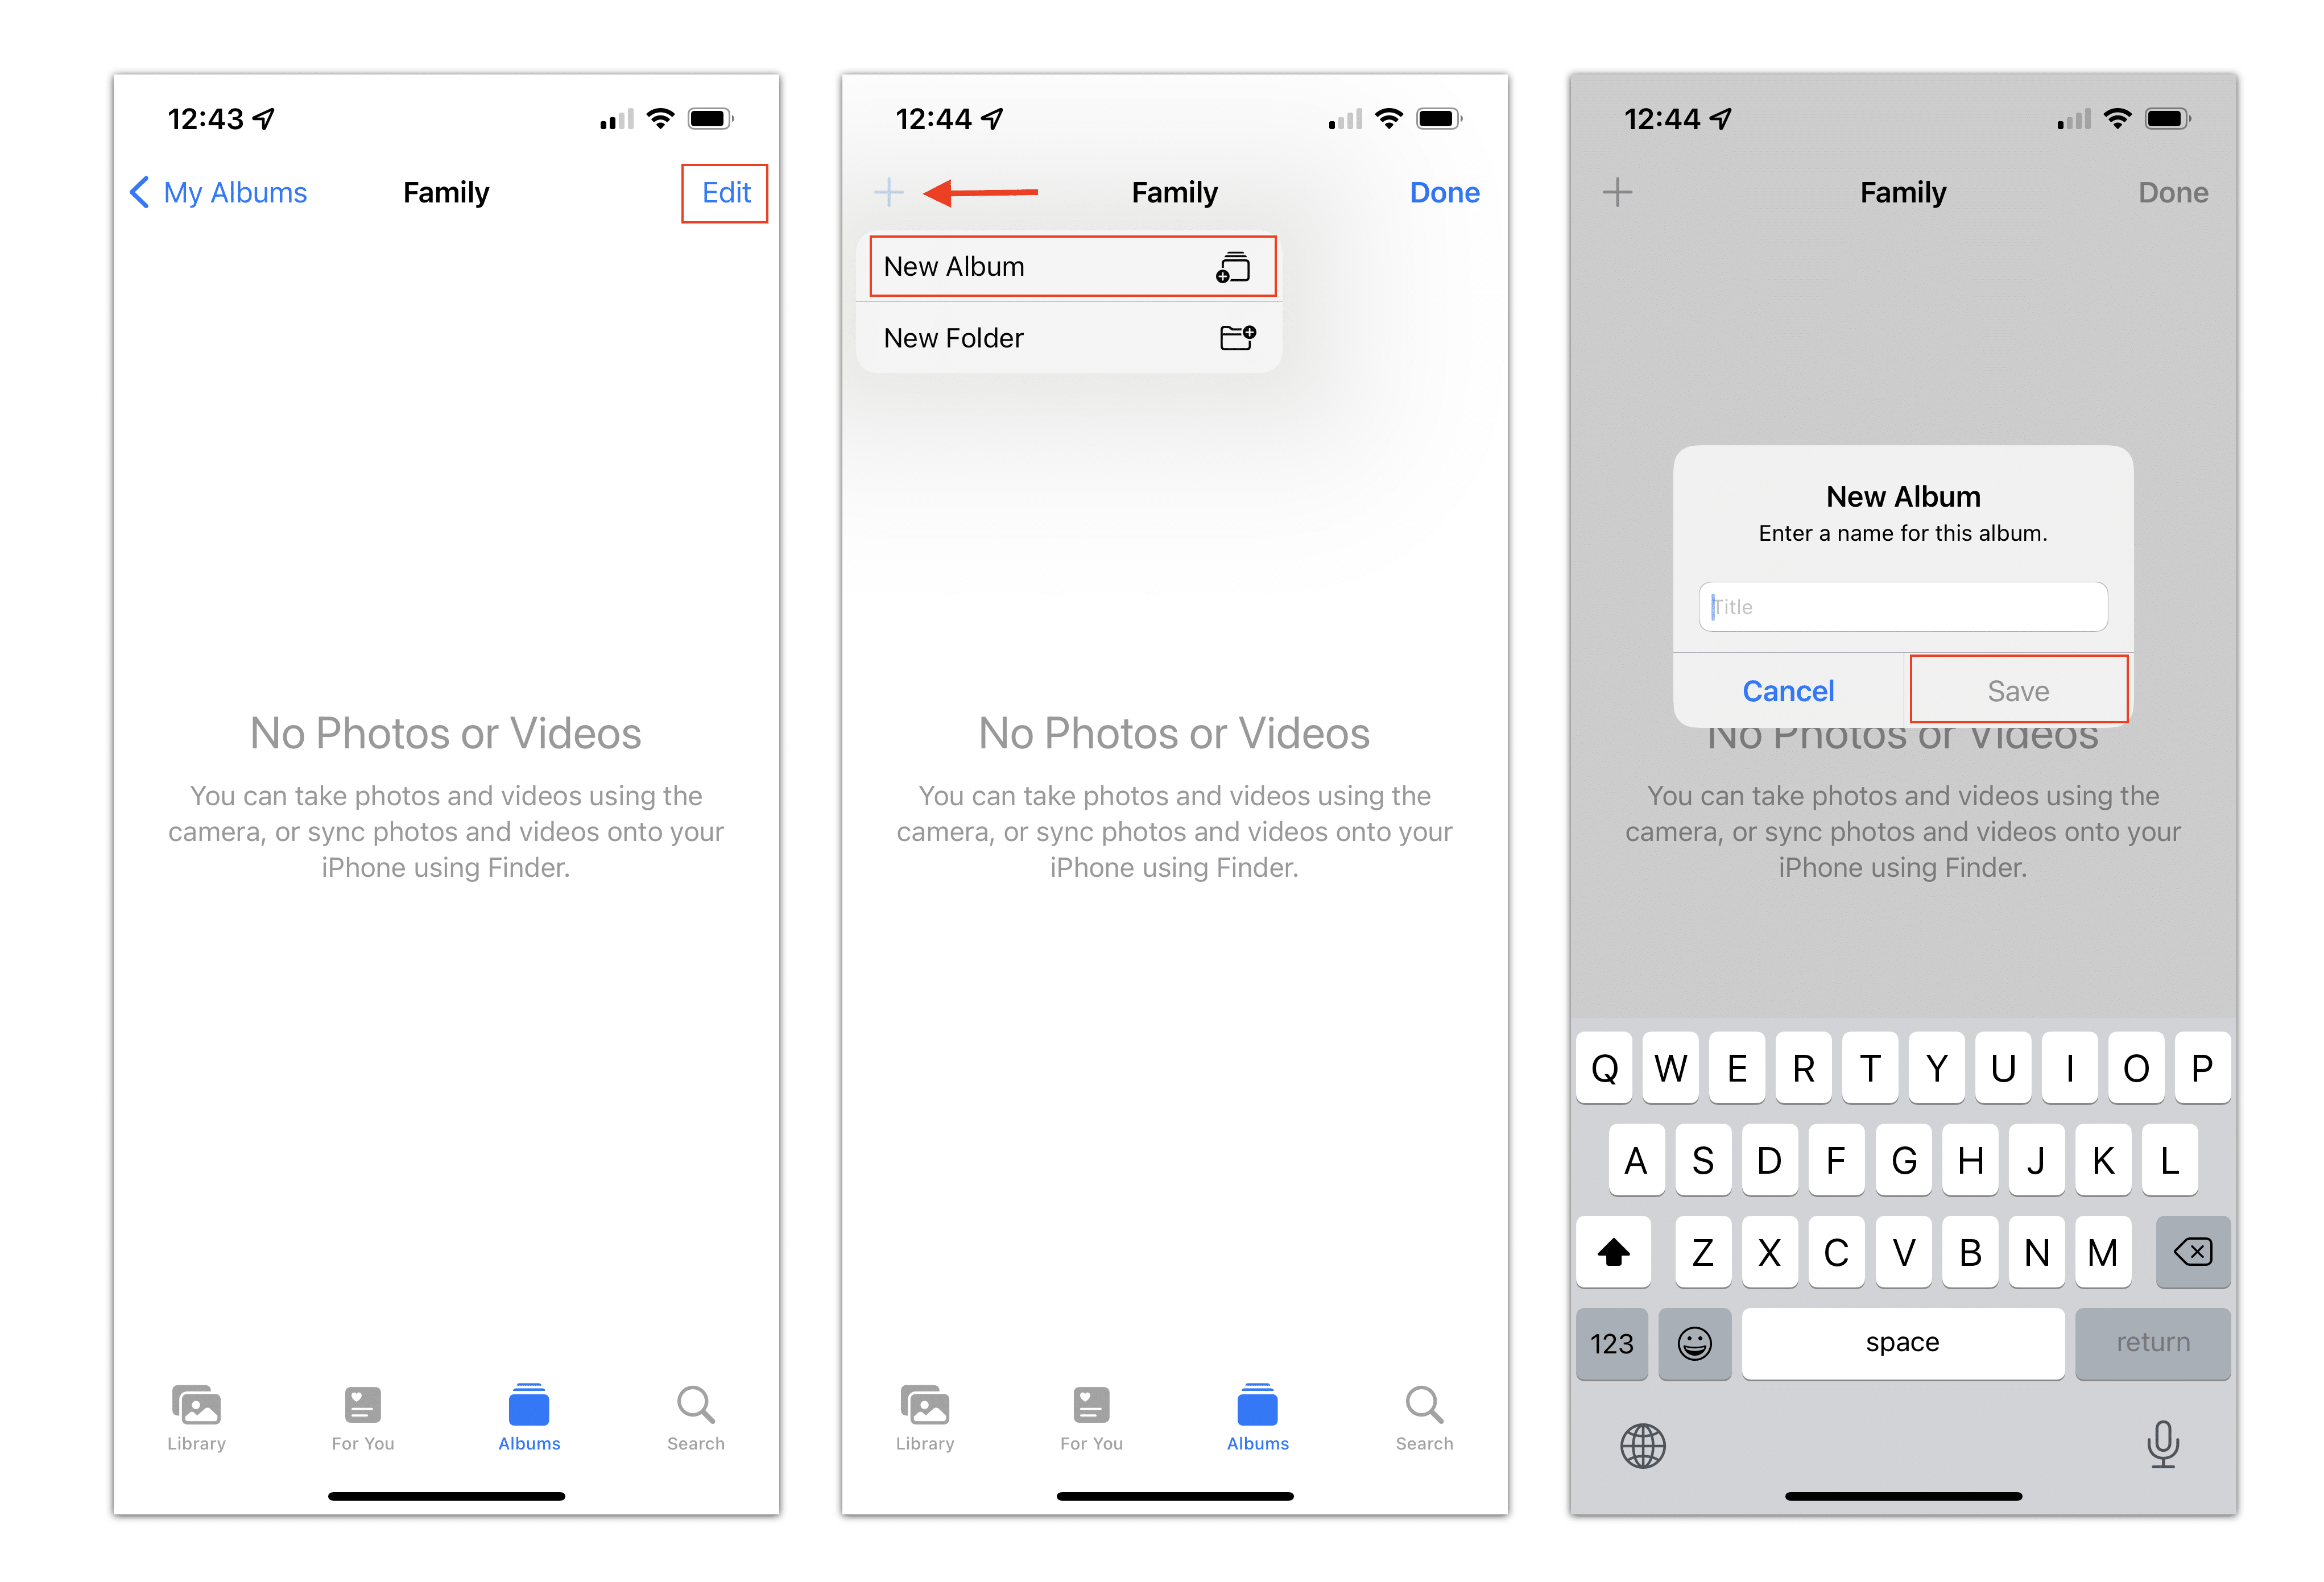
As we mentioned before, you can’t just drag albums to the new folders. That’s why we recommend first creating a folder, then creating albums inside this folder.Here’s how to create a folder in the iPhone Photos app:
- Open the Photos app.
- Go to the Albums section.
- Tap the Plus (+) icon on the top.
- Select New Folder.
- Enter a name for this folder and tap Save.
- You will see your new folder in the Albums section in the Photos app.
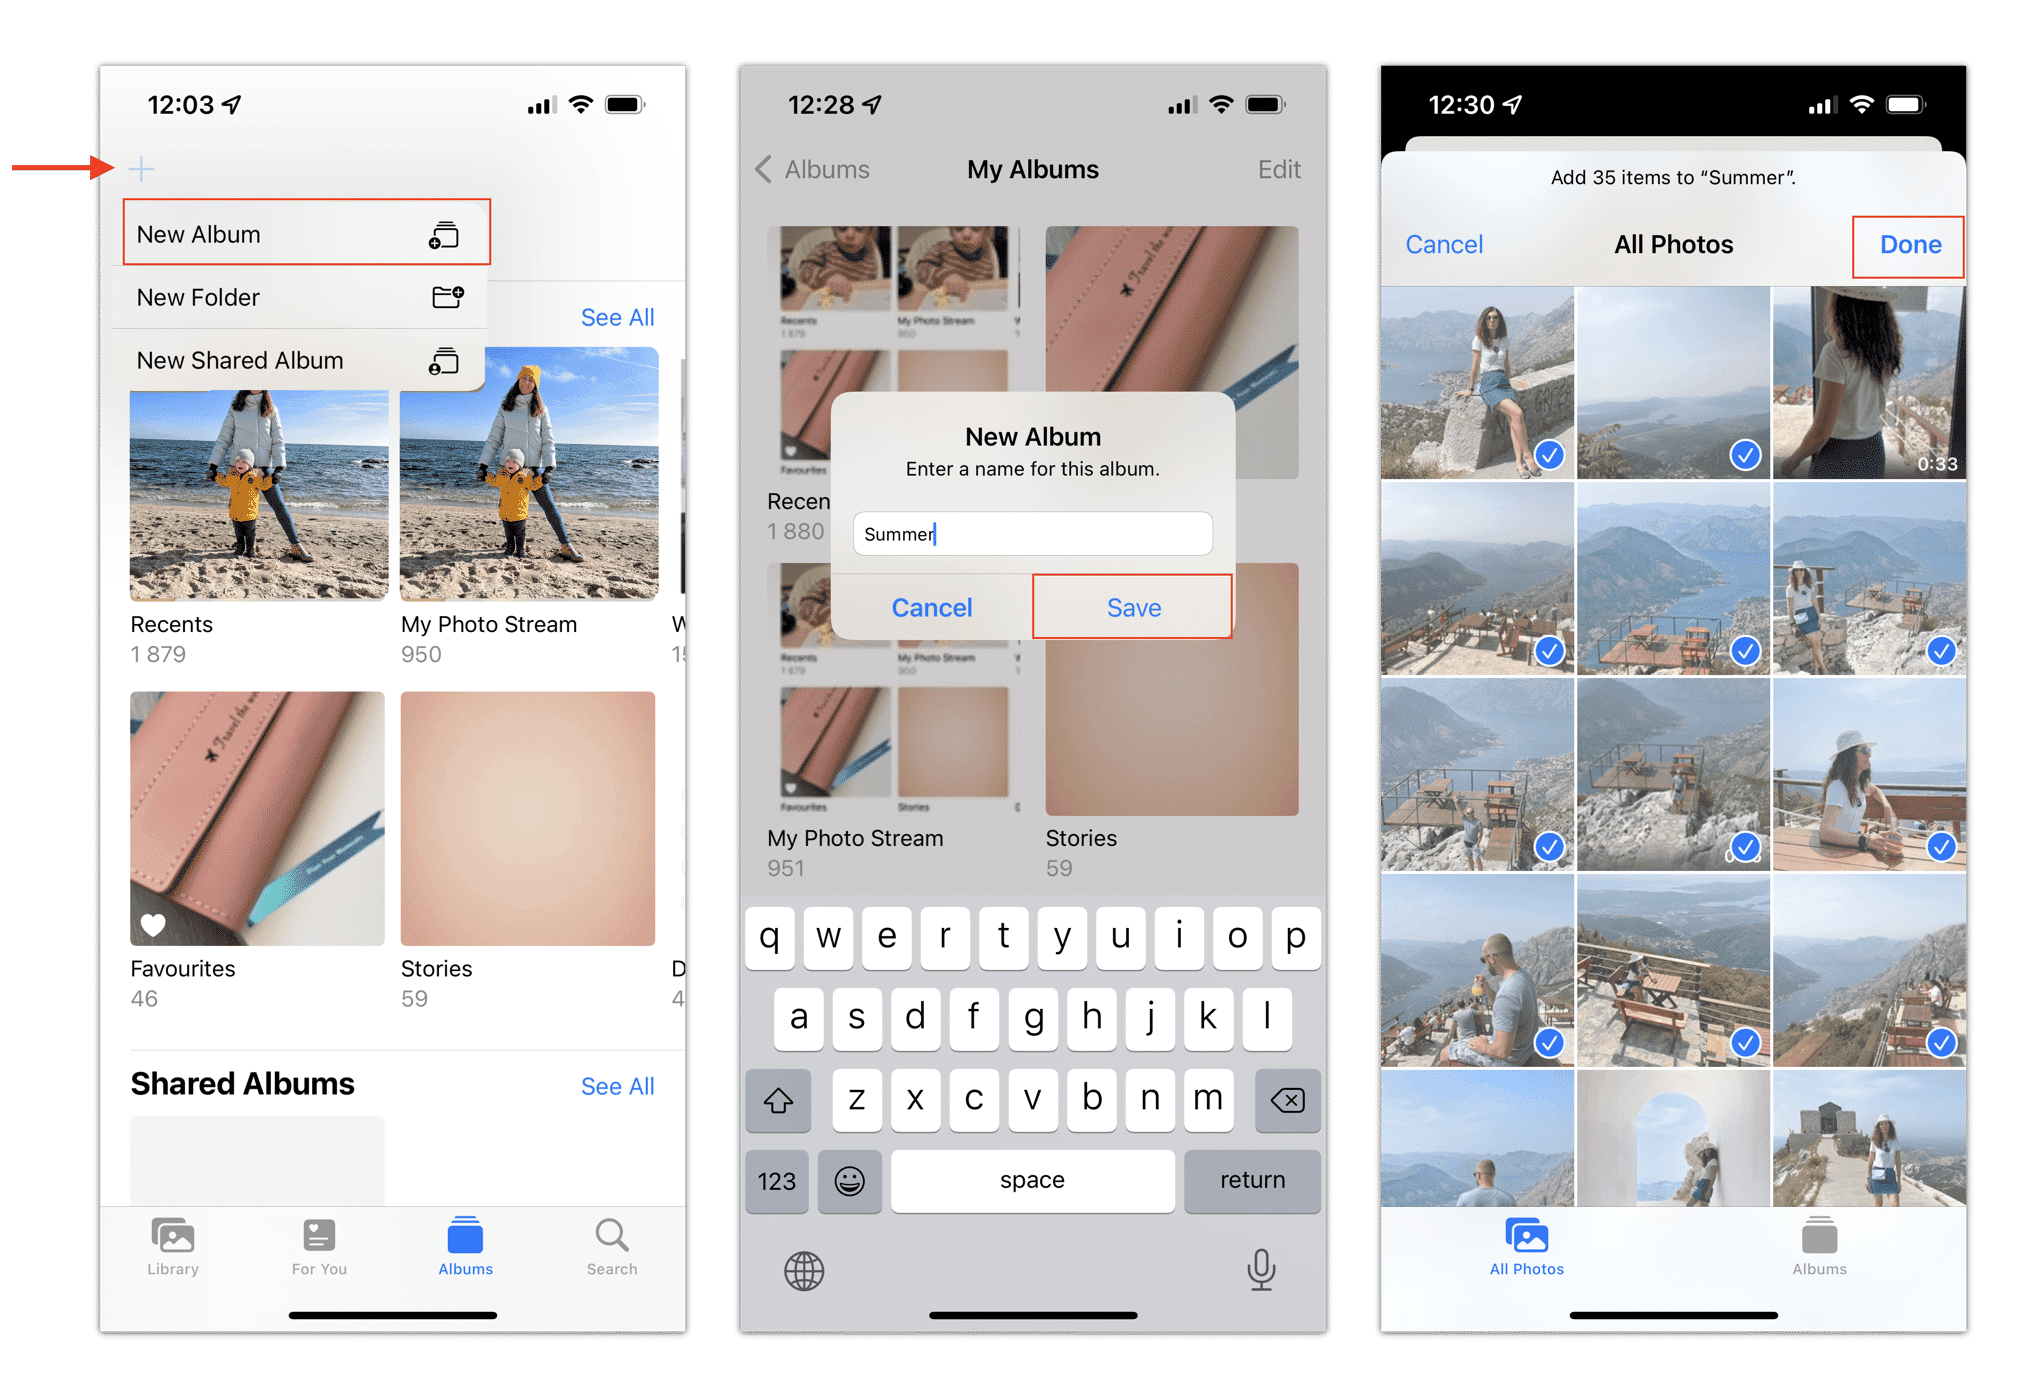
Follow these steps to create an album in the iPhone Photos app:
- Open the Photos app and go to the Albums section.
- Tap the Plus (+) icon in the top-left corner of your screen.
- Select New Album.
- Enter a name for this album and tap Save.
- Select the photos you want to add to this album.
- Tap Done.
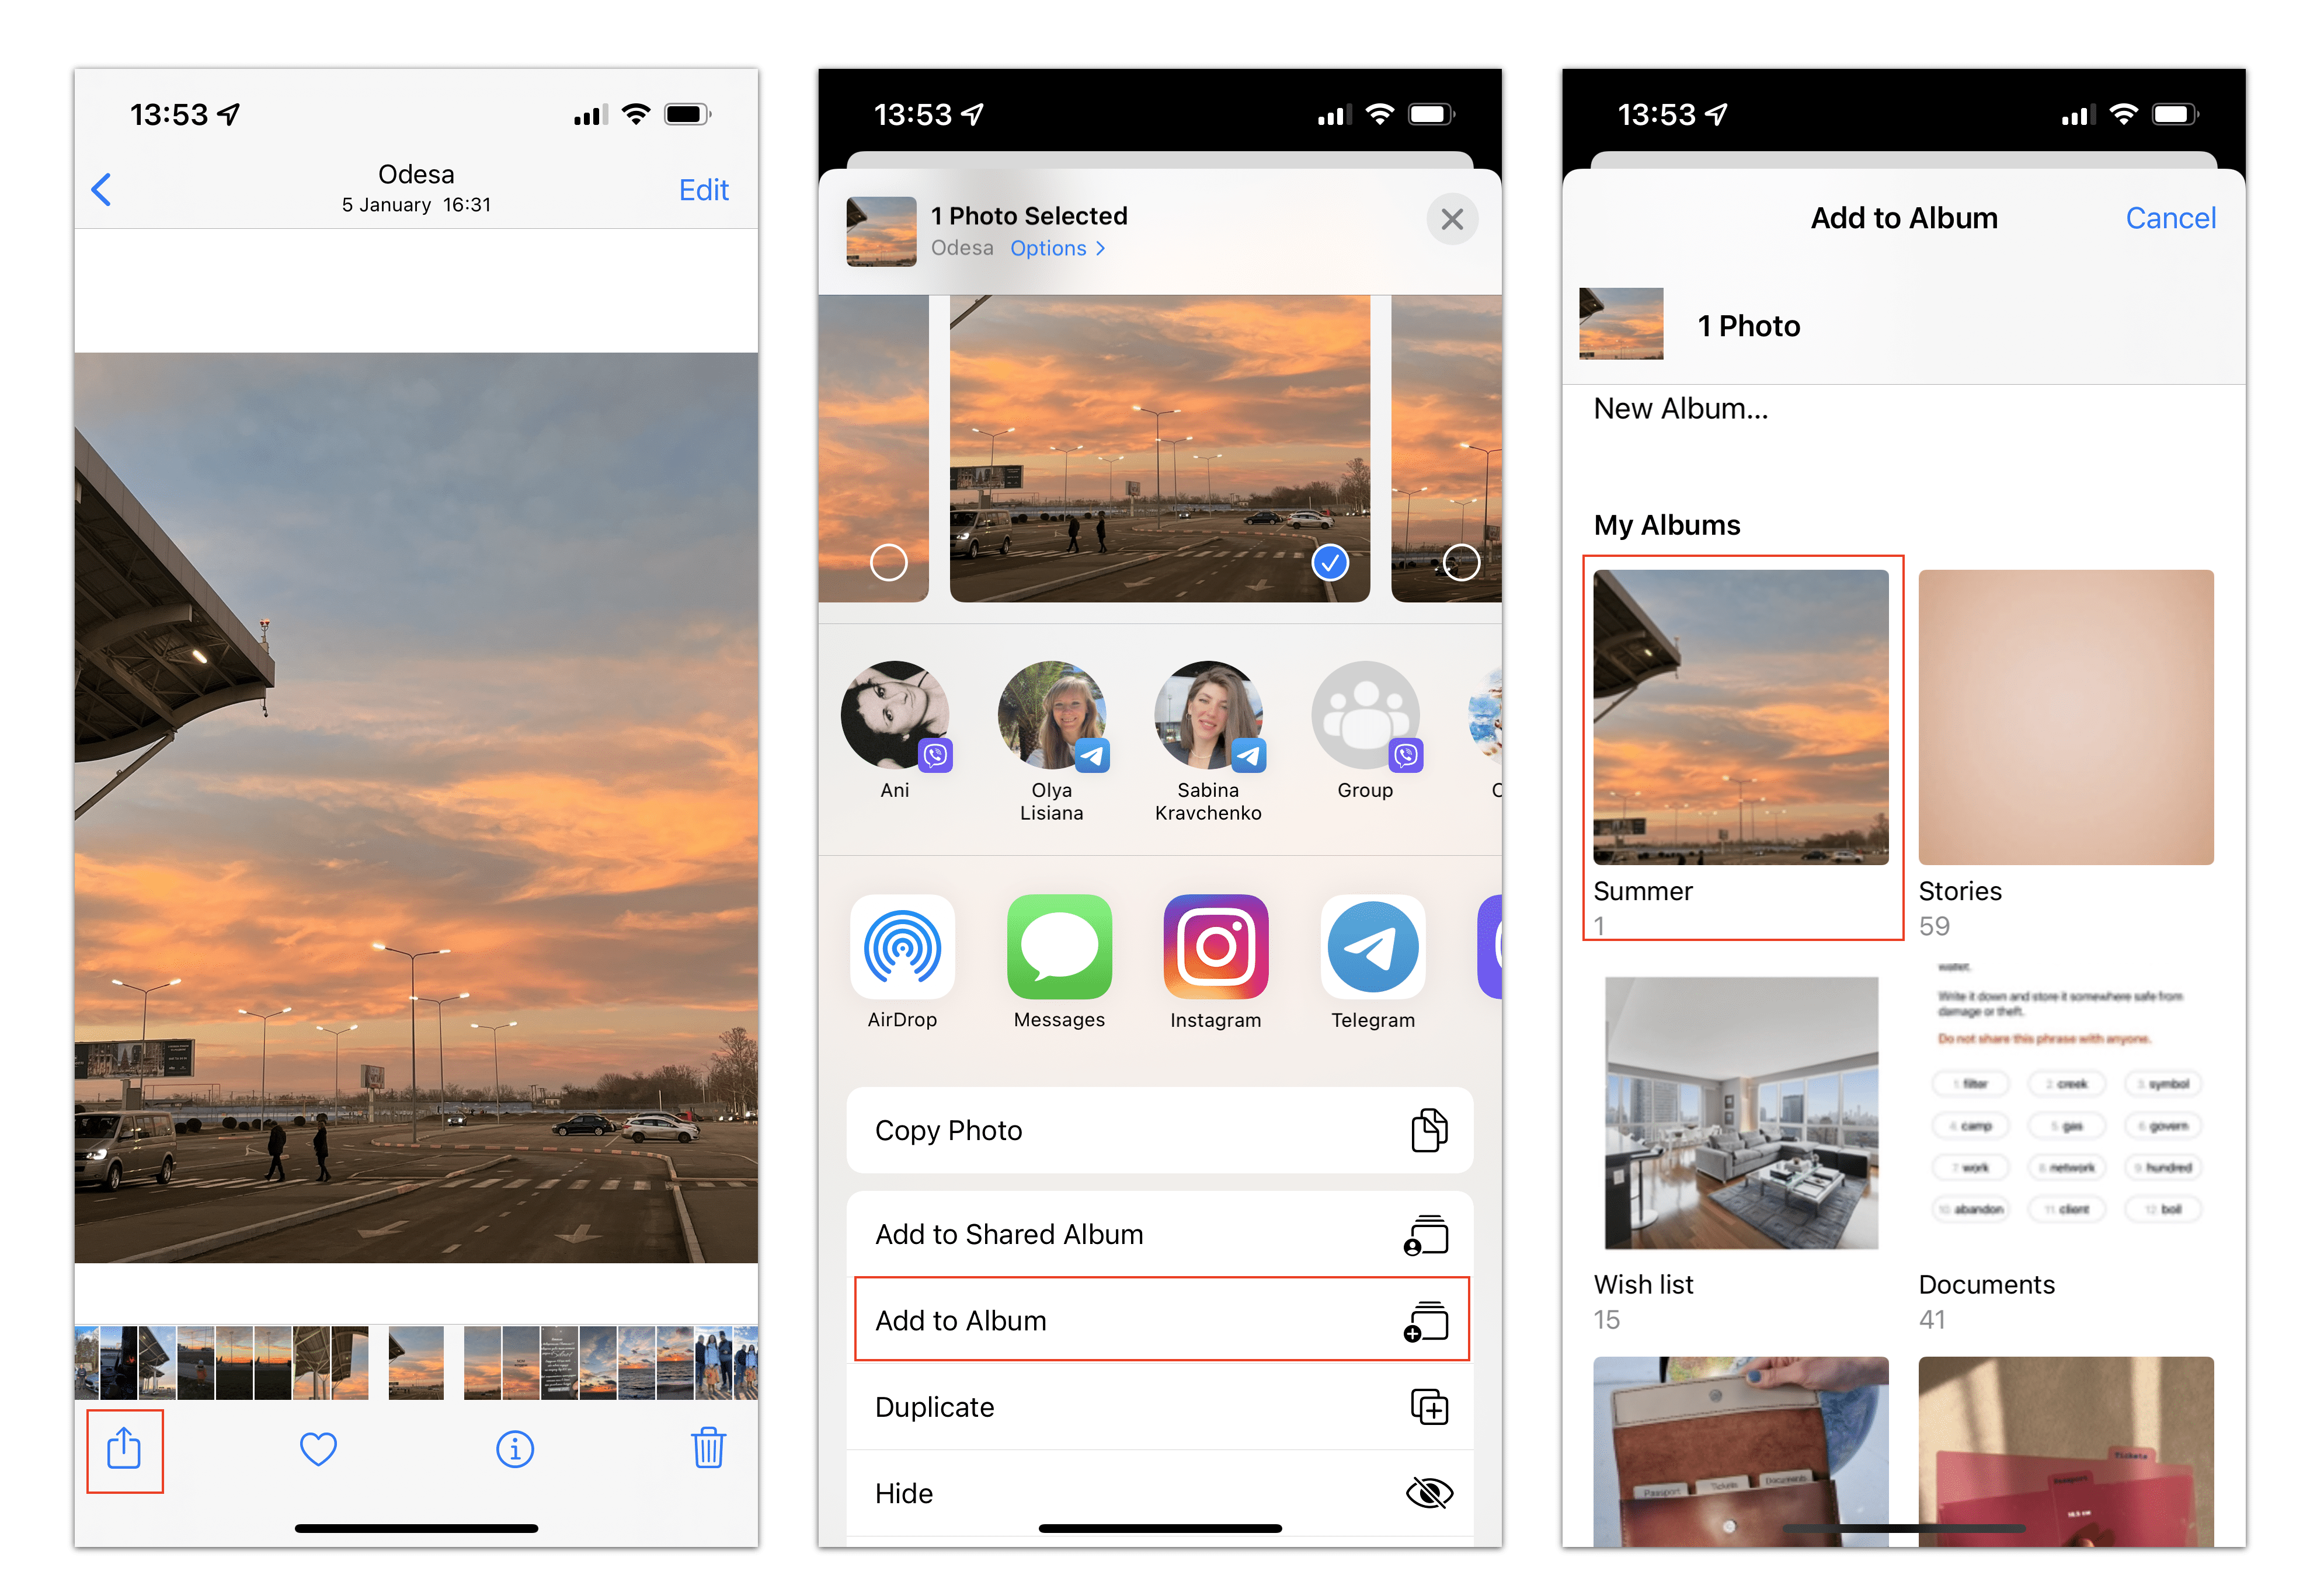
After creating an album, you can add separate photos to it. Here’s how to move a photo to the album on iPhone:
- Open the photo you want to add to the album.
- Tap the Share icon.
- Select Add to Album.
- Tap the album where you want to move the photo.
After creating a folder, you can organize albums inside it. Here’s how to add an album to a folder in iOS photos:
- Go to the folder in the Photos app.
- Tap Edit.
- Tap the Plus (+) icon and select New Album.
- Give a name to the album.
- Select photos to add to this album.
- Tap Done.
How to delete a photo album from iPhone
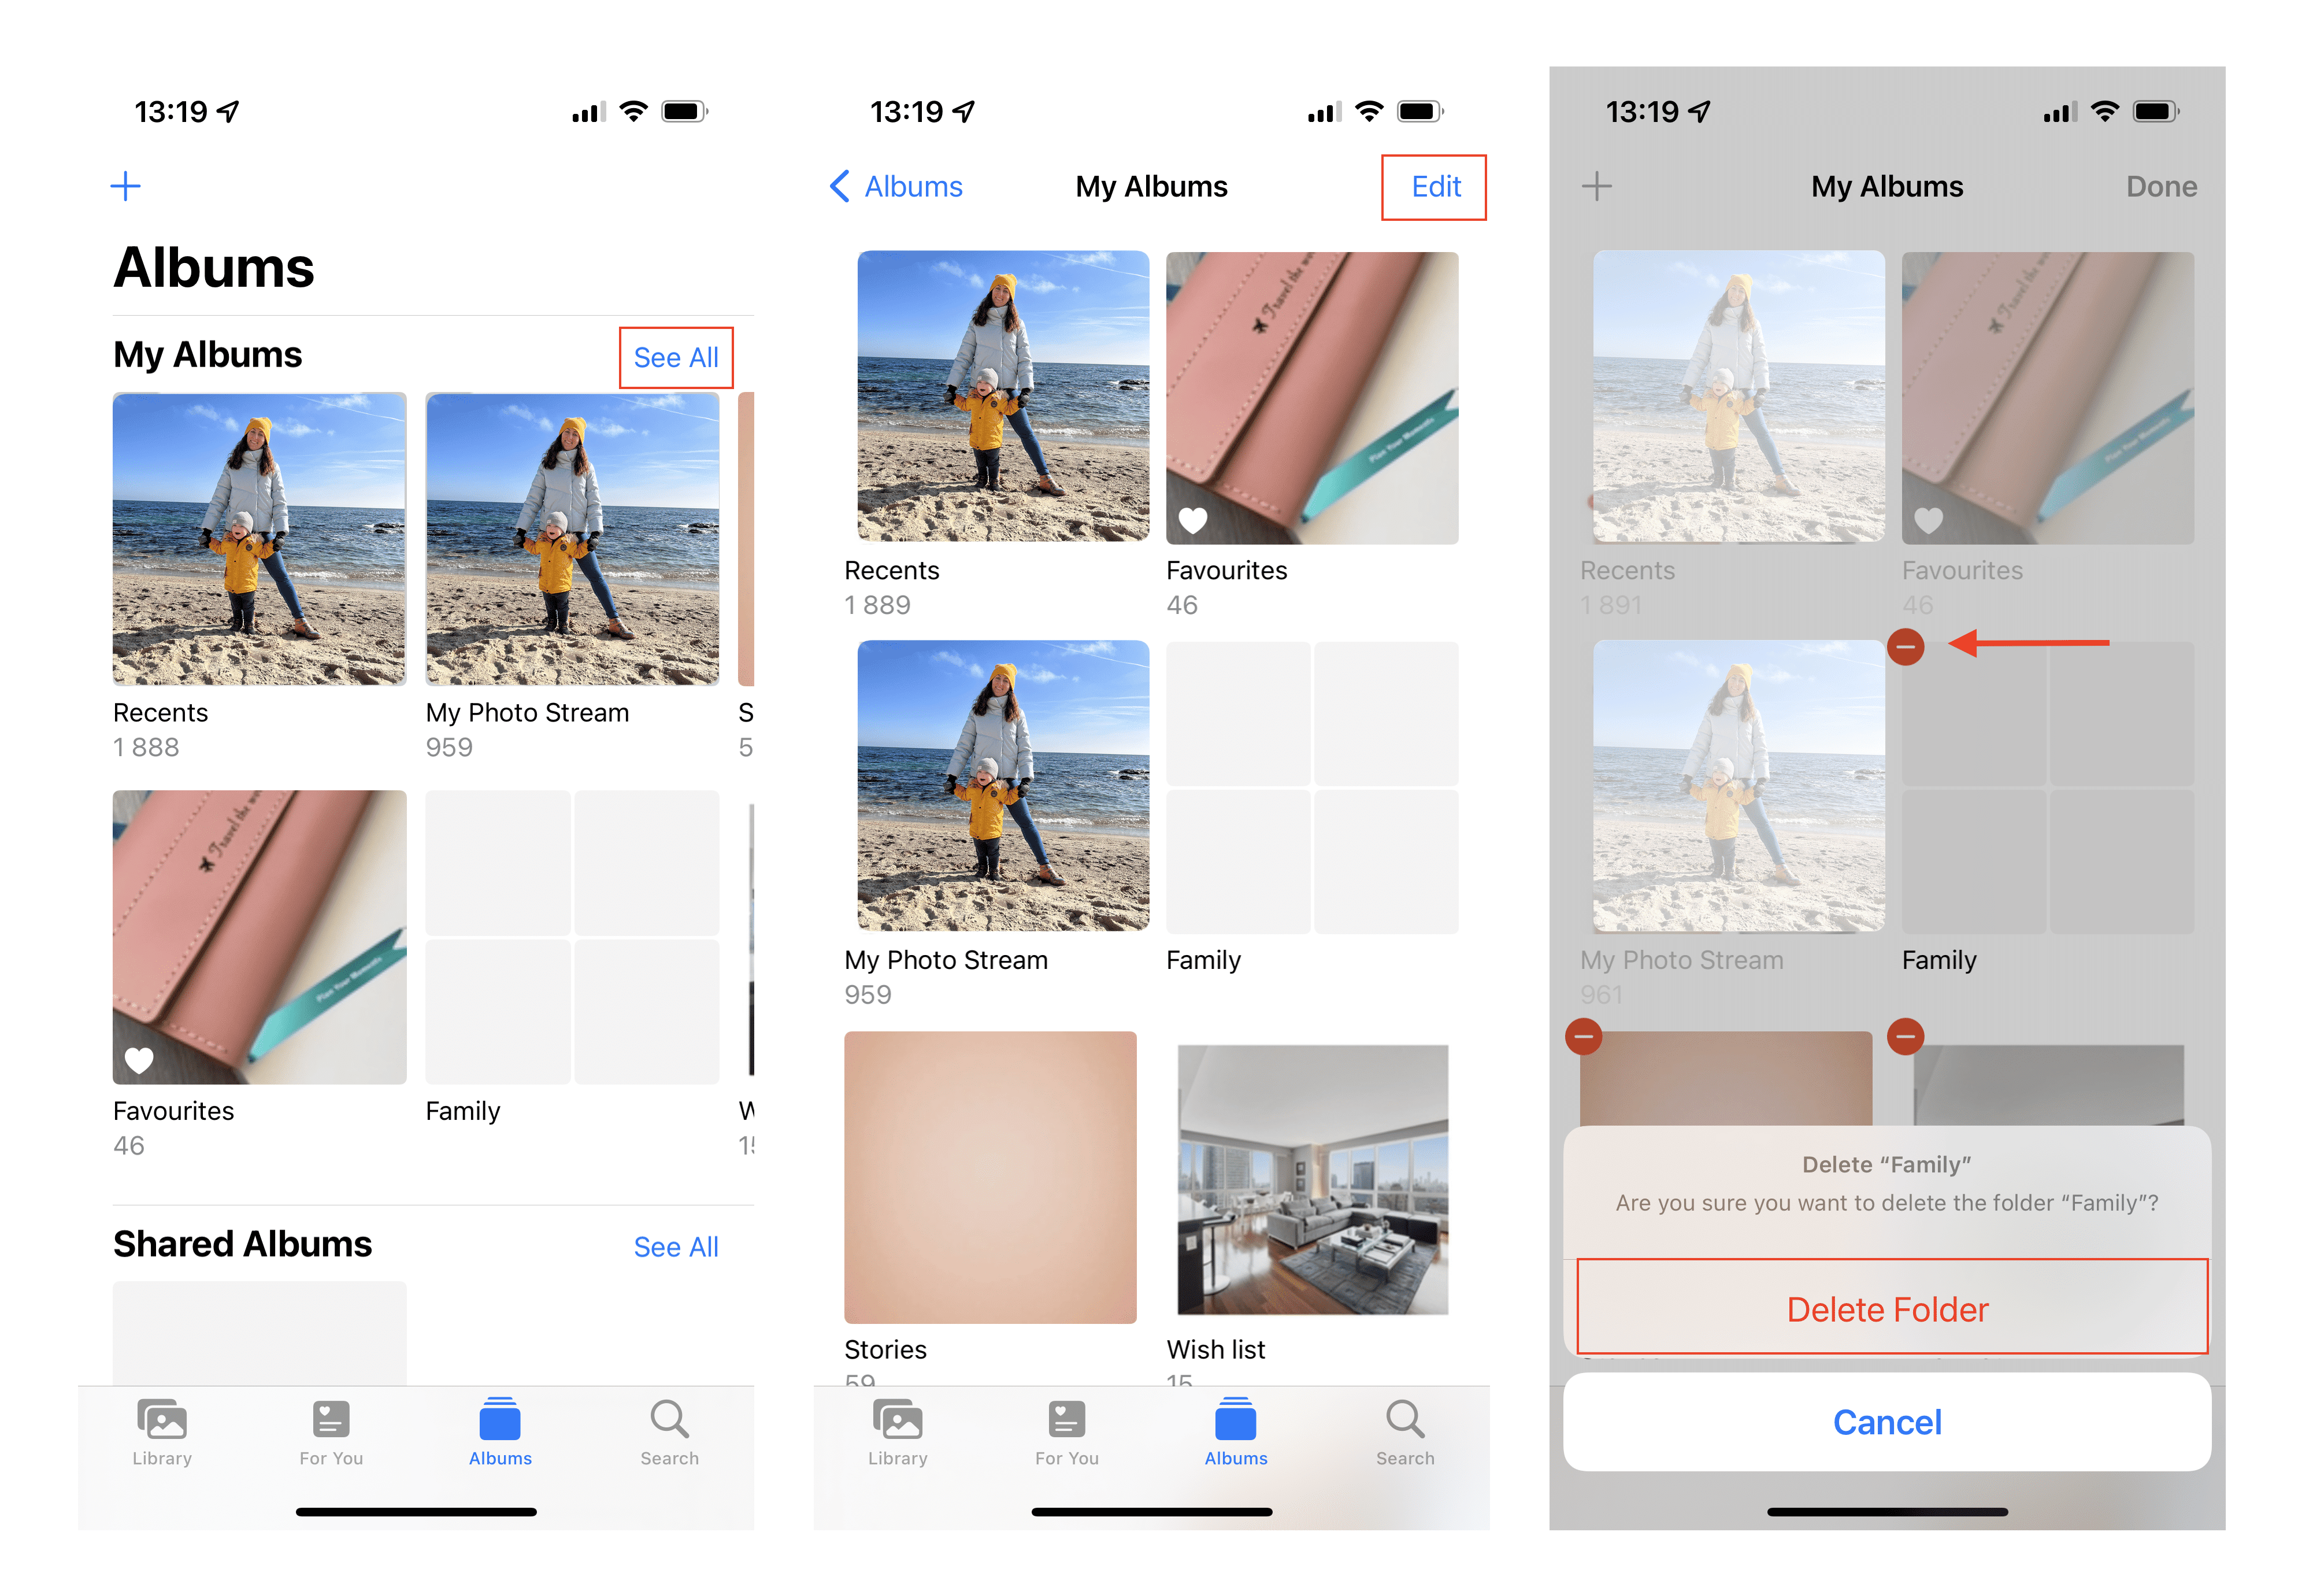
Follow these steps to delete an album from your iPhone. The same instructions work for deleting folders from iPhone:
- Open the Photos app and go to the Albums section.
- Tap See All.
- Tap edit.
- Tap the red icon for the album or folder you want to delete.
- Tap Delete Forever to confirm.
iPhone photo organization ideas
Arrange photos by dateWhen you take a picture, your iPhone saves metadata for each photo, including the data of the date when it was taken. Thanks to this, you can arrange your photos by date. Here’s how:
- Open the Photos app.
- Tap the search icon.
- Enter the month or event in the search bar, for example, “May.”
- Your phone will display all the photos taken that month.
- You can narrow down your search as many times as you need. For example, in your results, you can search for the keyword “park.” You will see all photos taken in a park in May.

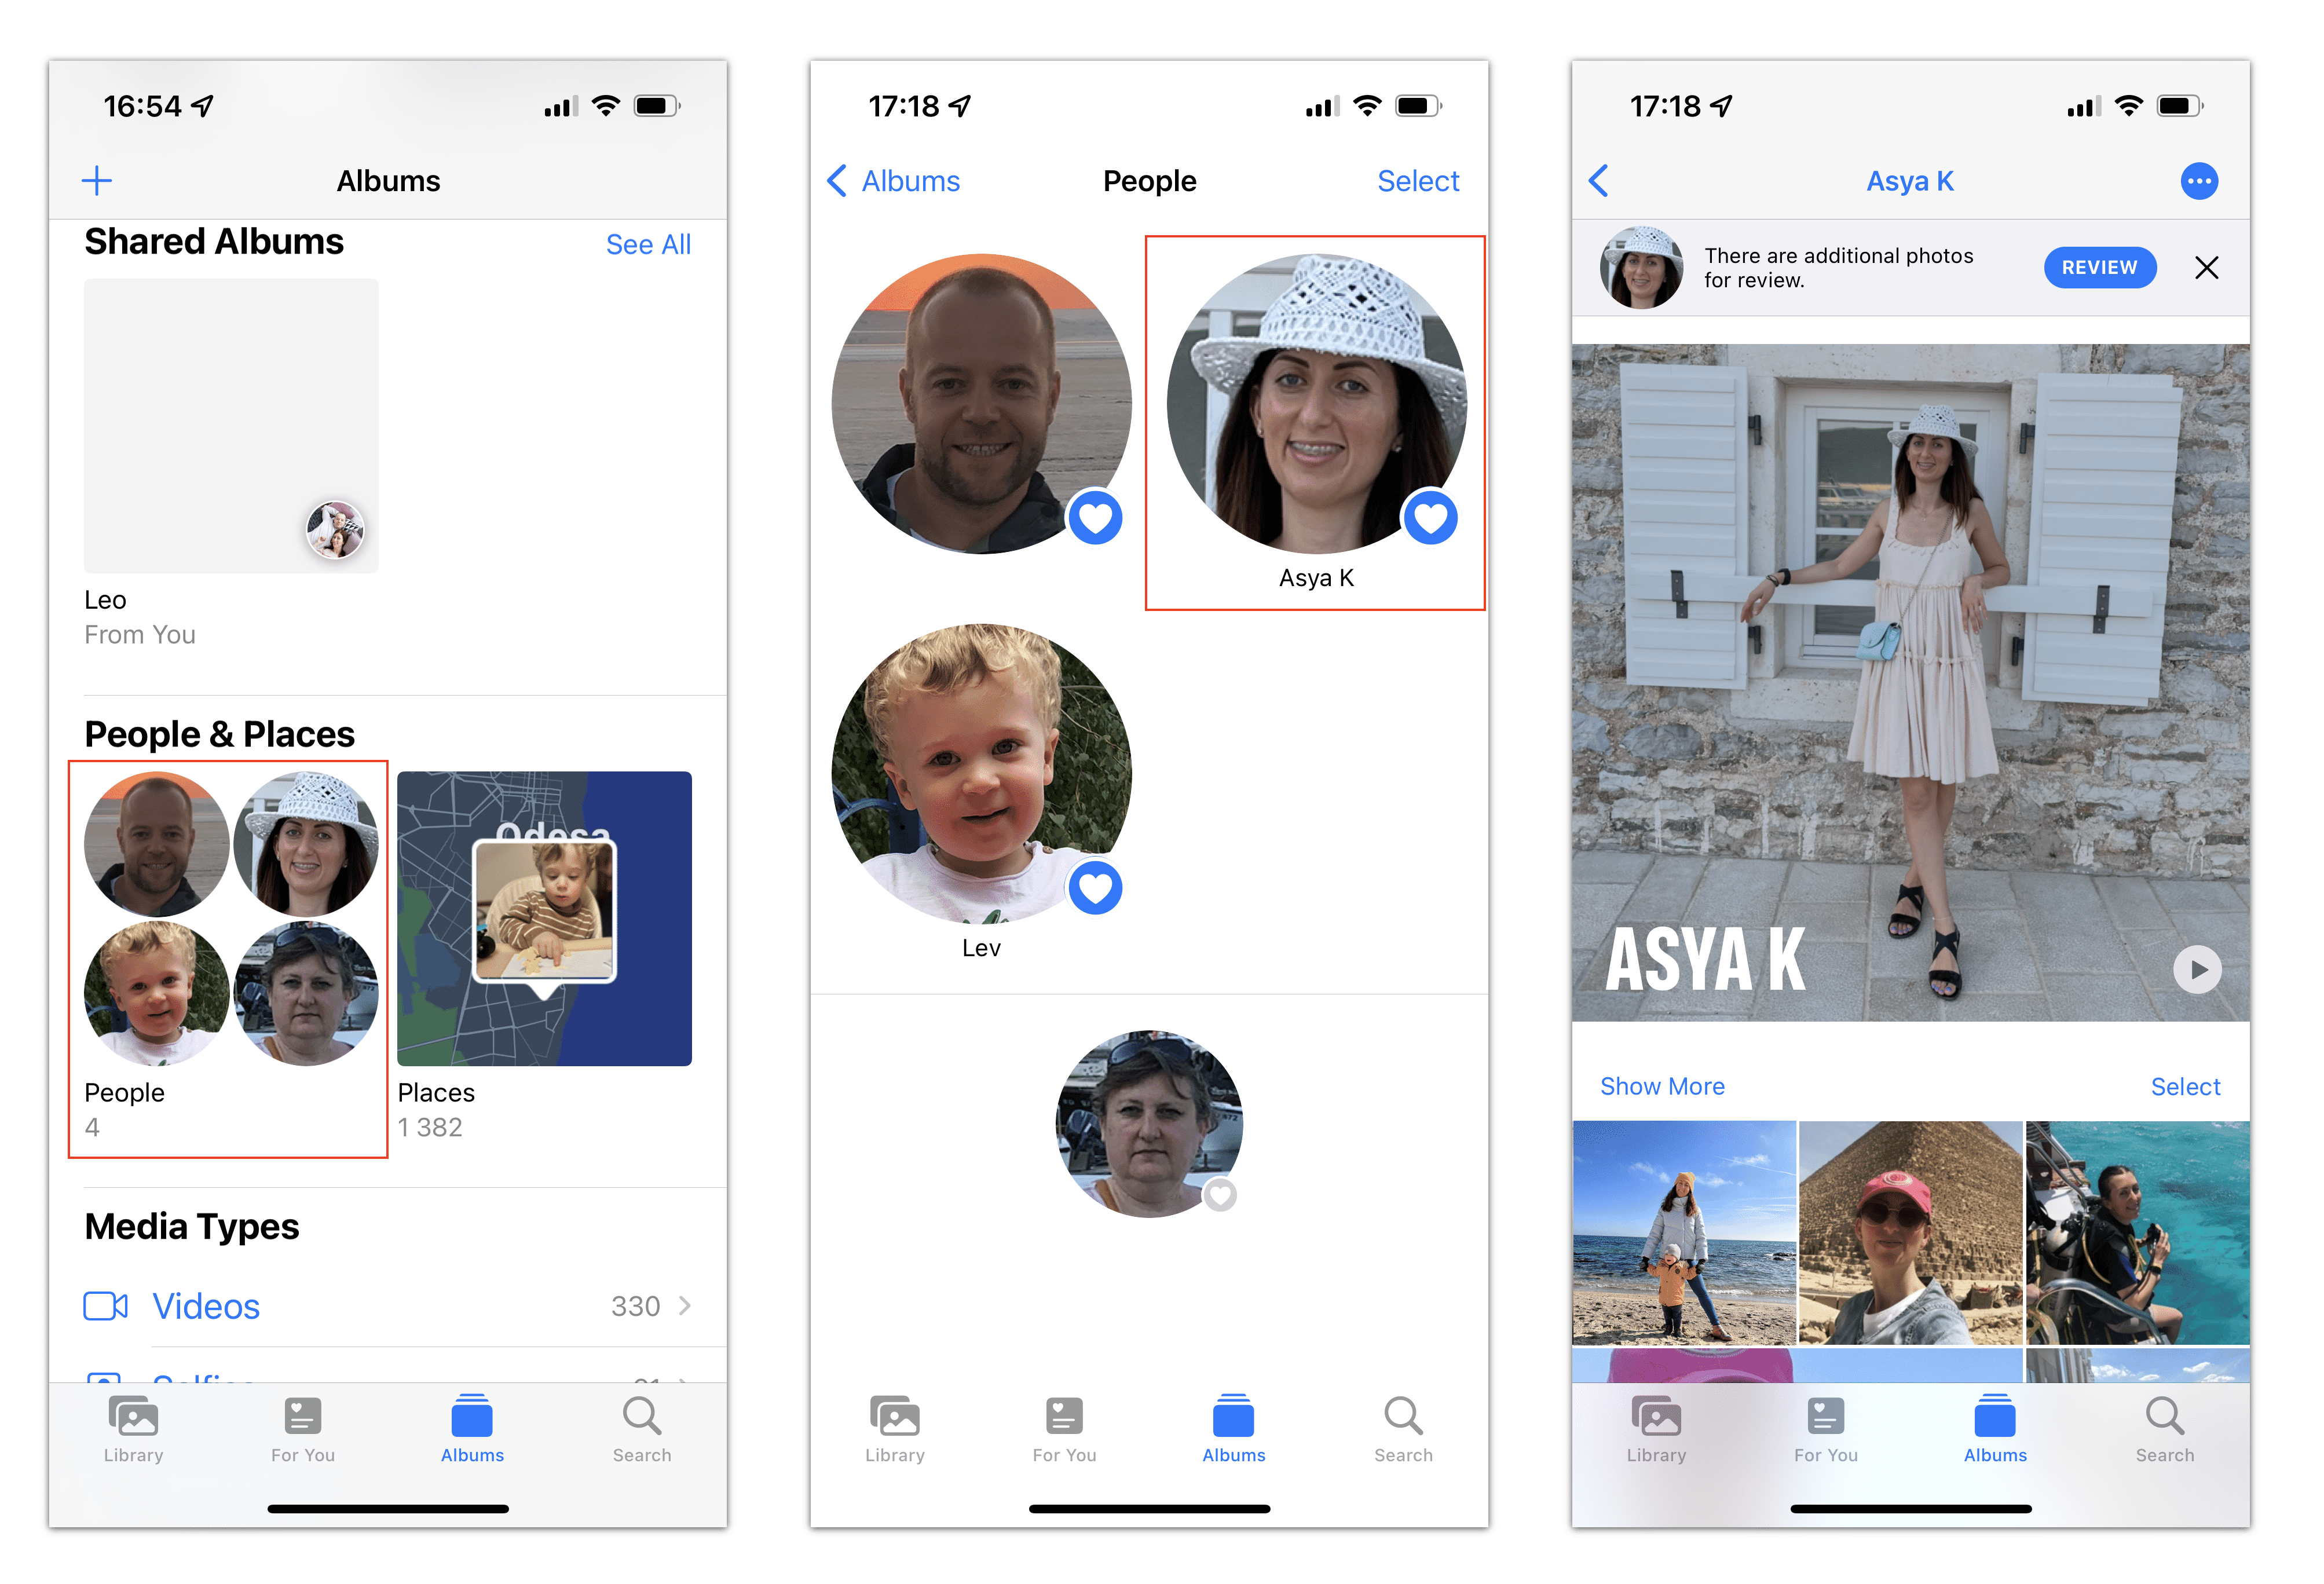
The new iPhones can recognize faces. When you take a new photo, the system automatically recognizes the faces of the people in the photos and groups them. You can give names to faces, mark them as favorites, and then view all photos of a particular person. Here’s how it works:
- Open the Photos app and go to Albums.
- Scroll down and find the “People & Places” section.
- Tap People.
- You will see a catalog of all the photos that have been recognized by face.
- Tap a circle and view all photos of a particular person.
- You can configure and add more photos to the faces that were not automatically recognized by the system.
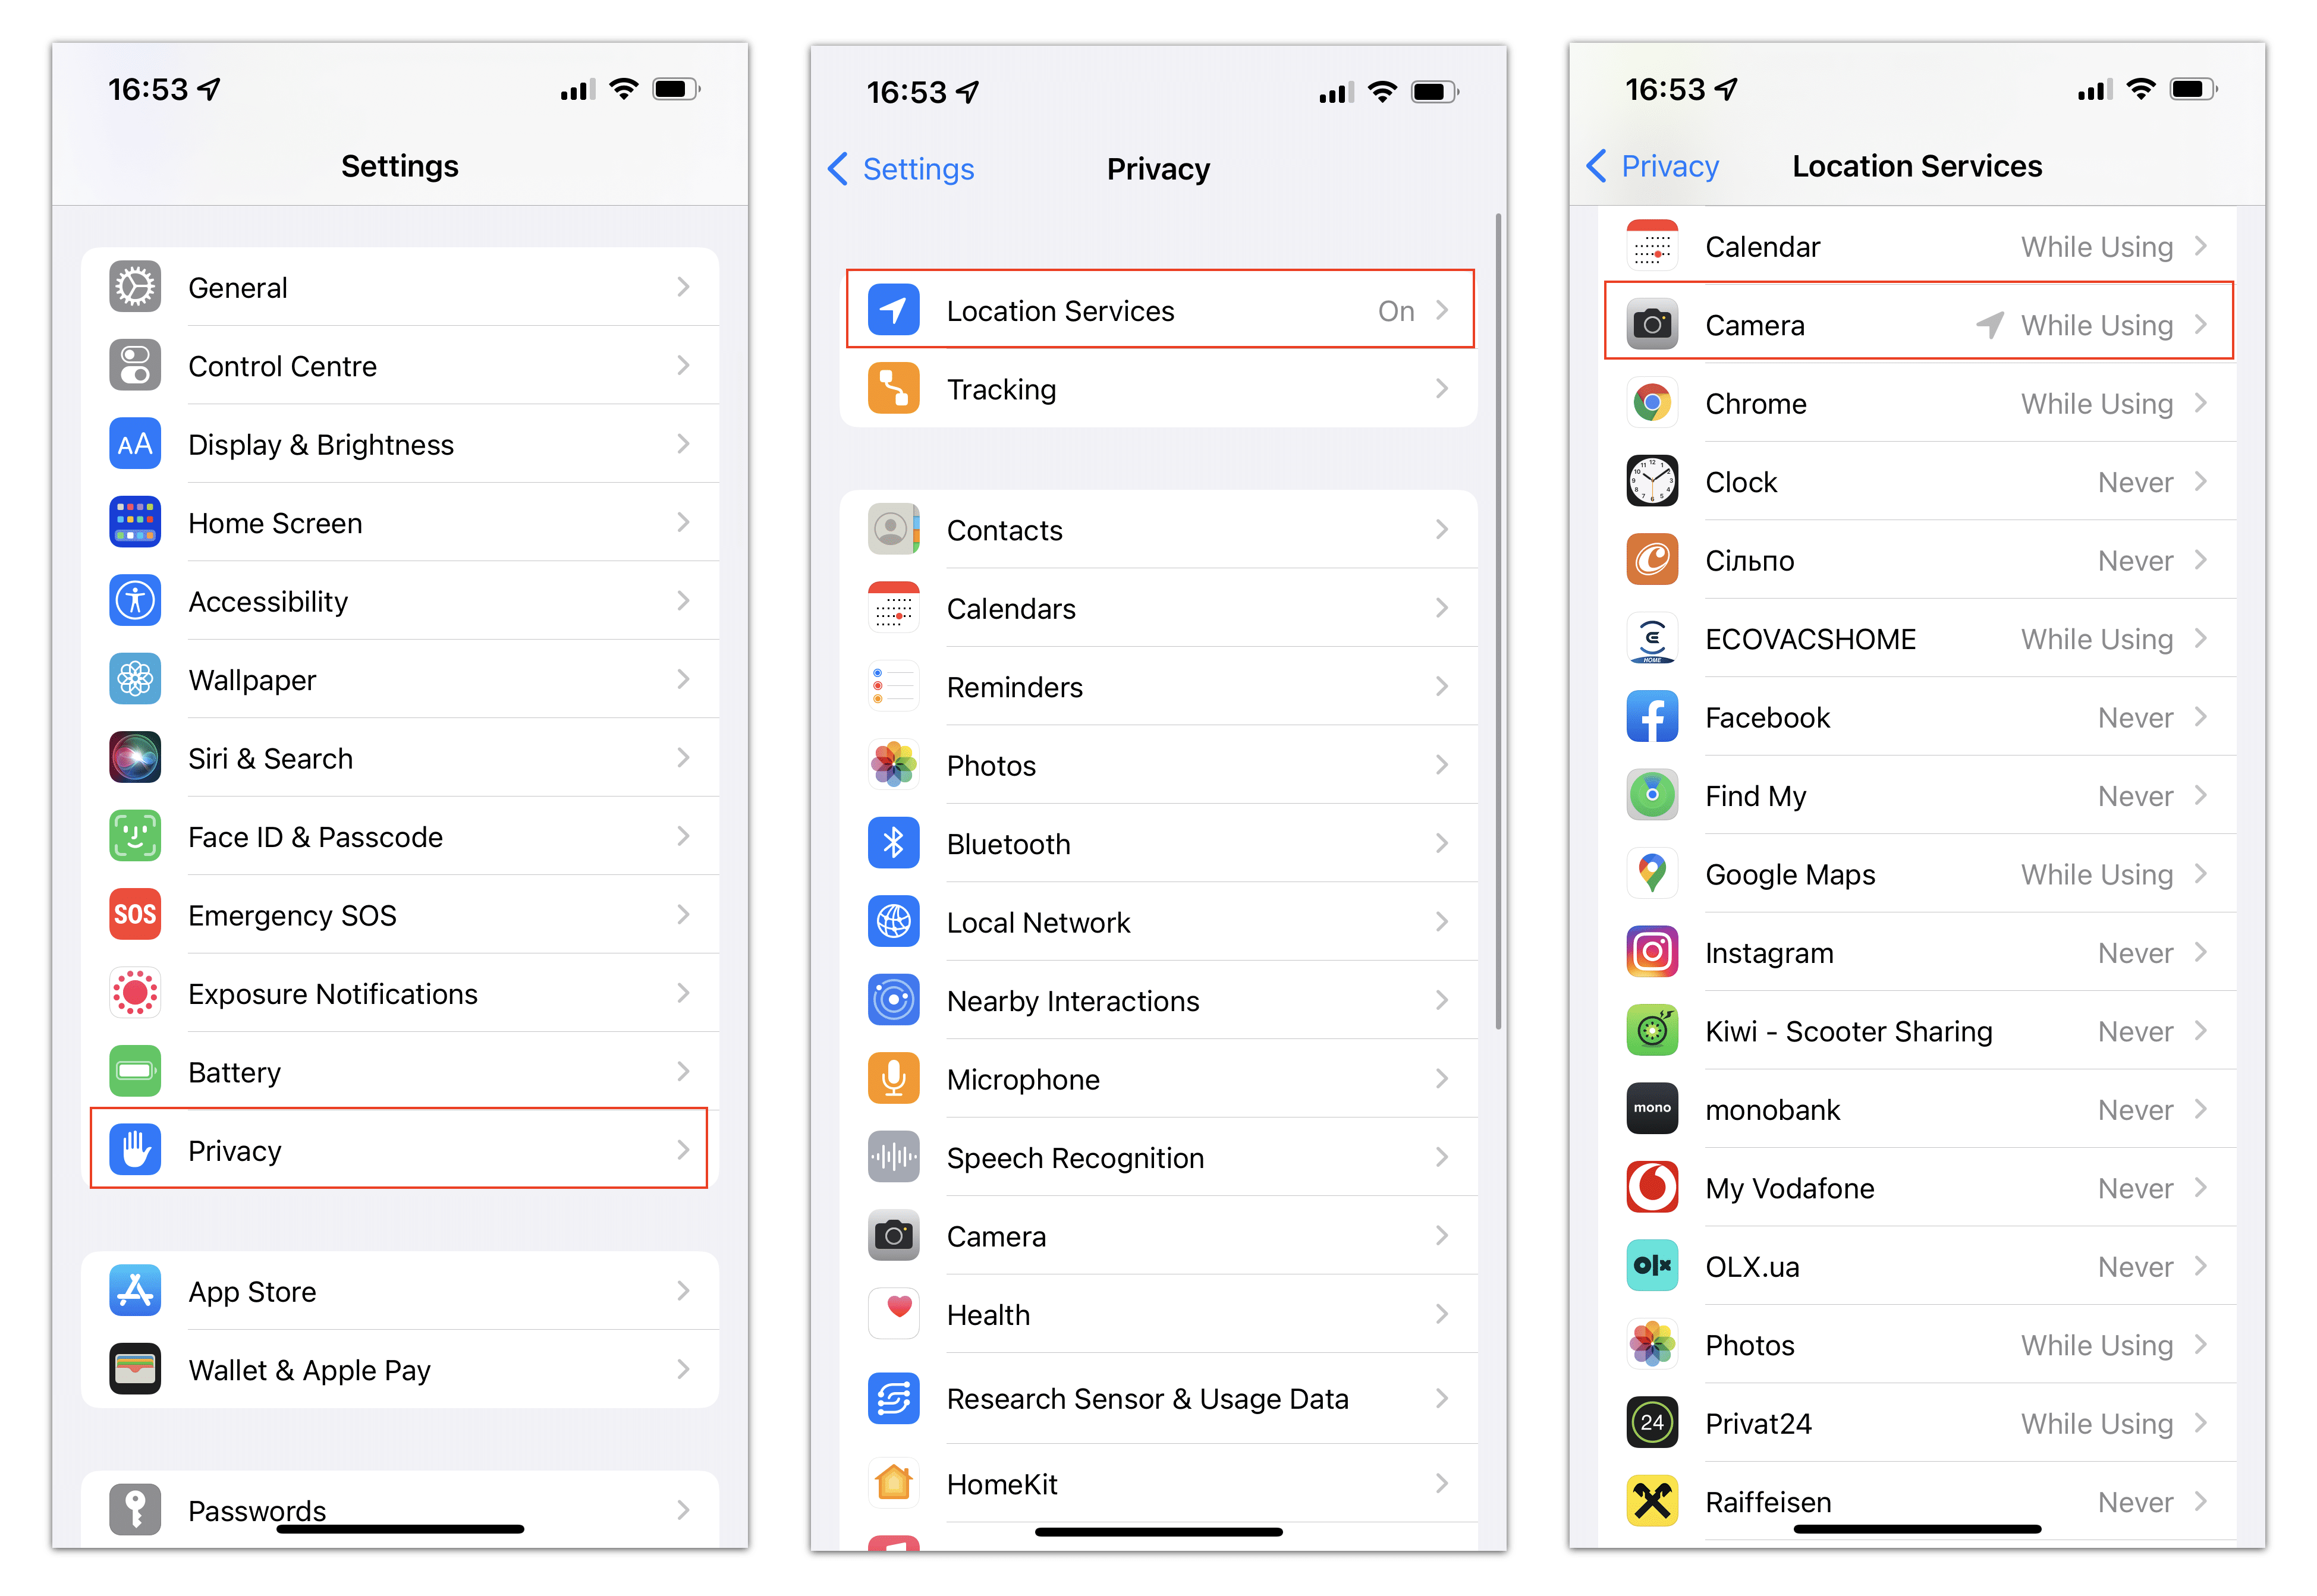
How to enable Location Services on iPhone:
- Open Settings.
- Scroll down and tap Privacy.
- Select Location Services → Camera.
- Tap Allow location access when using the app.
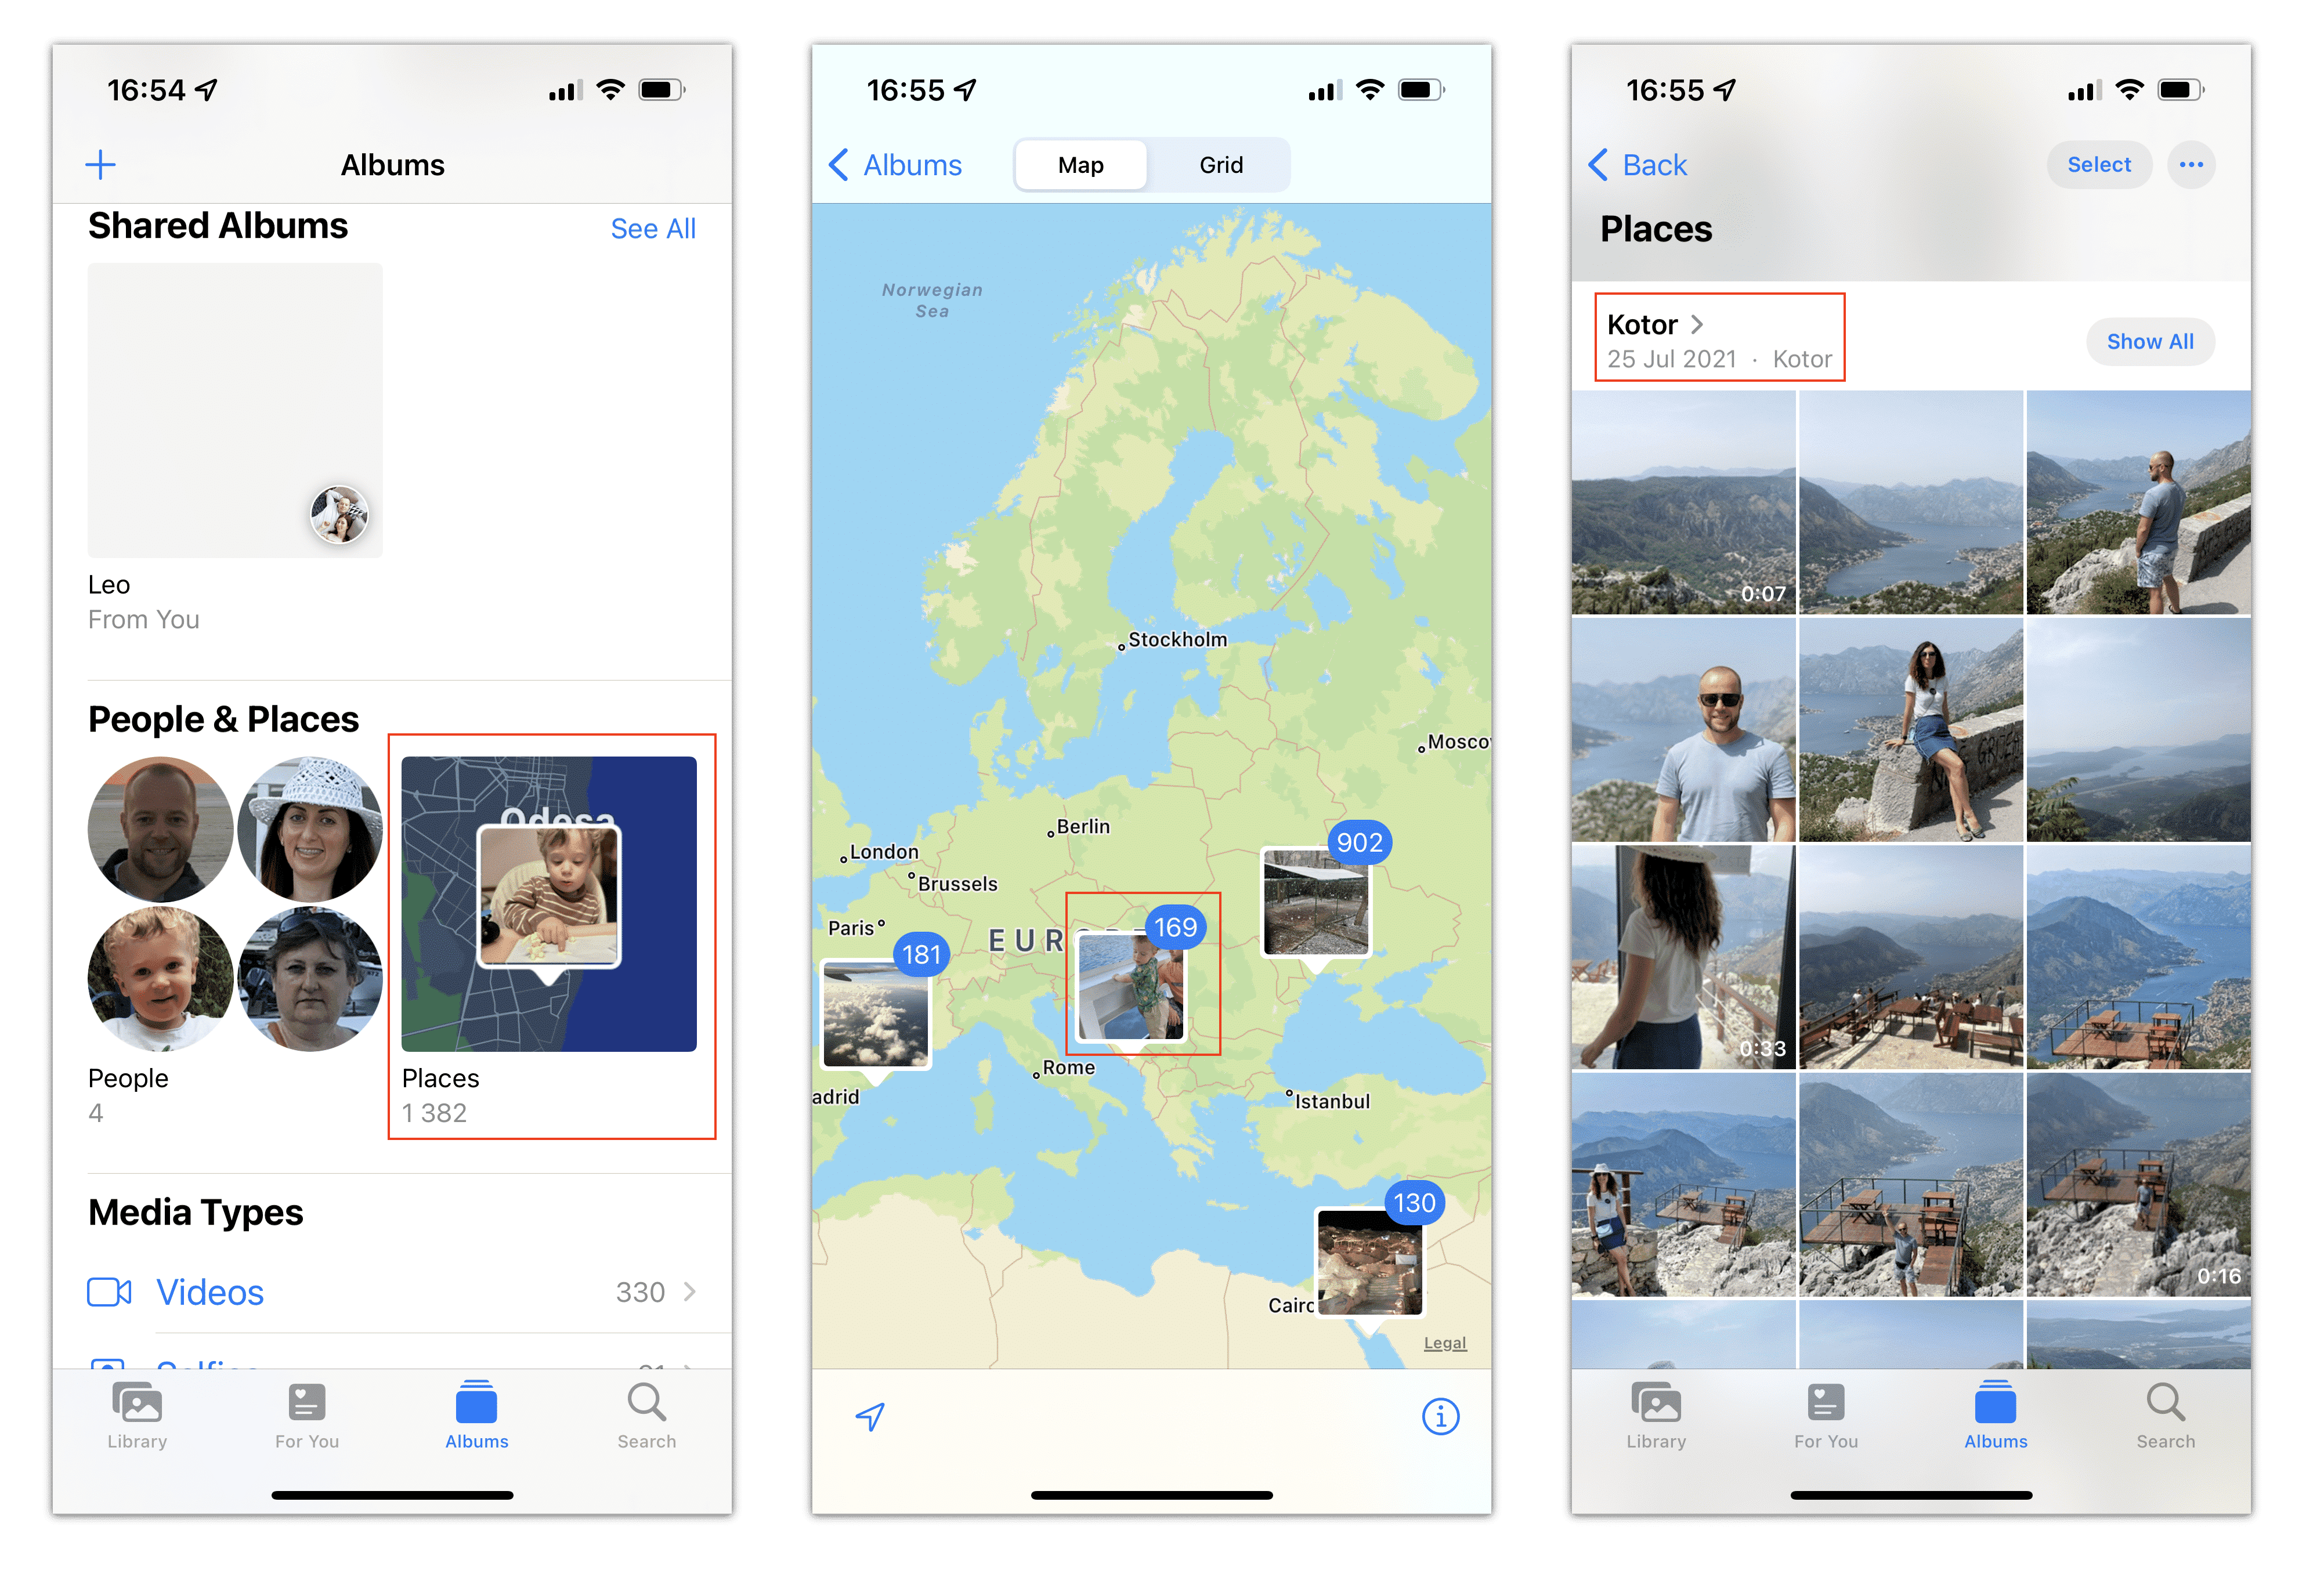
Once you turn on location for photos, your iPhone will automatically geotag new photos and save this data. Then you can sort your photos by location. Here’s how:
- Open the Photos app and go to Albums.
- Scroll down and find the People & Places section.
- Tap Places.
- Select the location on the map for which you want to see the photos. You will see the list of photos taken in this place.
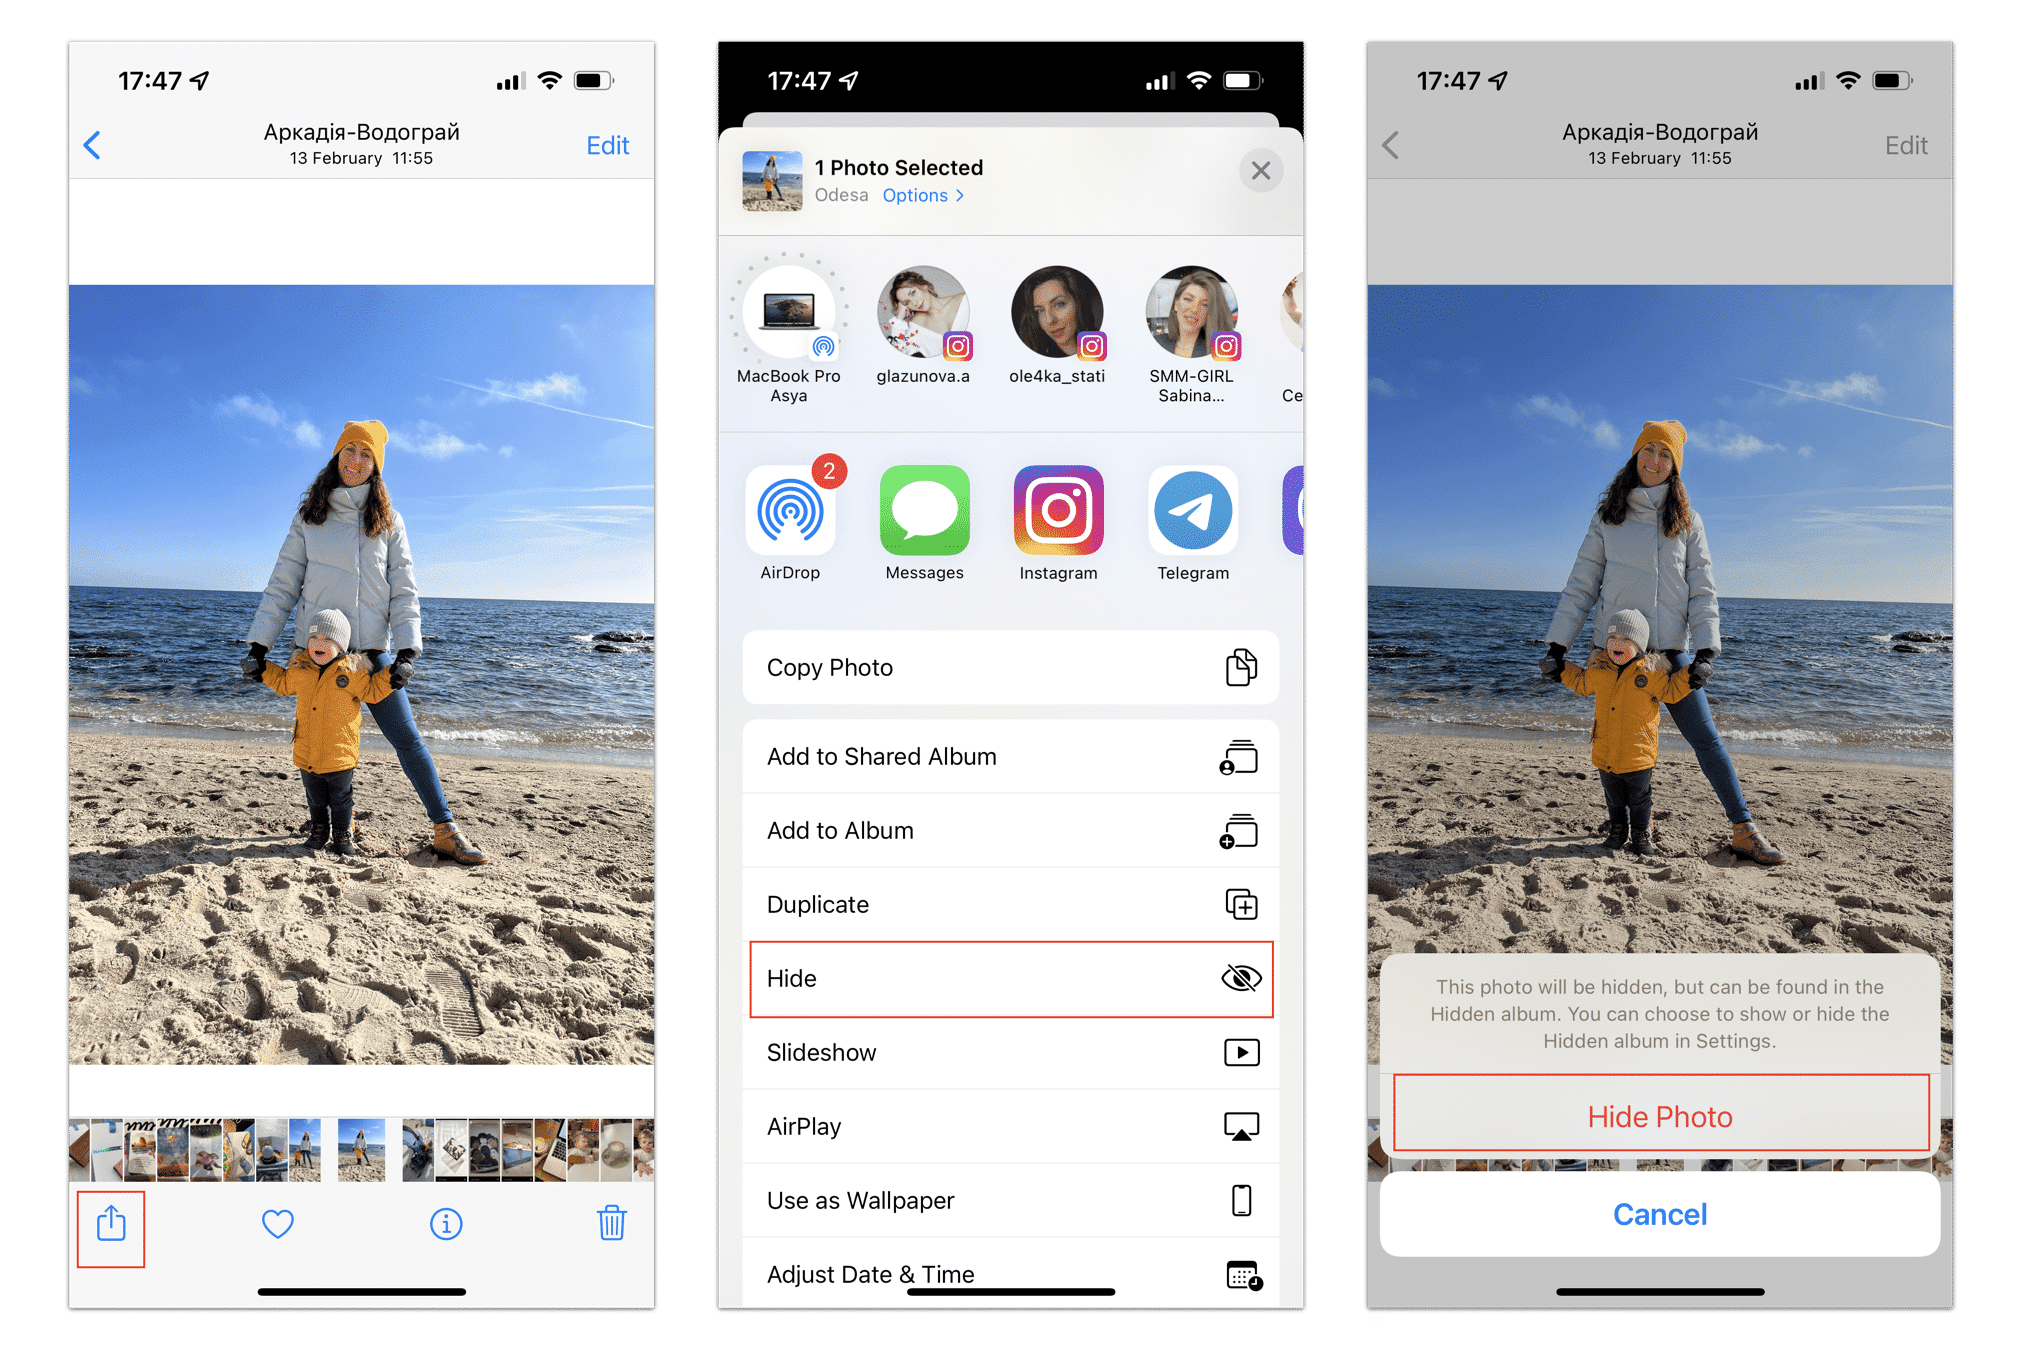
On iPhone, you can hide photos. The hidden photos won’t appear in the shared Recent feed or individual albums but will remain on your device. You can see them in a separate folder named Hidden. Here’s how to hide photos on iPhone:
- Open Photos.
- Find the image you want to hide and tap the Share icon.
- Select Hide.
- Tap Hide Photo to confirm.
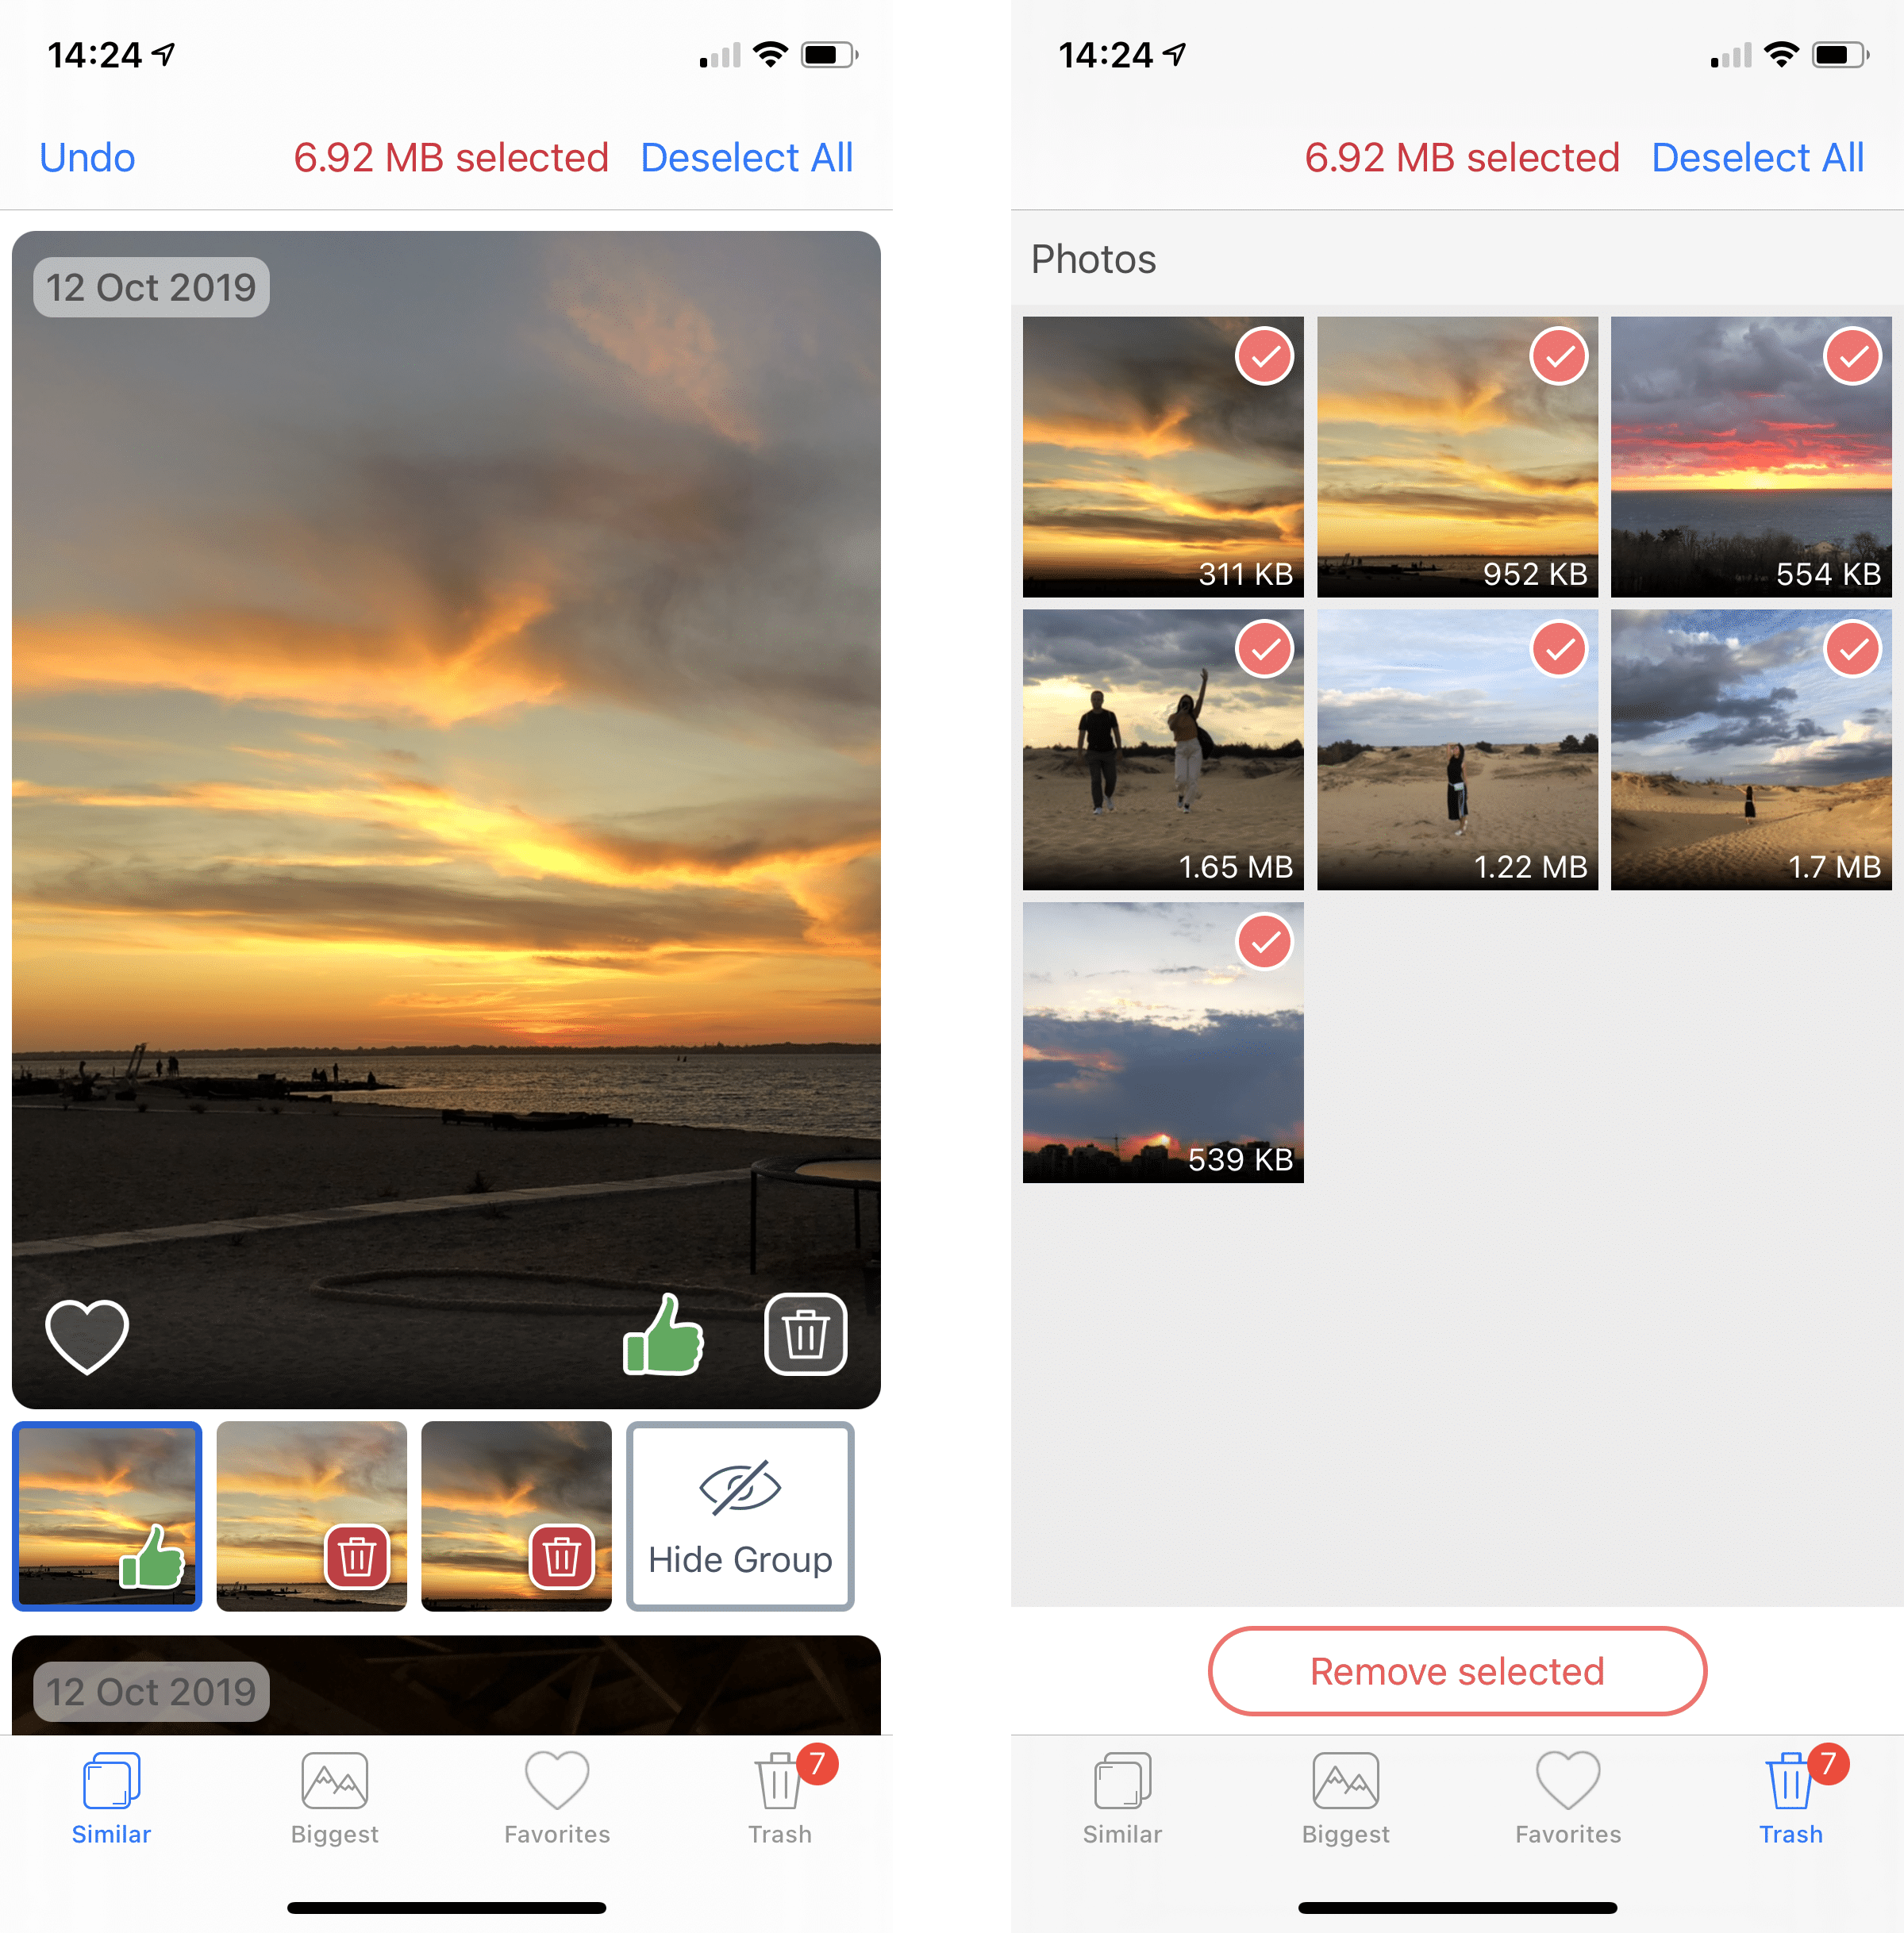
When organizing photos on your iPhone, don’t forget to clear up all unneeded pictures in your storage. This will free up huge space in your storage and help you find the needed photos much faster. You can easily find and remove duplicate and similar photos with a free application Phone Cleaner for Media Files. Here’s how:
- Download and open Phone Cleaner on your iPhone.
- Go to the Similar section and remove unneeded similar and duplicate photos.
- Go to the Trash section and tap Remove selected.
- Then you have to empty the Trash folder in the Photos app to remove these photos forever.
Conclusion
We hope these tips helped you greatly to organize your photos and easily find the ones you need. If you have your own tips, please share them in the comments below.FAQs
How do I declutter my iPhone photos?
To declutter your iPhone photos, use a free application called Phone Cleaner for Media Files. This application helps you quickly find and remove duplicate and similar photos, as well as the largest media files that take up the most space in your storage.
Can you delete photos but keep them in the album?
You can’t keep photos in an album if they’ve been deleted. However, you can hide them so they will not be displayed in the Recent, My Photo Stream, and some other albums. You can see hidden photos in the album called Hidden. To hide photos, do the following:
- Open the photo you want to hide.
- Tap the Share icon at the bottom of your iPhone screen.
- Select Hide.
- Confirm by tapping Hide Photo.
Do albums take up space on iPhone?
No. On iPhone, additional albums don’t take up additional space in your storage. Albums are an organizational tool for your photos that help you group your photos and easily find them.