August 14, 2025
How to uninstall TeamViewer from Mac
Unsure how to correctly uninstall TeamViewer without leftovers? It’s exactly the place where you’ll find clear, step-by-step instructions to completely remove TeamViewer from your Mac, including hidden files that often get left behind.
Why is it important?
Well, TeamViewer may cause boot errors and even brick your Mac after dragging it to the Trash. Let’s make sure that won’t happen to you. In this ultimate guide, I’ll show you 4 safe ways to remove TeamViewer fully.
This Article Contains
Get a head start!
Want to jump straight to a swift solution? App Cleaner & Uninstaller is your top pick. It uninstalls apps like TeamViewer wholly from your Mac, including all residual files. This tool is a reliable manager for apps designed to work with a few clicks.
What is TeamViewer, and why remove it?
TeamViewer is a popular remote connectivity software that can bridge distances between any devices globally. Its strength lies in delivering remote control, desktop sharing, online meetings, and file transfers. You’ve likely encountered it when:
- Needed a programmer to remotely set up your device or do the troubleshooting.
- Managed a network of company computers from a single location.
- Transferred files between your devices without relying on cloud services.
- Accessed your office desktop while traveling or working remotely.
- Needed to securely access business tools or servers.
Wiki minute:
TeamViewer says over 600,000 users are active at any moment you check, and its app has been installed more than 2.5 billion times.
Contrary to its utility, there are compelling reasons to consider its removal:
- Security concerns: If not managed carefully, TeamViewer can open doors for bad actors and pose risks of unauthorized access, data breaches, or even identity theft. Here, using FileVault disk encryption adds an extra defense layer.
- Performance issues: Users report that the background process TeamViewer_Service consumes excessive CPU (often over 100%), which can cause the Mac to run slowly or drain its battery life.
- Freeing up disk space: Removing TeamViewer helps clean up your system and reclaim storage space, including hidden leftover files.
- Troubleshooting: Uninstalling TeamViewer can resolve software conflicts, crashes, or errors caused by incomplete removal.
- No longer needed: Perhaps your remote support needs have changed, or you’ve found an alternative like LogMeIn.
4 proven methods to uninstall TeamViewer completely
Here comes the decision to remove TeamViewer. Speaking of which, it’s essential to push the matter through. I mean, you’re supposed to delete the app with all remnants.
I’ve identified four reliable strategies for a complete uninstallation – from using TeamViewer’s own uninstaller and manual digging to Terminal commands, and finally an automated solution. My goal was to see which method gets the job done most efficiently and gets your Mac truly clean.
Note:
I performed exhaustive tests on TeamViewer version 15 running on macOS 15. I’ll guide you through each proven method step-by-step and provide insights into its effectiveness to help you choose the best path.
Delete TeamViewer with its uninstaller
First up is the official TeamViewer built-in uninstaller. According to TeamViewer’s support knowledge base, this method removes the core app and configuration files, Still, it doesn’t erase associated files tucked away in different system folders.
Rest assured, you won’t have to guess about these leftovers; I’ll provide all those directories below. Here’s how to proceed with basic removal:
- Open TeamViewer.
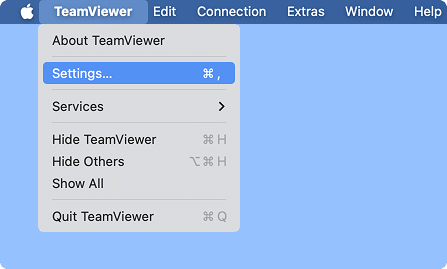
- Click on the menu in the top-left corner → choose Settings.
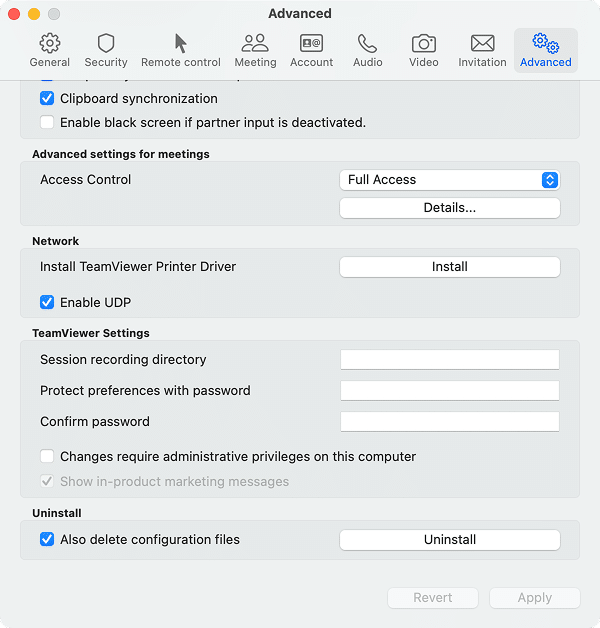
- Select the Advanced tab → scroll down and check the Also delete configuration files box.
- Click on the Uninstall button → confirm the uninstallation process.
Note:
At this step, the official guide ends with the uninstall in progress message. However, it is not about a complete uninstallation. After using TV’s native uninstaller, I still found 11 files and 3 folders remaining, in my case, taking up about 30 MB. Fortunately, these residuals were easy to clean up using App Cleaner & Uninstaller.
- Delete all TeamViewer remains. Open Finder → press Cmd+Shift+G → navigate to the following directories and delete TeamViewer-related files:
Application files:
/Library/Application Support/TeamViewer/TeamViewerUninstaller.appCopy
Application support:
/Library/PrivilegedHelperTools/com.teamviewer.UninstallerHelperCopy
Caches:
/private/var/db/receipts/com.teamviewer.teamviewerUninstallerApp.plistCopy
/private/var/db/receipts/com.teamviewer.teamviewerUninstallerApp.bomCopy
/private/var/db/receipts/com.teamviewer.teamviewerUninstallerHelper.plistCopy
/private/var/db/receipts/com.teamviewer.teamviewerUninstallerHelper.bomCopy
Login items:
/Library/LaunchDaemons/com.teamviewer.UninstallerHelper.plistCopy
/Library/LaunchDaemons/com.teamviewer.UninstallerWatcher.plistCopy
- Empty your Trash.
- Restart your Mac.
Remove TeamViewer manually with Finder
Alternatively, you can manually remove TeamViewer by using Finder and locating and deleting all the service files that the built-in uninstaller misses. Here is how to act:
- Quit TeamViewer.
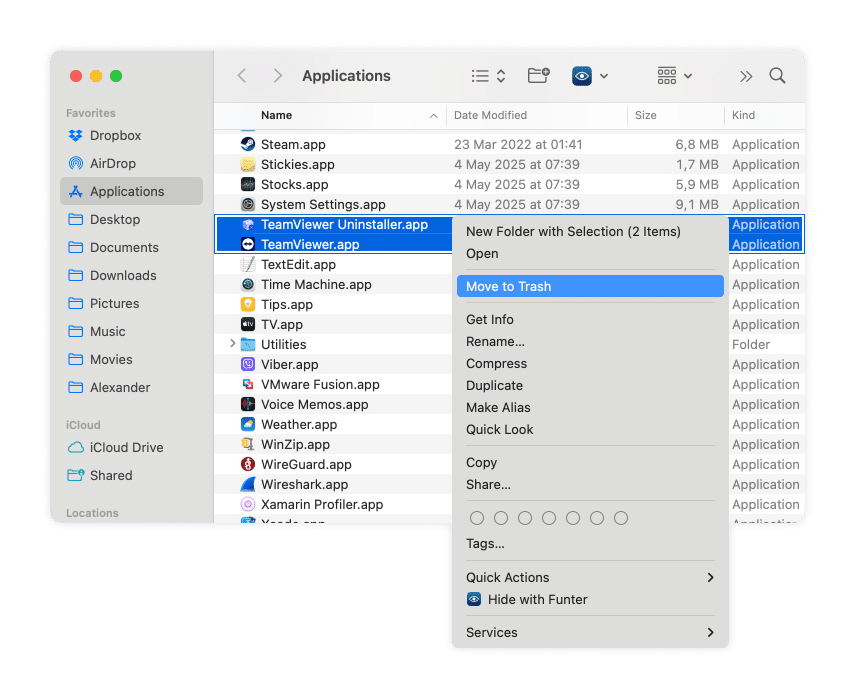
- Open Finder → go to the Applications folder.
-
Locate TeamViewer andTeamViewer Uninstaller→ drag them to Trash.
If your version includes the TeamViewer Uninstaller, you can use it to delete the app, especially in case the latter is unresponsive. It’s a good alternative to deleting through Advanced Settings.
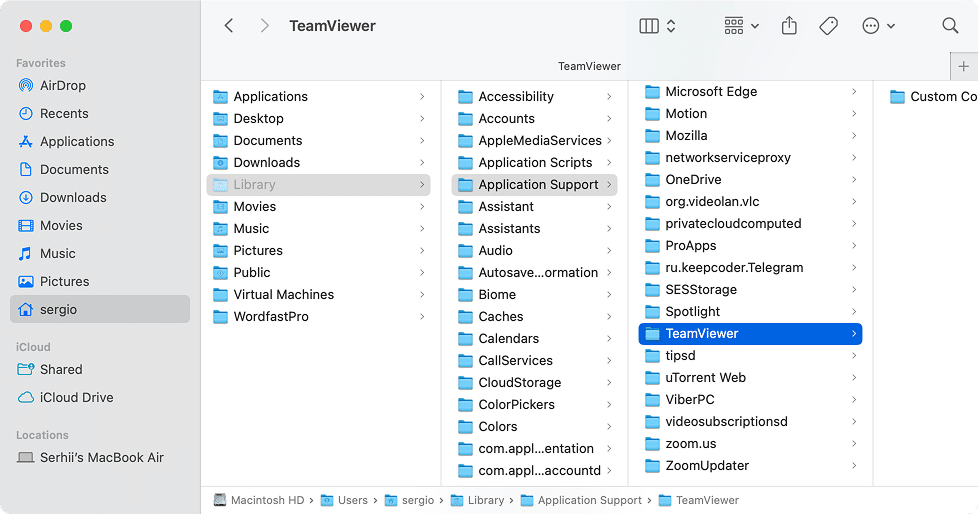
- Go back to Finder → hit ⌘+Shift+G to open a search window.
- In the Go to Folder placeholder, copy-paste the following locations one by one → trash any TeamViewer-associated files or folders you see there:
Application support files:
/Library/Application Support/TeamViewerCopy
~/Library/Application Support/TeamViewerCopy
~/Library/HTTPStorages/com.teamviewer.TeamViewerCopy
~/Library/HTTPStorages/com.teamviewer.TeamViewer.binarycookiesCopy
/Library/PrivilegedHelperTools/com.teamviewer.HelperCopy
~/Library/Application Support/Google/Chrome/Default/IndexedDB/https_web.teamviewer.com_0.indexeddb.leveldbCopy
Library files:
~/Library/WebKit/com.teamviewer.TeamViewerCopy
/Library/Fonts/TeamViewer11.otfCopy
/Library/Audio/Plug-Ins/HAL/TVRemoteAudio.driverCopy
Login items:
/Library/LaunchAgents/com.teamviewer.teamviewer.plistCopy
/Library/LaunchDaemons/com.teamviewer.Helper.plistCopy
/Library/LaunchDaemons/com.teamviewer.teamviewer_service.plistCopy
/Library/LaunchAgents/com.teamviewer.teamviewer_desktop.plistCopy
Log files:
~/Library/Logs/TeamViewerCopy
Preference files:
~/Library/Preferences/com.teamviewer.teamviewer.preferences.Machine.plistCopy
~/Library/Preferences/com.teamviewer.teamviewer.preferences.plistCopy
~/Library/Preferences/com.teamviewer.TeamViewer.plistCopy
/Library/Preferences/com.teamviewer.teamviewer.preferences.plistCopy
Plugins:
/Library/Security/SecurityAgentPlugins/TeamViewerAuthPlugin.bundleCopy
Crash reports:
~/Library/Caches/SentryCrash/TeamViewerCopy
~/Library/Caches/SentryCrash/TeamViewer_DesktopCopy
Shared:
/Users/Shared/Maxon/.service/Library/Preferences/com.teamviewer.teamviewer.preferences.plistCopy
Cache files:
~/Library/Caches/com.teamviewer.TeamViewerCopy
~/Library/Saved Application State/com.teamviewer.TeamViewer.savedStateCopy
/private/tmp/.TeamViewer.lockCopy
~/Library/Caches/Cleanup At Startup/.TeamViewer.lockCopy
~/Library/Application Support/com.apple.sharedfilelist/com.apple.LSSharedFileList.ApplicationRecentDocuments/com.teamviewer.teamviewer.sflCopy
~/Library/Caches/TeamViewerCopy
~/Library/Saved Application State/com.teamviewer.TeamViewerQS.savedStateCopy
- Empty Trash.
Note:
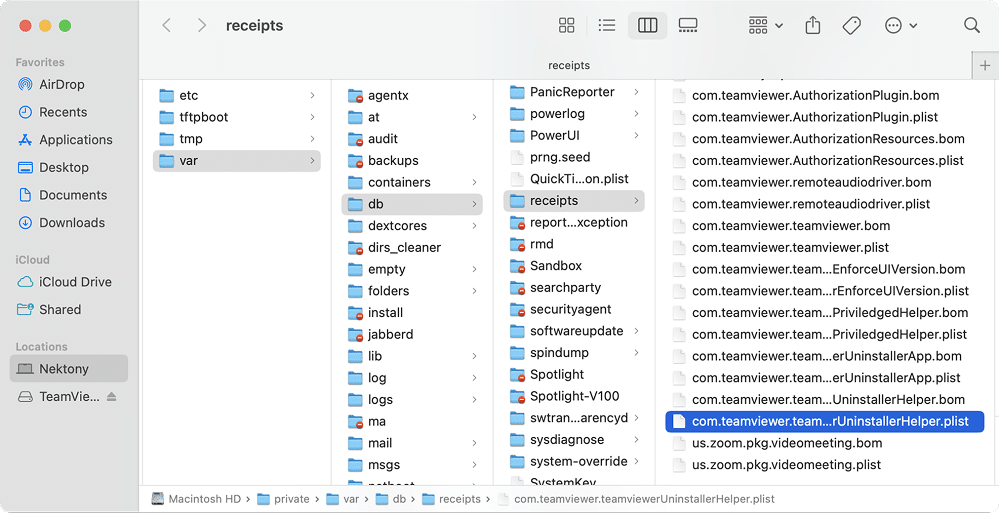
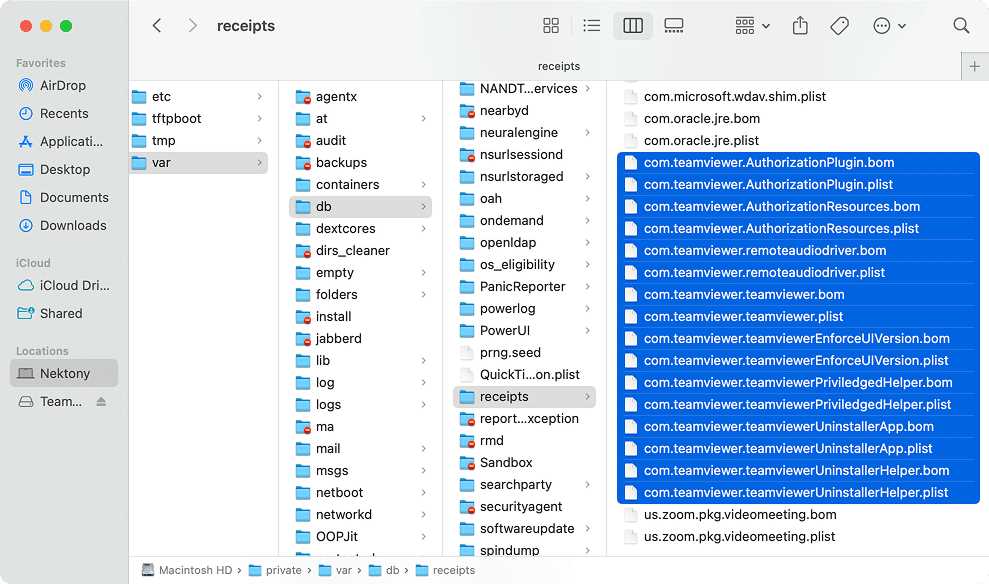
TeamViewer generates a bunch of caches in /private/var/db/receipts/. These files can vary depending on the version or specific modules installed, but they typically start with com.teamviewer. They should also be deleted. Below is an example of what you might find in this folder.
Uninstall TeamViewer with Terminal
If you are confident working in the command-line environment, there’s a way to remove TeamViewer through Terminal. A few precise commands can effectively clear the application and its typically elusive support files.
⚠️ Heads-up:
Terminal can be powerful but also unforgiving. A single incorrect command may lead to unwanted consequences, so only use this route if you know what you’re doing or are following exact instructions.
- Open Terminal.
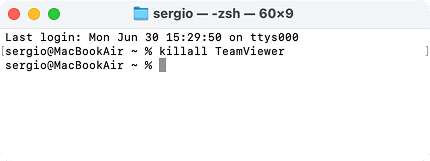
- Start with force quitting TeamViewer. Enter the following command and hit Return:
killall TeamViewerCopy
- Delete the TeamViewer.app and TeamViewer Uninstaller files by running, on a line-by-line basis, the following commands:
sudo rm -rf /Applications/TeamViewer.appCopy
sudo rm -rf /Applications/TeamViewerUninstaller.appCopy
Note:
Before you take the next step, keep in mind that the TeamViewer files uninstallation script below only removes all service files created by TeamViewer – nothing more. It won’t affect any other system files or apps on your Mac.
- Delete TeamViewer service files: download the script file → execute it in Terminal by running these commands line by line:
Important!
The command expects ~/Downloads/remove_teamviewer.sh as the script’s location, which means the file is in the Downloads folder. If you saved it elsewhere, replace ~/Downloads/ with the actual directory of remove_teamviewer.sh file.
chmod +x ~/Downloads/remove_teamviewer.shCopy
~/Downloads/remove_teamviewer.shCopy
Remove TeamViewer totally in a flash
Now, you can stop pretending you enjoy crawling through system folders or playing with commands. The easy-peasy way to fully uninstall TeamViewer and all its remainders lies with App Cleaner & Uninstaller, which takes you less than 1 minute 😯
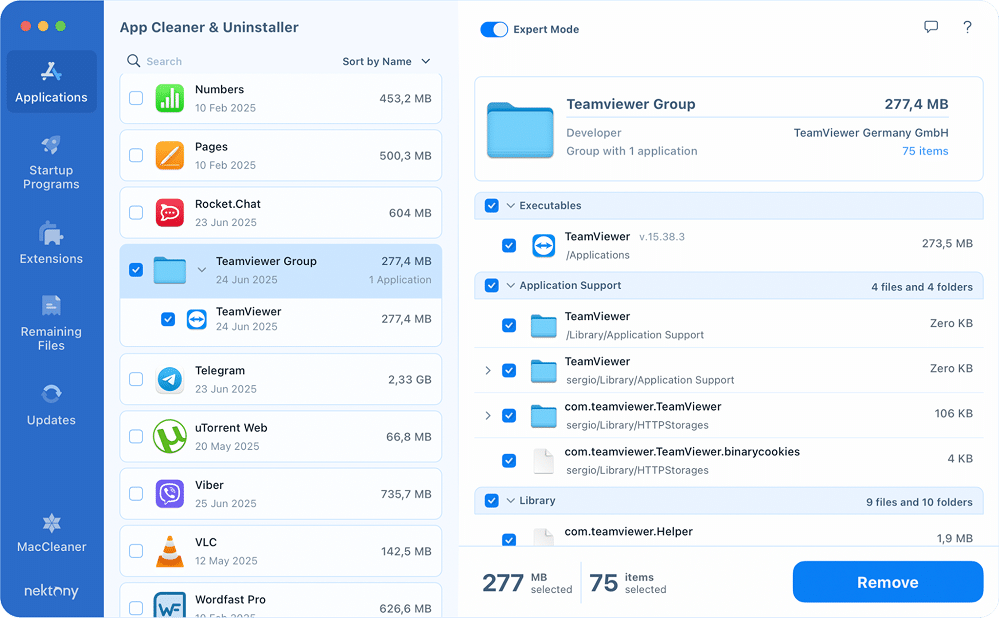
This handy utility automatically detects and cuts out the last file tied to TeamViewer, from logs to hidden support data, and clears it all in a flash:
- Get and launch the App Cleaner & Uninstaller.
- Scroll to TeamViewer and check it among the applications.
- Push the Remove button → finish the uninstallation.
How to delete TeamViewer leftovers from Mac
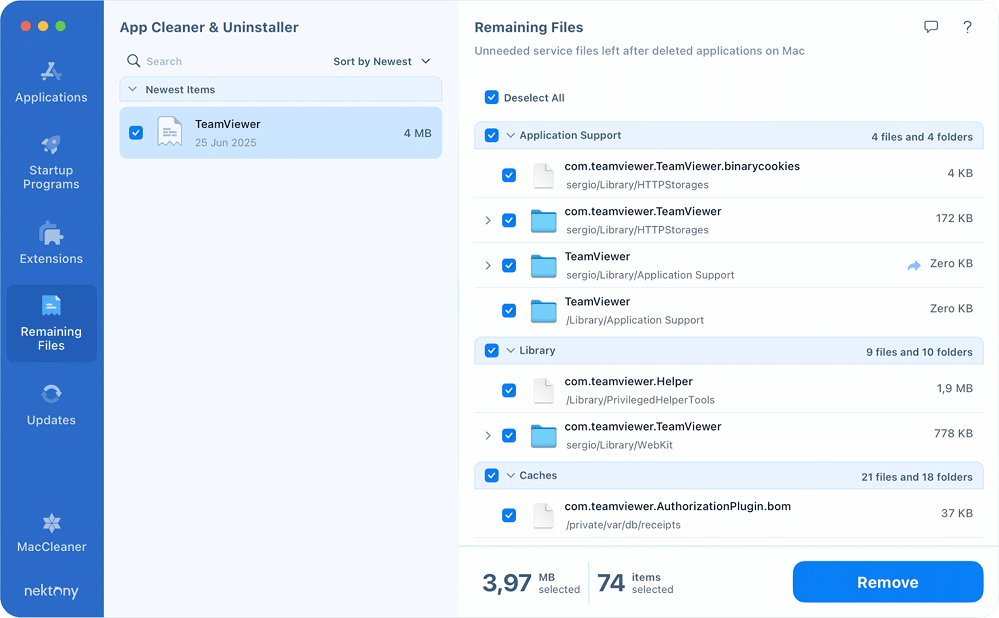
You are up to locating and removing the auxiliary files omitted by applications, whether you started deleting them manually or otherwise. To that end:
- Open App Cleaner & Uninstaller.
- Go to the Remaining Files tab.
- Locate and delete TeamViewer remaining files → finish the action.
Final session
So, uninstalling TeamViewer isn’t just about dragging it to Trash; it’s about clearing out every related file to avoid system clutter, errors, or potential conflicts down the road.
Built-in uninstaller? Basic at best. Manual cleanup? Possible but time-consuming. Terminal? Sharp, but one wrong command could cost you. The fastest and most comprehensive way? App Cleaner & Uninstaller, obviously. It takes care of the mess for you, clearing every trace and keeping your Mac lean and running smoothly.
Whether you uninstall Sunlogin, TeamViewer, or any other app, make sure you give your Mac a proper cleanup. With App Cleaner & Uninstaller, it’s fast, easy, and thorough – just how it should be. Interested in how this app can level up your Mac? Get in touch!
