


August 27, 2025
Step-by-step guide: How to uninstall VirtualBox from Mac
Share

VirtualBox is software that allows you to run virtual machines on a computer without uninstalling the current operating system (OS). That comes in really handy. However, uninstalling VirtualBox is not as easy as you may think. You have to understand the difference between just moving the application to the Trash and uninstalling it entirely with all of its support files.
The official VirtualBox website does not offer a removal guide on its Help page. There are only some user discussions on its forum. That’s why we’ve prepared this step-by-step guide to help you properly remove VirtualBox from your Mac. We’ll show you three methods to uninstall VirtualBox: manual and automatic ones. It’s up to you to choose which approach works best for your needs.
Looking for a VirtualBox alternative?
If you’re uninstalling VirtualBox because you’re seeking a better virtualization solution, here are some alternatives:
- Parallels Desktop. Great for running Windows applications seamlessly.
- VMware Fusion. A professional-grade tool with advanced features.
- Docker Desktop. Ideal if you’re a developer running containerized environments instead of full virtual machines.
Common reasons to remove VirtualBox
| Reason | Explanation |
|---|---|
| Low disk space | Virtual machines can take up several GBs of storage, especially with snapshots. |
| Slow performance | Running VirtualBox may slow down your Mac if resources are limited. |
| General system cleanup | Part of a routine to remove unused apps and optimize the system. |
| No longer needed | Moving to tools like Parallels or VMware for better integration or features. |
| Compatibility issues | New macOS versions might not fully support older VirtualBox builds. |
| App crashes or errors | Persistent bugs, crashes, or kernel extension errors can lead to uninstalling. |
How to uninstall VirtualBox from Mac using Terminal
By default, VirtualBox provides an uninstallation tool with a command line in Terminal. Learn where to find it and how to use it to uninstall VirtualBox.
- Quit VirtualBox.
- Find and open the VirtualBox installation file. Usually, the installation files are stored in the Download folder on Mac. If you can’t find it or you have already removed the installation file, you can download it again from the VirtualBox website.
- Double-click on VirtualBox_Uninstall.tool.

- It will open the Terminal app and automatically run the command to uninstall VirtualBox.
- Once it asks for confirmation, type Yes and press Return.
- If it asks to delete additional VirtualBox extensions, also confirm by typing Yes.
- If prompted, enter your Mac user password to confirm the uninstallation.


After these steps, VirtualBox should be removed from your Mac.
Extra tip:
If you’re facing unusual issues during uninstallation, such as VirtualBox kernel extensions not being removed, check this Apple Support thread, which discusses potential solutions shared by the community.
How to uninstall VirtualBox from Mac manually
Now we will provide a removal method that you can use to uninstall VirtualBox and any other application from Mac with all of its service files. In this method, you will need to manually search for remaining files of the already removed application.
- Quit VirtualBox.
- Go to the Applications folder and move VirtualBox to the Trash. Also, you can drag and drop VirtualBox into the Trash right in the Launchpad.
Now you need to find and remove the virtual machine image that still remains on your disk taking up significant disk space.

- Go to the Library folder. For this open Finder and press the Command+Shift+G shortcut.
- Type in the search field and press Return.
~/LibraryCopy

-
From the Library, remove all files and folders related to the VirtualBox. We found the following files:
~/Library/VirtualBoxCopy
~/Library/Preferences/org.VirtualBox.app.VirtualBox.plistCopy
~/Library/Saved Application State/org.VirtualBox.app.VirtualBox.SavedStateCopy
~/Library/LaunchAgents/org.virtualbox.vboxwebsrv.plistCopy
~/Library/Saved Application State/org.VirtualBox.app.VirtualBox.SavedStateCopy

- Once you remove all VirtualBox’s support files, empty your Trash.


If you removed all of the VirtualBox’ service files, then you can be sure that you uninstalled the application entirely. If you are not sure, use App Cleaner & Uninstaller. With this tool, you can uninstall any application completely with just a few clicks.
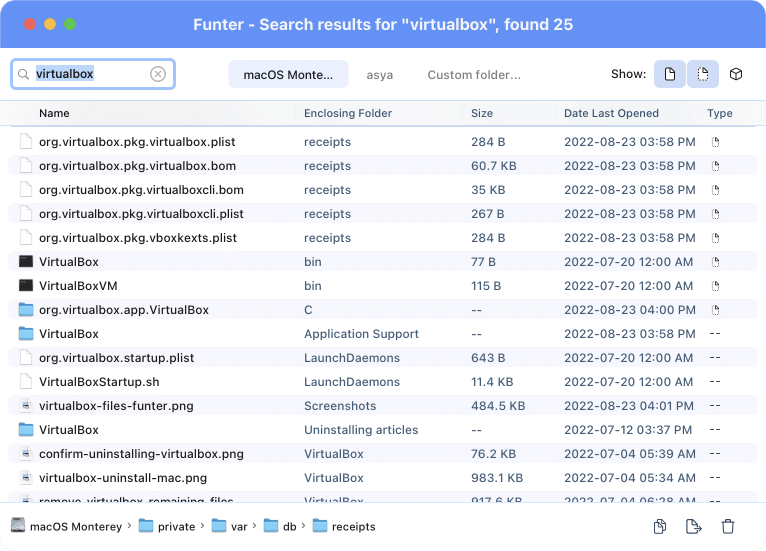
You can also find VirtualBox support files with a free application Funter.
Here is how to use it:
- Run Funter on your Mac.
- Click on the Funter’s icon in the toolbar.
- Type VirtualBox in the search field and press Return.
- In a moment, Funter will show you the list of all files that contain “virtualbox” in their names. Funter finds and shows even the hidden files in packages.
- Select all unneeded VirtualBox’s support files and remove them.
Note:
Please, be careful when removing service files on Mac. Deleting important system files can damage your system. If searching for applications’ service files tends to be difficult for you, you should use App Cleaner & Uninstaller from Nektony. This uninstaller will automatically detect all support files of each application on your Mac and help you to remove them safely.
Uninstall VirtualBox with App Cleaner & Uninstaller
App Cleaner & Uninstaller is designed to remove applications from Mac safely and entirely. In its Expert mode, you can see the list of all service files of each application on your Mac, as well as the number, types and total volume of service files.
- Open App Cleaner & Uninstaller.
- In the list of scanned apps select VirtualBox.
- Click the Remove button.
- Confirm the uninstallation.

Also, you can set up in App Cleaner & Uninstaller Settings the option that when you drag and drop any application into the Trash, the uninstaller will automatically find its orphaned service files and remind you to remove them as well. Just click the Uninstall button and confirm your action.

If you have already removed VirtualBox using one of the methods above, you can find its remaining files. For this, in the app, switch to the Remaining Files section. Select all unneeded leftover files and remove them.

With App Cleaner & Uninstaller, you can be sure that you uninstall applications from Mac without leaving their service files behind. Download it for free and try its best features.
Thanks for your post. I also believe that laptop computers have gotten more and more popular lately, and now will often be the only type of computer included in a household. The reason being at the same time that they’re becoming more and more affordable, their computing power keeps growing to the point where they’re as powerful as desktop from just a few in years past.