If your Mac randomly restarts and shows the message “Your computer restarted because of a problem…,” you are most likely experiencing a kernel panic error. This article will help you learn what a kernel panic error is when it occurs, and what to do when your Mac keeps restarting.
Contents
- What is kernel panic?
- When does a kernel panic error occur?
- How to deal with a Mac that keeps restarting.
- The ultimate way to prevent a kernel panic on your Mac.
Tip – How to prevent or fix a kernel panic error on Mac
Download a free trial of MacCleaner Pro and help your Mac by regularly cleaning and maintaining the system.
MacCleaner Pro
What is kernel panic?
A kernel panic is an unrecoverable kernel error detected by a Mac, after which the operating system cannot continue functioning, forcing you to restart your device. A kernel is like the heart of the system, responsible for the interaction of both hardware and software of your computer. If a critical error occurs in the operation of the kernel, it is often necessary to restart the kernel, and therefore the system, to recover from it.
A kernel panic is a security measure of macOS that protects the system from a Mac crash that can result in data loss. When the operating system detects an internal kernel error, it has no choice but to shut down and restart.
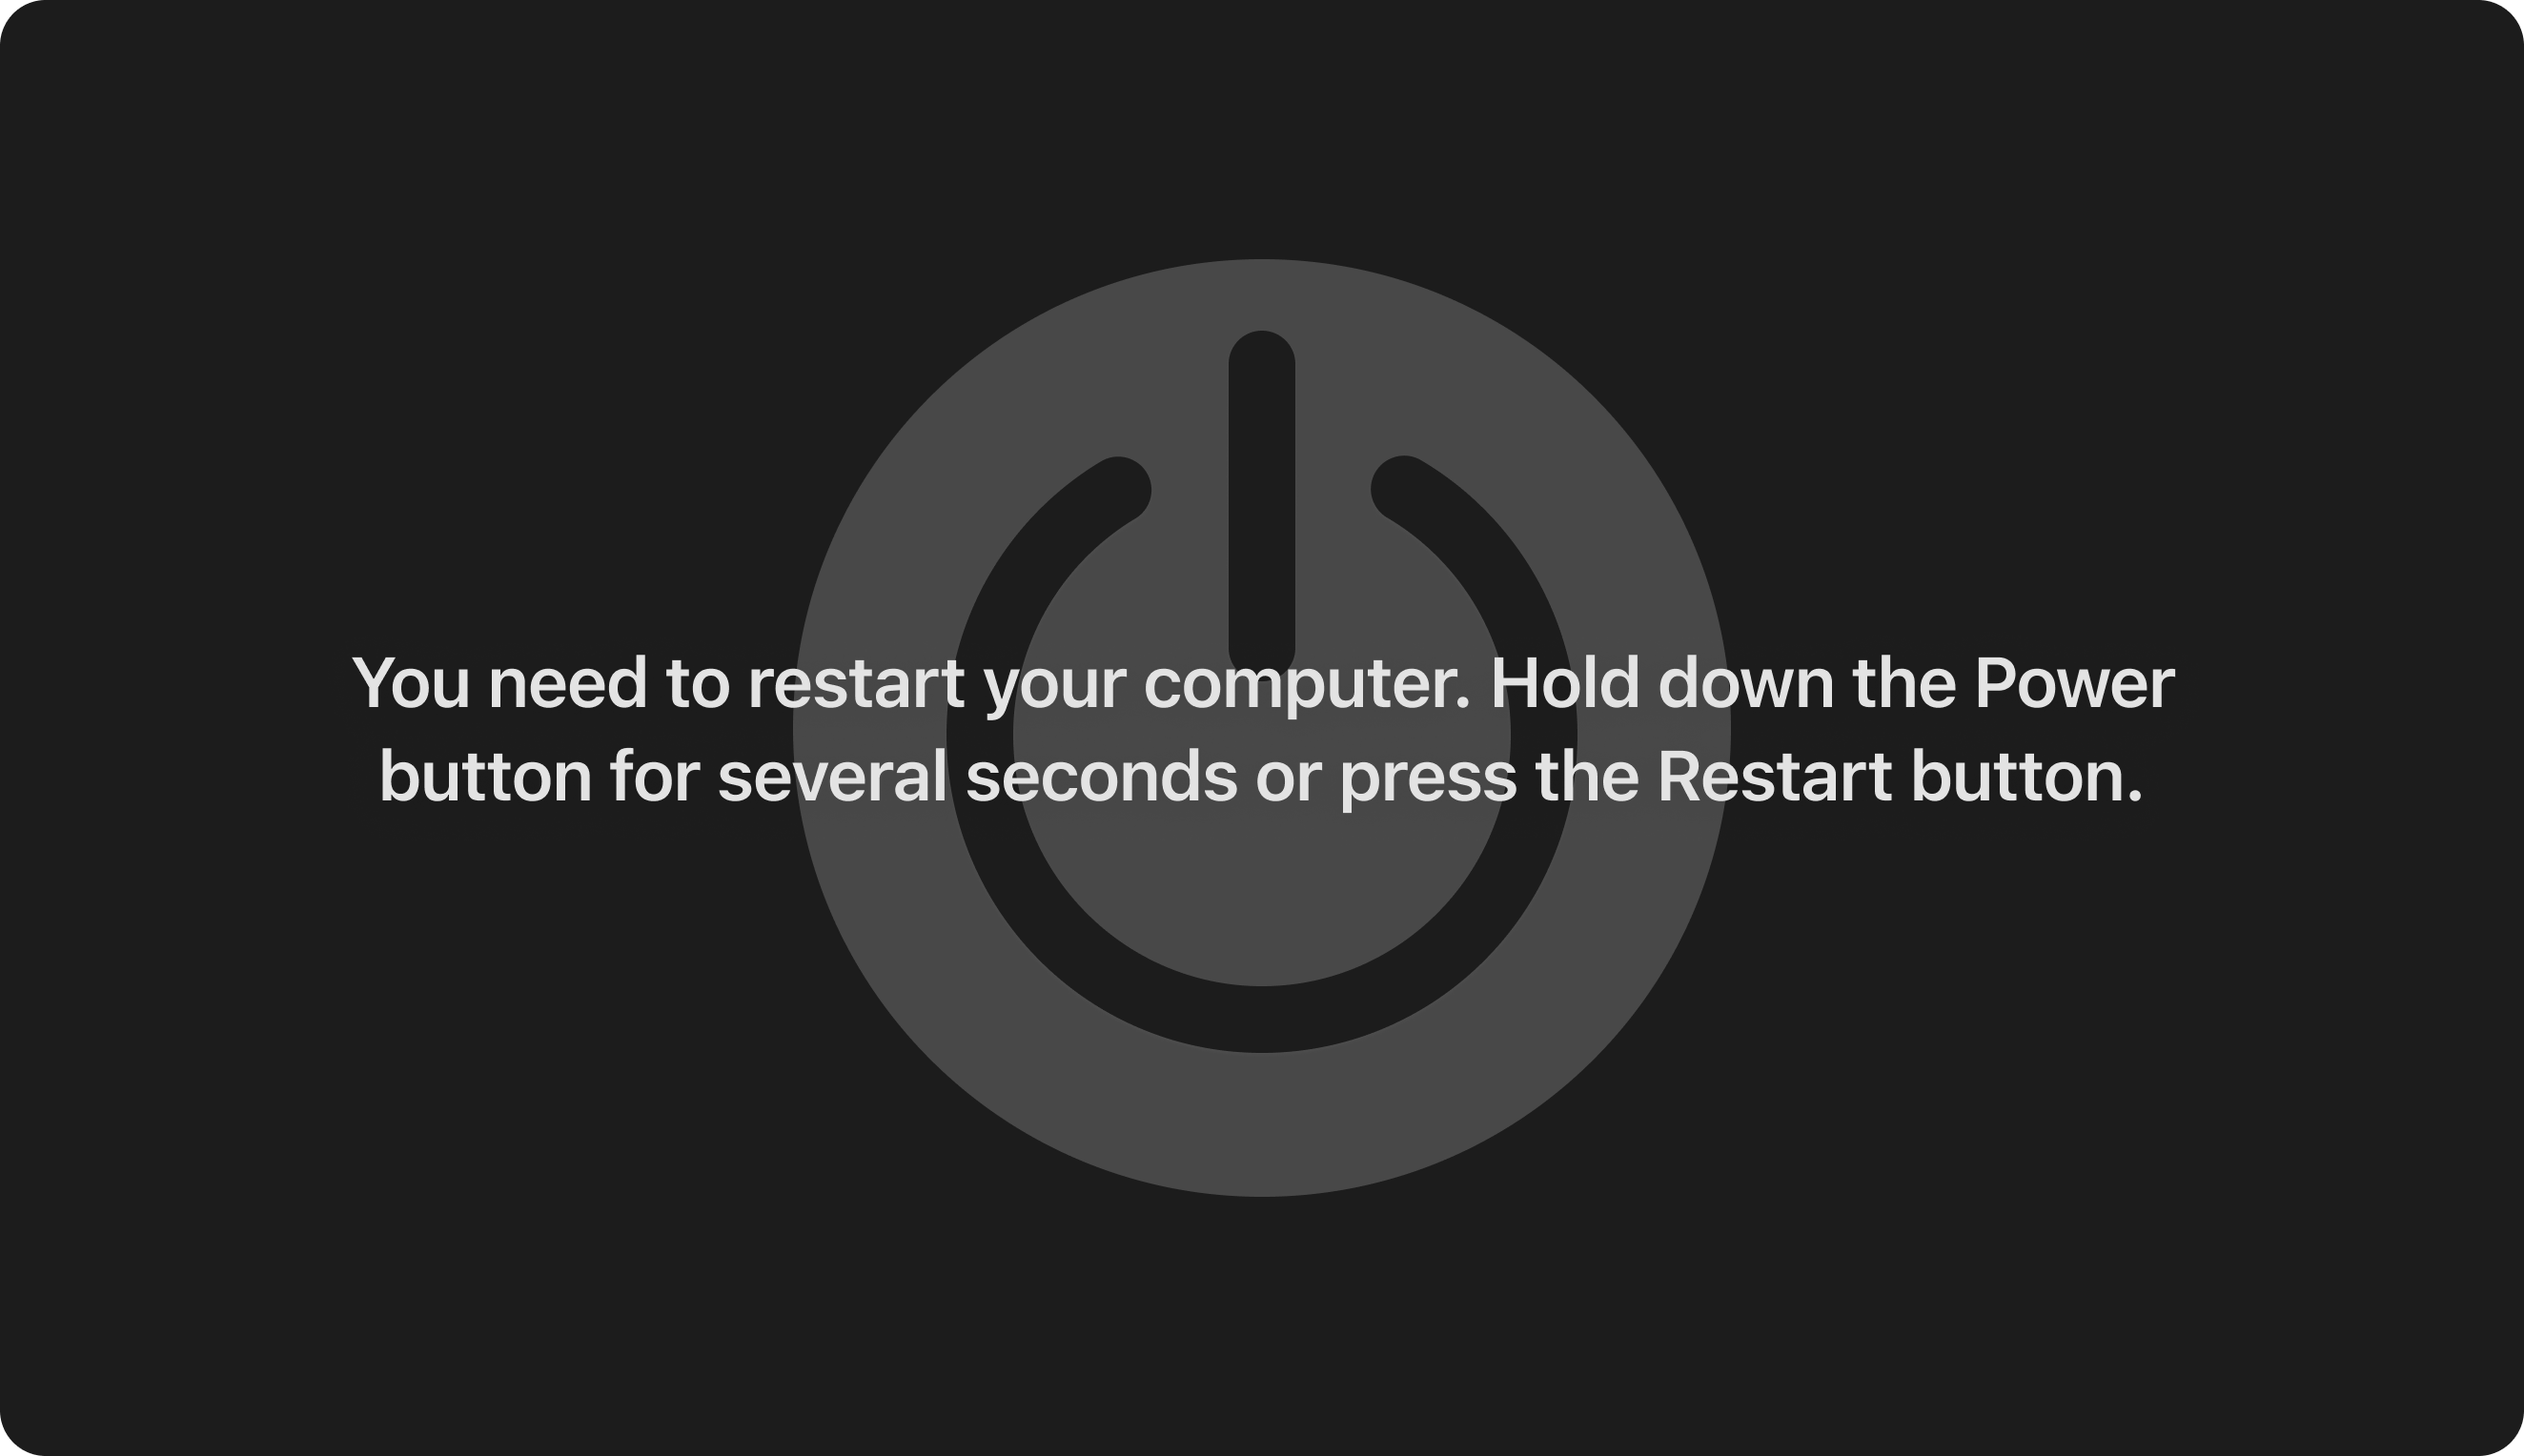
When a kernel panic happens, you will typically see a grey screen with the words “You need to restart your computer …” in different languages. However, sometimes restarting the device will not fix the kernel panic, meaning your Mac keeps restarting over and over. The error and restarts seem to be never-ending, because even after restarting you cannot access the desktop, and the system asks again and again to restart.
When does a kernel panic occur on Mac?
Since the kernel interacts with every process on a Mac, it might be hard in some cases to detect what exactly caused a kernel panic. In most cases, a kernel panic on Mac is caused by a software incompatibility, for example, when you are trying to install something extremely invasive, or when the installed application tries to modify the system.
Here are the most likely causes for kernel panic errors on Mac:
- Not enough free disk space.
- Not enough free RAM memory.
- Outdated drivers, applications, or plugins installed.
- Software conflicts.
- Broken disk resolution.
- Incompatible peripheral and hardware problems.
When a kernel panic happens and your Mac randomly restarts, the system does the following:
- The macOS detects a problem and displays an error message saying that you need to restart your Mac to fix the problem.
- If the system is really stuck in a reboot loop, it will shut down.
- A message stating “Your computer restarted because of a problem” then appears on your Mac screen.
It is possible that you might never experience a kernel panic error again on your Mac and it is an isolated incident. However, if your Mac keeps restarting randomly, you should check your Mac for the possible reasons mentioned above.
How to deal with a Mac that keeps restarting
When critical errors occur on your Mac, diagnosing what caused the error can be hard. We recommend trying out some general approaches to fix the error instead of analyzing crash log files from the DiagnosticReports folder.
Find a conflicting external device
If you have recently installed a new RAM, hard drive, printer, or other devices, this might cause a conflict and result in a kernel panic error on your Mac.
To check the devices for a conflict and fix any kernel errors, do the following:
- Shut down your Mac.
- Disconnect all devices, including any external hardware, printers, and so on.
- Reboot your Mac.
- If everything appears fine, you can restart your Mac and plug one of the devices back into your computer.
- Repeat the previous step until you detect a device that causes the kernel panic error on your Mac.
Boot your Mac in Safe Mode
Kernel panics can happen on a Mac due to outdated or incompatible software. You can boot your Mac in Safe Mode to check whether the problem is connected to the software issue. Safe Mode restarts your Mac without launching third-party applications and extensions. If any third-party applications led to errors at your Mac startup, the system will boot without issue. As a result, Safe Mode can help you diagnose whether a kernel panic is connected with third-party software or not.
How to boot an Intel-based Mac in Safe mode
- Shut Down your Mac.
- Press the Power button and immediately hold down the Shift key.
- Once you see the Mac login window, you can release the Shift key.
How to boot an M1 Mac in Safe Mode
- Shut down your Mac and wait for a few seconds.
- Press and hold the Power (Touch ID) button on your Mac to boot it up.
- Release the Power button once you see “Loading startup options” on your screen.
- Press the Shift key and hover your mouse over the startup disk. You should see the option to Continue in Safe Mode. Click on it.
- In a few seconds, you will see the login screen. Your Mac is now in Safe Mode.
Run Apple diagnostic
Mac computers have built-in Apple Diagnostics that can test the hardware and find what caused a kernel panic issue.
How to run the Apple hardware test on an Intel-based Mac:
- Shut down your Mac.
- Disconnect all peripherals (except the mouse and keyboard).
- Turn on your Mac and immediately press and hold the D key.
- When you see a progress bar, you can release the D key.
How to run Apple Diagnostics on a Mac with an M1 chip:
- Press and hold the Power button.
- When you see a screen showing startup options, you can release the Power button.
- Press the Command+D shortcut on your keyboard.
Apple Diagnostics will start checking your hardware for issues. Once it finishes the test, you’ll get a report. Note that the report can consist of reference codes. If you don’t know what they mean, check Apple’s reference code guidance.
The ultimate way to prevent a kernel panic on your Mac
These recommendations will help you to maintain your Mac and reduce the chances of issues, including a kernel panic error that causes your Mac to keep restarting over and over.
Check for software updates
With the updates, Apple and developers provide performance improvements and bug fixes in their software. You should update your software any time new versions are available to keep your Mac working great.
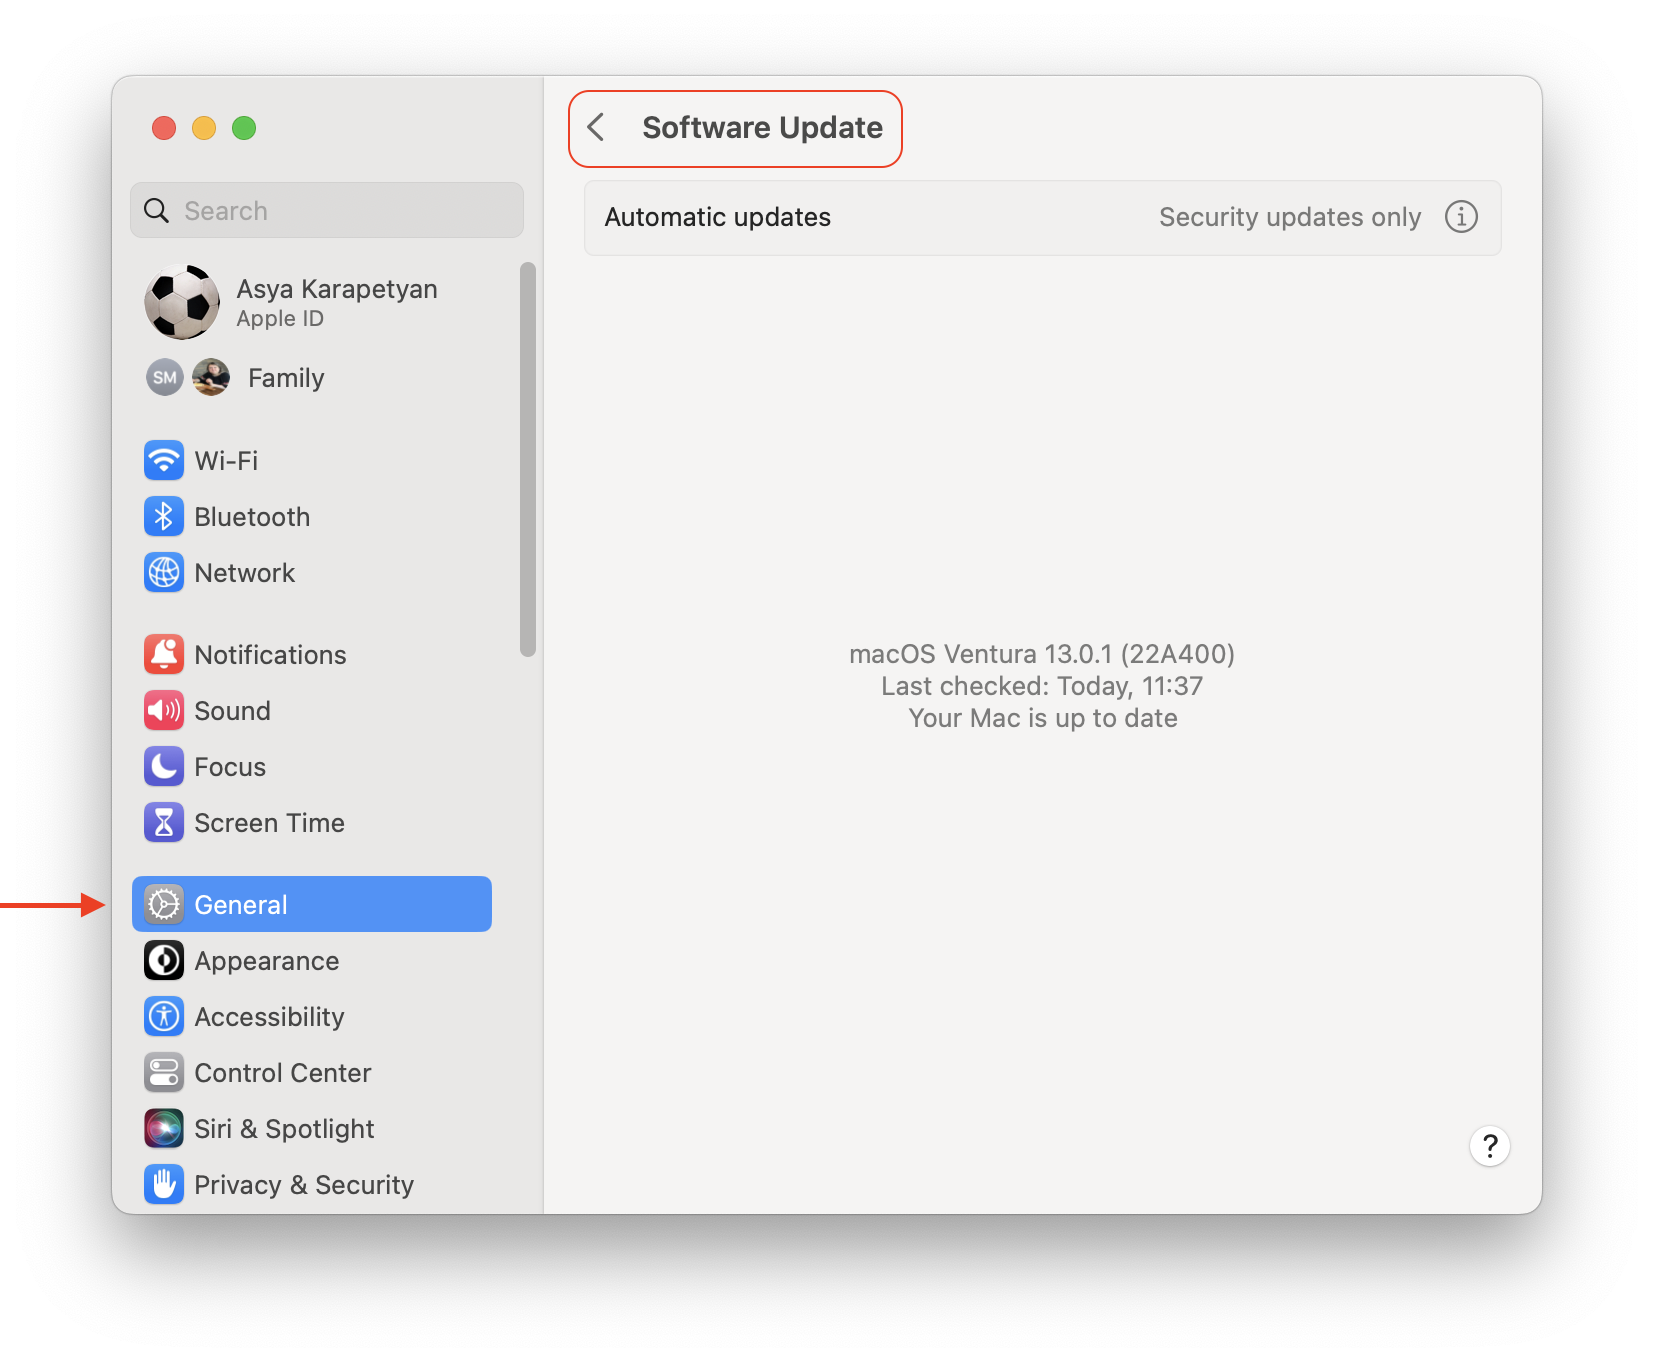
How to check a Mac for macOS updates:
- Open System Settings and click General in the sidebar.
- Click Software Update in the right panel.
Also, check third-party applications on your Mac for new updates. Updates for apps downloaded from the App Store can be checked in the App Store window → Updates section.
If you download apps directly from the developers’ websites, you will need to open these apps → Go to their menu, and select About for that app. You should see a window showing if new updates are available or if you are using the latest version of the app.
Fix RAM issues
Not having enough free RAM leads to a slow device and can even create a situation when your computer shuts down unexpectedly. Many applications on Mac use a significant amount of RAM memory, for example, Chrome, Adobe Photoshop, or any video editing application. We call such apps “heavy memory consumers.”
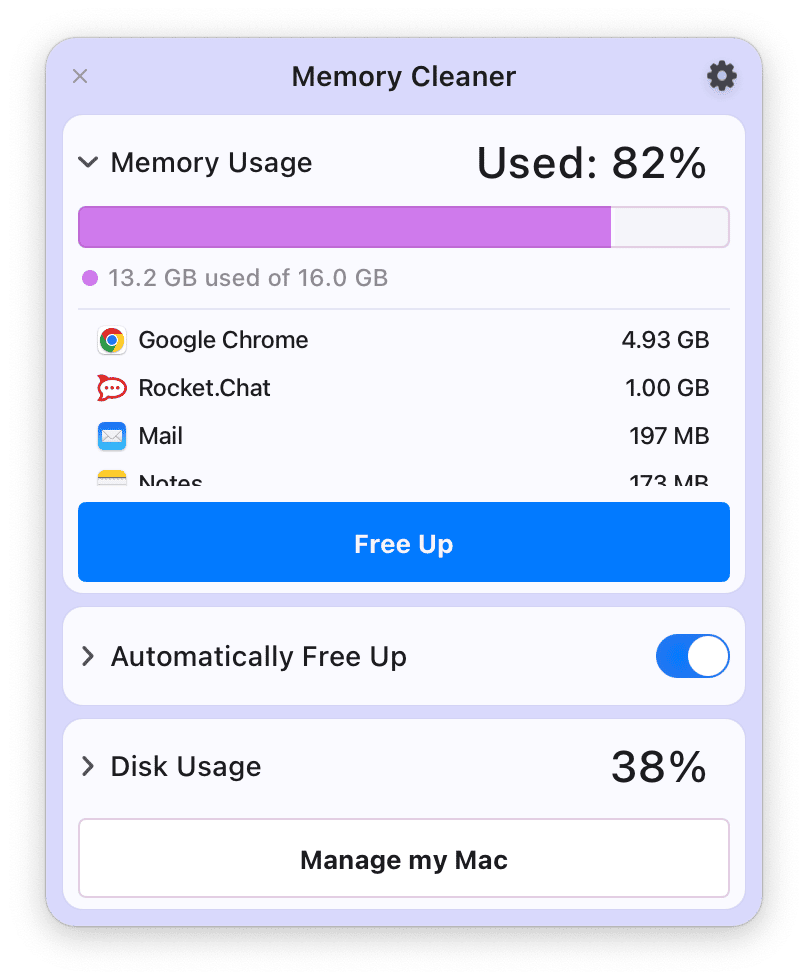
To find the memory-consuming apps and free up unused RAM memory for smooth performance, you can use MacCleaner Pro and its PRO tool called Memory Cleaner.
Once you launch Memory Cleaner, it will show how much RAM is being used at the moment and how much RAM each launched application is using, You can also set it up to automatically free up your RAM every time it reaches a high level.
Clean up caches
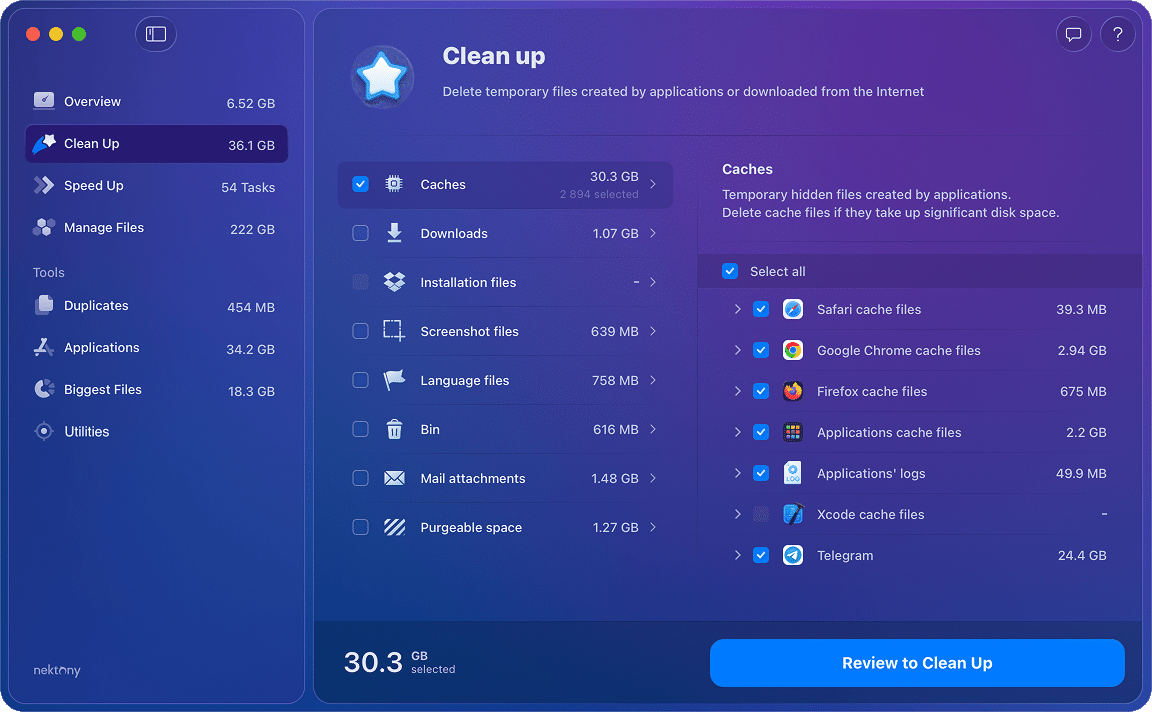
Caches are used for proper application function and system processes. However, some broken service files can lead to failure. When fixing a Mac that randomly restarts, it is worth clearing the cache. You can use MacCleaner Pro to quickly and safely clean up the cache, or delete temporary files manually.
How to manually clear caches on Mac:
- Open Finder and press the ⌘Command + ⇧Shift + G shortcut.
- In the Go to the Folder search field, type ~/Library and press Return.
- In the Library folder, find the Cache subfolder.
- Select and remove all content from the Cache folder.
- While here in Library, also find and remove all files named “Extensions.kextcache” and “Extensions.mkext”.
- Repeat the previous steps and delete caches from the /Library folder.
- Empty the Trash and reboot your Mac.
How to easily clear cache with MacCleaner Pro:
- Download and launch MacCleaner Pro.
- Go to the Clean Up section.
- Select Caches.
- Click the Review and Clean Up button and confirm clearing the cache.
Check if you have enough free disk space
One reason for a kernel panic issue is a lack of free disk space on your Mac and a full Startup Disk. When you have too many files occupying your Mac’s hard drive, this brings your system to a dangerous level for the system operations. To resolve this issue, you need to free up some disk space.
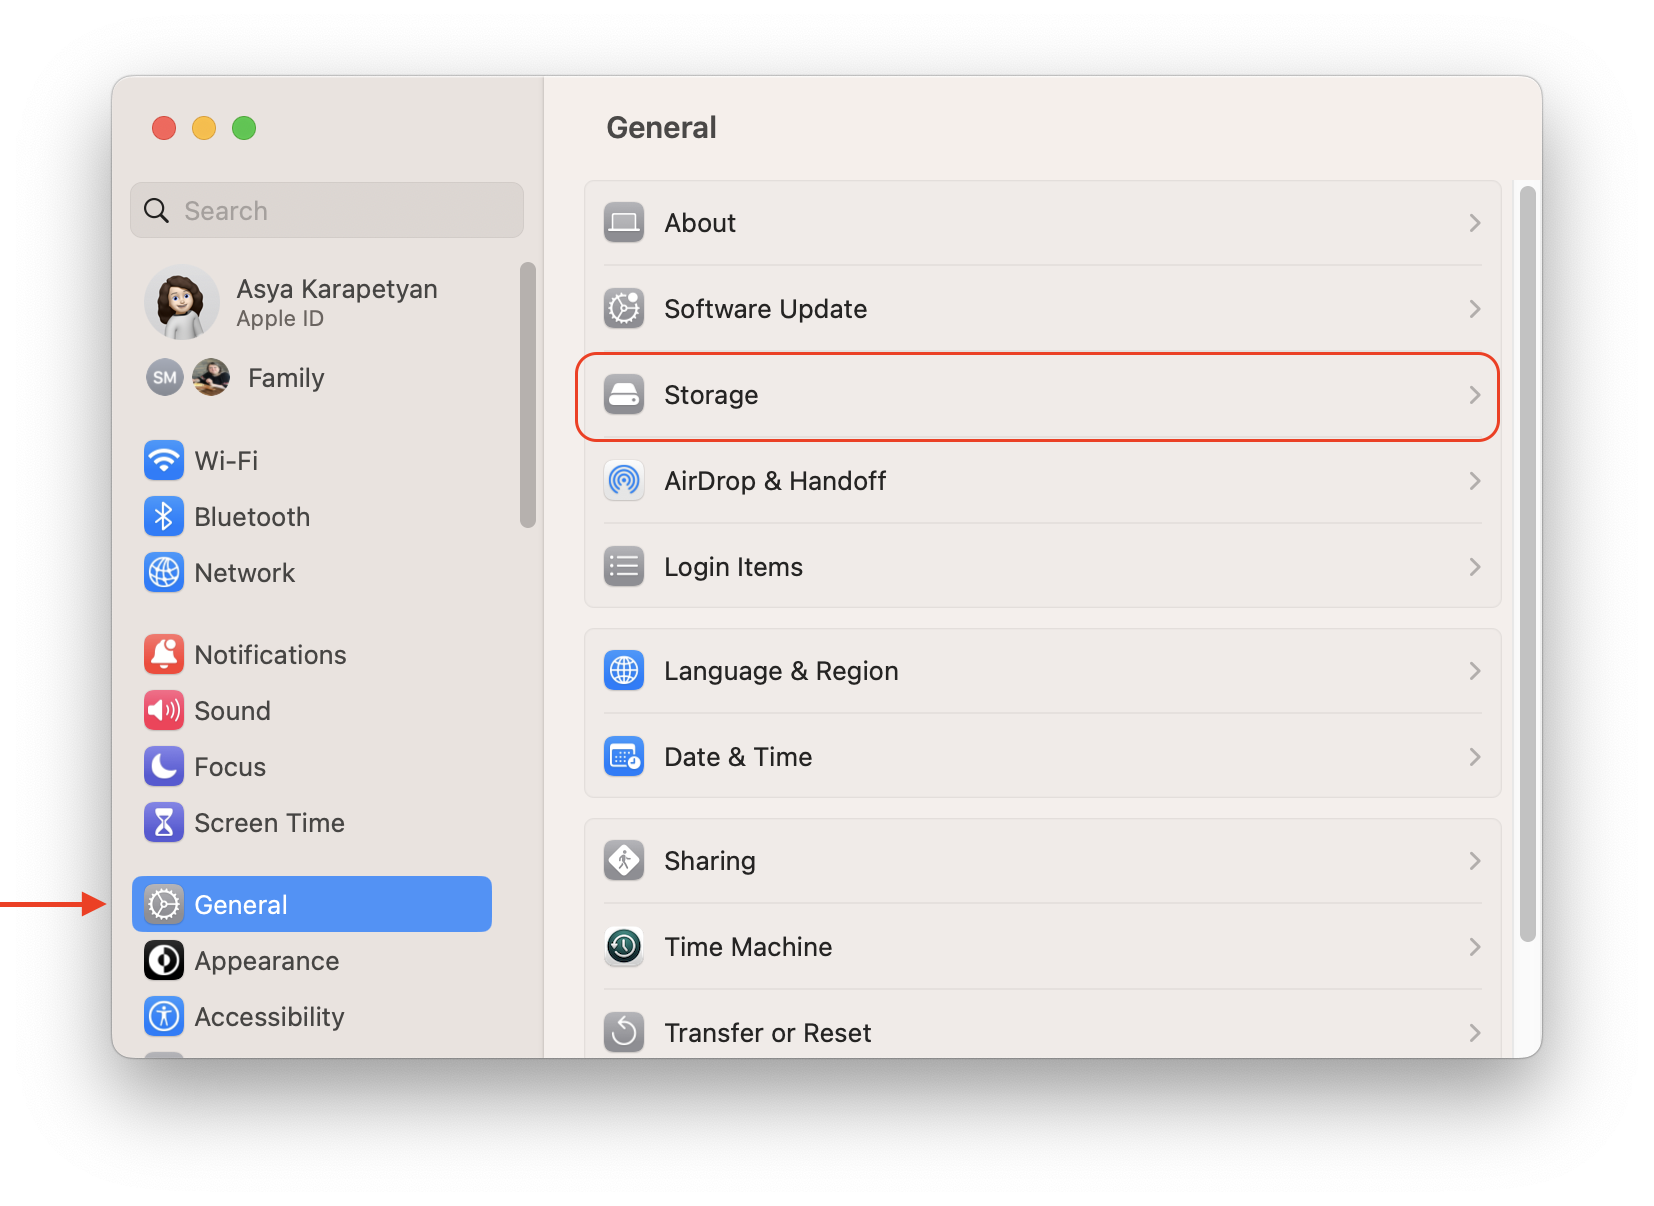
How to check your Mac’s disk space on macOS:
- Open System Settings.
- Go to the Genaral section.
- Click Storage in the right panel. Here you will see how much free space you have on your Mac.
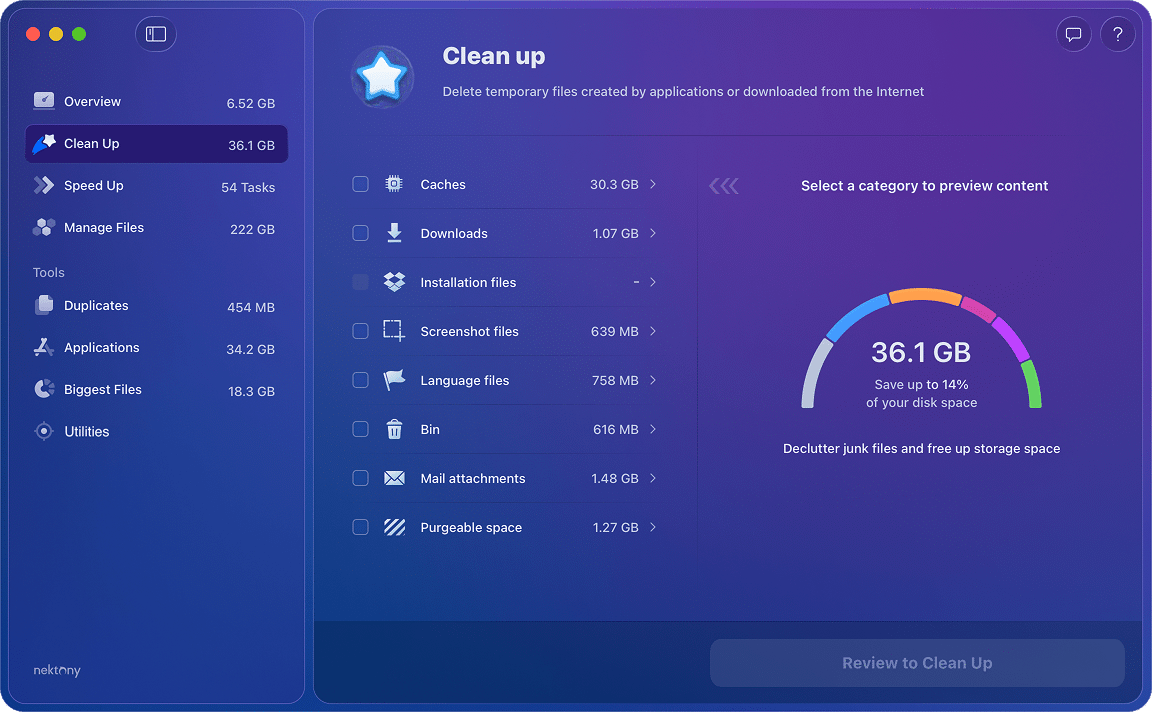
If you have low free space on your Mac, you can clean up your disk from all types of junk files and free up space with MacCleaner Pro. This utility allows you to find and remove all types of junk files, such as caches, leftovers from deleted apps, and broken service files. You can also remove duplicates, completely uninstall unused apps, and analyze your disk space usage.
How to free up space on a Mac with MacCleaner Pro:
- Launch MacCleaner Pro.
- Go to the Clean Up section.
- Select all unneeded junk files.
- Click to remove them and confirm the deletion.
Conclusion
You should take kernel panic errors that occur on your Mac very seriously as they can cause significant problems. Any software that causes a kernel error should be removed from your Mac. If the error happened due to a lack of free disk space or RAM memory on your Mac, use MacCleaner Pro to clean up your disk and free up RAM. Doing this will help you avoid potential errors and pitfalls and keep your Mac working in peak condition.
