October 3, 2025
How to uninstall Google Drive on Mac: Full removal instructions
With over 2 billion users and 15 GB of free storage shared across Drive, Gmail, and Photos, it’s no surprise that so many people rely on it every day.
But while convenient, the Drive app on a Mac can sometimes turn from a helpful tool into a storage hog. Synced files and cached data pile up quickly, eating into your disk space.
If you’ve decided it’s time to remove Google Drive from your Mac, this tutorial explains two techniques for how to completely and safely uninstall Google Drive from your Mac. What’s more, I’ll share pre-/post-uninstall tips and alternative cloud storage options.
How come you uninstall Google Drive
Every now and then, Google Drive just isn’t the perfect fit anymore, and that’s okay. I’ve seen it happen to me and friends, and usually, it comes down to a few key scenarios why people decide to delete it from a Mac:
- Running low on storage. Google Drive’s caches and synced data can quietly eat up GBs. Deleting it or removing duplicates in Google Drive frees up space fast.
- Sync issues and app glitches. If Drive fails to sync, constantly asks for login, or drains your RAM, uninstalling and reinstalling can fix bugs and reduce RAM usage.
- Security and privacy concerns. Some users worry about storing personal data on Google’s servers and prefer a service they trust more.
- Duplicate services. On macOS, iCloud is built in and works well enough. Having multiple cloud apps can feel redundant.
- Avoiding extra costs. If you run out of free storage and don’t want to pay for Google One, uninstalling Drive is a way to reclaim space without spending a dime.
- Sluggish performance with large data. If you store hundreds of gigabytes, the Drive may cause your Mac to run more slowly. Removing it brings speed back.
- Switching to another service. Maybe you’re moving to iCloud, Dropbox, or OneDrive for better integration, features, or simply to keep things tidy.
Google Drive pre-uninstall steps
Before you dive into deleting Google Drive from your Mac, there are a few things worth doing first. These steps keep your files safe and make sure the uninstall goes smoothly.
Backup and Sync is gone
Google used to have a separate Backup and Sync app, but it’s now merged into Google Drive for desktop. If you see the older app still installed, remove it too to avoid duplicate processes eating resources:
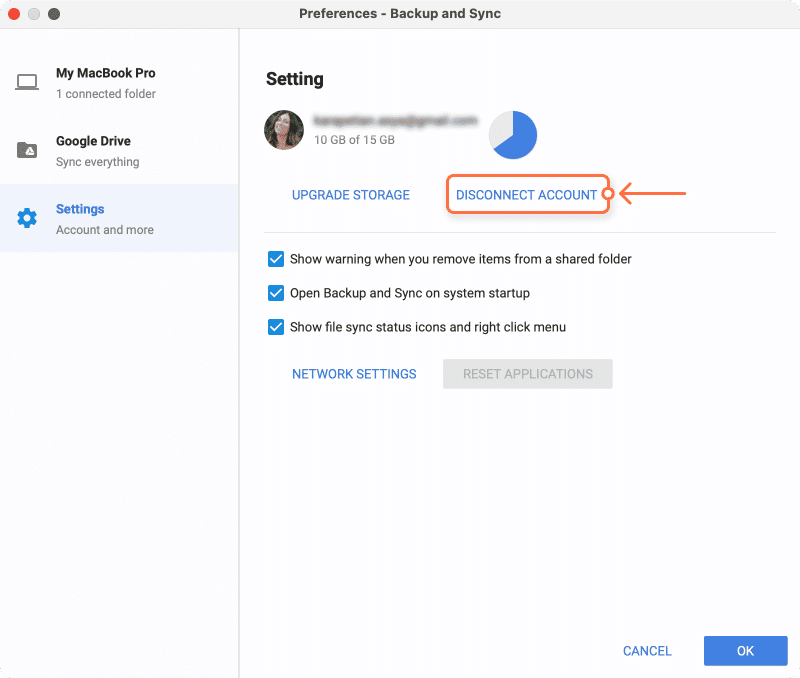
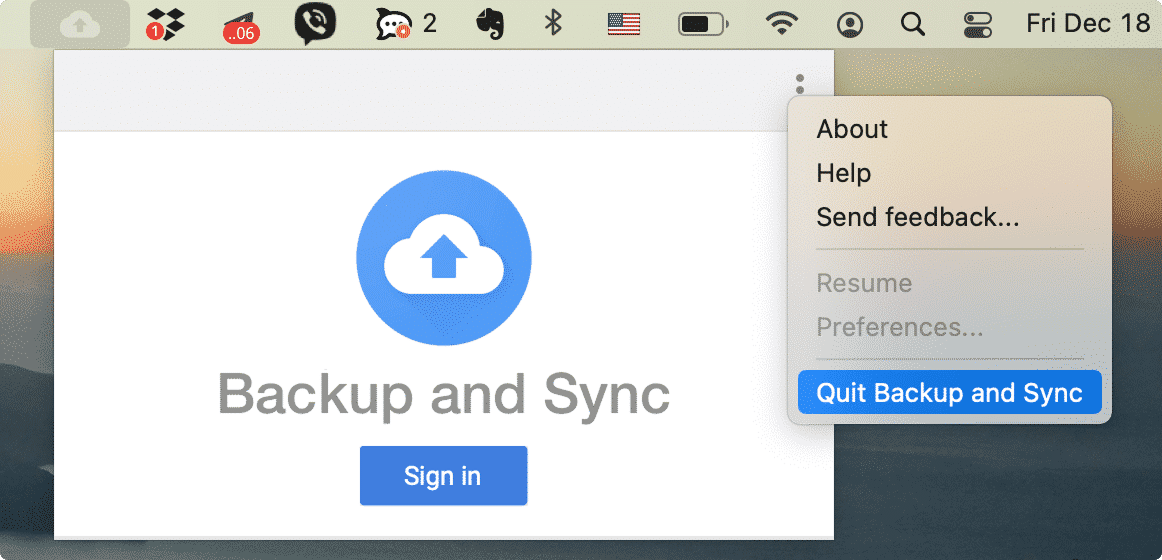
- Sign out of your account. Click the app’s icon in the menu bar → hit the three dots → choose Preferences….
- In the sidebar, go to Setting → select Disconnect account → confirm. Once done, your files will stop syncing.
- Close the app. From the same menu bar icon, click the three dots again → select Quit Backup and Sync.
- Delete the app itself. Open Finder, select your Applications folder, find Backup and Sync, and drag it to the Trash.
- Clear leftover files. In Finder, press Command + Shift + G, type , and press Return → search for any folders or files linked to Backup and Sync, and trash them.
~/LibraryCopy
- Empty the Trash.
Disconnect your account from the Google Drive app
For a clean uninstall, sign out of your Google account in the app first. This way, no sync processes are running in the background, and you avoid leftover connection settings.
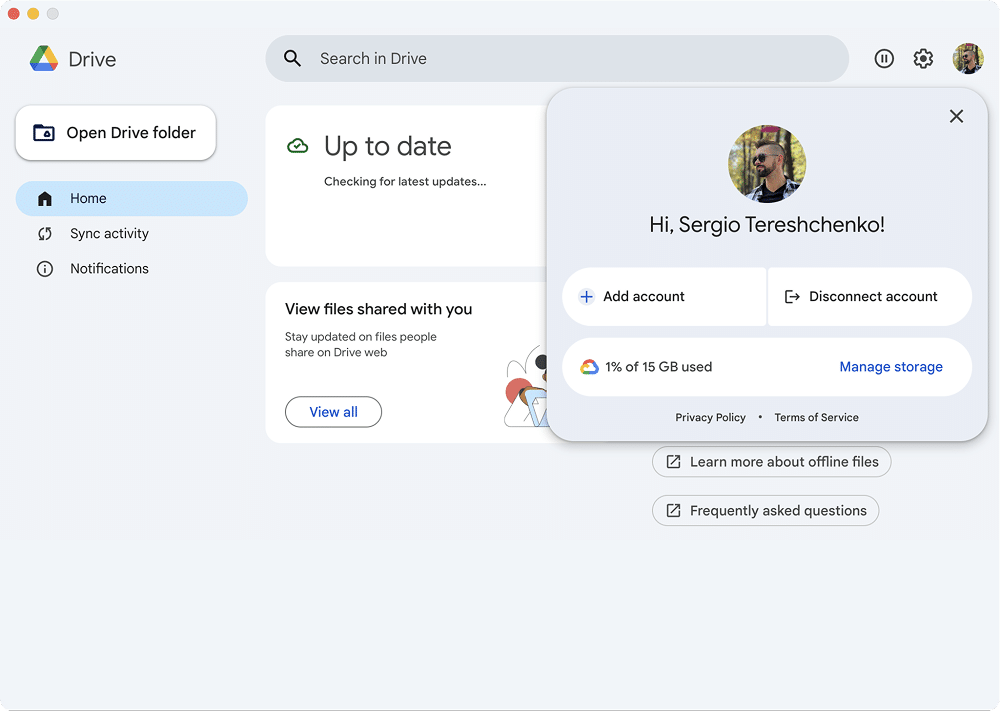
- Open the Google Drive app.
- Click on your user icon in the top-right corner.
- Click Disconnect account.
Note:
If you skip the Sign out step and delete the Google Drive, a few problems may pop up:
- Shared computer risks. On a work or family Mac, your synced Drive folder might stay put. Other users could still see your files.
- Local files left behind. Synced documents remain on your hard drive, which means your private data could end up in the wrong hands.
- Sync conflicts later. If you reinstall Drive, it may start pulling data from the old sync folder, causing duplicates or confusion.
Always disconnect your account first; it’s a small step that prevents big headaches.
Quit the app and its processes before deleting
This one’s simple but important. If Google Drive is still running, your Mac won’t let you delete it completely.
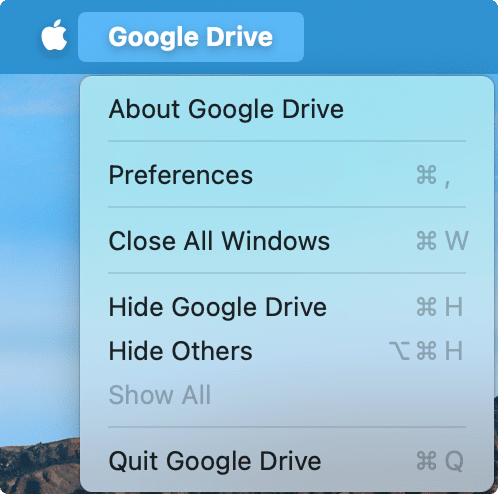
- With Google Drive open, click on its menu next to the Apple logo.
- Choose Quit Google Drive.
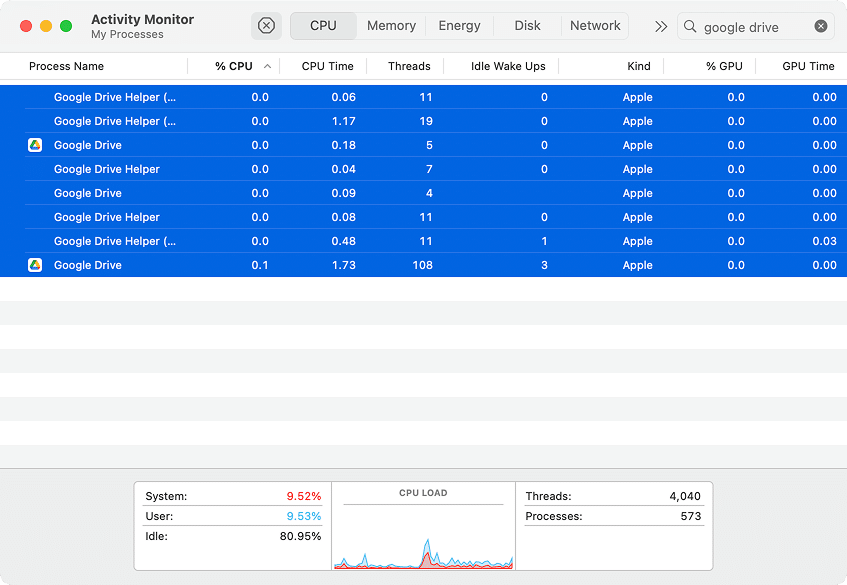
- Open Activity Monitor (Finder → Applications folder→ Utilities → Activity Monitor).
- Type in the search placeholder in the right corner → select all Google Drive processes.
Google DriveCopy
- Click on the Stop (x) button → Force Quit.
Remove Google Drive from startup
Make sure Google Drive doesn’t sneak back in every time you restart your Mac.
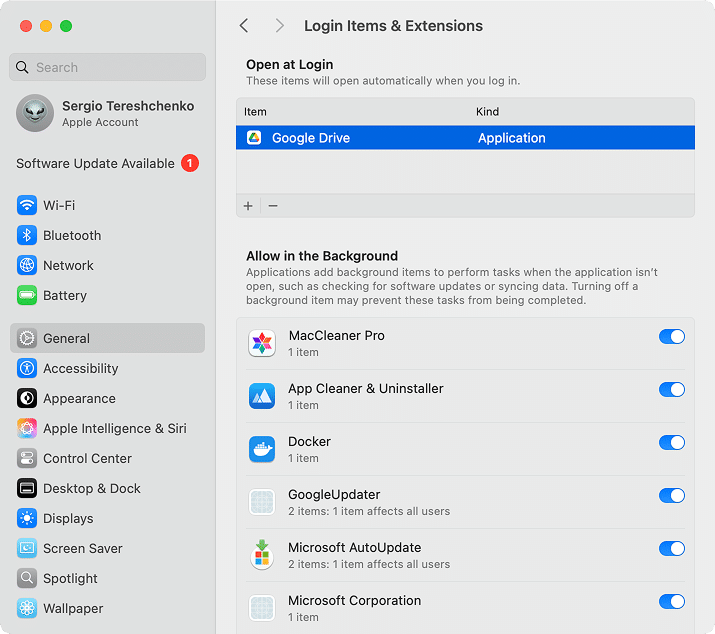
- Open System Settings → General → Login Items & Extensions.
- In the Open at Login section, find Google Drive in the list.
- Select it and click the – (minus) button to remove it from startup.
- Restart your Mac for the changes to apply.
Two techniques to uninstall Google Drive on Mac
After you take the preparation steps, you’re ready to do the uninstalling. You’ve got two paths: the manual route or the quick automatic cleanup with App Cleaner & Uninstaller.
| Method | What it involves | Time required | Best for |
|---|---|---|---|
| Manual uninstall | Finder + Library cleanup + Chrome extension removal | 5 minutes | If you like doing things yourself |
| Automatic uninstall | Four clicks: open app → select Google Drive → click uninstall → confirm | 0.5 minute | If you want it fast, complete, and residue-free |
Note:
Uninstalling Google Drive doesn’t delete cloud files. Regardless of the way you uninstall the Drive app, deleting it from your Mac won’t remove the files in your Google account. Everything in the cloud stays untouched; you can still access it through a browser or another device. Even files shared with you stay safe in your Google account. So, don’t worry – uninstalling the app won’t cause you to lose data.
Uninstall Google Drive from Mac manually
If you’re fine doing a bit of digging, here’s the step-by-step manual method:
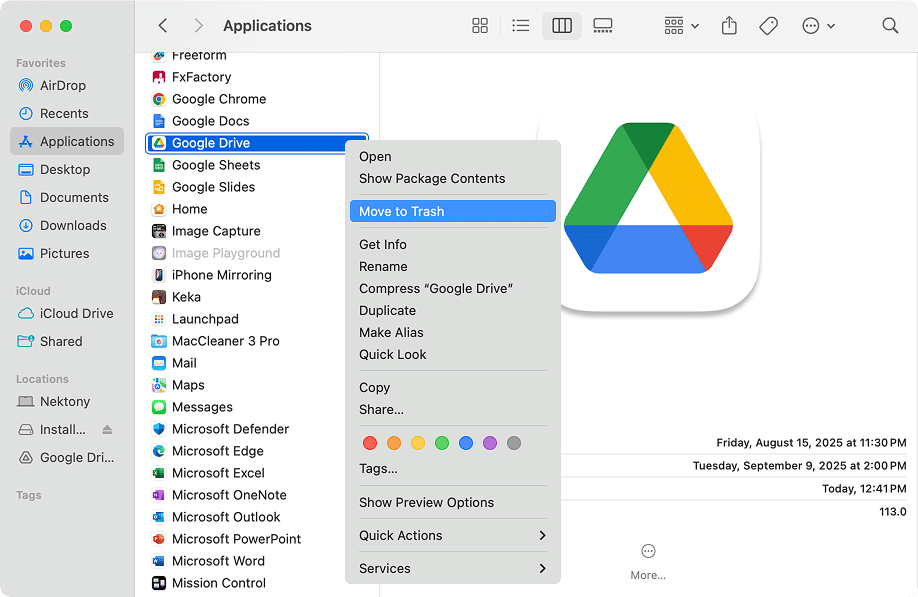
- Open Finder → go to Applications.
- Right-click Google Drive → select Move to Trash.
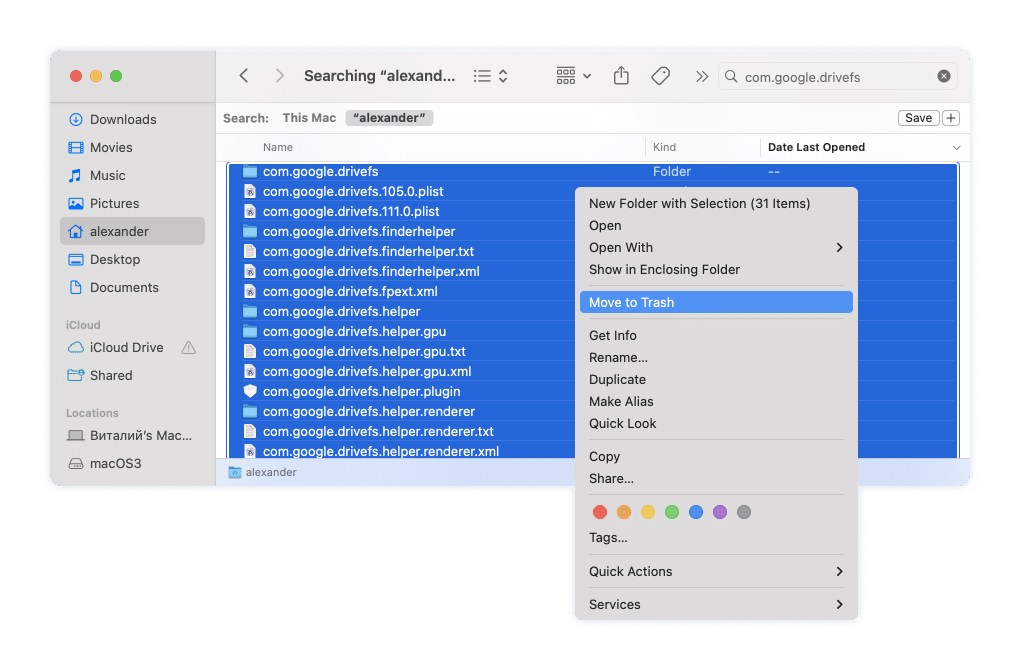
- In Finder, use the search bar and type com.google.drivefs → delete the folders and files you see as shown here for your reference:
- Empty the Trash.
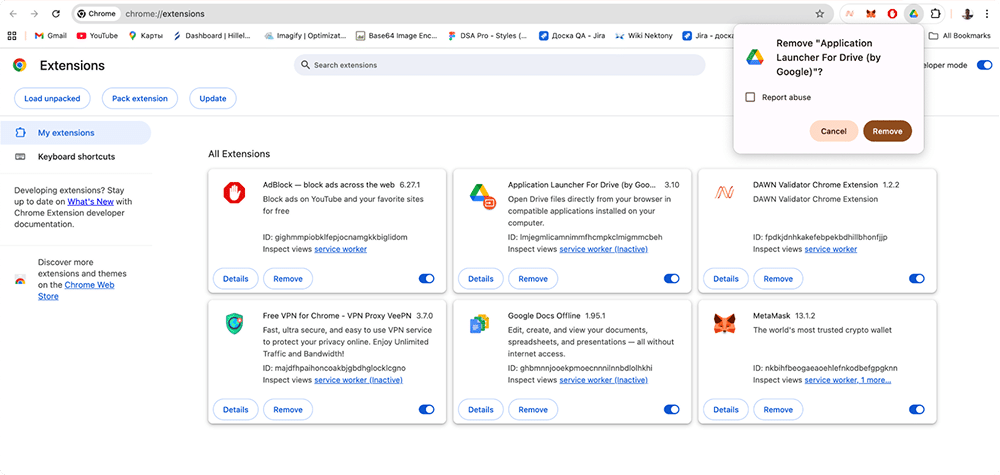
- Clean up Chrome extension. If you use Google Chrome, there’s also an extension called Application Launcher for Drive. After uninstalling the main app, this extension may stay. To remove it: run the Chrome browser → open its menu (three dots in the right corner) → click Extensions → Manage Extensions → find Application Launcher for Drive → hit Remove.
Uninstall Google Drive automatically
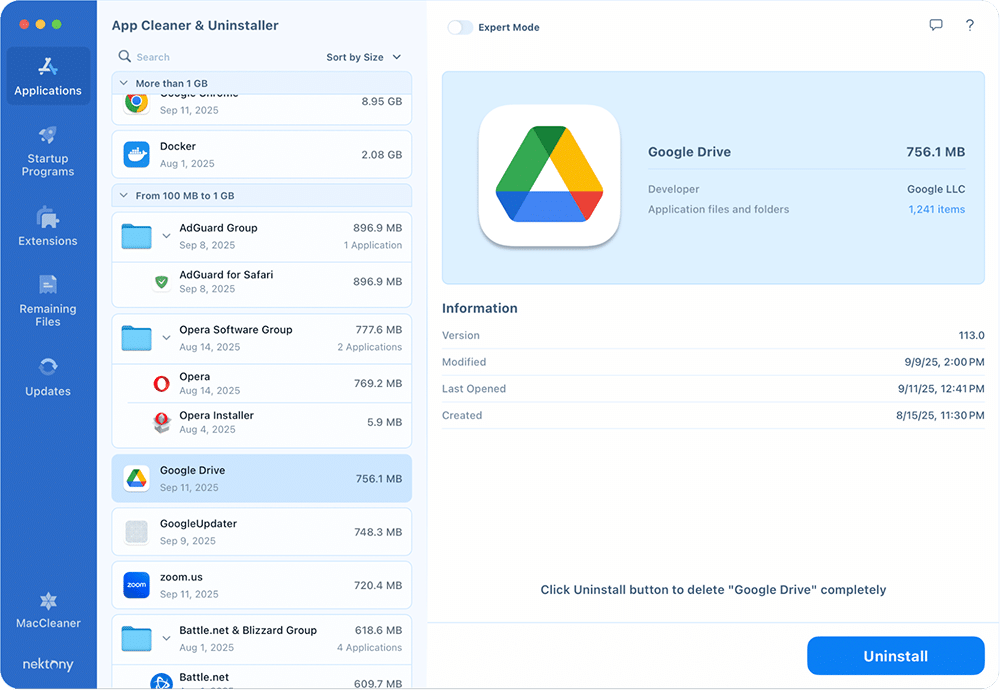
Here’s the faster lane. With App Cleaner & Uninstaller, uninstalling Google Drive takes you less than a minute for four taps on your touchpad – no traces, no second-guessing.
- Download and launch App Cleaner & Uninstaller.
- Locate and select Google Drive out of the Applications.
- Click Uninstall.
- In the Review and Removal window, confirm by clicking Remove.
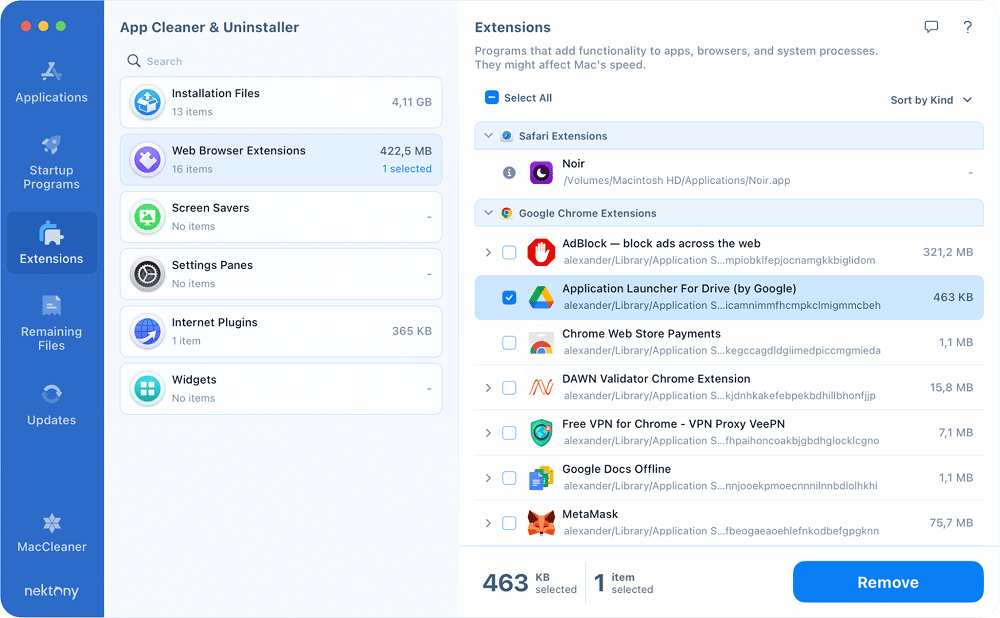
To remove the Google Drive extension in Chrome with App Cleaner & Uninstaller, do the following:
- Go to the Extensions tab → select Web Browser Extensions.
- Find Application Launcher for Drive. If it’s locked due to Chrome sync, turn off sync in Google Chrome.
- Select the extension and click the Remove button.
- Confirm the removal.
Google Drive post-uninstall things to consider
Free up extra storage space
If deleting Google Drive isn’t enough and your Mac still needs more room to breathe, here are a few extra cleanup moves worth trying:
- Double-check local copies for duplicates: If you saved files for offline use, decide whether you want to keep or delete them from your Mac’s drive.
- Delete leftovers from manually deleted apps: When you uninstall Google Drive or other apps by just dragging them to the Trash, hidden support files often remain.
- Clear caches and cookies on MacBook: Browser caches and system junk pile up over time. Removing them helps free gigabytes and can also speed up your Mac.
Reinstall Google Drive if needed
Uninstalling isn’t the end; it’s just a clean start. If the Drive is glitchy, draining memory, or refusing to sync, reinstalling often fixes those issues. To reinstall the Drive, take these steps:
- Head to the Google Drive download page.
- Grab the installer for Mac.
- Open the downloaded file → drag the Google Drive icon into the Applications folder.
- Launch the app → sign back into your account → set up your sync preferences.
Note:
If you don’t want the full app but still want access, stick with the browser version of Google Drive; it saves space and avoids running background processes on your Mac.
Alternative cloud storage options
If Google Drive no longer feels like the right fit, you’re far from out of options. macOS already integrates with iCloud, and several other services bring unique strengths, whether it’s cross-platform syncing, generous storage plans, or advanced backup features.
Here’s a quick overview to help you pick the best alternative for your needs:
| Service | Best for | Free storage | Key advantage |
|---|---|---|---|
| iCloud | Apple users | 5 GB | Built into macOS and iOS, automatic photo sync, smooth integration with Finder and native apps. |
| Dropbox | Teamwork & sharing | 2 GB | Easy file sharing with links, team collaboration tools, integrates with Slack/Zoom. |
| OneDrive | Microsoft users | 5 GB | Perfect for Office 365 users, file versioning, and real-time collaboration on Word/Excel files. |
| iDrive | Backups & security | 10 GB | Focused on data backup and recovery, continuous cloud backup, version history, strong encryption, supports multiple devices. |
Final call
You’ve seen my experience in getting rid of Google Drive. When I first tried removing it with Finder, it took me a good five minutes. Not bad, but I was always left second-guessing – did I really catch every file, or is there still some stray folder eating space in the Library?
Then I gave App Cleaner & Uninstaller a spin. In less than 30 seconds, Google Drive was gone, traces and all. No hunting down leftovers, no digging through hidden folders, no stress. Just a clean slate for my Mac.
In the end, I realized there’s no sense wasting time playing with hidden folders when a tool can do it in seconds. App Cleaner & Uninstaller gave me a cleaner Mac with zero leftovers, and that’s the kind of result I’d stick with. Ask Nektony about how you can turn your Mac into a lightning-fast workspace and your uninstall routine into autopilot mode.
