


August 21, 2025
Free methods to find duplicate files on a Mac
Share

If you’ve been using your Mac for some time now, there is a high chance that you have accumulated duplicates even without knowing it. Such data might occupy significant space on your Mac. This article will show you free methods how to find and remove duplicates on your Mac.
Ways to find duplicate files on a Mac:
| Smart Folder in Finder | Uses Finder’s built-in filters to locate duplicates. It’s the most inconvenient method as it requires manually opening and verifying each file before deletion. |
|---|---|
| Duplicate finder app | A fully automated solution and the quickest way to identify all types of duplicate files on any disk. |
| Terminal | With a special Terminal command, you can get a list of duplicate files. You’ll need to manually review and delete them, which can be time-consuming. |
| A built-in option in Photos | Compatible only with duplicates in the Photos library. Available only on the latest macOS versions. |
Why do duplicate files appear on my Mac?
Usually, we don’t notice duplicate files until our Mac runs low on storage or we find the same documents, photos, or downloads scattered across multiple folders. These copies can accumulate for many reasons:
- accidentally saving the same file twice
- importing photos multiple times
- re-downloading attachments we couldn’t find
- iCloud sync issues can also create extra copies when files don’t merge correctly between devices
Sometimes, we even duplicate files on purpose for backups and then forget to delete them. No matter the cause, these items are inevitable, which is why regular cleanup is essential to keep your Mac organized and running smoothly.
Find duplicates on Mac using Duplicate File Finder
An effective and time-saving solution to remove duplicate content on Mac is to use a free application Duplicate File Finder. The application has a complex search algorithm that automatically identifies exact duplicate photos, videos, music, documents, and other common types of files. Also, the application finds similar folders, photos, and audio files, helping you clear all unneeded copies.
Video Guide: How find duplicate files on macOS
1:32

How to use the app:
- Download and launch the app.
- Choose the folders you want to scan and click on Find duplicates.

- Once the scan is completed, you’ll see the list of all your duplicate files.
- Select the items you want to delete.
- Click on Review to Remove and confirm the action.


Note:
You can use the Auto Select button to automatically select duplicates. The application will leave only one copy in each set of duplicate copies. Once again, the application is available for Free on the App Store. Download the app and see how it is easy to declutter your Mac.
Once again, the application is available for Free on the App Store. Download the app and see how it is easy to declutter your Mac.
Find duplicates using a Smart Folder in Finder
You can use the Smart Folder option in Finder to manually find duplicate files on Mac. Before we start explaining how to search for duplicate files on Mac with Finder, note that this is usually time-consuming, and you will have to compare every file that seems to be a duplicate manually. However, if you prefer not to use any third-party tool, follow the guide below.
How to use Smart Folder:
- Open Finder.
- Go to the Finder menu → click on File → select New Smart Folder.
- Click the Plus button in the top right corner and select Search parameters: Kind, Date, Name, File type, and other parameters.

- Sort the files by size.
- Now open each file with the same name or size and check whether their data is duplicated.


You can find more parameters for searching and sorting files by clicking on Other and adding new search filters with the Plus button. For example, if you want to search for duplicate photos, set up Kind – Image, Extension – .png, .jpg, .tiff, or others. Add as many filters as you need and see the results. Such a list will let you look at all possible duplicate files, focusing on the size, extension, pixel size, name, and other parameters.
Find duplicates on Mac using Terminal
One more way to find duplicate files is by using the Terminal command line. With a special command, you can scan specific directories. The system will compare file sizes and MD5 signatures (unique digital fingerprints of files), followed by a byte-by-byte comparison for verification.
Here’s how to do it:
- Download this duplicate-finder script.
- Open the Terminal from the Applications → Utilities folder.
- Type the following command:
or, if you want to give the script broader access to system folders, use this command:
shCopy
sudo shCopy
- Drag and drop the duplicate-finder script file into the Terminal window. (Note: There must be a space after the sh command.)
- Press Return.
- If required, enter your administrator password.

- The script will ask for the path to the folder you want to scan. You can:
- Type the full path manually, or
- Drag and drop the folder into the Terminal window (this is recommended, as it automatically handles spaces in file names and paths)
- Press Return to start the search for duplicate files.
- After the scan is complete, you will see the path to a file containing the list of duplicate items.

- Locate and open this file in Finder.

- Here’s an example of what the list of duplicates might look like. Review your list and manually delete the duplicates you don’t need.


Tip:
To quickly access these files, in Finder press Cmd+Shift+G, paste the file paths into the Go to Folder box, and press Return.

This method is not very beginner-friendly, so we recommend using it only if you’re comfortable working with Terminal.
How to find duplicate pictures in the Photos Library
Please note, that when you import photos from your Mac’s hard drive to the Photos app, you automatically create duplicates. In this case, the system does not move the photos, it creates copies in the Photos library. Here is how to find duplicates in the Photos app:
- Launch the Photos app.
- Click Duplicates in the sidebar. It may require some time to scan your library for duplicates.
- Once the scanning is complete, you’ll see the list of repeating photos.
- Select and remove unneeded items.
- By default, the system does not remove them to Trash, it moves them to the Recently Deleted folder in Photos. So, don’t forget to empty this folder for complete removal.

Note:
The built-in option to detect duplicates in the Photos app is available in macOS Monterey and later versions. If you use earlier macOS versions, you won’t be able to use this method.
How to find duplicate Mail downloads
By default, when you open a file or document from Mail attachments, the system automatically saves it to the hidden Mail Downloads folder. This folder can be found in the system Library → Containers. However, when you click to download and save this file in any folder on your Mac, as a result, you have two copies of the file on your hard drive.
Well, you hadn’t saved the file twice, but the system had done this for you. If this happens often, your disk might be cluttered with duplicates in the Mail Downloads folder.
Here’s how to use Finder to spot duplicates (folders and files) and remove them:
- Open Finder.
- Press Shift+Command+G and you will see the Go to Folder search field.
- Copy and paste the directory below and press Return.
~/Library/Containers/com.apple.mail/Data/Library/Mail DownloadsCopy

- In this folder, you can find all Mail attachments. Find the downloaded file and remove it.

How to find duplicate songs the Music app (iTunes)
No matter if you have an old version of macOS and use iTunes or the Music app, the steps for finding duplicate songs in both versions are the same.
- Launch the Music app or iTunes.
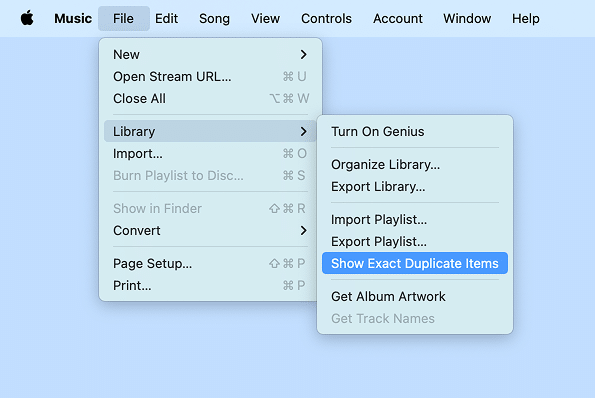
- In the menu bar, click on File → Library.
- Click on Show Duplicate Items. You will see the list of repeating music files.
Note:
In this case, the Music app might show you the same songs but from different albums. If you want to find exact duplicates in your Music Library, press and hold the Option key on your keyboard, and you will see this option – Show Exact Duplicate Items .
Important!
Please, don’t automatically select and delete all files which iTunes shows as exact duplicates. If you do this, you will remove all copies. iTunes is showing all files and you need to manually skim them and decide which one you want to remove. Read more: How to delete duplicate songs in iTunes.
Another quick way to find exact duplicate music files and similar audio files is to use Duplicate File Finder from Nektony.
Conclusion
Using a duplicate finder is the best way to clean up your Mac. The application supports any storage, including external cloud storage and external hard drives. It’s easy to use, it’s fast and safe. The best thing about the app is that it’s free to use. The in-App purchase is required only if you need additional Pro options for organizing your duplicate files.
A lot of space has been taken because of this duplicate content. Thank you for this article. This sounds like an interesting work.
Nice article and tips, thanks!
great to hear!