
Help

App Cleaner & Uninstaller
Overview
App Cleaner & Uninstaller is your all-in-one command center for macOS application management. Moving beyond simple uninstallation, it serves as a total maintenance suite designed to optimize your Mac’s app performance and security.
While macOS allows you to “trash” apps by dragging icons to the Trash, this process leaves behind hidden caches, logs, and system files that clutter your drive. Our program ensures every app is removed correctly and completely.
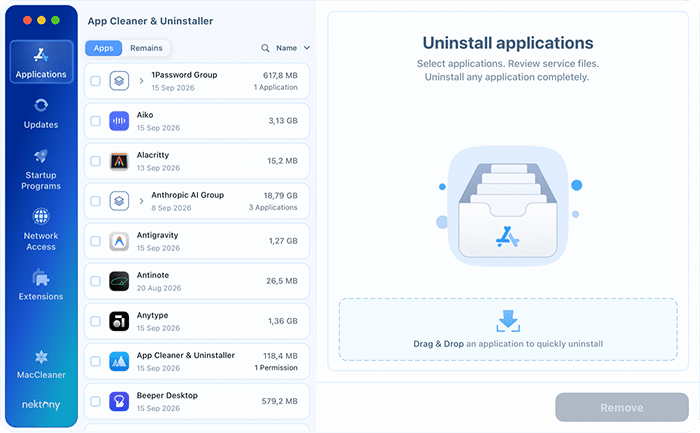
App Cleaner & Uninstaller empowers you to take full control of your software ecosystem with a wide set of features:
- Complete uninstallation: Erase applications along with every hidden byte of service data.
- Software updater: Keep your system secure and functional by tracking and installing the latest versions of all your apps in one click.
- Network access control: See how much internet traffic each app moves and block the apps you do not want online. Traffic is analyzed locally on your Mac.
- Startup & launch agent manager: Boost your Mac’s boot speed by managing login items and background processes.
- System extensions & plugins: Easily disable or remove web browser extensions, settings panes, and system plugins.
- Security & access audit: Audit and manage app permissions in one place. Monitor access to your camera and microphone, and revoke permissions with a single click. Combined with Apple Notarization checks, you can ensure that only trusted, malware-free software is allowed to run on your Mac.
Applications Section
In the Applications section, you can browse your software library with total clarity. Selecting any app from the list reveals a detailed profile in the right column, giving you an immediate overview of:
- Vital stats: total disk footprint, the number of files and folders the app owns, its developer, version number, and the dates it was created, modified and last opened.
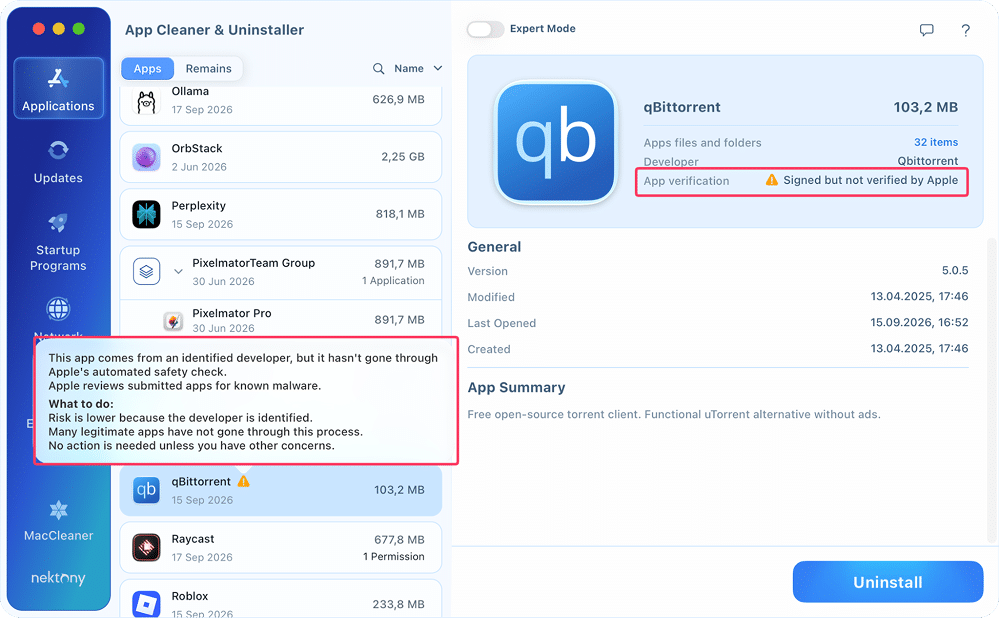
- Security Insights: Verify the Apple Notarization status to ensure the app is recognized as safe and malware-free.
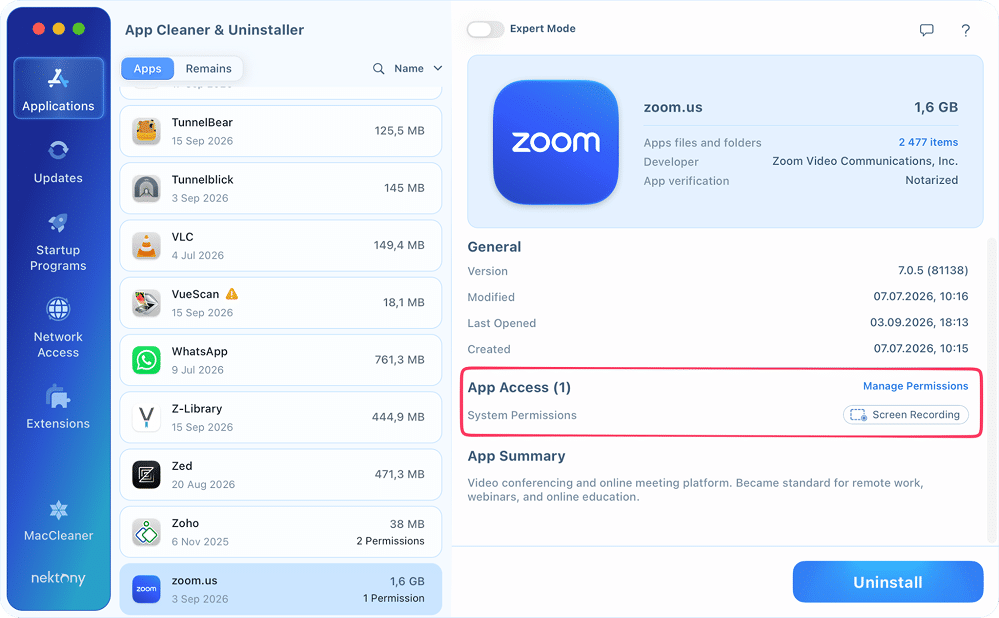
- Privacy Audit: See exactly what App Access has been granted (such as access to your Camera, Microphone, or Full Disk Access) and manage permissions.
- AI App Summary: Get a smart, AI-generated summary that explains what the app does – perfect for identifying mysterious processes or deciding if an old app is still worth keeping.
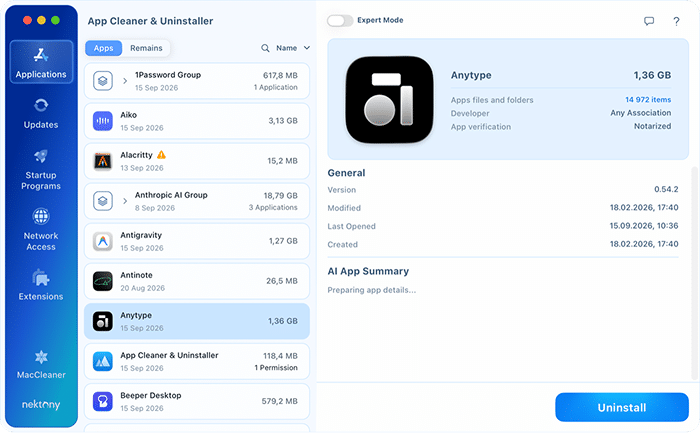
The Apps and Remains switch above the list moves you between the applications installed on your Mac and the service files left behind by apps you have already deleted. In version 10, the remaining files live here instead of in their own sidebar section.
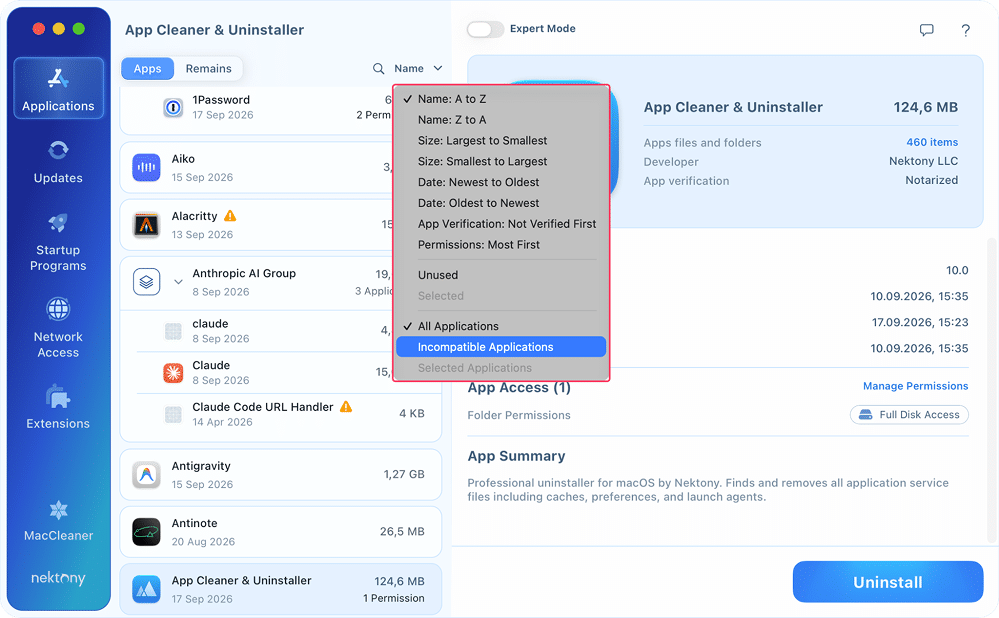
Apps that belong together are collected into groups – for example, 1Password Group or Anthropic AI Group – so a suite and its helpers can be reviewed and removed as one item. Use the control next to the search field to sort the list, and the new Incompatible Applications filter to collect the apps that will not run on your version of macOS.
You can also drag an application straight from Finder onto the right-hand panel to queue it for removal without hunting for it in the list.
How to completely remove an application:
- Select the app you wish to remove from the left column.
- Click the Uninstall button.
- Confirm the removal.
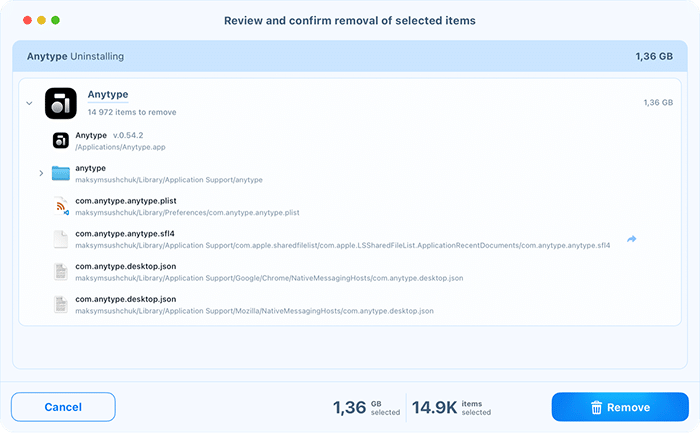
The app and all its associated service files will be moved to the Trash or deleted permanently according to your settings.
App security
App Cleaner & Uninstaller acts as a security audit tool for your Mac, helping you identify potential risks hidden in your application list.
- Verifying trustworthiness
Use the App Verification field to see which apps have passed Apple’s notarization process. A warning icon (⚠️) signifies that the software has not been officially notarized by Apple. This means the app has not been scanned for known malware or malicious code, and you should exercise caution before keeping it on your system.
- Managing privacy exposure
Regularly review the App Access section to see which apps have permissions to your sensitive data, such as your camera, microphone, location, or full disk.
How to manage app permissions:
- Select an application from the list to view its details.
-
In the right panel, you will see the App Access section. Here:
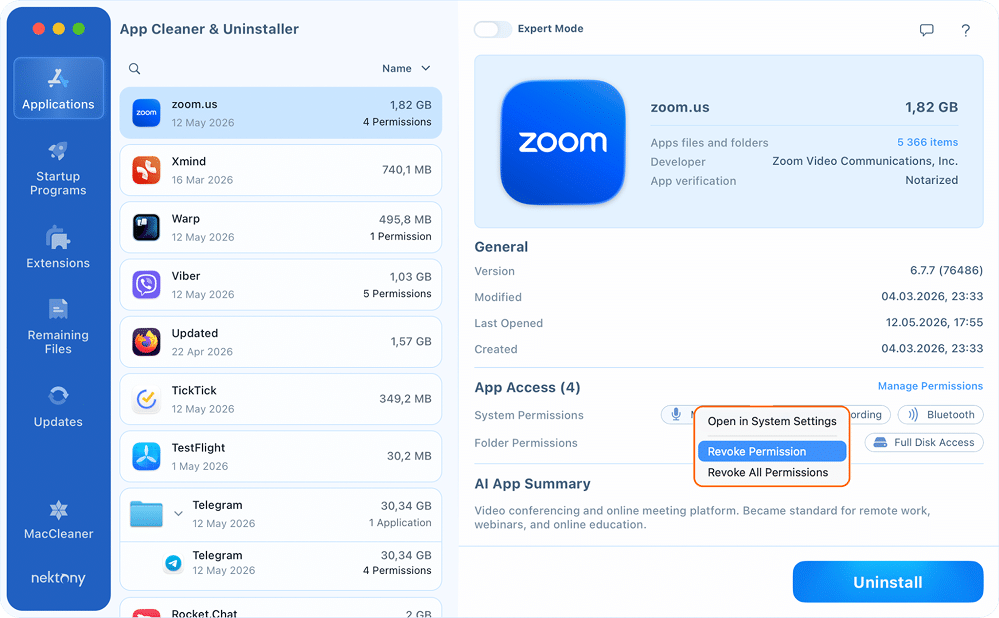
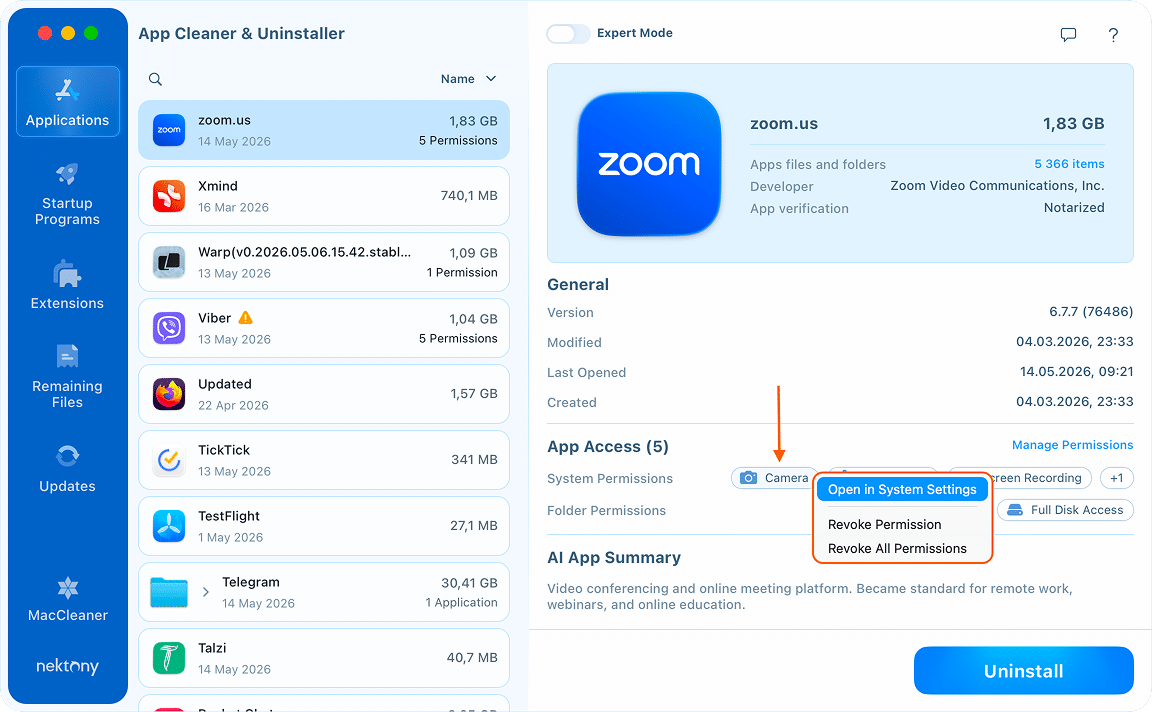
- Right-click on a specific permission icon (like Camera or Microphone) to open the context menu and select Revoke Permission to immediately disable access, or Revoke All Permissions for that app.

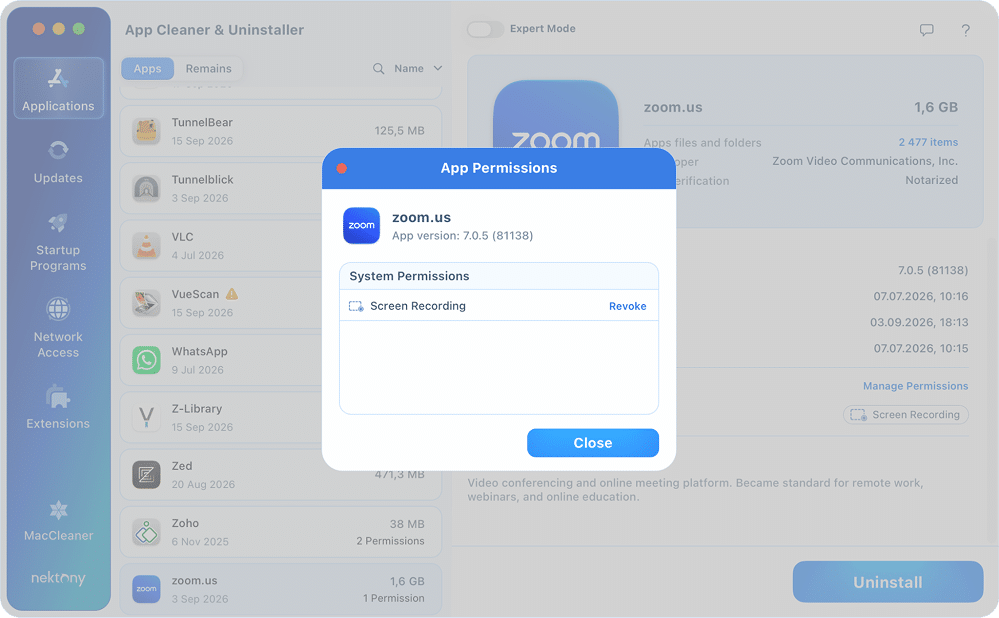
- Alternatively, click Manage Permissions to open a dedicated window showing all active permissions for that specific application. Here, click Revoke for System or Folder Permissions.
- Right-click on a specific permission icon (like Camera or Microphone) to open the context menu and select Revoke Permission to immediately disable access, or Revoke All Permissions for that app.
- Confirm the action: the app may prompt you to enter your Mac password to proceed.
System Settings integration
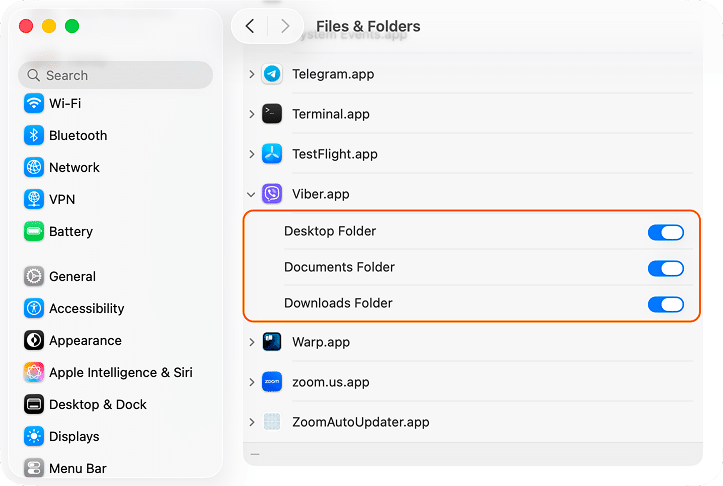
If you prefer to use native macOS controls, you can click a specific permission or select Open in System Settings from the right-click menu.

This will automatically open the relevant macOS privacy panel where you can manually toggle access.
- AI app summaries
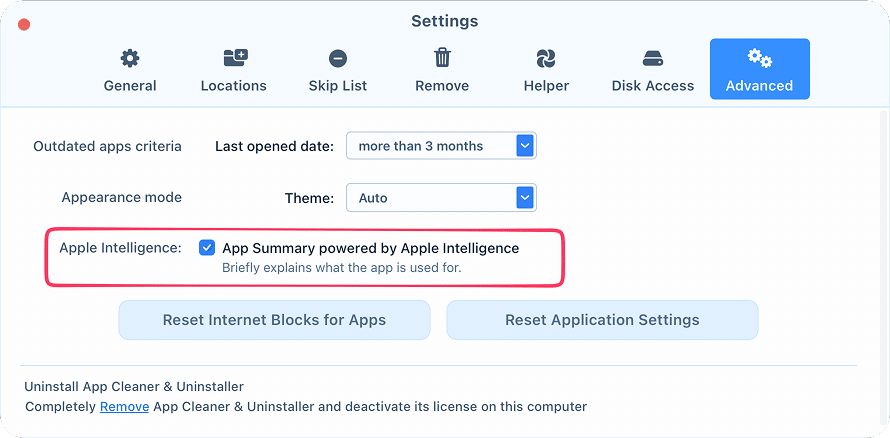
The App Summary feature is powered by Apple Intelligence to help you understand the true purpose of every application on your Mac.Note: To ensure these descriptions are always available, verify that “App Summary powered by Apple Intelligence” is enabled in the Advanced tab of your Settings.
This feature is especially useful for identifying mysterious background processes or deciding if an old, forgotten app is still vital to your workflow or should be removed for security reasons.
Expert mode
For users who want full transparency and granular control, Expert Mode provides an “under the hood” look at every single file associated with an application.
You can activate this view by toggling the Expert Mode switch located at the top-center of the application window. Once enabled, the right-hand panel expands to show a detailed file tree instead of just a summary.
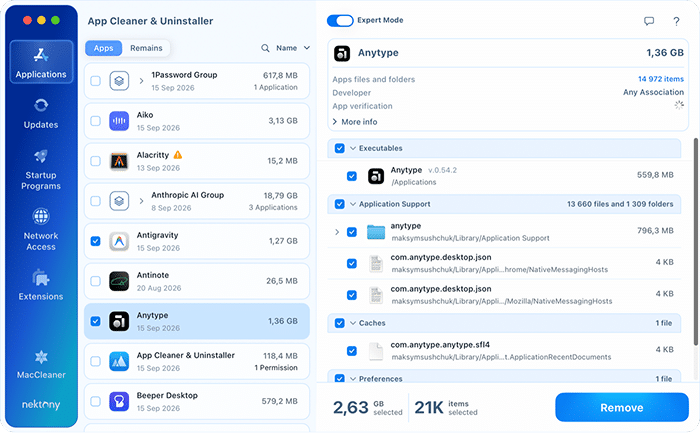
In this mode, you can see exactly where files are stored on your Mac. Service files are organized into clear categories:
- Executables – the application’s core program files. Note: Executables with the same identifier are combined into a single application.
- Application Support – app-specific data and support files created and managed by the application. These can also include files containing user data.
- Plugins – components that add specific features or functionality to an application.
- Shared – service files that are shared among different users on the macOS system.
- Library – app-specific data and support files that may be shared with other applications.
- Growl – components that support notifications via the Growl notification system.
- Caches – temporary data that can be regenerated as needed; applications do not rely on these files to function.
- Containers – home directories used specifically by sandboxed applications.
- Preferences – files that store the user’s custom settings for the application.
- Logs – record files for the console and specific system services.
- Cookies – data files containing web browser cookies.
- Crash Reports – diagnostic files generated when an application closes unexpectedly.
- Settings Panes – special plugins dynamically loaded into System Settings (formerly System Preferences) to customize app behavior.
- Login Items – agents, daemons, and items that allow an application to start automatically upon system launch or user login.
- Dock Icon – an alias (shortcut) to the application located in the Dock.
- Supported Document Types – a list of file formats that the application is capable of opening or handling.
For every item listed, you can see the specific file path and the exact file size, ensuring you know exactly what you are modifying.
Expert Mode allows you to be surgical. Instead of deleting the entire app, you can use the checkboxes to select only specific folders or files like a bloated “WebLocalStorage” folder or an old version of an executable, and click the Remove button to clean them out.
Resetting apps
To fix a buggy application or clear its data without deleting the software itself, you can use the Reset feature. This returns the app to its original, default state by clearing its settings and cache while keeping the main program intact.
There are two ways to perform a reset:
- Via the Context Menu: simply right-click on any application in the list. From the dropdown menu, select Reset Application.
- Manually in Expert Mode: toggle Expert Mode → uncheck the Executables category so the main program isn’t deleted → select Application Support and other service categories like Caches or Preferences → click Remove to wipe only those selected files.
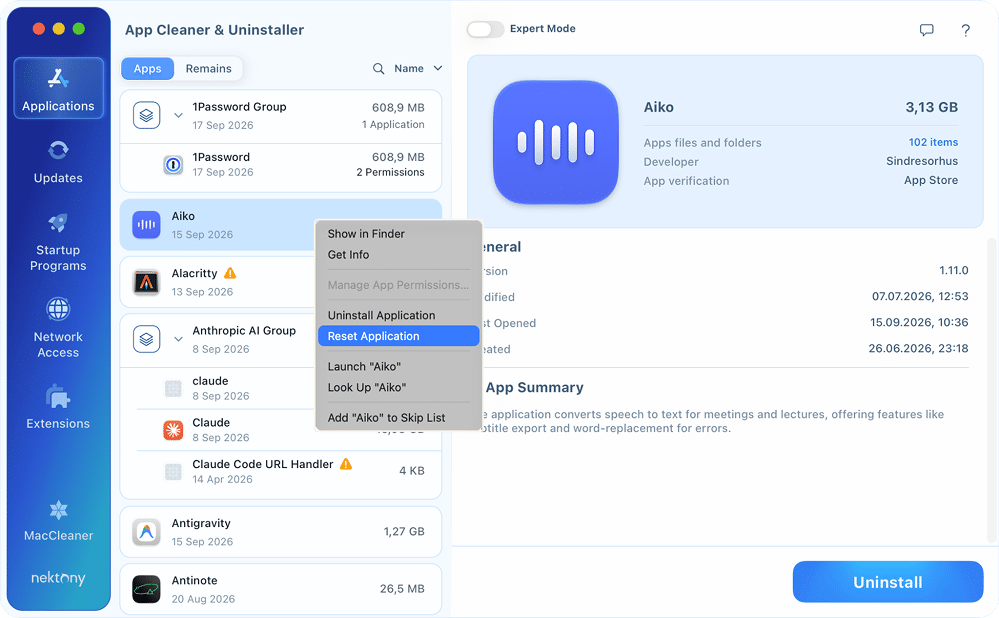
This manual method is perfect if you want to keep specific things (like large plugins) but clear out corrupted preferences or login data.
Startup Programs Section
In the Startup Programs section, you can optimize your Mac’s performance by managing the background processes that trigger during system boot. This section provides a comprehensive list of:
- Launch agents – background programs that run automatically upon user login or system startup. You can disable their auto-launch or delete them entirely from the disk.
- Login items – user-facing applications that open automatically when you log in. You can manage items that are typically found in System Settings or disable specific background agents associated with these apps.
- System daemons – files that contain scripts that manage system-wide service processes for all users. They load during system startup and run in the background to support various OS functions.
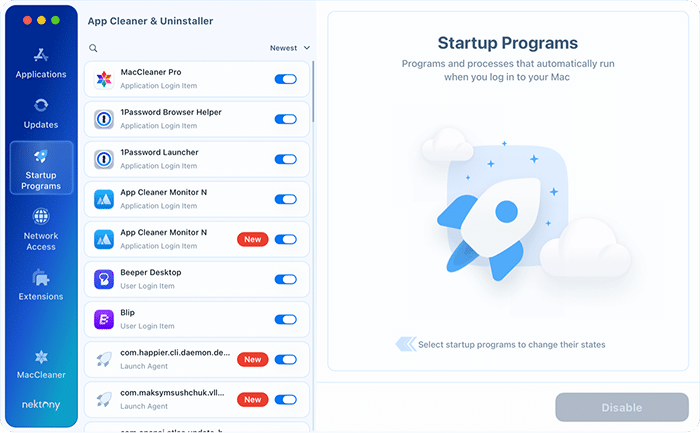
To change how a program behaves at startup, simply use the Enable/Disable slider next to each item. Disabling an item stops it from launching automatically, which can significantly speed up your Mac’s startup time without deleting the file itself.
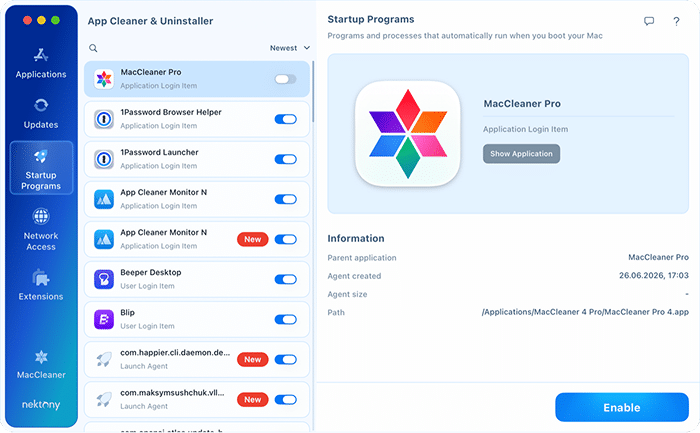
App Cleaner & Uninstaller also allows you to permanently remove launch agents from your disk.
To remove an item:
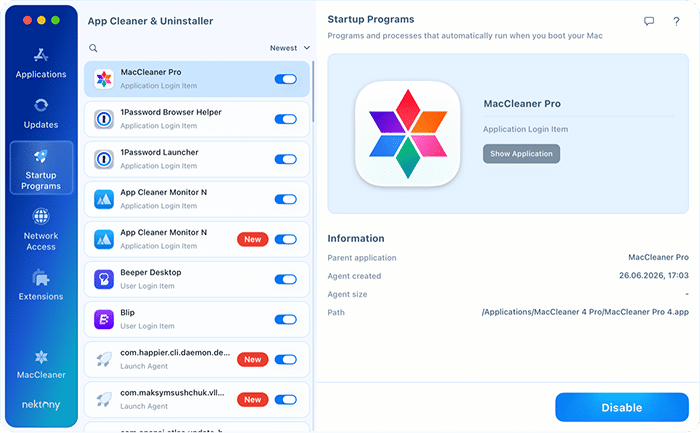
- Locate the launch agent in the Startup Programs tab.
- Click the Disable button.
- Confirm the action to finalize the deletion.
Network Access Section
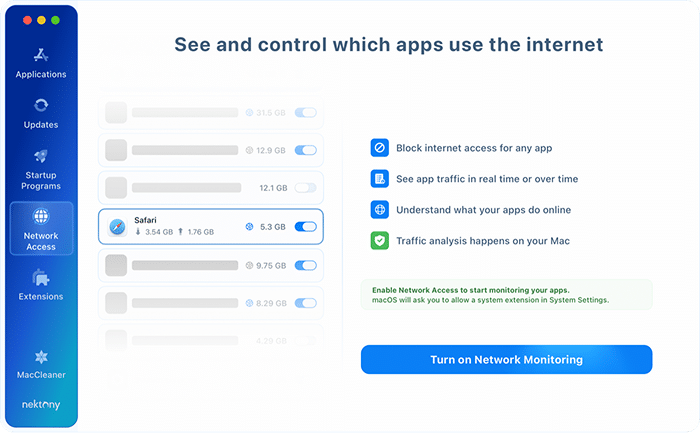
The Network Access section shows which of your apps talk to the internet, how much traffic each of them moves, and lets you cut off any app you do not want online. All traffic analysis happens on your Mac – no browsing data or app activity is sent anywhere.
How to turn on network monitoring
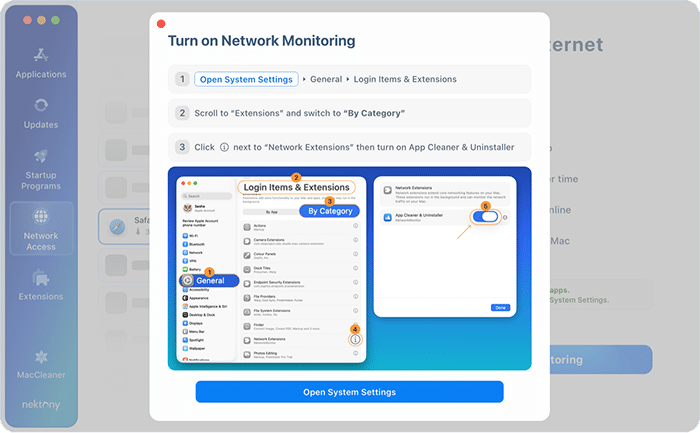
Network monitoring works through a macOS network extension, so the first time you open the tab you have to allow that extension:
- Open the Network Access tab and click Turn on Network Monitoring.
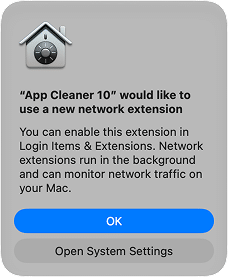
- When macOS asks whether “App Cleaner 10” may use a new network extension, click OK.
- Follow the on-screen instruction: open System Settings → General → Login Items & Extensions.
- Scroll to Extensions and switch the view to By Category.
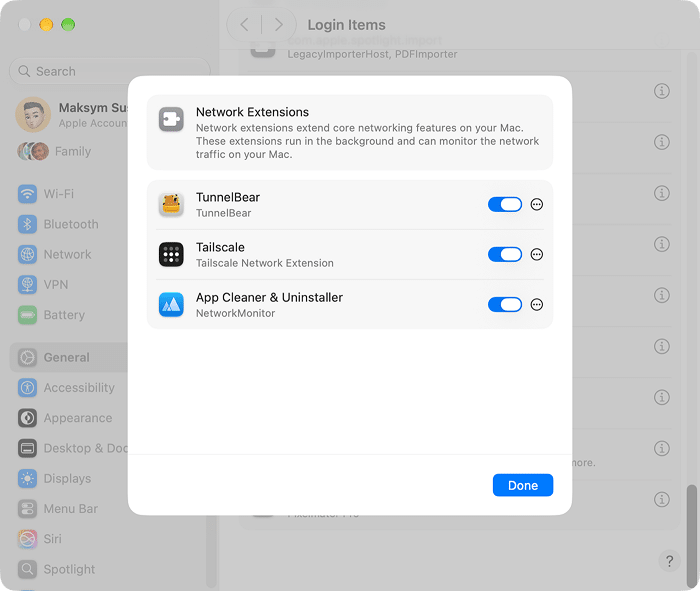
- Click the ⓘ button next to Network Extensions, turn on App Cleaner & Uninstaller, and click Done.
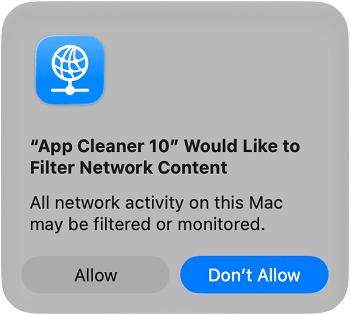
- Back in the app, confirm the macOS prompt “App Cleaner 10” Would Like to Filter Network Content by clicking Allow.
How to read the traffic list
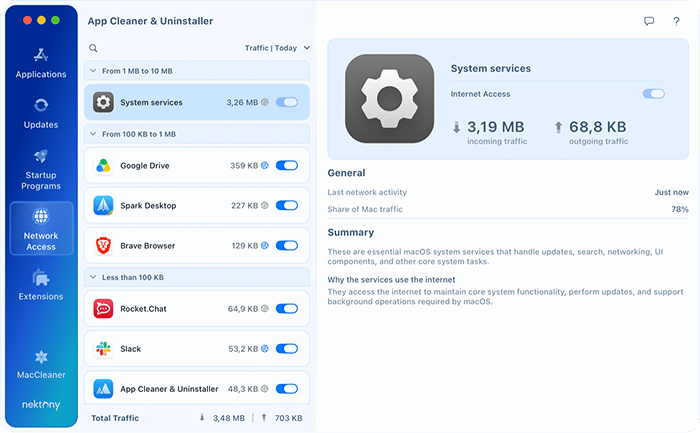
Once monitoring is on, the left column lists every app that has used the network, grouped by how much traffic it has moved. The control above the list switches the metric and the period you are looking at – for example Traffic | Today. The bar at the bottom shows the Total Traffic in and out for that period.
Select any app to open its profile on the right:
- Internet Access – the switch that allows or blocks the app’s connections.
- Incoming and outgoing traffic – how much data the app has downloaded and uploaded in the selected period.
- Last network activity and Share of Mac traffic – when the app was last online, and how large its share of your Mac’s total traffic is.
- Summary – a plain-language explanation of what the app is and why it goes online.
How to block an app from the internet
- Go to the Network Access tab.
- Find the app you want to cut off – use the search field or the sorting control.
- Switch the toggle next to the app OFF, or select the app and use the Internet Access switch in the right-hand panel.
The app stays installed and fully usable; it simply stops reaching the network, and you can turn the switch back on at any time. To lift every block you have set at once, open Settings → Advanced and click Reset Internet Blocks for Apps.
Extension Section
This area allows you to declutter your system by removing various plugins and add-ons that often accumulate over time.
To remove extensions
- Navigate to the Extensions sidebar tab.
- Browse the categories and select the items you no longer need.
- Click the Remove button and confirm your choice.
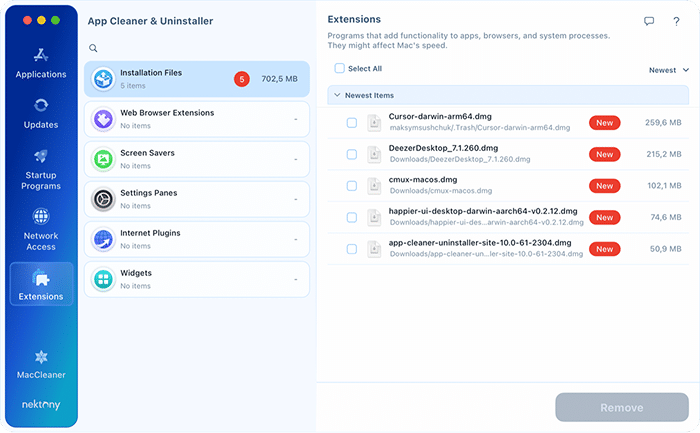
Available extension categories
- Installation Files – setup files (.dmg, .pkg) used to install programs. Once an app is installed, these files are often no longer needed; removing them is a quick way to reclaim disk space.
- Web Browser Extensions – small programs that modify and enhance your browser’s functionality and interface. You can view and uninstall extensions for all browsers installed on your Mac from this single dashboard.
- Screen Savers – View all installed screen saver files and easily remove those you no longer use to free up storage.
- Settings Panes – custom plugins that appear in your macOS System Settings to manage specific third-party app behaviors. App Cleaner & Uninstaller allows you to remove these completely, along with their associated service files.
- Internet Plugins – components that add specific features to your web browsing experience.
- Widgets – simple programs originally designed for the Dashboard.
Settings panes
Some third-party apps may be downloaded as settings panes, for example, Flash Player, or they may create settings panes the same way MySQL or Wacom drivers do.
In the Extensions section, you can preview and remove all the settings panes on your Mac installed by third-party apps. Also, you can open any settings pane in Finder directly from the app by clicking the Arrow icon next to it.
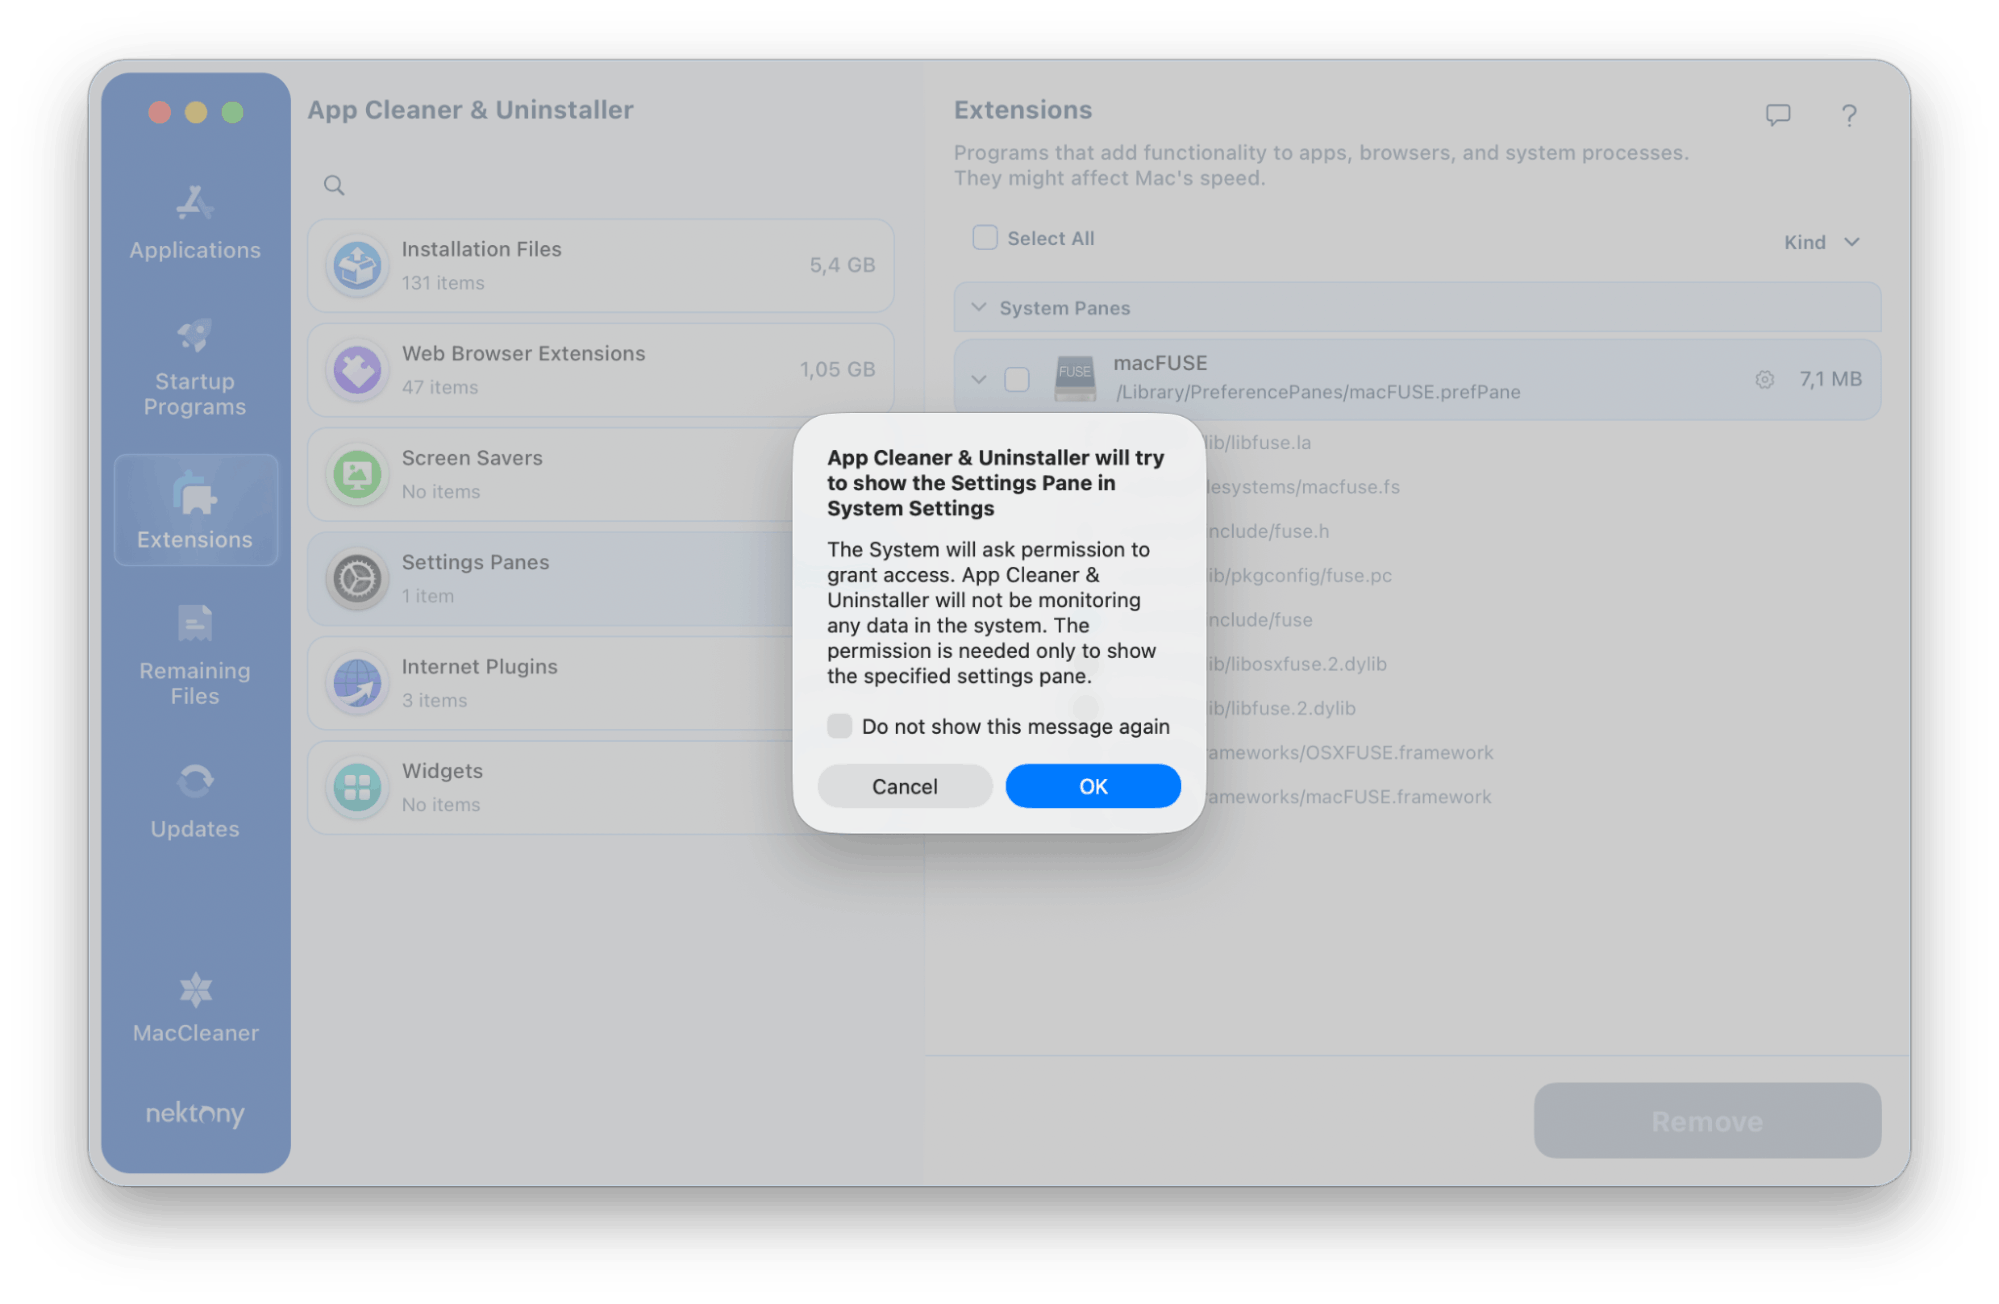
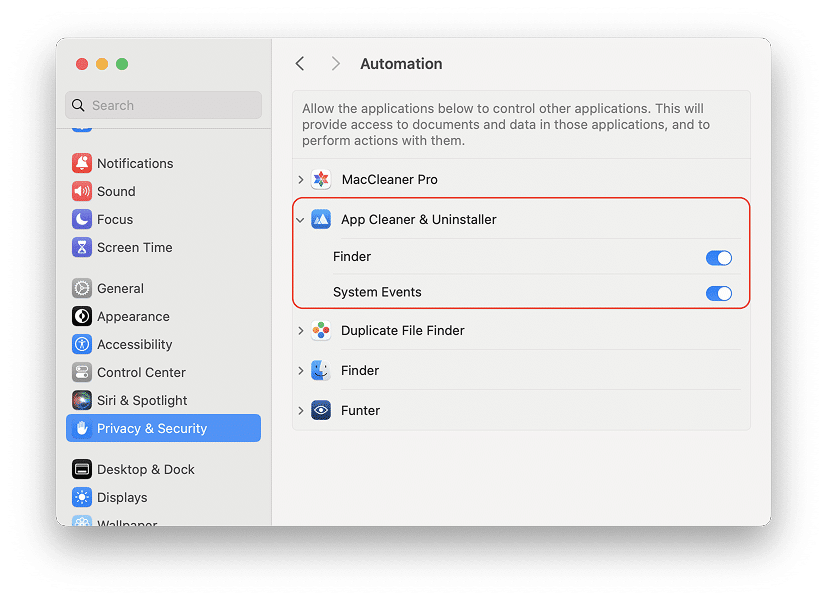
If you previously clicked “Cancel” and need to enable access manually, follow these steps:
- Open System Settings and navigate to the Privacy & Security section.
- Select Automation from the right-hand panel.
- Find App Cleaner & Uninstaller in the list and toggle the switch to enable access to Finder.
Remaining Files Section
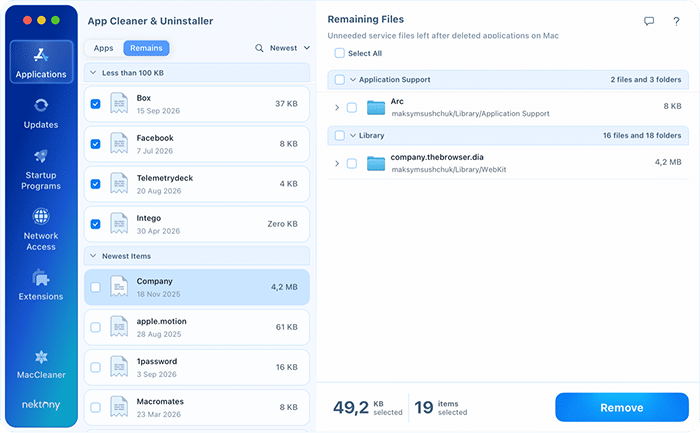
When you delete an app by simply dragging it to the Trash, its hidden service files are often left behind. These “broken” files clutter your storage and provide no benefit to your system. App Cleaner & Uninstaller identifies these “forgotten” files and allows you to clear them.
In version 10, the remaining files moved from their own sidebar section into the Applications section, where the Apps / Remains switch above the list opens them.
To view these files, open the Applications section and switch the list from Apps to Remains. Remaining files no longer have their own item in the sidebar. Since the original application has been removed, these file sets are grouped and labeled by the name of the app that created them.
How to remove remnants:
- Open the Applications section and switch the list to Remains.
- Select an application remnant from the list in the left column.
- Click the Remove button at the bottom of the window.
- Confirm the removal action.
Updates section
Updates often introduce new features and functionalities. Also, they include security patches to protect your system. The Updates feature in App Cleaner & Uninstaller helps you identify outdated programs and apply security patches with ease. In version 10, the update database has grown by more than 1,200 apps and now also covers Safari extensions and Homebrew command-line tools, and installing updates itself has become faster and more reliable.
How to update your apps:
- Navigate to the Updates tab in the left-hand sidebar.
- Review the list of outdated applications detected on your Mac.
- Select the specific app you wish to refresh.
- Click the Update button.
- Confirm the action to begin the installation of the latest version.
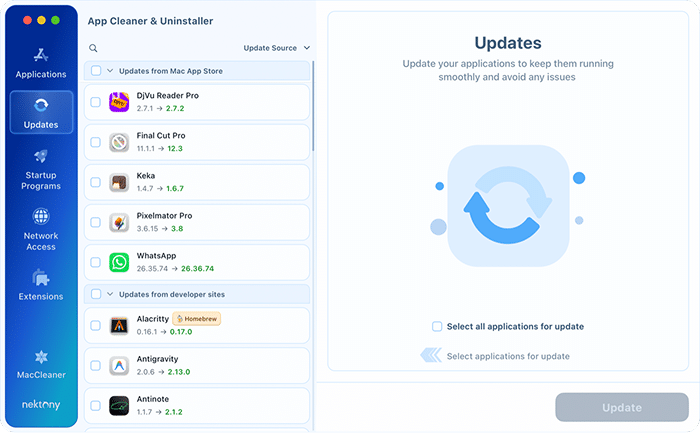
The list is grouped by where each update comes from – Updates from Mac App Store and Updates from developer sites – and items installed through Homebrew carry a Homebrew badge. Use the sorting control to reorder the list by name, size, update date or update source, and tick Select all applications for update to queue everything at once; the bar at the bottom then shows how many items and how much data the update will pull.
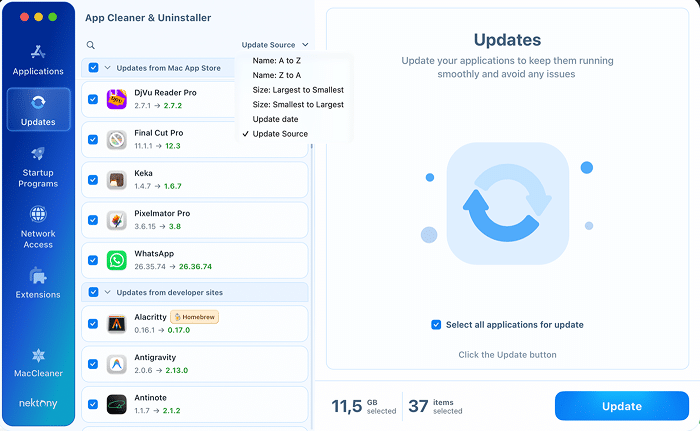
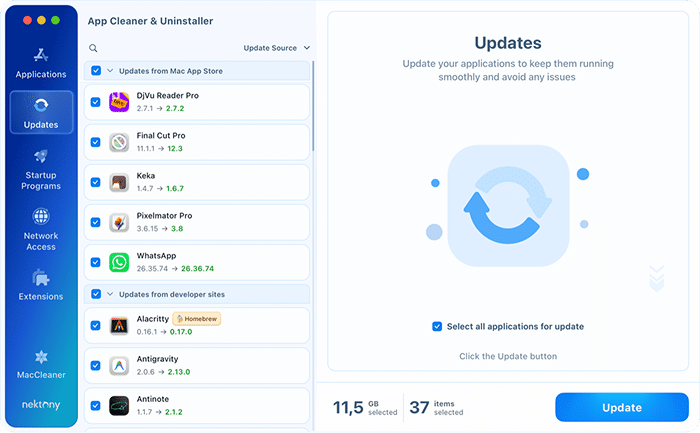
You can detect and manage updates for both App Store applications and apps installed directly from developers. It is fully compatible with the most common distribution and update systems used on macOS:
- App Store
- Sparkle
- Electron
- Squirrel
- Homebrew, including command-line tools
- GitHub
- Safari extensions
Settings
You can customize your experience by adjusting the Settings to fit your workflow. To access these options, go to the App Cleaner & Uninstaller menu and select Settings.
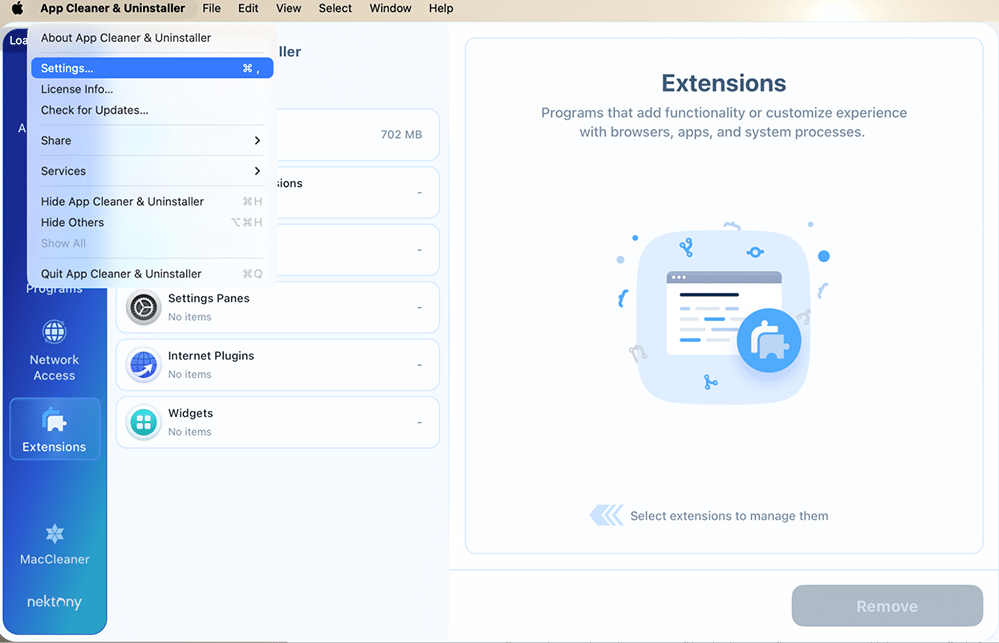
General tab
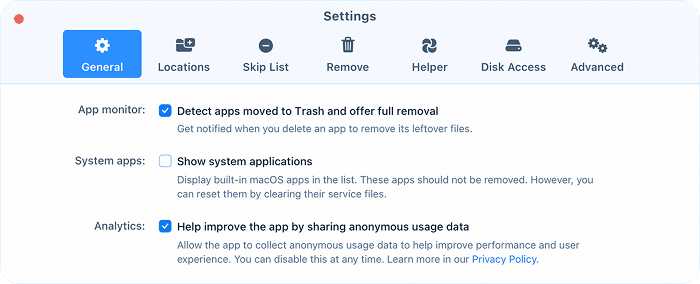
In the General tab of the Settings, you can customize how the application monitors your system and manages your software list.
- Detect apps moved to Trash and offer full removal: Enable this option to receive an automatic notification whenever you delete an application by dragging it to the Trash. The app will then offer to find and remove all associated leftover service files simultaneously.
- Show system applications: Use this toggle to display built-in macOS applications in your main list. While these core apps cannot be removed, enabling this allows you to reset them by clearing their specific service files if they are malfunctioning.
- Help improve the app by sharing anonymous usage data: By keeping this enabled, you allow the app to collect anonymous data to help improve overall performance and user experience. You can disable this at any time, and you can learn more about how your data is handled in the Privacy Policy.
When you enable the last option, no sensitive data is collected, and no identity information is shared with Nektony or any third party. Your privacy is important to us, and we collect only the following information to improve the user experience:
- the type of OS of the user’s device (subject to receipt of the separate user’s consent);
- the user’s device identifier;
- the user’s license check for administration purposes;
- the information about crash logs and other issues;
- a list of programs and applications installed on the user’s device;
- the periods in which the user uses App Cleaner & Uninstaller;
- the events within App Cleaner & Uninstaller recorded with analytics;
- start date of the trial version of App Cleaner & Uninstaller;
- the user’s evaluation of the trial version of the app, and the user’s way of using App Cleaner & Uninstaller.
Locations tab
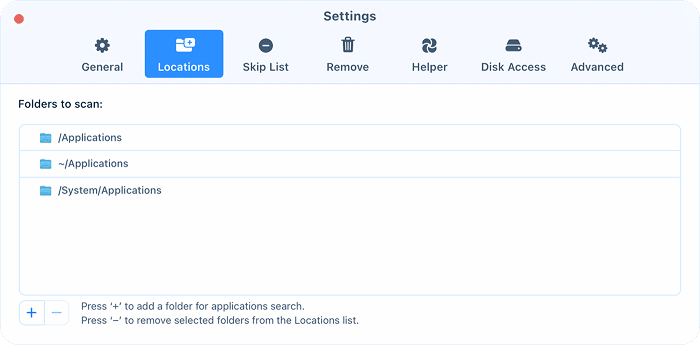
In the Locations tab, you can manage the specific areas of your Mac that the app scans for applications. By default, the app searches the standard /Applications, ~/Applications, and /System/Applications directories.
If you store software in non-standard locations, you can manually update the list to ensure no application is missed:
- Click the “+” button at the bottom to add a new folder to the application search path.
- Select a path and click the “–” button to exclude it from the Locations list.
Skip List tab
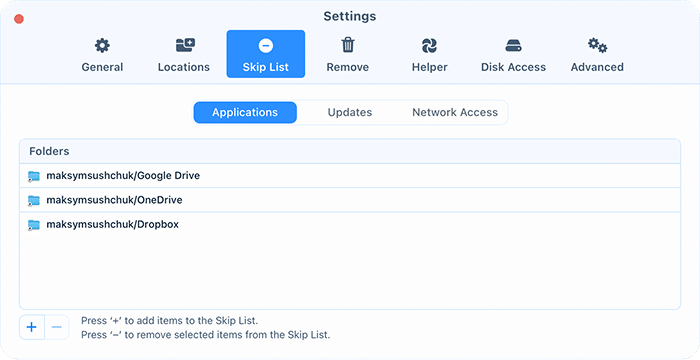
You can protect specific applications from being scanned or modified, updates from being applied, and network access from being changed. Simply navigate to the Skip List tab and click the Plus (+) button to define the apps, updates, or network access preferences you want App Cleaner & Uninstaller to be skipped.
Remove tab
In the Remove tab of the Settings, you can configure how the application handles file deletion and post-cleanup notifications.
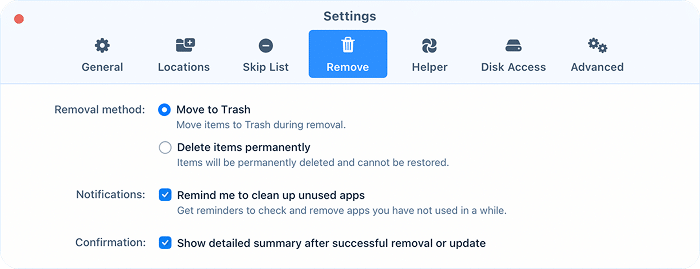
- Move to Trash: This is the default setting. Items are moved to the Trash during removal, allowing you to restore them if needed.
- Delete items permanently: Select this option to bypass the Trash. Items will be permanently deleted and cannot be restored once removed.
- Remind me to clean up unused apps: Enable this to receive helpful reminders to check for and remove applications that you haven’t opened in a while.
- Show detailed summary after successful removal or update: When this is checked, the app will provide a comprehensive report of all items cleared or updated once the process is complete.
Helper tab
In the Helper tab, you can enable a convenient menu bar agent to manage your system health without opening the full application window.
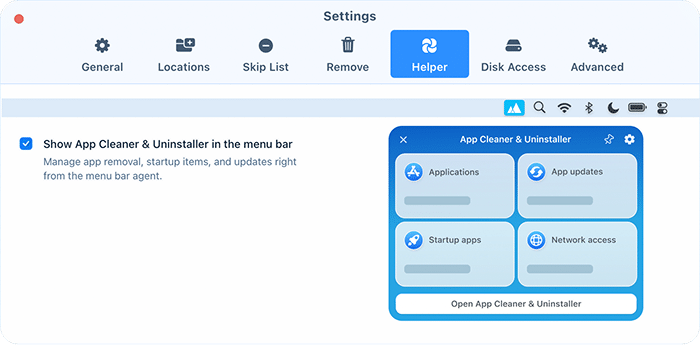
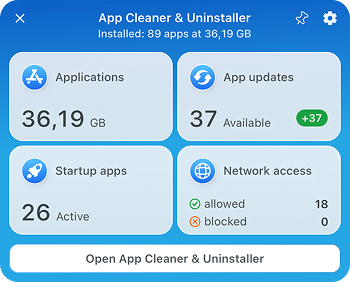
Toggling this checkbox adds a small icon to your macOS menu bar for instant access to core features. The menu bar agent was redesigned in version 10 and now reports on four areas at a glance:
- Applications – how much disk space your installed apps take up in total.
- App updates – how many updates are waiting to be installed.
- Startup apps – how many items are set to launch with your Mac.
- Network access – how many apps are allowed online and how many you have blocked.
Disk Access tab
In the Disk Access tab of the app’s Settings, you can see whether you have already provided the necessary access.
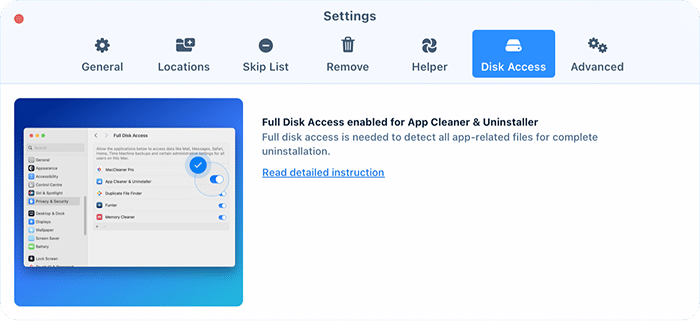
For security reasons, macOS requires that you manually grant apps permission to access your private data. Since App Cleaner & Uninstaller scans your entire hard drive to locate service files, manage extensions, and restore items from the Trash, it requires Full Disk Access to function correctly.
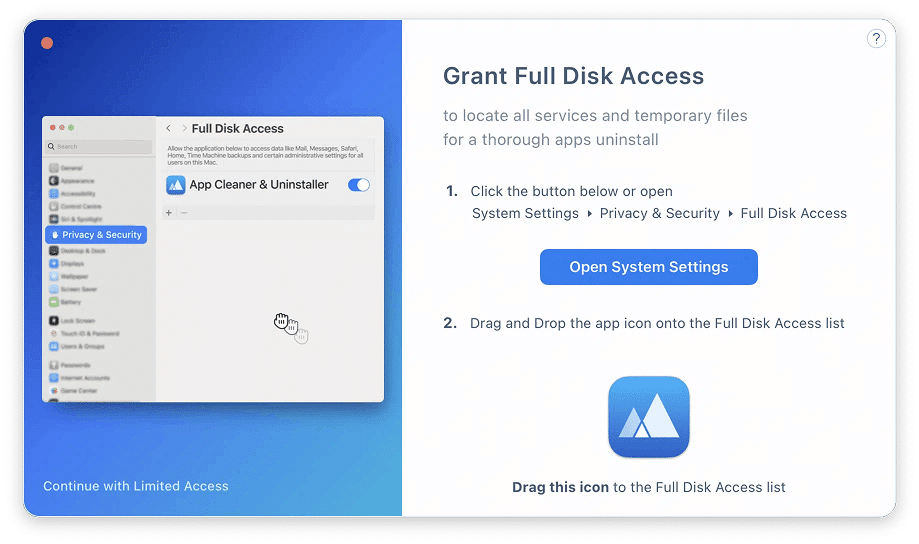
Initial setup:
- Click the Open System Settings button in the app’s prompt to automatically open the Full Disk Access section of your macOS settings.
- Locate App Cleaner & Uninstaller in the list and switch the toggle to ON.
Manual method:
If you need to grant access manually:
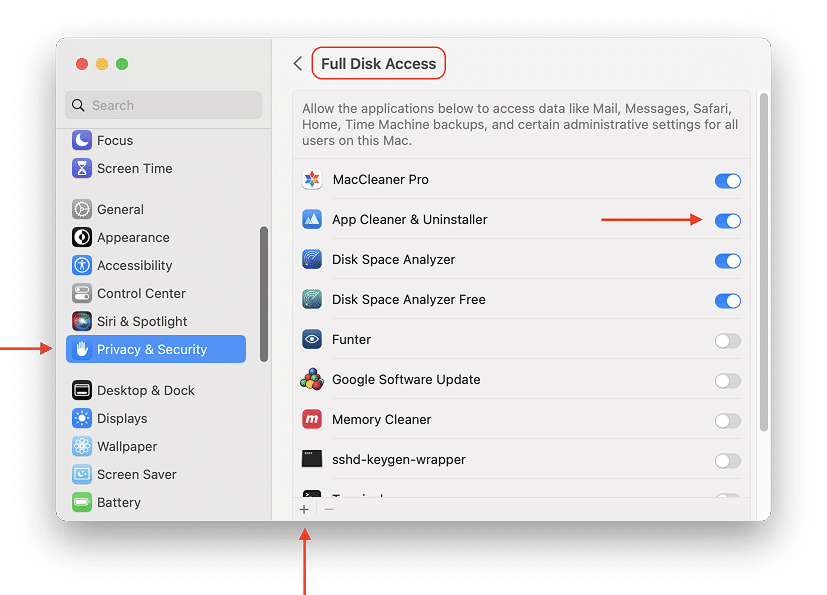
- Open System Settings and go to Privacy & Security → Full Disk Access.
- Switch the toggle for App Cleaner & Uninstaller to ON.
- If the app is missing from the list, click the plus (+) icon and select it from your Applications folder.
- Relaunch the app to enable all features.
Advanced
In the Advanced tab, you can customize the application’s intelligent detection features and overall look to better suit your preferences.
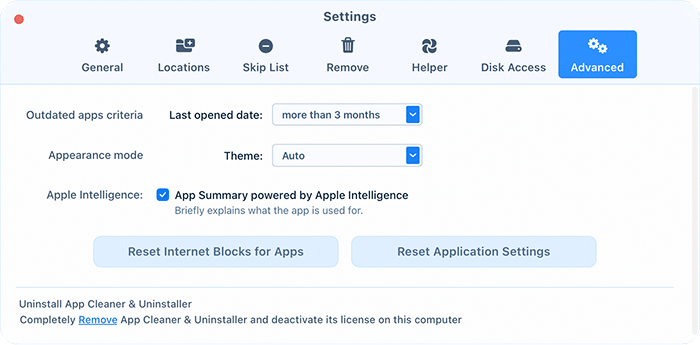
- Outdated apps criteria: set the “last opened” period after which an application is flagged as outdated in your scan results.
- Appearance mode: Manually toggle between Light or Dark themes, or select Auto to have the app automatically match your macOS system appearance.
- Apple Intelligence: Enable the “App Summary powered by Apple Intelligence” to receive brief, AI-generated explanations of what specific applications on your Mac do.
- Reset Internet Blocks for Apps: Lift every internet block you have set in the Network Access section, in one click.
- Reset Application Settings: Use this button to instantly restore all App Cleaner & Uninstaller preferences to their original factory defaults.
Removal history
If you have uninstalled an application by mistake, you can easily restore your data.
To recover your files, follow these steps:
- Open the App Cleaner & Uninstaller and navigate to Menu → File → Removal History.

- Browse the Removal History window to find the apps or service files you wish to recover.
- Select the desired items and click the Restore button.
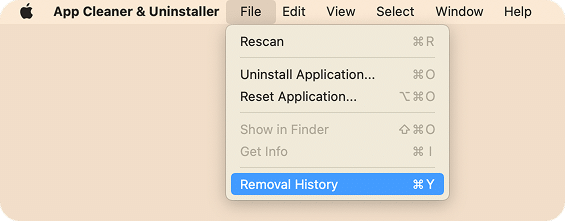
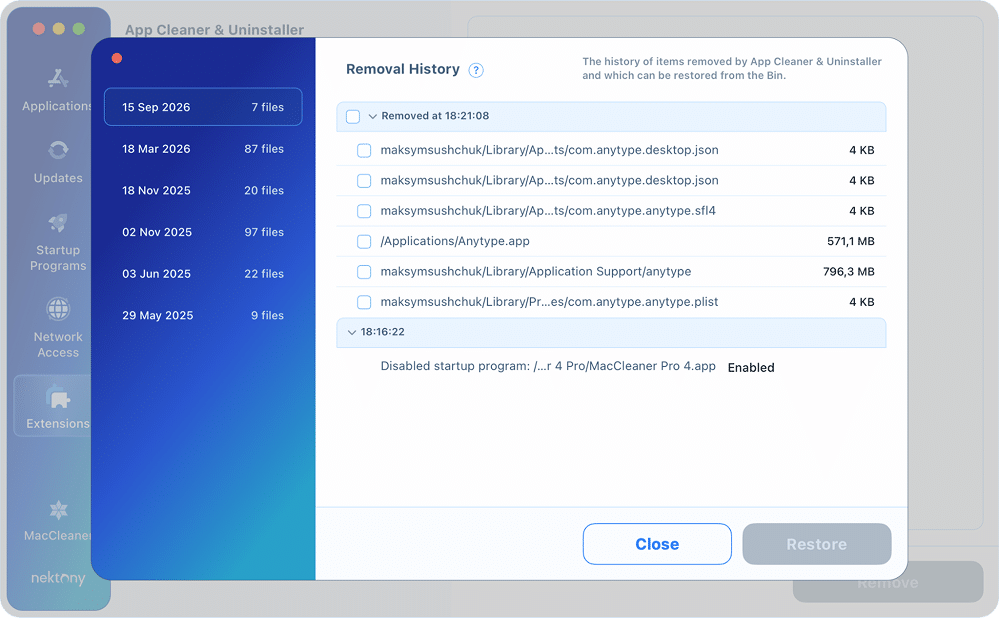
Once confirmed, your files will be moved out of the Trash and returned exactly to their original folders.
Language
App Cleaner & Uninstaller is designed to be accessible globally and currently supports the following languages:
- English
- German
- French
- Spanish
- Italian
- Ukrainian
- Russian
- Japanese
- Chinese (Traditional and Simplified).
How to change the language
By default, the application matches the preferred language set in your macOS system settings. However, you can set a specific language without changing your entire system language by following these steps:
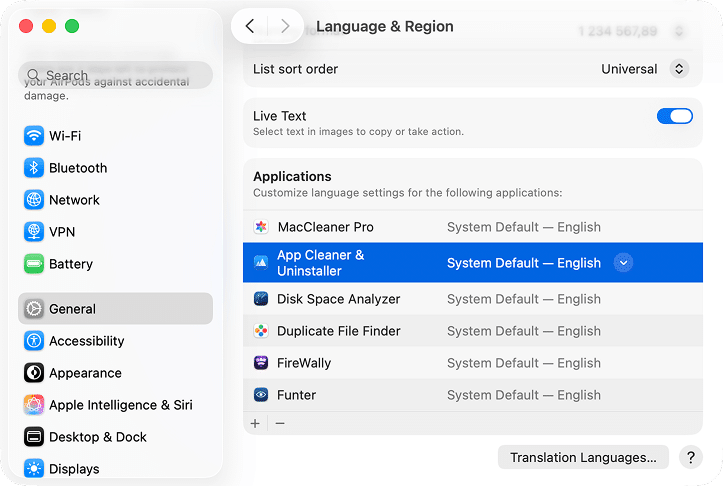
- Open System Settings and navigate to General → Language & Region.
- Scroll down to the Applications section at the bottom of the window.
- Click the plus (+) button and select App Cleaner & Uninstaller from the list.
- Choose your preferred language from the dropdown menu and click Add.
- Restart App Cleaner & Uninstaller for the changes to take effect.
Shortcut Commands
App Cleaner & Uninstaller provides a variety of keyboard shortcuts to help you navigate the interface and manage your files more efficiently.
Processing Apps and Service Files
| Cmd+R | Rescan apps and service files |
| Cmd+O | Choose and remove a specific app from Finder |
| Cmd+Opt+O | Choose an app to delete its service files (reset an app to the initial launch state) |
| Cmd+Shift+O | Show the selected app in the Finder window |
| Cmd+I | Show information about the selected app |
View Modes
| Cmd+0 | Go to the Overview section |
| Cmd+1 | Go into the Applications section |
| Cmd+2 | Go into the Updates section |
| Cmd+3 | Go into the Startup Programs section |
| Cmd+4 | Go into the Network Access section |
| Cmd+5 | Go into the Extensions section |
| Cmd+6 | Go into the “MacCleaner” section |
| Cmd+7 | Go into the “Open with” section |
| Tab | Switch from one tab column to another from left to right |
| Shift+Cmd+1 | Enable/disable Expert Mode |
Selections
| Cmd+A | Select all elements to delete |
| Cmd+Shift+A | Select service files for apps selected by the filter |
| Cmd+D | Deselect marks from all previously selected elements |
| Enter | Check/uncheck the checkbox for the selected item |
Search
| Cmd+F | Go to the Search field |
| Esc | Clear the search query and exit the search field |
Additional Options
| Cmd+Y | Open the Removal History tab |
| Cmd+. | Open HelpDesk |
| Cmd+, | Open Settings |
Upgrade to Pro
App Cleaner & Uninstaller offers a free trial that includes access to all premium features. Once the trial expires, an upgrade to the Pro version is required to continue using all features.
| Options | Free | Pro |
|---|---|---|
| View all installed apps and their sizes | ||
| View detailed app service files (caches, logs, etc.) | ||
| View all extensions and plug-ins | ||
| View remaining files | ||
| View app permissions | ||
| View available updates for installed apps | ||
| View AI app information | ||
| Uninstall apps completely in one click | – | |
| Delete remaining files | – | |
| Clear app caches and other service files | – | |
| Reset apps to their original state | – | |
| Manage and remove startup items and launch agents | – | |
| Manage and delete extensions | – | |
| Bulk update apps to the latest versions | – | |
| Restore accidentally deleted apps from history | – | |
| Premium technical support | – | |
| View which apps use the internet and how much traffic they move | ||
| Block internet access for an app |
How to Upgrade to Pro
Follow these steps to unlock the full version of the application:
- Launch the app.
- Click the green Unlock Full Version button located at the top of the window.

- In the pop-up window, click Go to Purchase to open the official purchasing page in your browser.

- Select your license type and payment method. Ensure your email address is correct, as your unique license key will be sent there.
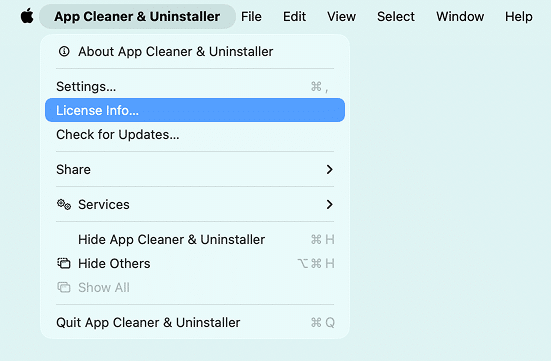
- Once you receive your license key via email (check your Spam folder if it doesn’t appear), open the app and go to the Menu Bar → App Cleaner & Uninstaller → License Info…. Alternatively, click the green Unlock Full Version button again and click Enter License Key.
- Enter your key into the field and click Activate.

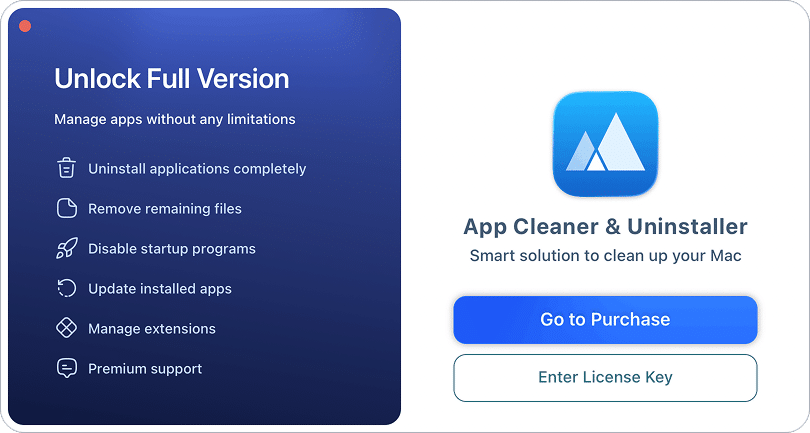
Once successfully upgraded, the green “Unlock” button will disappear, indicating that you have full, unrestricted access to all features.
Uninstall App Cleaner & Uninstaller
If you need to remove App Cleaner & Uninstaller from your Mac, the process depends on which version you are using. To ensure a clean removal and license deactivation, follow the appropriate steps below:
For the Current Version
The easiest way to remove the application is to use its built-in self-uninstallation tool:
- Go to the app’s menu, select Settings, and switch to the Advanced tab.
- Scroll to the bottom of the Advanced tab.
- Click the Remove button.
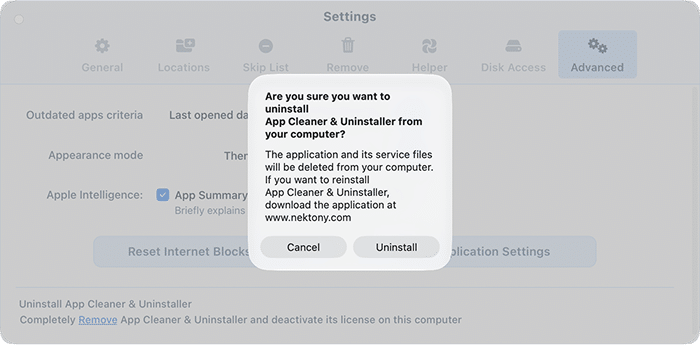
This action will completely uninstall the app from your Mac and automatically deactivate your license.
License Key
App Cleaner & Uninstaller provides a two-day free trial with unlimited access to all features. After this period, Pro features will be locked. To enjoy the full version without restrictions, click the Unlock Full Version button at the top of the window.
How to activate your license
After purchasing, your license key will be sent to your email address (please check your Spam folder if it does not appear in your inbox).
To activate the app:
- Launch App Cleaner & Uninstaller.
- Go to the Menu Bar, click App Cleaner & Uninstaller, and select License info….

- Copy and paste your unique key into the designated field.
- Click the Activate button.

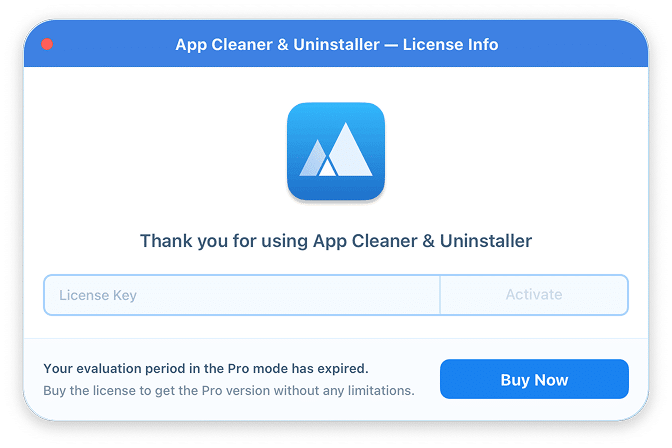
Your license will be activated immediately, removing all feature restrictions.
Lost Your Key?
If you lose your activation key, please contact our support team and provide the email address used for the purchase. We will verify your information and resend your key.
Video Guides





Troubleshooting
How-to Guides


