Help
![]()
Duplicate File Finder
Overview
Duplicate File Finder is an application to find and remove duplicates on your Mac. It also allows you to organize files, merge folders, compare files for duplicates, and find similar pictures and music files.
When you launch the application, you will see the first dialog window that invites you to choose a folder you want to scan. From the sidebar, you can switch between different options to work with duplicate files:
- Find duplicates – the application will scan the chosen folders and disk and find duplicates of all types of files, duplicate folders, similar media files, and similar folders.
- Merge folders – here, you can choose two folders to merge and organize your files.
- Compare folders – compare two folders to check whether they are duplicates or not.
- Compare files – compare two files to see if they are 100% identical.

Here is how to use Duplicate File Finder:
- In the Find duplicates option, choose the folders you want to scan.
- Click the Find Duplicates button.
- See the results and select all unneeded duplicates.
- Click the Review to Remove button and confirm the action.

Now let’s see in more detail how to find and remove duplicate files and folders from your Mac:
How to find duplicate files
Step 1. Choose a folder and start scanning
When you launch the application, you will see the first dialog window showing the “Find duplicates” option and inviting you to choose the folders you want to scan. You can scan your Home folder or сhoose individual folders. Note that you can even add an external disk for scanning. Duplicate File Finder supports both external and internal volumes.
You can add several folders or drives at once — drag them in or click the + button. Each one now appears as a full-size tile, and the number of folders queued for scanning is always shown above the list, which scrolls sideways when you add many.
By default, the app scans for all duplicates and similar media — the scan screen shows “Scanning for: all duplicates, similar media.” To change what the scan looks for, click Customize… to open the What to find window (the same options are described in the What to Find settings tab below).

Step 2. Get the results
When duplicate scanning starts, an animated chart is displayed to reflect search results. The entire search process time depends on the volume’s size.
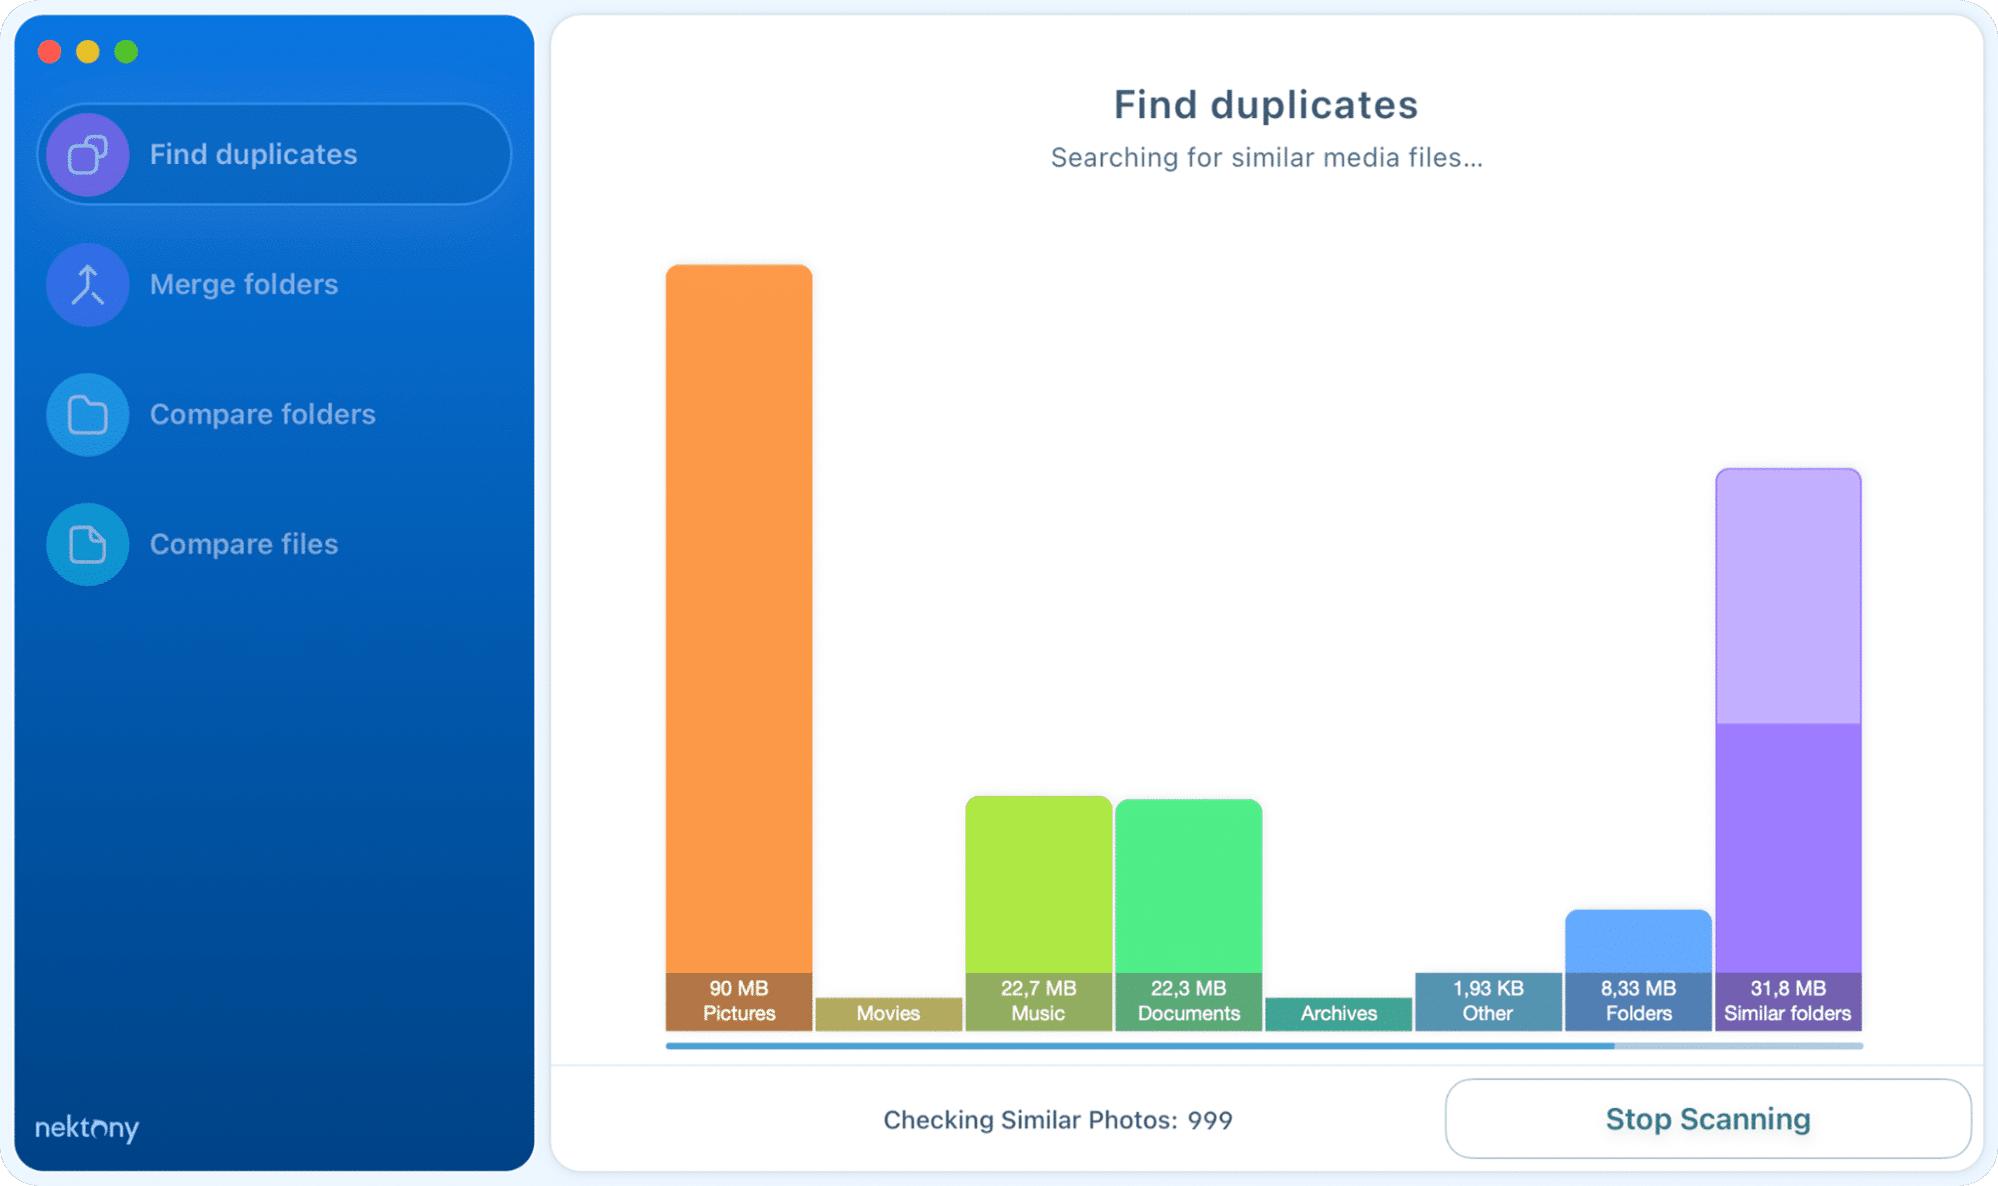
Step 3. Select duplicates
At the top of the window, you will see different tabs, allowing you to switch between the following categories of items:
- All duplicates (with a drop-down menu allowing you to see separately duplicate pictures, music, movies, documents, and archives).
- Duplicate folders.
- Similar photos.
- Similar audio.
- Similar folders
Preview the files and select those you want to remove. If you have thousands of duplicates and need a quick way to select all duplicates, use the Smart Select button. It will select all duplicates and keep only one copy in each group of duplicates on your Mac.

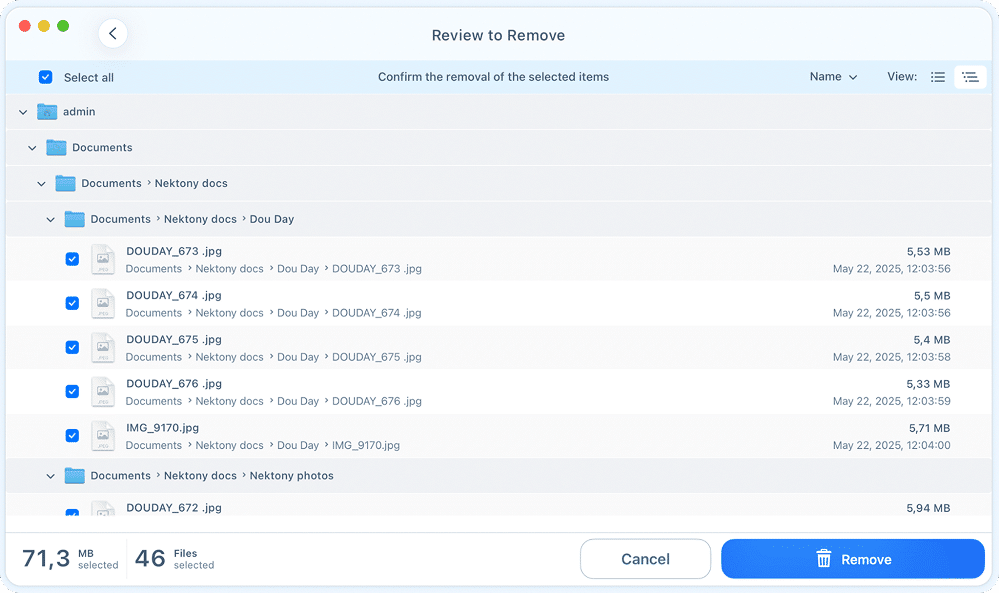
Step 4. Remove duplicates
The last step is to delete duplicates by clicking the Review to Remove button. You will see the list of all selected duplicates. Preview them and confirm by clicking on Remove. If you want to keep some of the files, just uncheck the checkboxes by the names of the files and they will not be deleted.
Duplicate Pictures
If you want to find only duplicate pictures, use the appropriate option in the sidebar.
- Add the folders you want to scan — you can even add your Photos libraries.
- Click Customize…, then under Duplicate files set File types to Pictures and video.
- Click Done, then click Find duplicates.

- Select unneeded duplicate photos.
- Switch to the Similar photos tab and select similar pictures.
- Click to remove them and confirm.


Duplicate Music
If you want to find your duplicate music files, use the appropriate option in the sidebar.
- Choose the folders you want to scan.
- Click Customize…, then under Duplicate files set File types to Music.
- Click Done, then click Find duplicates.

- Select unneeded duplicate or similar audio files.
- Click to remove them and confirm.


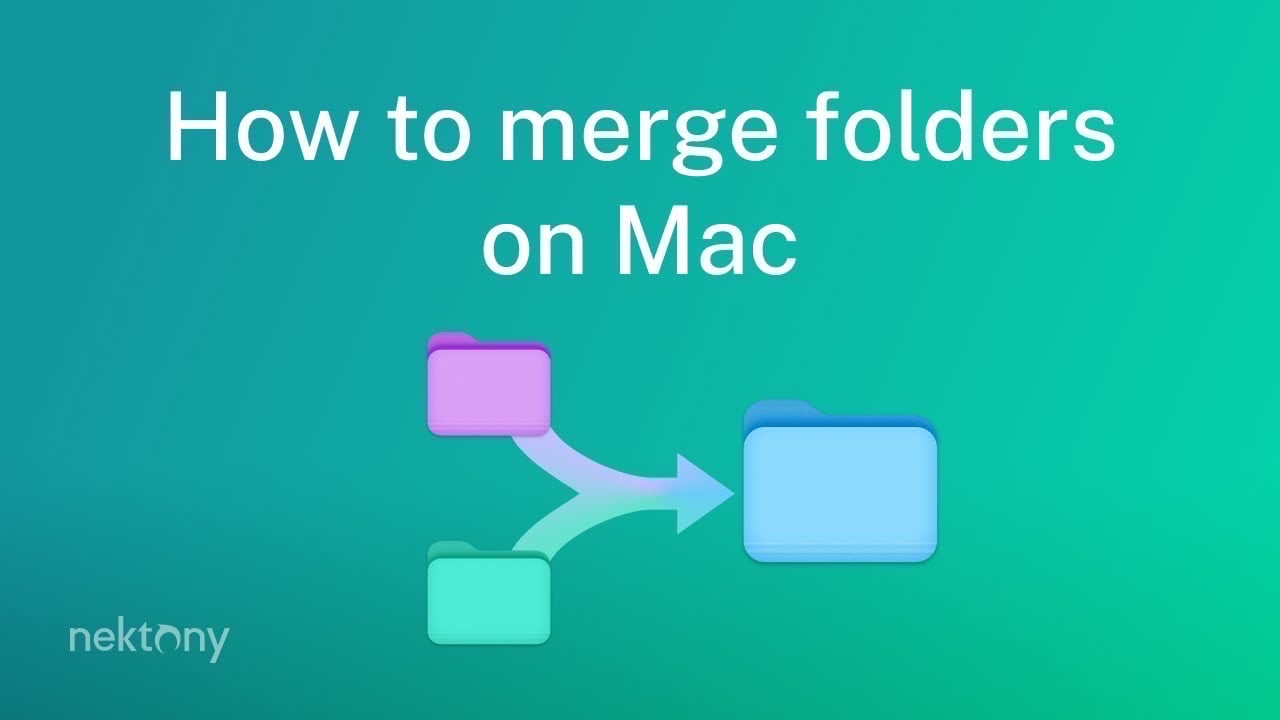
Merge Folders
Duplicate File Finder offers two distinct ways to merge folders on your Mac:
- Merge any two folders: This tool allows you to select any two folders on your Mac and merge them into one, regardless of whether they contain duplicate files.
- Merge similar folders: Use this option to consolidate folders identified by the app during a duplicate scan as containing identical or similar content.
Please note that the steps for these two methods differ slightly.
Option 1 – Merge any two folders
If you want to merge two specific folders on your Mac without first running a full duplicate scan, follow these steps:
- Switch to the Merge folders option in the sidebar.
- Select the folders you wish to merge. You can also simply drag and drop the folders directly into the application window.
- Click the Review button to proceed.
- Choose a destination folder - this is where the content from the source folder will be moved. Alternatively, you can create and select a new, empty folder to house the combined contents.
- Confirm the action by clicking the Merge button in the next window.


Option 2 – Merge similar folders
Similar folders are those that contain both duplicate and unique files. To consolidate these folders, follow these steps:
- Select and scan your folders or disks using the “Find duplicates” option in the sidebar.
- Once the scan is complete, navigate to the Similar Folders tab in the results panel.
- Select the specific folders you wish to combine and click the Merge Folders button at the bottom.

- Select the Source and Destination folders to determine where the content will be moved or copied.
- Click Review to Merge and confirm the action.


Option 3 – Merge multiple folders
If you want to merge multiple scanned folders, follow these steps:
- Launch the application, add the folders or drives you wish to check, and click Find duplicates.
- Once the scanning is complete, click Merge multiple folders in the left panel.

- In the left column, check the box next to each folder you want to move or merge.
- Select your preferred destination folder in the right panel. This is where the contents of your source folders will be consolidated.
- Click the Review to Merge button.
- Review the folder structure one last time and click to confirm the merge.


- The application copies non-duplicate files and duplicates with different names from a source folder to a destination folder during merging.
- If duplicates have the same name in both the source and destination folders, they are not copied.
- If files with the same name are not duplicates, all files are kept in the destination folder, and the files from the source folder are renamed by adding a numerical suffix.
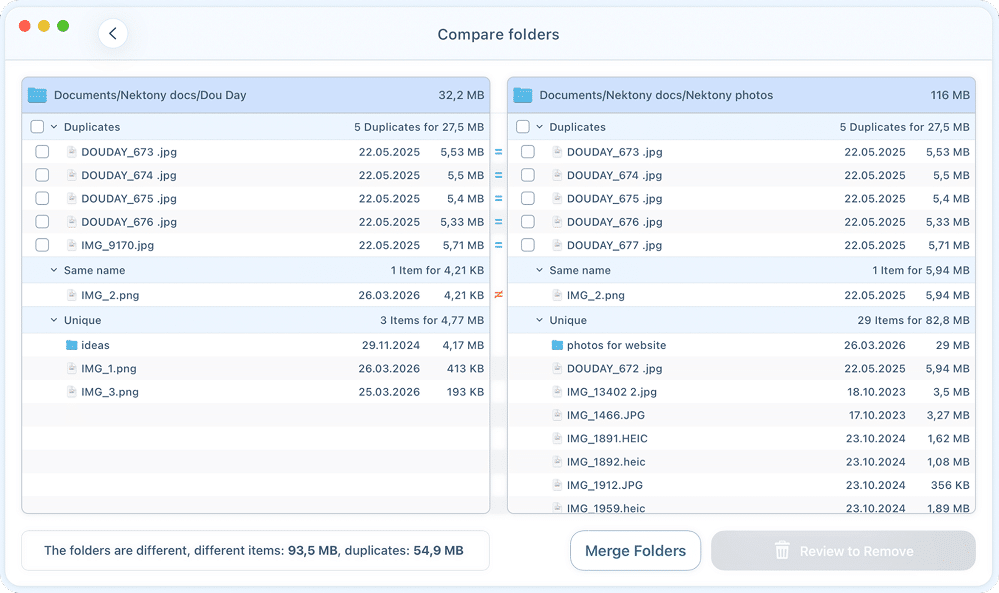
Compare folders
With Duplicate File Finder, you can compare two specific folders and find which duplicate files they have. Here’s how to compare two folders on Mac for duplicate content:
- Launch Duplicate File Finder.
- Select Compare folders from the sidebar.
- Drag and drop the two folders you wish to compare into the designated sections of the application window.
- Click Compare Folders.
- In a moment, you will see the results showing the duplicate files both folders have and the unique files. The duplicate items are marked with an equal sign and grouped in the list named Duplicates.
- If you want to delete duplicates from one of these folders, simply select those duplicate files and click Review to Remove. Then confirm the deletion.
- You can also merge the content of these two folders. For this, click the Merge Folders button at the bottom.
- Choose your preferred merge option, specifying the destination folder where you want the files moved.
- Click Review to Merge and confirm the action.


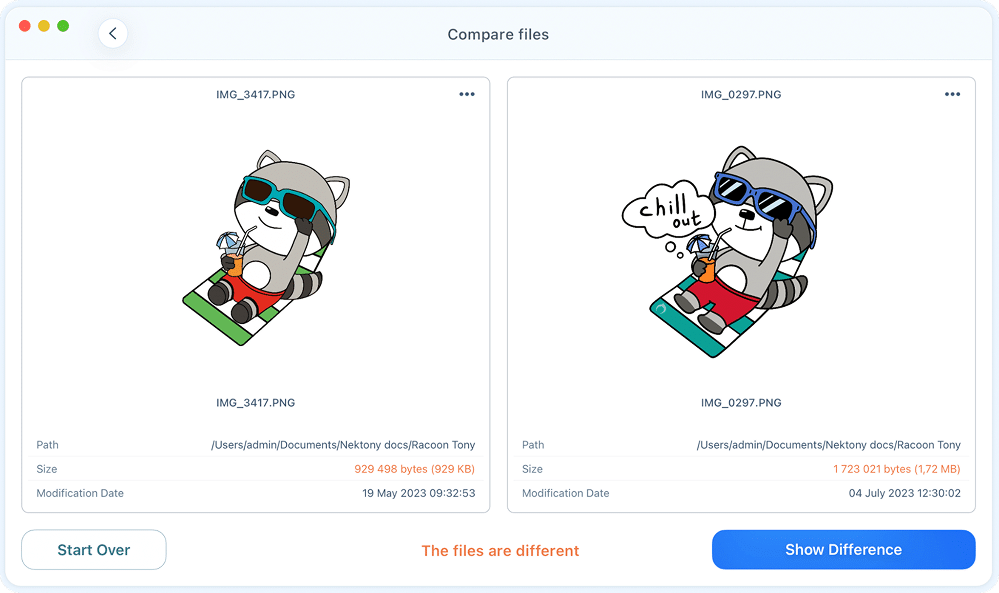
Compare files
Duplicate File Finder accurately compares the files and detects whether they are duplicates or not. If you are not sure about the results or just want to compare two specific files to see whether they are duplicates or not, you can use the Compare files feature.
Here’s how to compare two files on Mac:
- Go to the Compare Files section from the sidebar.

- In the next window, you will see whether these files are different or duplicates. In the example, you can see that the two files have different sizes, which means that they are different.

Settings
Duplicate File Finder can be finely-tuned for a quicker and more efficient duplicate search process by adjusting its settings or by using its helpful options.
To open Settings, use the Command(Cmd) + Comma sign (,) key shortcut or go to the Menu bar → select Duplicate File Finder → click Settings.
Here you will find the following tabs:
- What to Find
- Scan Options
- Skip List
- Smart Select
- Remove
- Merge
- Advanced
- Disk Access (site version only)
Let’s take a closer look at each section of the settings.
What to Find Tab

In the What to Find tab, you choose what the app looks for. Most of these options also appear in the What to find window you open with the Customize… button on the scan screen:
- Duplicate files – exact duplicates among documents, photos, audio, and other files. Use File types to limit the search to All (default), Pictures and video, Music, or Specific extensions… (choose the last one to type your own list; click the × next to a previously entered extension to remove it).
- Duplicate folders – folders with identical contents. On by default, and available only when File types is set to All.
- Similar folders – folders that share most of the same files. Off by default; requires Duplicate folders to be enabled.
- Similar photos – look-alike and edited images. On by default. The Photo similarity slider sets how close images must be to match; the default position is Medium.
- Similar audio – the same track saved in different quality. On by default.
- Find hidden duplicate files and folders – also scans hidden folders for duplicates. Off by default.
Scan Options Tab

The Scan Options tab holds the more advanced scan settings:
- Set default scan folder – designate a folder that is selected automatically every time you launch the app.
- Scan mode – turn on Full-scale duplicate scan for a deeper, more accurate comparison, and Full-scale scan for similar photos to also match similar photos of different sizes. These deeper checks make scanning slower.
- Minimum file size – exclude files below a chosen size to speed up scanning and skip tiny, irrelevant files.
- Music – options for verifying detected duplicates in your Music app library (see Duplicates in the Music library).
Skip List Tab

In this section, you can manage specific files, folders, and extensions that you want the application to ignore during the scanning process. To customize your skip list, switch to one of the following categories in the sidebar:
- Folders
- Folder names
- Files
- File names
- File extensions
To add an item to any of these lists, simply click the Plus (+) button or drag and drop the items directly into the window. To remove an item from the list, select it and click the Minus (-) button.
Smart Select Tab
The Smart Select feature in Duplicate File Finder provides a powerful way to automatically select duplicate files for removal based on a set of customizable rules. This saves you significant time by eliminating the need to manually review and select every single file.
The Smart Select settings are organized into three main tabs:
- Always Select: This tab lets you specify folders in which all duplicate files are automatically selected when using the Smart Select button.

- Never Select: Use this tab to define folders where duplicates are protected from being automatically selected for deletion.
- Deep Select Rules: This tab offers a more advanced, granular level of control over the automatic selection process. This is ideal for users who need precise control over how duplicates are handled.


Remove Tab
By default, when you remove files with Duplicate File Finder, they are moved to the Trash. In this tab, you can modify this behavior or choose to delete files permanently.
- Move to Trash: Selected files and folders are moved to your system’s Trash. This allows you to recover them later if you change your mind.
- Delete without moving to Trash: Selected items are deleted permanently. Use this with caution, as you will not be able to restore these files easily.
- Move to folder: Moves selected duplicates to a specific directory of your choice. You’ll need to set the destination folder. This is a great way to “quarantine” files before final deletion.
- Allow removing the last item in a duplicate or similar group: > ⚠️ Warning: Enabling this allows the app to remove the final remaining copy of a file (the “original”). Only use this if you intend to wipe all versions of a specific file from your drive.
- Remove empty folders: Automatically deletes folders that become empty after their duplicate contents are removed. This helps keep your file system clean.
- Log removed duplicates: Keeps a history of deleted items.
- Show the confirmation window after successful removal: Displays a summary window once the cleanup process is complete.

Merge Tab
Besides finding and deleting duplicates, the application allows you to merge the scanned folders. In the Merge tab of Settings, you can decide whether to keep or not keep source folders after merging the content.
Also, you can set the Finder color tag to merged files.

Advanced Tab
The Advanced tab provides additional preferences:
- Save results: when enabled, the app saves your last scan results and restores them the next time you launch it.
- Display options: control on-screen behavior — showing the Overview tab after a scan, file name in path, a confirmation when you use Smart Select, and reminders to clean up duplicates regularly.
- Analytics: (site version only) opt in to anonymous usage analytics. No sensitive or identifying data is shared with Nektony or any third party.
- Display date: choose whether the results show the file creation date or the file modification date.
- Appearance: set the visual theme — Light, Dark, or Auto (which follows your macOS setting).
- Reset Application Settings: revert all preferences and settings to their factory defaults.

If you downloaded Duplicate File Finder from our website, in its Settings window → Advance tab you can see the option “Enable Analytics”. When marking this checkbox, no sensitive data is collected, and no identity information is shared with Nektony and any third party. Your privacy is important to us and we collect only the following information to improve the user experience:
- type of OS of the user’s device (subject to receipt of the separate user’s consent);
- the user’s device identifier;
- the user’s license check for administration purposes;
- the information about crash logs and other issues;
- the periods in which the user uses Duplicate File Finder;
- the events within Duplicate File Finder recorded with analytics;
- start date of the trial version of Duplicate File Finder, the user’s evaluation of the trial version of the app, and how the user’s way of the Duplicate File Finder use.
Disk Access
The Disk Access tab allows you to check and grant Full Disk Access to Duplicate File Finder. This is a crucial step because the application requires this permission to successfully scan all folders on your Mac and to remove the duplicate files you select.

If you have not yet granted this permission, you will see an Open System Settings button. Simply click this button to be directed to your System Settings → Privacy & Security section. From there, you can easily grant Full Disk Access to the application.

Alternatively, you can enable disk access for the app directly from Mac System Settings:
- Open System Settings from your Apple menu.
- Go to the Privacy & Security section and select Full Disk Access.
- Find Duplicate File Finder in the list and switch the toggle ON.
- If you don’t see the app in the list, click the plus (+) icon and add Duplicate File Finder from your Applications folder.

Uninstall Duplicate File Finder
Follow these steps to manually uninstall the app:
- Quit Duplicate File Finder.
- Go to the Applications folder → remove Duplicate File Finder to Trash.
- In the Finder’s menu bar, click Go → Go to Folder → in the window that appears, type ~/Library, and hit Enter.
- Within the Library folder, find and remove Duplicate File Finder service files.
If you downloaded the free version of the app from the App Store, find and remove the following files:
- ~/Library/Application Scripts/com.nektony.Duplicates-Finder
- ~/Library/Containers/com.nektony.Duplicates-Finder
If you purchased the PRO version of the app directly on the App Store, find and remove these files:
- ~/Library/Application Scripts/com.nektony.Duplicates-Expert
- ~/Library/Containers/com.nektony.Duplicates-Expert
If you downloaded the app from the site, find and remove these files:
- ~/Library/Application Scripts/com.nektony.Duplicate-File-Finder-SIII
- ~/Library/Application Support/com.nektony.Duplicate-File-Finder-SIII
- ~/Library/Caches/com.nektony.Duplicate-File-Finder-SIII
- ~/Library/Preferences/com.nektony.Duplicate-File-Finder-SIII.plist
Once you have removed all service files, empty your Trash bin to completely uninstall Duplicate File Finder.
Statistics window
If you want to see the statistics of types of duplicate files, in the menu bar, click View and select Overview.

You will see a window showing the total size and breakdown of the duplicate files found on your Mac. You can choose to preview the details in either a bar chart or a pie chart.
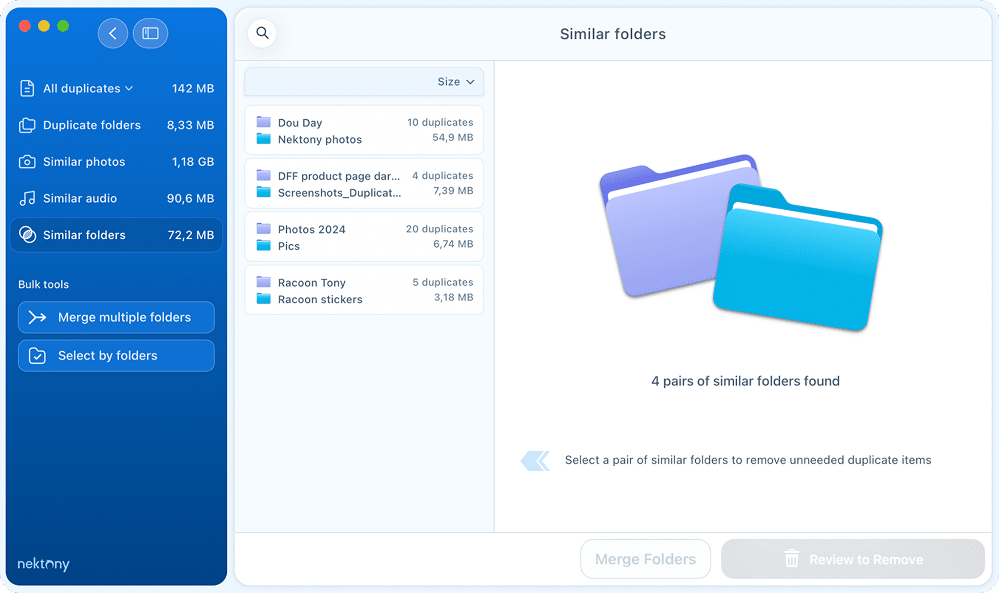
Similar Folders
Duplicate File Finder goes beyond just finding identical files; it also identifies Similar Folders.
A folder is classified as “Similar” when it is nearly identical to another but contains a mix of both duplicate and unique files. These folders are presented in a side-by-side view, allowing you to quickly compare their contents and decide which versions are redundant.
Understanding the difference
Imagine you have two folders on your Mac that contain mostly the same data, but one folder has a few extra files that the other does not. Since the overall contents are not 100% identical, these are not “Duplicate Folders,” but they are Similar.
Imagine you have several folders on your Mac or drive that contain identical and unique files. In this case, these folders are not duplicates, as they keep different data. The folders on the screenshots below keep two duplicate files and one unique file. In the Duplicate File Finder program such folders are called similar folders.
Similar Folders

How to clean up similar folders
- Select your target folders or disks and scan them for duplicate files.
- Once the scan is complete, switch to the Similar Folders tab in the sidebar.
- Select a group from the list to see the folders compared side-by-side.
Note: A single folder may have multiple similar folders identified across different locations.
- In the right panel, you will see a visual representation of duplicates in two folders. The intersection of the two folders shows how many duplicates they have, while the other parts of the folders represent unique files.
- Below the visual chart, you will see a detailed list of Copies (duplicates) and Unique Files (non-repetitive).
Please note that the app prevents the removal of unique files, so you don’t have to worry about unintentionally removing files you need to keep. You can select only identical files for removal.
If one folder is displayed entirely inside another in the chart, it means that almost all its files are duplicates found within the larger folder.
- Once you have decided which folder should be cleaned, tick the checkboxes for the duplicates inside that specific folder.
- Click Review to Remove in the bottom-right corner.
- After clicking Review, do a final check of the items marked for deletion. If everything looks correct, click the Remove button to complete the process.


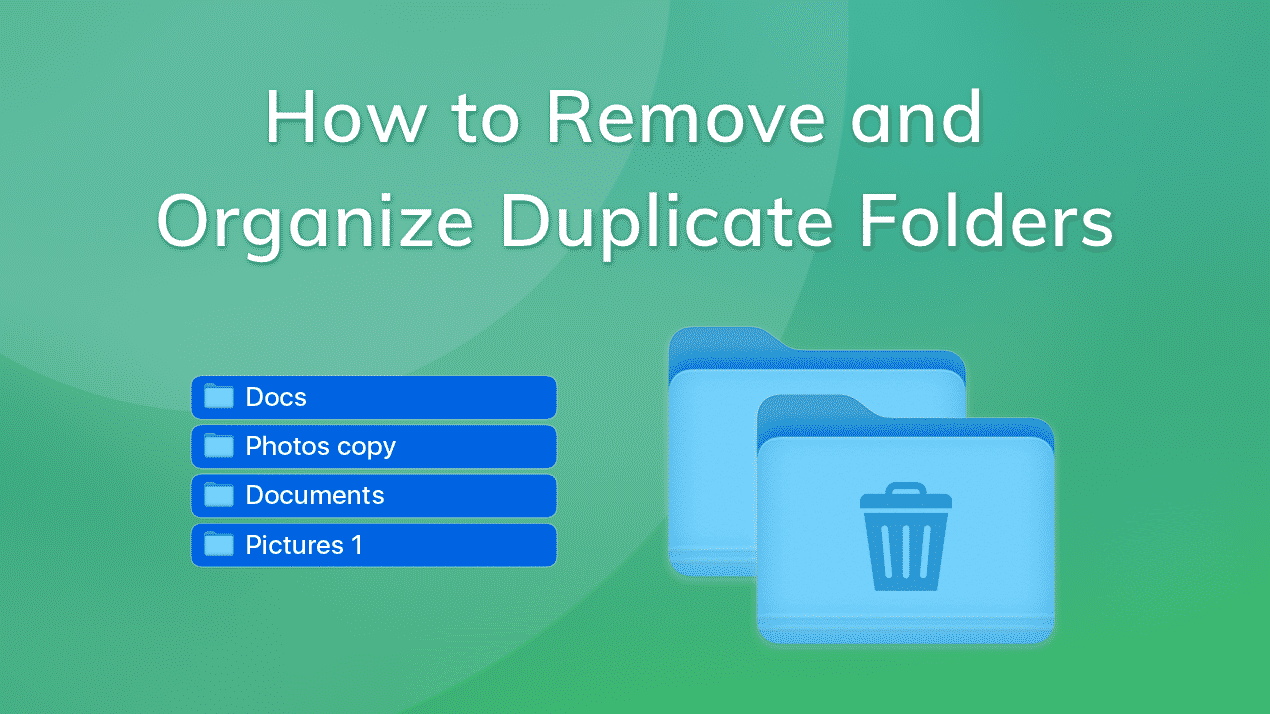
Duplicate Folders
Duplicate folders are folders that have identical content and keep the same duplicate files. Note that these duplicate files can have different names.
Take a look at the screenshots below. These folders contain duplicate files and no other data, so they are duplicate folders.

Before checking your Mac or any disk for duplicate folders, check if this option is turned on in the app’s settings.
- Open Settings in Duplicate File Finder.
- In the What to Find tab, make sure Duplicate folders is enabled (File types must be set to All). You can also make sure this toggle is on via the Customize button on the main screen of the app.
- Scan your data for duplicate folders.

The application will show duplicate folders in the appropriate tab of its window. Here, you can select all duplicate folders and remove them.

Please note:
- Files inside duplicate folders are not displayed in the Duplicate Files section. So, when you remove duplicate folders, nothing changes in the Duplicate Files section.
- Duplicate folders can contain other duplicate folders inside them. The application shows the folders of the top level of the directory only. It doesn’t display the inside duplicate folders.
Similar Media
Apart from finding absolutely identical photos and music by size and binary data, Duplicate File Finder also finds and displays similar photos and audio files.
If you like to take many pictures to get the best one, then you may have plenty of unnecessary similar photos. Here’s how to manage your similar photos, quickly sort them, organize them, and remove unwanted pics. The process of clearing unneeded similar audio files will be the same.
- Switch to the Similar photos section from the sidebar.
- Here, you will see photos grouped by similarity.
- Review each group of similar photos and select unneeded ones.
- You can also use the Smart Select feature to automatically keep one picture in each group and select all other files.
- Once you have selected all unwanted photos, click on Review to Remove and confirm their deletion.


In some cases, you may have similar photos on your Mac; however, the app will display them in the Duplicate Photos tab, not in the Similar Photos tab. The reason is that, in this case, similar photos are stored in duplicate folders as well. The application displays these folders in the appropriate tab. If the app allows you to remove similar photos, the structure of duplicate folders will be broken. That’s why the app displays these files only in the Duplicate Folders and Duplicate Files tabs.
Select by folders
If you have many duplicates, it might take a significant amount of time to review each file and select unneeded copies in a specific folder. That’s why Duplicate File Finder provides a special feature that will help you to complete this task much faster.
- Go to the Select by folders tab.
- You will see a new window with a list of your folders and detailed information about how many duplicate and unique files each of them has.
- Click on the folder, and you will see its content in the right-hand panel:
- Cross-folder duplicates: Files that exist both in the selected folder and elsewhere.
- In-folder duplicates: Multiple copies located within the same folder.
- Unique files: Files that have no duplicates (these are never selected for removal).


How to use bulk selection
- Check a folder: Selecting a folder’s checkbox will mark all duplicate files within that folder for removal.
- Deselect a folder: Unchecking it ensures that no files inside that folder are marked for deletion.
- Mark as favorite: Click the Star icon next to a folder to designate it as your priority location. When a folder is “Starred,” the app automatically keeps all files inside that folder and selects all their copies in other folders for removal.

To select all duplicates in a specific folder, just mark the appropriate checkbox near the folder’s name.
- If you don’t see checkboxes and star icons for selecting folders, this means that your scanned folders don’t have common duplicates. The same will be true if you scan only one folder, all the found duplicates are inside this folder, and this folder doesn’t have subfolders.
- When you remove duplicates in the “Select Duplicates in Folder” window, you can be assured that you will not remove all copies accidentally. At least one duplicate will be kept because the application makes it impossible to select all folders and duplicate copies.
Restore Removed Files
By default, the application moves all these files to the Trash when you remove duplicates with the application. If you accidentally removed some files and would like to restore them, follow the steps below.
- Go to the Menu Bar → Duplicate → select Restore Removed Duplicates or use the Command+Y shortcut. Also, you can just click the Show Removal History button in the removal window.

- Select the files you want to restore using the checkboxes for files and groups of files. Then click the Restore button.


- To be able to restore the duplicates, the option Log Removed Duplicates has to be enabled. You can check it in the Settings → Remove tab.
- If the duplicates are deleted from the Trash, you will not be able to restore them. It is only possible to restore files in the Trash folder or have duplicates in other folders. You can see next to each file name whether it is Restored, Restorable, or Not Restorable.
In case you want to clear the removal history, right-click on any item in the left panel and choose Clear All History in the context menu.

How to find the original files of the previously removed duplicates
Usually, we have a lot of duplicates in different folders. That is why it can be challenging to remember where the original file is located. Fortunately, the Duplicate File Finder application can show you the original data of the previously deleted duplicate.
To manage this, you should open the Duplicate File Finder’s removal history. You will see the list of all deleted files grouped by the date of removal. Select the necessary file in your list and click on the icon called “Show Original file in Finder”.

This option will open the Finder window with the path to where the original file was stored.
Shortcuts
There are a lot of quick navigational shortcuts in the app that make your duplicate cleanup process even faster and easier.
General Navigation
| Cmd+↓(↑) | navigate through duplicate groups |
| Enter | select the checkbox |
| Space | Quick Look preview of the selected file (press arrow down or up to switch to the next file preview). |
| Opt+↓(↑) | select the last (first) item in the current list. |
| Cmd+F | search in the search field |
| Esc | reset search results |
| Cmd+N | new scan |
| Cmd+Opt+O | open the Finder window to select the folders for scanning |
| Cmd+R | rescan the current folder |
| Cmd+O | switch to the Overview tab |
| Cmd+1 | switch to the Duplicate Files tab |
| Cmd+2 | switch to the Pictures section |
| Cmd+3 | switch to the Movies section |
| Cmd+4 | switch to the Music section |
| Cmd+5 | switch to the Documents section |
| Cmd+6 | switch to the Archives section |
| Cmd+7 | switch to the Others Files section |
| Cmd+8 | switch to the Duplicate Folders tab |
| Cmd+9 | switch to the Similar Folders tab |
| Cmd+P | switch to the Similar Media tab |
| Cmd+Opt+2 | Switch to the Similar Photos section |
| Cmd+Opt+4 | Switch to the Similar Audio section |
| Cmd+Opt+S | switch to Select Duplicates in the Folder tab |
| Cmd+Opt+M | switch to the Merge Folders tab |
| Cmd+↑ | switch to upper file group |
Similar Media tab
| →(←) | show the next or previous similar file of the list in the left section of the preview window |
| Opt+→(←) | show the next or previous similar file of the list in the right section of the preview window |
| Enter | select or deselect the similar file in the right section of the preview window |
| Opt+Enter | select or deselect the similar file in the left section of the preview window |
| Shift(⇑)+Enter | keep the file from the left section and select all other similar files for removal |
| Opt+Shift(⇑)+Enter | keep the file from the right section and select all other similar files for removal |
| Space | open the file from the left section of the preview window |
| Opt+Space | open the file from the right section of the preview window |
| Double click on the picture | open the picture or audio file |
Selecting the files
| ↵ | select (deselect) file or folder |
| 1…9 | select items for removal by a number |
| ↑+1…9 | select all items except one with a number |
| Cmd+A | select all duplicates |
| Cmd+E | select newest duplicates |
| Cmd+L | select oldest duplicates |
| Cmd+K | select any duplicates |
| Cmd+D | deselect all duplicates |
| Cmd+A+↑ | select the duplicates in the active group |
| Cmd+E+↑ | select newest duplicates in the active group |
| Cmd+L+↑ | select oldest copies for removal in the active group |
| Cmd+K+↑ | select any copies in the active group |
| Cmd+D+↑ | deselect duplicates in the active group |
| Cmd+S | show a list of selected duplicates |
| Cmd+T | select the smallest similar media files |
| Cmd+Shift+T | select the smallest similar media files in the active group |
| Opt+Enter | select similar photo in the green frame |
| Cmd+Enter | select a marked group* in the Duplicates Files, Duplicate Folders and Similar Media tabs |
| Enter | select a marked item of the group of duplicate files in the right section or select a similar photo in the blue frame |
*This shortcut works only when the option to remove all duplicate copies is enabled.
Other Shortcuts
| Cmd+O+↑ | reveal the file in the Finder |
| Cmd+I | show file information |
| Cmd+O | open the file |
| Space | preview the file |
| ↓ or ↑ | preview the next file from the list |
| Cmd+, | open Preferences window |
| Cmd+Y | open Removal History window |
| Cmd+W | close Preferences window |
| Cmd+M | minimize the application window |
| Cmd+F+^ | enter fullscreen mode |
| Cmd+/ | show the context hints |
Hide or skip specific duplicates
Sometimes you may find duplicates that you don’t want to delete. For example, they might be part of a specific project or stored in a backup folder. In such cases, you can hide these files from your results list using special commands without deleting them from your Mac.
- Remove Group from List (⌘−): This hides a selected group of duplicates from your current scan results. The files remain on your Mac, and they will appear again in your next scan.
- Add Group to Skip List (⌘.): This hides the entire group and adds all its files to the Skip List. Duplicate File Finder will ignore these files in all future scans. You can view and manage your Skip List at any time in the app’s Settings.

- Add Files to Skip List (⇧⌘.): This excludes specific selected files from the current and all future scans.
Note: You can view, edit, or remove items from your Skip List at any time in the app’s Settings.


The algorithm for searching for duplicates
Before checking files for identity by their data, the algorithm for finding duplicate files uses the main characteristic – the sizes of the files. This means that if two or more files have the same size, they are then compared by their data. The filename is not taken into account. Users often rename files, so identifying duplicates by name is not reliable. Furthermore, different files might often have the same name.
For example, If there are two identical files with img.png and myphoto.PNG, they will be displayed as duplicates. However, if two files differ from each other in size – even by one byte – they will not be displayed in the application.

With the app, you can find duplicate files in several folders or even hard disks per single session.
Video Guides

Removing and moving files
Sometimes you may get a message that the app cannot remove duplicate files or the folders cannot be merged. There are several reasons for this:
- You are trying to remove files from an external drive which is mounted as Read Only. For example, you mount NTFS external disk and don’t have a special driver to make the disk writable on Mac. You should, therefore, install the necessary extension to allow the removal of the duplicates.
- You are trying to remove files from the external volume that does not have the Trash folder as yet. By default, Duplicate File Finder moves files to the Trash. If no Trash folder has been created, the app does not have enough permission to remove a file. You should switch to the Finder window and from there remove any unneeded file on that external drive/volume. The Trash for external volume will then be created, after which Duplicate File Finder can remove identical files.
- Your files might be locked. Check file permissions – select a file/ folder in the Finder, use CMD+I shortcut to verify the permissions.
- Your files might be used by another application.
Read detailed guides on how to troubleshoot situations when removing duplicates or merging folders:
- Troubleshooting the issues when merging duplicates
- Troubleshooting the issues when removing duplicates
- Troubleshooting the issues when moving folders
- Troubleshooting the issues when restoring files
- How to troubleshoot issues when scanning and removing duplicates in Photos Library
- Duplicate File Finder skips scanning the Time Machine backups
Duplicates in Cloud storage
Duplicate File Finder can find duplicates on any disk and even in cloud storages.
Before you begin searching for duplicates in cloud storage with Duplicate File Finder, make sure that you have downloaded your files to your Mac.
Follow the guides below to learn how to download files from the most popular cloud storage and find duplicate files:
Duplicates in the Music library
Launching the Music app by Duplicate File Finder
Duplicate File Finder finds duplicate audio files in your Music library. If you usually keep your music files in the Music app, please enable the option “Open the Music app to synchronize detected duplicates in your Music library.” This will allow Duplicate File Finder to check whether these files are included in your Music Library and correctly process the removal of the duplicates.
For this, do the following:
- Go to Duplicate File Finder’s Settings.
- Switch to the Scan tab.
- Mark the checkbox next to the “Verify audio files in Music app”.*
If you are using macOS 10.10-10.14, you will have to open iTunes.

Once you enable this option, Duplicate File Finder will check detected duplicates in your Music Library. Before doing this, it will show you a confirmation window to open the Music app.
Click Open Music to allow Duplicate File Finder to synchronize duplicates in Music Library.
In this window, you also can enable the option to Automatically launch the Music app when needed. For this, just mark the checkbox next to the appropriate option.

Grant access to the Music app
When Duplicate File Finder removes duplicates from the Music app, the Music library should automatically be updated; however, in some cases, you might face an issue. This can happen if you switch off access to the Music app for Duplicate File Finder.
You need to allow Duplicate File Finder to access the Music app to solve the issue.
Please follow the next steps to grant access and solve the issue:
- Open System Settings → go to the Privacy & Security section.
- Scroll down and click Automation in the right panel.
- Enable Music for Duplicate File Finder.

- Once you have granted access, go to Duplicate File Finder and click Open Music.


Smart selecting in Music Library
In the Duplicate File Finder Settings → Smart Select tab, you can set up to automatically select duplicates in the Music Library when using the Smart Select button. For this, just mark the checkbox for the “Select in Music Library” rule.

- This rule can be used only if Duplicate File Finder has access to your Music Library.
- Before scanning and removing duplicate music files, you need to open the Music app. Also, you can enable the option to automatically launch Music by Duplicate File Finder.
When you enable the “Select in Music Library” rule, you will see the following notification:

Thus, when using the Smart Select button for files in the Music Library, don’t forget to open the Music app, or allow Duplicate File Finder to do this for you automatically.
Upgrade to Pro
Duplicate File Finder is free to download from the App Store and allows you to find and remove duplicate files. It also has a paid mode that provides even more features and is available with in-App Purchase. Let’s take a look at the added benefits.
Free mode
- Finds all duplicate files and folders
- Finds similar photos
- Deletes duplicate files
- Scans all drive types
- Compares files
- Compares folders
- Finds duplicates in hidden folders
- Provides a Quick Look of duplicates
- Searches quickly among duplicates by category type
- Skips scanning certain folders, files, files with specified extensions
- Quickly open duplicates in Finder
- Regulates minimum and maximum file sizes for scanning
Paid mode
Includes all the features of free mode and even more:
- Removes duplicate folders
- Removes duplicates from Similar folders
- Merges folders
- Provides the Smart Select option
- Allows bulk select using the “Select by folders” option
- Restores removed duplicates
- Includes the option to remove duplicates to a specified folder instead of moving to Trash
Thus, if you want to do a deep cleanup, you should upgrade to Pro. Let’s learn how to upgrade:
- Click the green Get Pro button in the top right corner of the app’s window.
- You will see a pop-up window. Select the plan you wish and click Buy Now.
- In the window that appears, enter your Apple ID username and password, and click Sign in.

That’s all. As soon as the in-app purchase is completed, the green button and lock icons next to the features disappear. If no changes occur after purchasing, then reboot your Mac → launch the app → click Get Pro again → click Restore.
If you still have questions, read the article How to upgrade to Pro or email us at support@nektony.com. We are here to help you.
How-to Guides
Duplicates search
- What is the duplicates searching algorithm?
- How to remove duplicates from Photos Library
- How to find duplicates in iCloud
- How to grant access to folders
Tips for quick duplicate removal
- How to use Smart Select
- How to set up the file size threshold to be searched
- Quick tips to select and remove duplicates
The PRO version
- Duplicate File Finder Free mode vs Pro mode
- How to upgrade to Pro
- How to select duplicates in particular folders
- How to Merge similar folders
Specify a folder for duplicate removal
If you have two folders containing many identical files and want to delete duplicates from one specific location while keeping them untouched in another, manually flagging each file is unnecessary. Duplicate File Finder provides two ways to automate this process.
Scenario 1: Using Smart Select
- Launch Duplicate File Finder and open the Settings window.
- Switch to the Smart Select tab and select the Always Select sub-tab. Add folders here if you want the app to always prioritize removing duplicates from these locations.
- Switch to the Never Select sub-tab. Add folders here that should never have files removed (your “master” or “source” folders).
- Apply rules. After this you can click the Smart Select button to automatically select files in specified folders.

Scenario 2: Using the context menu
If you haven’t set up automatic rules in Settings, you can still perform bulk selections manually from the scan results window using the context menu.
- Select your target folders or disks and click Find duplicates.
- In the Duplicate Files tab, select a file from the list. In the right-hand preview panel, you will see the exact folder path (directory) where that specific copy is located.
- Right-click on the folder name within that path representation to open the context menu. Choose the command: “Select All Copies in [Folder Name]”.


This will instantly mark all duplicate files within that specific folder for removal. Once satisfied with your selection, click Review to Remove.
Scenario 3: Using the Select by folders option
If you want a high-level overview of where your duplicates are located and want to clear them out folder-by-folder, the Select by folders tab is the most efficient manual method.
- In the results sidebar, click the Select by folders tab.
- Click the Star icon next to your “primary” folder. The app will automatically keep all files in this folder and select their duplicates in all other locations for removal.
- You can also use the checkboxes next to folder names to mark an entire folder’s duplicate content for deletion in one click.

Compare two Macs for duplicates
Duplicate File Finder can help you even if you want to find duplicates between two Macs. For this, follow the steps below:
- Connect your two Macs using Apple File Sharing. For this, go to the System Settings → General → Sharing.
- Enable the File Sharing option.
- Click the “i” icon next to toggle button to open File Sharing settings.

- Click the Options button at the bottom.

- Enable sharing files and folders using SMB. It will provide a stable connection.
- After this, you will be able to select the whole disk or some folders from another Mac you want to compare.
- Now open the Duplicate File Finder application and add folders from the local Mac and the connected one. Click to find duplicates.
Please note: If you select the whole disk, the scanning process could be very long.
- After the scan is complete, you can use the Select by folders option to easily select duplicates in one of your Mac’s folders.


How to speed up duplicate search
Finding duplicate files can take time, especially if your Mac stores a large number of items. To make the process faster and more efficient, you can adjust several scanning settings in the app. Here’s how to optimize your duplicate search for speed and accuracy:
- 1. Set up the size of duplicate files
- 2. Enable or disable scanning hidden files
- 3. Enable or disable full-scale scan
- 4. Skip certain files from duplicate search
- 5. Use automatic selection of duplicates
- 6. Set up permanent removal of duplicates
To accelerate the speed of the duplicate search, you will need to open the app’s settings window. For this, launch the application, go to Menu → Duplicate File Finder → Settings or use Command (⌘)+ Comma (,) key shortcut.

Now, let’s take a look at each tab and learn how it can help you in your task.
1. Set up the size of duplicate files
Imagine that you have a huge number of files and the application has to compare one file with another to find the copies. In this section, you can manually specify the minimal size of files to be scanned with Duplicate File Finder. This means that if you, for example, set up the slider at 1 MB, the application will skip all files smaller than the specified size, so that, even if you want to find duplicate files across multiple drives, it would be much faster than scanning absolutely all the files.
This option would be especially useful when you need to free up some space on your disk very quickly. So, when you increase the size settings of the file, the app needs to check fewer items and hence the process of scanning is speeded up. It takes less time to search for identical images or videos.

2. Scan hidden folders
Duplicate File Finder can find even hidden files and folders. There is a special option you can enable, and Duplicate Finder will also scan all hidden folders for duplicates.
However, it is recommended that you disable this option because it may slow down the scanning process.
3. Full-scale duplicates scan
Duplicate File Finder compares the contents of files to find duplicates. Enabling search across all file contents slows down the scanning process. If the option is disabled, then the application checks only parts of the files.
This rule applies only to binary file formats. For simple formats (e.g. text, bmp), Duplicate File Finder checks the file completely.

4. Skip files from duplicate search
In the Skip List tab, you can add folders, files and extensions that will not be checked for duplicates. Why add items to Skip List? Imagine you have created duplicates for sharing in DropBox, Google Drive or any other cloud storage. You may want to add these folders to the Skip List, so they won’t be scanned by the duplicate file cleaner application.
Use this option also when you have important folders and would like to protect them. By default, the Skip List includes system extensions and some files and folders in order to prevent accidental deletion of files which are critical to the system.
5. Use automatic selection of duplicates
When you have too many duplicates, it will take too much time to preview each one of them and select certain ones manually. If you know from which folders exactly you want to remove duplicates, Smart Select option will help you.
You can add specific folders where you usually accumulate files. Or, in reverse, add folders to the Never Select list to insure against selecting copies of needed files.Also, you can add prefixes and suffixes used in the file name to be selected. And finally, you can enable or disable other selecting rules for the Smart Select option by marking the appropriate checkboxes and choosing the needed option for each of them.

Then you can select all duplicates due to your rules with one click by using the Smart Select button. This option is one more way to speed up the duplicate cleaning process.
6. Set up a permanent duplicate removal system
Remove empty folders
When you select and remove duplicate files from the folders, they become empty. Then you usually need to find these folders and move them to the Trash. But you don’t have to do so if you use our double file cleaner application. Duplicate File Finder can delete the empty folders automatically after cleaning the duplicates. Just enable the option “Remove empty folders.”
Log removed duplicates
In case, you want to preview the history of deleted duplicate files from your Mac, enable this option. For this, click on Duplicate in the applications menu bar and select “Restore Removed Duplicates”. If some files were accidentally removed to the Trash bin, you can select them and restore.
Removal method
By default, when you remove files with Duplicate File Finder, they are sent to the Trash. Here, you can enable the Remove option to delete your files permanently without moving them to Trash. This can save you the time taken to go to the Trash every time and empty it. However, you should be careful and understand that in this case, you will have no chance of recovering your files.

We have given you short tips on how to operate the application’s preferences so that duplicate cleaning is fast. Read more about quick ways to find and remove duplicates on Mac.
